Keto Coconut Flour Chocolate Cake
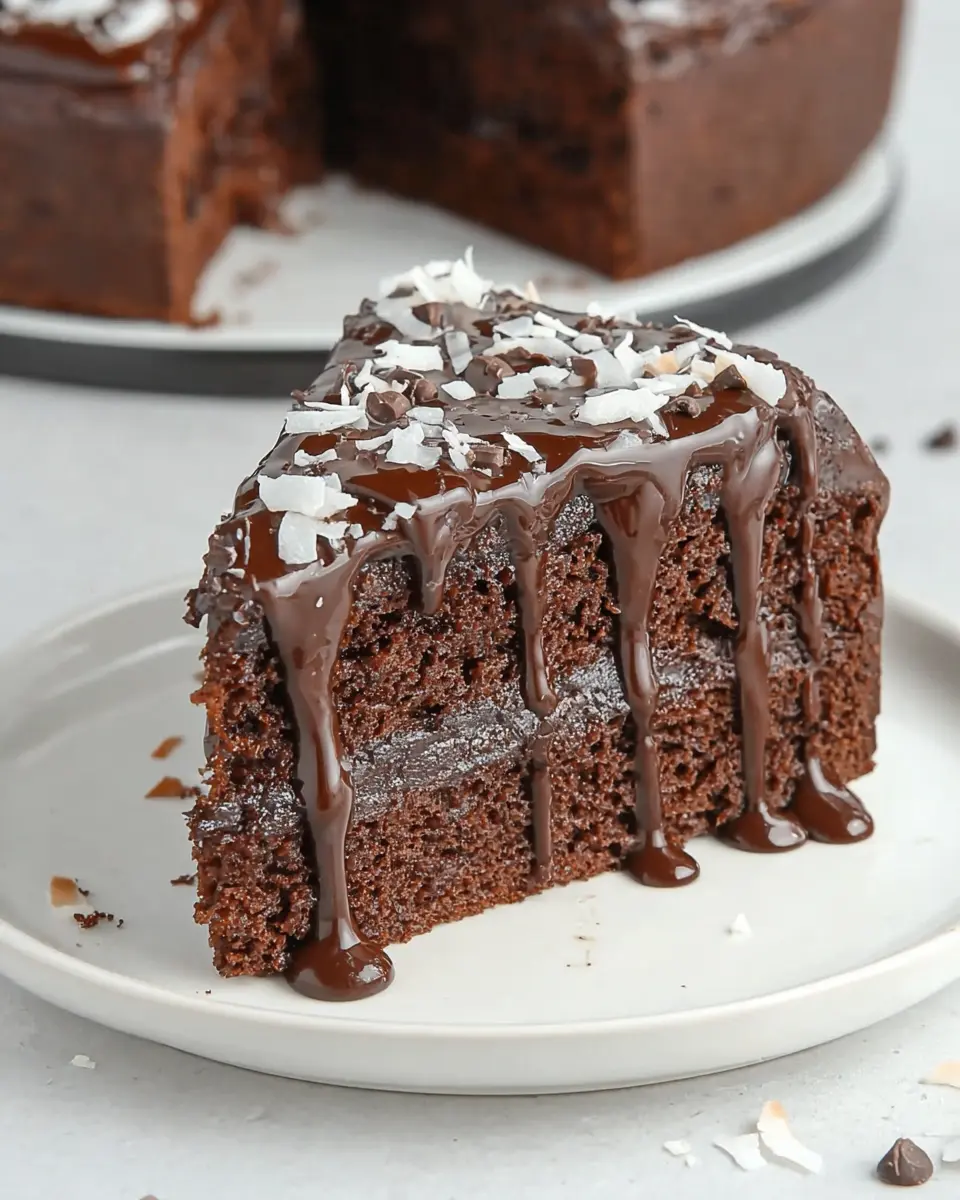
When you want a chocolate cake that feels generous but still works with a low-carb dessert plan, this one lands in a very satisfying place. It has that full cocoa flavor you expect from a proper chocolate cake, along with a soft, close crumb that slices neatly once cooled.
Coconut flour gives the cake structure, while coconut cream adds moisture and richness, so the texture stays tender rather than chalky. That combination is especially helpful in keto baking, where cakes can sometimes turn out too dry or too heavy.
Why You Will Love This Recipe
- Rich Chocolate Flavor: Experience deep, satisfying chocolate notes that rival traditional cakes.
- Tender, Moist Crumb: Despite being low-carb, the cake boasts a surprisingly soft and delightful texture.
- Naturally Gluten-Free: Perfect for those avoiding gluten without sacrificing dessert enjoyment.
- Easy Ganache Topping: A simple, silky sugar-free chocolate ganache elevates this cake to elegant status.
- Make-Ahead Friendly: Ideal for busy schedules, this cake tastes even better after a day of chilling.
Ingredients You Need
The quality of your ingredients plays a significant role in the final outcome of this keto coconut flour chocolate cake. Opting for high-quality, unsweetened cocoa powder and good sugar-free chocolate will ensure the most intense and pure chocolate flavor. Fresh eggs and full-fat coconut cream are essential for achieving the desired moist and tender crumb texture. Ensuring your coconut flour is fresh will also help prevent any undesirable flavors or textures in the finished cake.
Keto Coconut Flour Chocolate Cake

A rich, low-carb chocolate cake prepared with coconut flour, cocoa, and coconut cream, then finished with a smooth sugar-free chocolate ganache. This dessert offers a deeply chocolatey flavor with a tender crumb and is suitable for a ketogenic lifestyle.
- 4 large eggs
- 1 can (13.5 fluid ounces) coconut cream
- 2 teaspoons baking powder
- 1/2 cup granulated sweetener
- 1/2 cup coconut flour
- 1 teaspoon pure vanilla extract
- 1/2 cup unsweetened cocoa powder
- 4 ounces sugar-free chocolate, finely chopped
- 1/2 cup coconut cream
- 2 tablespoons unsweetened cocoa powder
- 1Preheat the oven to 170°C (340°F) on conventional bake. Grease a 9-inch round cake tin with coconut oil or butter, then set it aside.
- 2In a medium bowl, combine the coconut flour, baking powder, and unsweetened cocoa powder, whisking until the mixture is evenly blended.
- 3In a separate bowl, whisk the eggs together with the granulated sweetener for about 30 seconds, just until well combined.
- 4Add the egg mixture to the dry ingredients. Stir in the vanilla extract and coconut cream, then whisk until a glossy, lump-free batter forms.
- 5Pour the batter into the prepared cake pan and place it in the center of the oven. Bake for 50 minutes. After 30 minutes, loosely cover the top with foil if needed to prevent excessive browning. The cake is ready when a skewer inserted into the center comes out clean.
- 6Allow the cake to rest in the pan for 10 minutes. Then transfer it carefully to a wire rack and leave it to cool completely for at least 1 hour.
- 7To make the ganache, place the chopped sugar-free chocolate and coconut cream in a medium saucepan over medium heat. Warm gently while whisking continuously, until small bubbles appear around the edges. Do not let the mixture boil. After approximately 3 minutes, the ganache should be smooth and glossy. Whisk in the cocoa powder until fully incorporated.
- 8Once the cake has cooled, spread the ganache evenly over the top using a piping bag or a squeeze bottle, if preferred.
Keywords: Keto, Coconut Flour, Chocolate Cake, Low-Carb, Gluten-Free, Sugar-Free, Dessert
Quantities for these essential components are detailed within the recipe card itself, guiding you to the perfect balance for a delicious keto dessert.
Variations
For those following a strictly vegan lifestyle, adapting this dessert is quite achievable. You would need to replace the large eggs with a suitable vegan binder, such as a flax egg (1 tablespoon ground flaxseed mixed with 3 tablespoons water per egg, let sit for 5 minutes) or a commercial egg replacer. Ensure the granulated sweetener used is also vegan-certified. The coconut cream and sugar-free chocolate are typically vegan-friendly, but it’s always wise to check the labels for hidden animal-derived ingredients.
A low-carb twist that offers a delightful textural contrast could involve incorporating finely chopped nuts into the batter, like pecans or walnuts. These would add a subtle crunch and nutty flavor, complementing the chocolate beautifully. For a richer, more decadent experience, consider folding in a handful of sugar-free chocolate chips into the batter just before baking. This will create pockets of melted chocolate throughout the cake.
To introduce a bright, zesty counterpoint to the deep chocolate, consider adding a teaspoon of orange zest to the batter. This classic pairing of chocolate and orange creates a sophisticated flavor profile. Alternatively, for a hint of warmth and spice, a quarter teaspoon of ground cinnamon or a pinch of cayenne pepper can be added to the dry ingredients. These subtle additions can transform the cake into something truly unique and memorable.
How to Prepare keto coconut flour chocolate cake
Step 1: Prepare the Baking Pan and Oven
Begin by preheating your oven to a moderate 340°F (170°C). It is crucial to ensure your oven is at the correct temperature before you start mixing the batter. This allows for even baking and helps the cake rise properly, leading to a consistent texture throughout.
Next, thoroughly grease a 9-inch round cake pan. Using coconut oil or butter is recommended for a good non-stick surface. Proper greasing is exceptionally important because coconut flour cakes can be a bit more delicate when they are warm. Taking this extra moment to prepare the pan well will make unmolding the cake significantly easier later, preventing any sticking or breakage.
You might also consider lining the bottom of the pan with a circle of parchment paper after greasing. This provides an additional layer of security against sticking, ensuring your beautiful cake slides out of the pan in one perfect piece. This preparatory step is fundamental for a successful bake and a visually appealing final product.
Step 2: Combine Dry Ingredients
In a medium-sized mixing bowl, combine all of your dry ingredients. This includes the coconut flour, unsweetened cocoa powder, and baking powder. It’s important to measure these accurately to achieve the right balance in your cake’s structure and flavor profile.
Whisk these dry ingredients together thoroughly until they are completely evenly blended. The goal here is to eliminate any pockets of cocoa powder or flour, ensuring a uniform distribution throughout the batter. This small but vital step helps prevent any inconsistent textures or flavors in your finished cake, leading to a more cohesive and enjoyable eating experience.
A well-mixed dry base is the foundation for a smooth batter. This step ensures that the leavening agent, baking powder, is distributed evenly, which is key for a good rise. You should see a uniform color, indicating the cocoa powder is fully incorporated without streaks or clumps.
Step 3: Whisk Wet Ingredients Separately
In a separate, larger mixing bowl, begin by whisking together the large eggs and your chosen granulated sweetener. Ensure you are using a sweetener that is suitable for keto baking, such as erythritol or a blend. The combination of eggs and sweetener forms the initial binding and sweetening base for your cake batter.
Whisk these together just until they are combined and appear homogenous. You do not need to whip in a significant amount of air or aim for a frothy mixture at this stage. The primary objective is to create a smooth, integrated base that will readily mix with the dry ingredients in the next step without developing any stubborn lumps.
Using room-temperature eggs is highly recommended here, as they emulsify more easily with other ingredients, contributing to a smoother batter and a finer crumb in the final cake. This contributes to the overall tender texture of the dessert.
Step 4: Combine Wet and Dry Ingredients to Form Batter
Now, gradually add the whisked egg and sweetener mixture into the bowl containing your pre-mixed dry ingredients. Stir gently at first to begin incorporating the two elements, then proceed to incorporate the remaining wet components.
Next, stir in the pure vanilla extract for its aromatic depth and the rich coconut cream. This coconut cream is crucial for adding moisture and a luxurious richness, which helps counteract any potential dryness that can sometimes be associated with coconut flour. Whisk everything together until the batter is glossy, smooth, and entirely free from any lumps or dry streaks. The consistency should be thick but still easily spreadable, indicating it’s ready for the pan.
This is where the magic happens, transforming separate ingredients into a cohesive, rich chocolate batter. Ensure you scrape down the sides and bottom of the bowl to incorporate all ingredients, guaranteeing a uniform flavor and texture. The resulting batter should have a deep, inviting chocolate hue and a texture that promises a wonderfully moist cake.
Step 5: Bake the Cake
Carefully transfer the thick chocolate batter to your well-prepared cake pan. Use a spatula to spread it evenly, ensuring the surface is as level as possible. This will help the cake bake uniformly and present a flat canvas for the ganache later on.
Place the pan in the center of your preheated oven and bake for approximately 50 minutes. The exact baking time can vary depending on your oven, so it’s important to keep an eye on it. You are looking for the center of the cake to be set and firm to the touch.
A key indicator that the cake is done is the clean skewer test: insert a wooden skewer or toothpick into the center of the cake. If it comes out clean, with no wet batter clinging to it, the cake is ready. If the top of the cake starts to darken too quickly before the center is cooked, you can loosely tent it with a piece of aluminum foil. This protects the surface from burning while allowing the inside to finish baking through to perfection.
Step 6: Cool the Cake and Prepare Ganache
Once baked, allow the cake to rest in the pan for about 10 minutes. This brief resting period helps the cake firm up slightly, making it less prone to breaking when you attempt to remove it from the pan. Afterwards, carefully invert the cake onto a wire cooling rack.
Let the cake cool completely on the wire rack. Patience here is key, as a warm cake is much more likely to crumble. While the cake is cooling, you can prepare the decadent sugar-free chocolate ganache. In a small saucepan, gently warm the coconut cream and the finely chopped sugar-free chocolate over medium-low heat. Stir continuously until the chocolate is completely melted and the mixture is smooth and glossy. Be careful not to let it boil, as this can affect the texture of the ganache.
Once the ganache is smooth, whisk in the additional unsweetened cocoa powder until it is fully incorporated and the ganache has a rich, deep chocolate color. Once the cake has reached room temperature and is fully cool, spread this luscious ganache evenly over the top of the cake. Allow the ganache to set slightly before slicing and serving, ensuring a neat and beautiful finish.
Pro Tips for keto coconut flour chocolate cake
Room Temperature Eggs are Key: Always use room-temperature eggs for your cake batter. They emulsify more readily with other ingredients, resulting in a smoother batter and a more tender cake crumb. This makes a noticeable difference in the final texture.
Don’t Rush Cooling: It is absolutely vital not to rush the cooling process for this cake. Allow it to cool completely on a wire rack. A fully cooled cake has a much more stable structure, which makes it slice much better and prevents it from falling apart when you cut into it.
Gentle Ganache Warming: When preparing the ganache, warm the coconut cream and chocolate very gently. Stop the heating process as soon as the chocolate is melted and the mixture is smooth. Overheating can cause the ganache to become grainy or lose its glossy sheen, diminishing its appeal.
Accurate Flour Measurement: Coconut flour is highly absorbent. Ensure you measure it accurately using the spoon-and-level method to avoid making the cake too dense or dry. Too much coconut flour can significantly alter the cake’s texture.
Quality Cocoa Matters: Invest in a good quality unsweetened cocoa powder. The flavor of the cocoa is paramount in a chocolate cake, and a superior product will yield a richer, more intense chocolate taste that enhances the overall dessert experience.
Serving Suggestions for keto coconut flour chocolate cake
Decoration
The smooth, glossy sugar-free chocolate ganache provides a beautiful foundation for simple yet elegant decorations. For a touch of texture and visual appeal, consider a light dusting of unsweetened shredded coconut or a sprinkle of cocoa nibs over the ganache once it has set. You could also use a piping bag with a star tip to create decorative swirls or rosettes along the edge of the cake. If you want to add a pop of color, a few fresh berries, like raspberries or strawberries, can be artfully placed on top.
Side Dishes
This rich chocolate cake pairs wonderfully with a dollop of lightly whipped unsweetened cream or a keto-friendly whipped topping. The airy texture of the cream provides a lovely contrast to the dense, moist crumb of the cake. Fresh berries, such as raspberries, strawberries, or blueberries, also make an excellent side. Their slight tartness and freshness cut through the richness of the chocolate, creating a balanced flavor profile on the plate.
For a more sophisticated pairing, consider serving a small scoop of sugar-free vanilla ice cream or a keto-friendly chocolate mousse alongside a slice of cake. These additions elevate the dessert experience, turning a simple cake into a truly indulgent treat. A warm beverage also complements the cake beautifully; a hot cup of coffee or a soothing herbal tea can enhance the flavors and make for a cozy dessert experience.
Creative Serving Ideas
Transform individual slices into elegant parfaits by layering crumbled cake with whipped cream and fresh berries in glasses. This presentation is visually stunning and perfect for entertaining guests. For a more casual treat, cut the cake into small squares and serve them as petit fours, perhaps with a dusting of powdered sweetener or a tiny chocolate curl on top.
Consider serving the cake slightly warm with a side of a rich, keto-friendly caramel sauce for an added layer of indulgence. This warm, gooey sauce creates a delightful contrast with the cool, dense cake. Another idea is to prepare mini chocolate cakes using muffin tins; these are perfect for portion control and make charming individual desserts for parties or gatherings.
Preparation & Storage
Storing Leftovers
Once the cake has cooled completely and the ganache has set, store any leftovers in an airtight container. Keeping the container in the refrigerator is ideal, as it helps maintain the ganache’s firmness and prevents the cake from drying out. Properly stored, this keto coconut flour chocolate cake can stay fresh and delicious for up to 4 days. Slicing the cake ahead of time and storing individual portions in separate containers can also make it easier to grab a quick treat without disturbing the whole cake.
Freezing
For longer-term storage, freezing is an excellent option. It’s best to freeze unfrosted slices of the cake individually. Wrap each slice securely in plastic wrap, then place them in a freezer-safe bag or airtight container. This method prevents freezer burn and ensures the cake retains its quality. Frozen slices can be kept for up to 2-3 months. This allows you to have delicious keto chocolate cake on hand whenever a craving strikes, ensuring you always have a delightful dessert ready.
Reheating
This cake is typically enjoyed cold or at room temperature, and reheating is usually not necessary. However, if you prefer a slightly softer ganache or a warmer cake, you can gently reheat a slice. A few seconds in the microwave on a low power setting should suffice. Alternatively, simply let a chilled slice sit on the counter for about 15-20 minutes to come to room temperature; this usually softens the ganache enough and allows the chocolate flavor to fully emerge.
Frequently Asked Questions
-
Can I use a different type of keto-friendly flour besides coconut flour?
While this recipe is specifically formulated for coconut flour due to its unique absorbency and texture-building properties, some substitutions might be possible with adjustments. Almond flour is a common keto alternative, but it behaves very differently from coconut flour. If you opt for almond flour, you might need to increase the amount of liquid and eggs, as almond flour is less absorbent. The texture will likely be different, potentially lighter or more crumbly. Other flours like lupin or sunflower seed flour could also be experimented with, but expect significant changes to the baking time, moisture content, and final crumb structure. For the most predictable and successful outcome following the recipe as written, sticking to coconut flour is highly recommended.
-
My cake turned out dry; what could have gone wrong?
A dry keto coconut flour chocolate cake can result from several common issues. The most frequent culprit is an inaccurate measurement of coconut flour; it’s extremely absorbent, and using too much can easily lead to a dry, crumbly cake. Ensure you are spooning the flour into your measuring cup and leveling it off, rather than scooping directly from the bag. Another factor could be over-baking; even a few extra minutes can dry out a delicate keto cake significantly. Always use the skewer test to check for doneness and remove the cake promptly once it comes out clean. Lastly, ensure you used enough fat, such as the specified amount of coconut cream, as this is crucial for moisture retention in coconut flour bakes.
-
Is it possible to make this cake dairy-free and nut-free?
This recipe is already designed to be dairy-free, as it uses coconut cream instead of dairy cream and typically sugar-free chocolates that are dairy-free. For a nut-free version, ensure that the sugar-free chocolate you select does not contain any nuts or is processed in a facility that handles nuts if cross-contamination is a concern. The main ingredients, coconut flour, eggs, cocoa powder, and sweetener, are generally nut-free. Therefore, with careful selection of the sugar-free chocolate, this recipe can easily cater to both dairy-free and nut-free dietary needs, making it a versatile option for many individuals seeking a delicious low-carb chocolate dessert. Always double-check ingredient labels for specific dietary requirements.