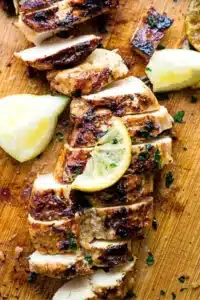
Grilled Lemon Chicken Recipe – The Best Lemon Marinade!

This juicy grilled lemon chicken has always been my family’s go-to grilled chicken recipe for summer. Bursting with fresh flavor and herbs, the garlicky lemon chicken marinade is quick and easy to make, promising a delightful meal for any occasion.
In honor of May Day, I’m marinating juicy chicken with plenty of lemon and tossing it onto the grill, reminiscent of cherished holiday picnics in Macedonia. The aroma alone transports me back to those joyous gatherings filled with an abundance of delicious grilled food.
Why You Will Love This Recipe
- Quick & Easy Preparation: This recipe comes together with minimal fuss, allowing you to enjoy a restaurant-quality meal without spending hours in the kitchen. The simple yet effective marinade requires just a few staple ingredients.
- Bursting with Fresh Flavors: The combination of zesty lemon, fragrant garlic, and fresh parsley creates a vibrant and irresistible taste profile that is both refreshing and deeply satisfying. It’s a flavor explosion that perfectly complements the grilled chicken.
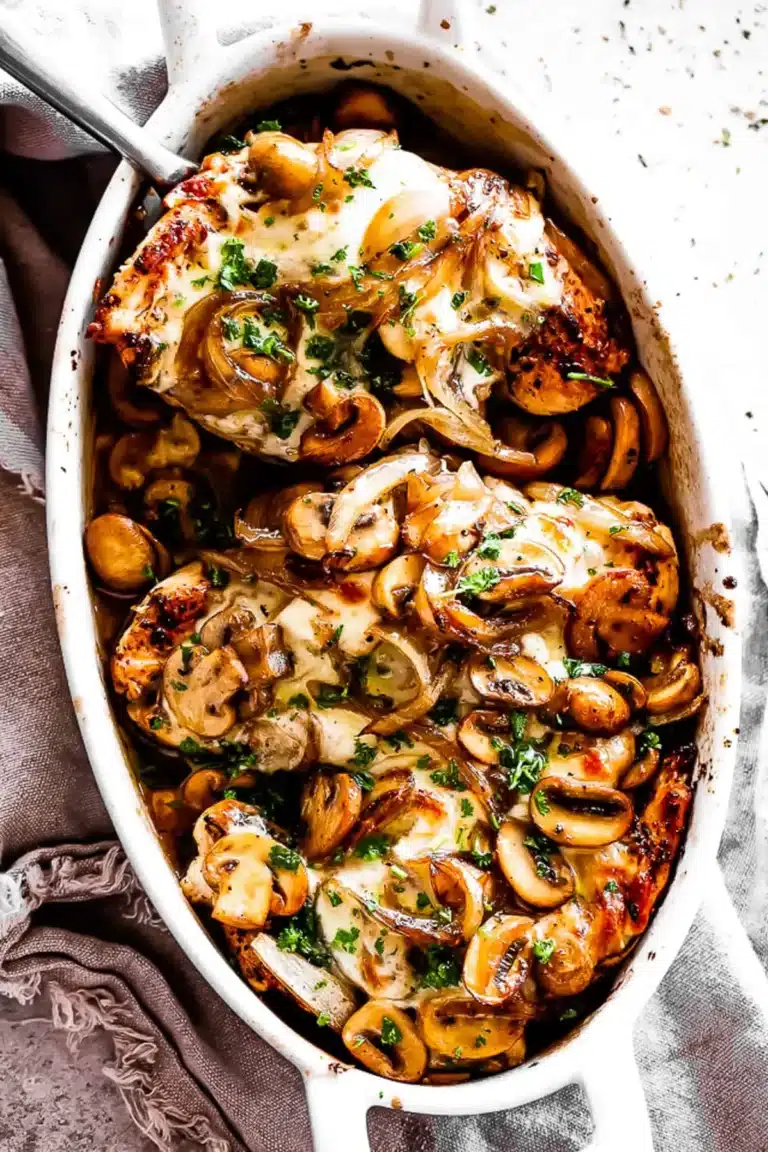
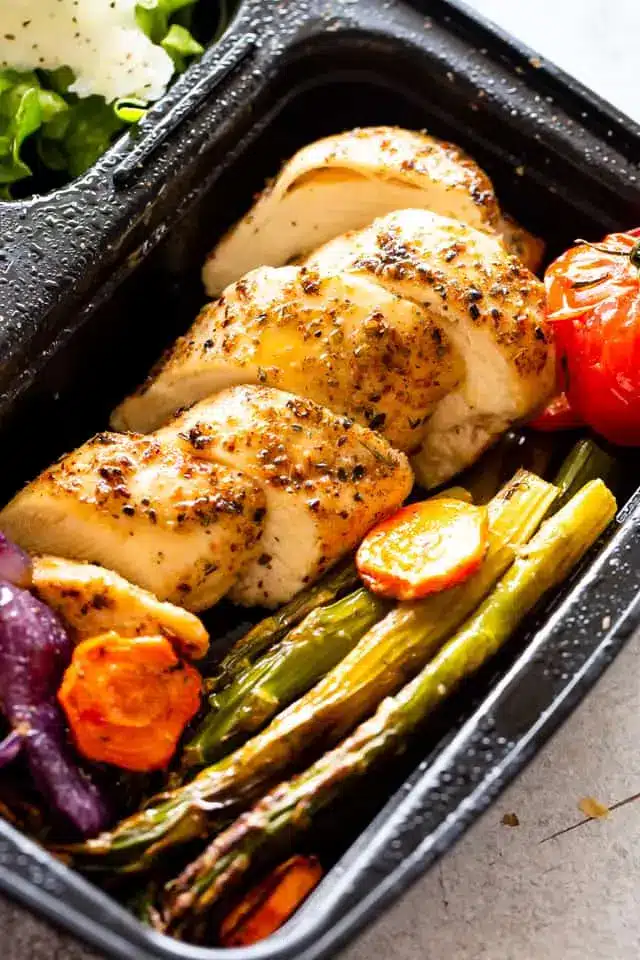
- Versatile Serving Options: Whether you’re serving it over rice, alongside roasted vegetables, or as part of a vibrant salad, this grilled lemon chicken is incredibly adaptable to any meal or occasion. It pairs beautifully with a wide range of side dishes.
- Family-Favorite Approved: This recipe has been a beloved staple in my family for years, consistently met with rave reviews and requests for seconds. Its inherent deliciousness makes it a guaranteed hit with even the pickiest eaters.
- Utilizes Whole Lemons: A brilliant aspect of this recipe is its ability to use the entire lemon, from zest to juice and even slices for grilling, minimizing waste and maximizing flavor. It’s a testament to smart, sustainable cooking.
Ingredients You Need
The foundation of this spectacular grilled lemon chicken lies in the quality and simplicity of its ingredients, ensuring that the natural flavors shine through. Using fresh, vibrant components is key to achieving that signature bright and zesty taste that makes this dish so special.
Grilled Lemon Chicken
This juicy lemon chicken is a go-to grilled chicken recipe for summer! The garlicky lemon marinade is bursting with fresh flavor and needs only 5 ingredients.
- 2 pounds boneless, skinless chicken breasts
- zest of 2 lemons
- 4 cloves garlic, minced
- salt and fresh ground pepper, to taste
- 1 whole lemon, cut into slices
- 1In a large ziploc bag, combine chicken, olive oil, lemon zest, lemon juice, garlic, parsley, salt, and pepper. Seal the bag and shake it all up until well combined. Place the bag in the refrigerator and marinate for about 4 hours or overnight.
- 2Preheat the grill to about 375ºF to 400ºF. Brush the grill grates with olive oil.
- 3Remove the chicken breasts from the marinade and place them on the hot grill; cook without touching the grill until they start to get grill marks, about 5 minutes.
- 4Turn the chicken breasts over, cover the grill, and let them finish cooking, about 7 more minutes, depending on the thickness of the chicken. The chicken is done when a meat thermometer registers 165 degrees Fahrenheit.
- 5Remove chicken from grill; cover and let rest for 5 minutes before cutting and serving.
Keywords: Grilled Lemon Chicken, Chicken Recipe, Summer Recipe, Easy Dinner, Grill Recipe
- boneless, skinless chicken breasts: Using boneless, skinless chicken breasts ensures a quick cooking time and easy handling, but thighs are also an excellent option for a richer flavor.
- olive oil: A good quality olive oil forms the base of the marinade, helping to tenderize the chicken and carry the other flavors.
- lemons: Fresh lemons are absolutely essential, providing both the bright zest and the tangy juice that define this dish.
- garlic: Freshly minced garlic provides a pungent depth of flavor that is crucial to the marinade’s aromatic profile.
- parsley: Freshly chopped parsley adds a burst of herbaceous freshness and a beautiful green color to the marinade.
- salt and fresh ground pepper: These pantry staples are vital for enhancing all the other flavors and bringing the dish into perfect balance.
- whole lemon, cut into slices: These lemon slices not only add flavor during the grilling process but also contribute to the visual appeal of the final dish.
Please refer to the recipe card for the precise quantities of each ingredient needed to create this delightful meal.
Variations
While this grilled lemon chicken recipe is already a showstopper on its own, it’s also wonderfully adaptable, allowing you to tailor it to various dietary preferences and taste profiles. Experimenting with these variations can open up a whole new world of delicious possibilities, ensuring there’s a version for everyone to enjoy.
For those following a plant-based lifestyle, a fantastic vegan alternative can be achieved by substituting the chicken with firm tofu or substantial vegetables like large cauliflower florets or thick slices of zucchini and bell peppers. The vibrant lemon marinade will still infuse these ingredients with its characteristic zest and aroma, creating a delightful and satisfying vegan main course.
A low-carb approach can be easily implemented by focusing on the protein and non-starchy vegetables. Skip any grains or starchy sides, and instead, pair the grilled lemon chicken with a generous helping of steamed broccoli, asparagus, or a fresh, crisp salad drizzled with a light vinaigrette. This keeps the meal satisfyingly light and compliant with a low-carbohydrate eating plan.
To add a touch of smoky sweetness, consider incorporating a hint of honey or maple syrup into the marinade for a honey-lemon chicken variation, though be mindful of sugar content if aiming for low-carb. Alternatively, a spicy kick can be introduced by adding red pepper flakes or a dash of your favorite hot sauce to the marinade, transforming it into a zesty and fiery delight perfect for those who enjoy a bit of heat.
How to Prepare grilled lemon chicken
Step 1: Marinate the Chicken
Begin by preparing your chicken for its flavor infusion. If you’re using chicken breasts, you might consider slicing them in half horizontally to create thinner cutlets, which will ensure more even cooking and allow the marinade to penetrate more deeply. This step is optional but highly recommended for achieving optimal tenderness and flavor distribution throughout the chicken.
In a large resealable bag or a non-reactive bowl, combine the boneless, skinless chicken breasts or thighs. Add the olive oil, the zest of two fresh lemons, and the juice from those same lemons. Ensure you zest the lemons before you juice them to capture all that aromatic goodness. Mince your garlic cloves finely and add them to the mixture, along with the freshly chopped parsley.
Season generously with salt and freshly ground black pepper to taste. You can also add other herbs or spices at this stage if you desire, such as a pinch of dried oregano or a sprinkle of paprika for color. Once all the marinade ingredients are in the bag with the chicken, seal it tightly, ensuring that all the air is removed to prevent oxidation. Gently shake the bag or toss the contents in the bowl until the chicken is thoroughly coated with the vibrant marinade.
Place the sealed bag or covered bowl into the refrigerator. For the best flavor, allow the chicken to marinate for a minimum of 4 hours. However, for an even more profound and delicious taste experience, marinating overnight is ideal. This extended marination time allows the lemon juice to tenderize the chicken beautifully while the garlic and herbs work their magic, infusing every bite with incredible flavor.
Step 2: Prepare the Grill
As your chicken reaches the end of its marinating time, it’s time to prepare your grilling surface. Whether you’re using an outdoor charcoal or gas grill, or a stovetop grill pan, preheating is a crucial step for achieving those coveted grill marks and ensuring even cooking. A properly preheated grill prevents the chicken from sticking and helps develop a beautiful sear.
For an outdoor grill, preheat it to a medium-high heat, aiming for a temperature between 375°F and 400°F. This range provides enough heat for a good sear without burning the exterior before the inside is cooked through. Once the grill is hot, it’s essential to clean the grates thoroughly to remove any leftover residue from previous cooking sessions. This not only prevents sticking but also ensures a clean flavor profile for your lemon chicken.
After cleaning, lightly brush the grill grates with a bit of olive oil or cooking spray. This creates a non-stick surface, making it easier to flip the chicken and ensuring those beautiful grill marks appear cleanly. If you are using a stovetop grill pan, preheat it over medium-high heat as well. Ensure it’s thoroughly heated before adding any ingredients to achieve a proper sear.
For a stovetop grill pan, especially if it’s cast iron, it’s important to let it get nice and hot. You can test its readiness by flicking a few drops of water onto the surface; they should sizzle and evaporate immediately. Once the pan is adequately preheated, give it a light coating of cooking spray or a small amount of oil to further prevent sticking. This preparation ensures that your chicken will develop a lovely char and cook evenly.
Step 3: Grill the Chicken
Now comes the exciting part: grilling the marinated chicken to juicy perfection. Carefully remove the chicken pieces from the marinade, allowing any excess to drip back into the bag or bowl. Discard the leftover marinade; it should not be reused after raw chicken has been in contact with it. Place the marinated chicken onto the preheated grill grates.
For the first stage of grilling, resist the urge to move or flip the chicken immediately. Allow it to cook undisturbed for approximately 5 minutes. During this time, the chicken will begin to develop beautiful, distinct grill marks, and a flavorful crust will start to form. This initial sear is critical for locking in the juices and creating that desirable smoky flavor characteristic of grilled dishes.
Once the 5 minutes are up and you can see the grill marks have formed, it’s time to flip the chicken. Use tongs or a spatula to carefully turn each piece over. At this point, you can close the grill lid. Covering the grill helps to trap the heat and cook the chicken through evenly and more quickly. Continue grilling on the second side for another 7 to 10 minutes, depending on the thickness of your chicken pieces.
The total cooking time will vary based on the size and thickness of the chicken breasts or thighs. The most reliable way to ensure the chicken is perfectly cooked is to use an instant-read meat thermometer. Insert the thermometer into the thickest part of the chicken, avoiding any bones if you’re using thighs. The chicken is safely cooked and ready to be served when it reaches an internal temperature of 165°F (74°C).
Step 4: Rest the Chicken
Once the chicken has reached the perfect internal temperature of 165°F, carefully remove it from the grill. Place the cooked chicken onto a clean plate or a cutting board. The urge to cut into it immediately might be strong, but this step is crucial for achieving the most succulent and juicy results.
Tent the chicken loosely with aluminum foil. This creates a warm environment that allows the juices within the chicken to redistribute evenly throughout the meat. If you cut into the chicken too soon, all those delicious juices will escape onto the plate, leaving you with drier chicken. Allowing it to rest for at least 5 to 10 minutes is essential for maximizing moisture.
During this resting period, the muscle fibers in the chicken relax, allowing them to reabsorb the moisture that was drawn to the surface during cooking. This simple step makes a significant difference in the final texture and overall enjoyment of the dish, ensuring every bite is tender and flavorful. This resting period also gives you a moment to prepare any accompanying side dishes or to admire your perfectly grilled creation.
After the resting period, your grilled lemon chicken is ready to be sliced and served. You can slice it against the grain for maximum tenderness or serve the pieces whole. The aroma will be absolutely tantalizing, a testament to the power of simple, fresh ingredients and skillful grilling. Enjoy this incredibly flavorful and juicy chicken!
Step 5: Grill Pan Instructions (If Applicable)
For those who don’t have access to an outdoor grill or prefer indoor cooking, using a stovetop grill pan offers a fantastic alternative to achieve delicious results. This method provides a similar char and flavor profile to outdoor grilling, making it a versatile option year-round. The key to success with a grill pan lies in proper preheating and a specific cooking sequence.
First, preheat your oven to 350°F (175°C). While the oven heats, prepare your oven-safe grill pan. Lightly grease the pan with cooking spray or a bit of olive oil. Place the pan over medium-high heat on your stovetop. It’s imperative that the pan is sufficiently hot before adding the chicken; you should hear an immediate sizzle when the chicken touches the surface.
Add the marinated chicken pieces to the hot grill pan. Sear the chicken for about 4 minutes on the first side, allowing it to develop those appealing grill marks. Once seared, flip the chicken pieces over and continue to cook for an additional 2 minutes on the second side. This searing process creates a lovely browned exterior and locks in flavor.
After the initial searing on the stovetop, carefully transfer the entire grill pan with the chicken into the preheated oven. Allow the chicken to finish cooking in the oven for approximately 18 to 20 minutes. This dual cooking method ensures the chicken is cooked through evenly and remains incredibly moist. Always check the internal temperature with an instant-read thermometer to confirm it has reached 165°F (74°C) for safety and optimal texture.
Once cooked, remove the grill pan from the oven. Let the chicken rest in the pan, or transfer it to a plate and tent loosely with foil, for 5 to 8 minutes before cutting and serving. This resting period is just as vital as with outdoor grilling, allowing the juices to redistribute and ensuring a tender, flavorful final product. This method ensures that even without an outdoor grill, you can enjoy perfectly cooked lemon chicken.
Pro Tips for grilled lemon chicken
Don’t Overcrowd the Grill: When grilling, ensure there’s ample space between each piece of chicken. Overcrowding the grill can cause the temperature to drop significantly, leading to steaming rather than searing, and resulting in unevenly cooked chicken without those desirable grill marks. Give each piece enough room to breathe and cook efficiently.
Zest Before Juicing: For maximum flavor and efficiency, always zest your lemons before you juice them. The zest contains concentrated citrus oils and aromas that are essential for the marinade’s vibrancy. Once zested, you can easily juice the remaining fruit for the liquid component of the marinade.
Marinate for Flavor: While a shorter marination time will still yield tasty results, for the most intense flavor penetration and tender chicken, aim for at least 4 hours, or ideally, overnight. The acidity in the lemon juice tenderizes the meat, while the herbs and garlic infuse it with their aromatics.
Use a Meat Thermometer: The best way to guarantee perfectly cooked chicken every time is to use an instant-read meat thermometer. Aim for an internal temperature of 165°F (74°C) in the thickest part of the chicken. This prevents overcooking, which can lead to dry, tough meat, and ensures it’s safely cooked.
Consider the Chicken Cut: While boneless, skinless chicken breasts are classic, don’t shy away from using chicken thighs. Thighs are naturally more forgiving and tend to stay moister due to their higher fat content, making them an excellent choice for grilling, especially if you’re concerned about overcooking.
Serving Suggestions for grilled lemon chicken
Decoration
Elevate the visual appeal of your grilled lemon chicken with simple yet impactful garnishes. A scattering of fresh, finely chopped parsley over the finished dish adds a vibrant burst of green and a hint of freshness. Thinly sliced lemon rounds, either grilled alongside the chicken or fresh, can be artfully arranged around the platter, offering a bright visual cue to the chicken’s flavor profile and adding an elegant touch.
For an extra pop of color and a subtle herbaceous aroma, consider a few sprigs of fresh dill or rosemary placed strategically. These herbs not only look beautiful but also complement the lemon and garlic notes beautifully. A light dusting of paprika can also add a warm, inviting hue to the chicken, especially if you’ve served it in slices.
Side Dishes
This versatile grilled lemon chicken pairs exceptionally well with a variety of side dishes, making it suitable for any meal. For a healthy and complementary option, serve it alongside a fresh Greek salad bursting with cucumbers, tomatoes, olives, and feta cheese, or a simple mixed green salad tossed with a light lemon vinaigrette to echo the chicken’s flavors. Roasted vegetables like asparagus, broccoli, or bell peppers, seasoned lightly and roasted until tender-crisp, provide a delicious and colorful accompaniment.
To soak up the delicious marinade and juices, consider serving the chicken over a bed of fluffy basmati rice, lemon-infused couscous, or a flavorful quinoa pilaf. For a heartier meal, classic potato salad or roasted new potatoes, perhaps tossed with rosemary and garlic, make for a satisfying and comforting pairing. Pasta dishes, such as a simple lemon herb pasta or a creamy leek and mushroom pasta, can also be a delightful complement, with the chicken providing a perfect protein addition.
Creative Serving Ideas
Transform your grilled lemon chicken into exciting culinary creations beyond a simple main course. Slice the cooked chicken thinly and use it as a star ingredient in vibrant wraps or pitas, stuffed with crisp lettuce, juicy tomatoes, and a drizzle of tzatziki sauce for a portable and flavorful meal. It also makes a fantastic addition to homemade pizzas, layered over a creamy garlic sauce and topped with mozzarella and fresh herbs for a gourmet twist.
Consider shredding or dicing the chicken and incorporating it into hearty grain bowls alongside roasted vegetables, avocado, and a tangy lemon-tahini dressing for a complete and nutritious meal. For a lighter option, serve the grilled lemon chicken atop a bed of mixed greens with a variety of fresh vegetables, fruits like berries or sliced peaches, and a light dressing, creating a delightful summer salad. Leftover chicken can be chilled and added to pasta salads or even used in flavorful quesadillas for a quick and easy meal.
Preparation & Storage
Storing Leftovers
Proper storage is key to maintaining the quality and safety of your delicious grilled lemon chicken. Once the chicken has cooled down to room temperature, it’s important to store it in an airtight container. This prevents the chicken from drying out and protects it from absorbing odors from other foods in your refrigerator.
Leftover grilled lemon chicken can be safely stored in the refrigerator for up to 3 to 4 days. Ensure the container is sealed tightly to maintain freshness and prevent spoilage. This makes it convenient for enjoying delicious meals throughout the week without compromising on taste or texture.
When ready to enjoy, you can serve the leftover chicken cold, which is especially refreshing over salads or in sandwiches. Alternatively, it can be gently reheated, and we’ll cover the best methods for that next.
Freezing
If you find yourself with more grilled lemon chicken than you can consume within a few days, freezing is an excellent option for longer-term storage. Ensure the chicken is completely cooled before you begin the freezing process to prevent the formation of ice crystals, which can affect the texture upon thawing.
For best results, wrap individual portions of the chicken tightly in plastic wrap or aluminum foil, or place them in freezer-safe bags. Removing as much air as possible before sealing will help prevent freezer burn. You can also place these wrapped portions into a larger freezer-safe container for an extra layer of protection.
When properly stored, frozen grilled lemon chicken can retain its quality for up to 2 to 3 months. Labeling your containers with the date of freezing will help you keep track of its freshness and ensure you use it within the optimal timeframe for the best taste and texture.
Reheating
Reheating your leftover grilled lemon chicken gently is crucial to preserving its juicy and flavorful qualities. The best methods aim to warm the chicken through without drying it out. Microwaving is a quick option, but it’s best to reheat in short, 30-second to 1-minute increments, checking for doneness each time, and perhaps adding a tablespoon of water or broth to help keep it moist.
For a more evenly heated and moist result, preheat your oven to 350°F (175°C). Place the leftover chicken in an oven-safe dish and add a splash of liquid, such as chicken broth, water, or even a bit more lemon juice, to the bottom of the dish. Cover the dish tightly with foil to trap steam and heat.
Warm the chicken in the preheated oven for about 10 to 15 minutes, or until it is heated through. This method allows the chicken to warm gently and retain its moisture, ensuring it’s as delicious as when it was first prepared. Avoid overheating, as this can lead to a dry texture.
Frequently Asked Questions
- Can I use chicken thighs instead of breasts for this grilled lemon chicken recipe?
Absolutely! Chicken thighs are an excellent alternative to chicken breasts for this grilled lemon chicken recipe. In fact, many people prefer chicken thighs for grilling because they are naturally more forgiving and tend to stay incredibly moist and tender due to their higher fat content. The marinating process will work just as effectively on thighs, infusing them with the bright lemon and garlic flavors. Keep in mind that chicken thighs might take a slightly longer time to cook through than thinner chicken breasts, so always rely on a meat thermometer to ensure they reach an internal temperature of 165°F (74°C) for safety and optimal texture. You may want to trim some of the excess fat from the thighs before marinating, but leaving some will contribute to a richer flavor and juicier outcome.
- How do I prevent my grilled lemon chicken from sticking to the grill grates?
Preventing your grilled lemon chicken from sticking to the grill grates is essential for achieving beautiful grill marks and easy flipping. Several methods can help ensure a smooth grilling experience. First, make sure your grill is properly preheated to the correct temperature (around 375-400°F). A cold grill is a recipe for sticking. After preheating, thoroughly clean your grill grates with a wire brush to remove any residual food particles from previous cooks. Once clean, oil the grates generously. You can do this by dipping tongs into a high-heat cooking oil (like vegetable or canola oil) and rubbing them over the hot grates, or by using a grill spray.
Another tip is to oil the chicken itself lightly with olive oil or cooking spray after removing it from the marinade. This provides an additional barrier between the chicken and the grill. When you place the chicken on the grill, resist the urge to move it for the first few minutes. Let it sear and develop a crust; it will naturally release from the grates when it’s ready to be flipped. If you’re still concerned about sticking, you can also consider using a grill mat or foil packets for part of the cooking process, though this may slightly alter the char and flavor profile.
- What are some common mistakes to avoid when making grilled lemon chicken?
Several common mistakes can detract from the perfection of your grilled lemon chicken. One of the most frequent errors is not marinating the chicken long enough; the lemon juice needs time to tenderize the meat and infuse it with flavor, so a minimum of 4 hours, or ideally overnight, is recommended. Another common pitfall is overcrowding the grill; this leads to steaming rather than grilling, resulting in uneven cooking and a lack of desirable char. Ensure there’s adequate space between each piece of chicken for proper air circulation and heat distribution.
Furthermore, moving or flipping the chicken too soon is a mistake that prevents the formation of those beautiful grill marks and can cause the meat to tear. Allow the chicken to sear undisturbed for the initial cooking period before attempting to flip it. Overcooking is also a significant issue; relying solely on time rather than using an instant-read meat thermometer can easily lead to dry, tough chicken. Always aim for an internal temperature of 165°F in the thickest part. Finally, forgetting to rest the chicken after grilling is a missed opportunity for maximum juiciness; the resting period allows the juices to redistribute throughout the meat, ensuring a tender and flavorful outcome.