Easy Garlic Butter Oven Baked Tilapia – Quick & Delicious!
Embarking on a culinary adventure often begins with the simplest of ingredients, promising delightful flavors and satisfying meals. This recipe for Garlic Butter Oven Baked Tilapia is a testament to that philosophy, transforming humble tilapia fillets into a dish that sings with vibrant, fresh tastes. It’s the kind of meal that makes weeknight dinners feel like a special occasion, without any of the fuss.
Prepare to be enchanted by the subtle yet powerful combination of garlic, butter, and lemon, a trio that elevates seafood to new heights. This dish is not just about taste; it’s about ease, health, and pure enjoyment, making it a perfect addition to your regular rotation.
Why You Will Love This Recipe
- Effortless Elegance: Prepare a restaurant-quality fish dish in your own kitchen with minimal effort, perfect for busy evenings or when you want to impress guests without the stress.
- Bright & Zesty Flavors: The harmonious blend of fresh lemon juice, zest, and aromatic garlic creates a delightfully bright and refreshing taste profile that complements the delicate tilapia beautifully.
- Healthy & Wholesome: Packed with lean protein and beneficial Omega-3 fatty acids, this recipe is a guilt-free indulgence that nourishes your body while delighting your palate.
- Quick Preparation: From start to finish, this delicious meal can be on your table in approximately 20 minutes, making it an ideal choice for those seeking speedy yet satisfying dinner solutions.
- Minimal Ingredients, Maximum Flavor: Utilizing a straightforward list of pantry staples and fresh produce, this recipe proves that exceptional taste doesn’t require complex ingredients or elaborate techniques.
Ingredients You Need
The success of any dish lies in the quality of its components, and this Garlic Butter Oven Baked Tilapia is no exception. Opting for fresh, high-quality ingredients will undoubtedly enhance the final flavor and texture, ensuring a truly memorable meal. Each element plays a crucial role in creating the balanced and delicious profile that makes this recipe a standout choice for a healthy and satisfying dinner.
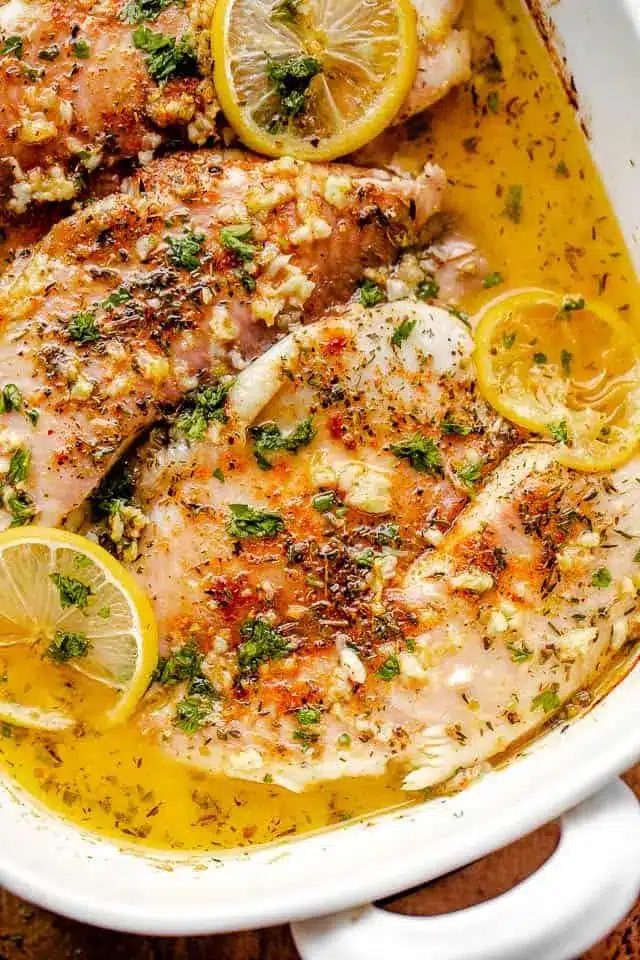
Garlic Butter Oven Baked Tilapia

Light, nutritious tilapia fillets are seasoned with garlic, butter, and lemon and baked to perfection. This simple dinner is low carb, gluten-free, and Keto-friendly.
- 4 tilapia fillets
- Salt and freshly ground black pepper, to taste
- 4 tablespoons butter, melted
- 4 cloves garlic, minced
- 2 tablespoons lemon juice
- 1 lemon, sliced into rounds, for garnish
- Red pepper flakes, for garnish
- Chopped fresh parsley, for garnish
- Lemon slices, for garnish
- 1Preheat oven to 400°F.
- 2Season tilapia with salt, pepper, paprika, thyme, and oregano; arrange fish in a 9x13 baking dish.
- 3In a mixing bowl, whisk together melted butter, garlic, lemon juice, and lemon zest; pour over tilapia.
- 4Bake tilapia for 10 to 12 minutes, or until fish flakes and is fork-tender.
- 5Garnish with pepper flakes, parsley, and lemon slices. Serve.
Keywords: tilapia, baked fish, garlic butter, lemon, keto, gluten-free, seafood, dinner, oven-baked
Quantities for each ingredient can be found within the recipe card for your convenience.
Variations
While the classic Garlic Butter Oven Baked Tilapia is undeniably delicious, the beauty of cooking lies in its adaptability. Experimentation can lead to exciting new flavor dimensions and cater to various dietary preferences, making this versatile dish a true crowd-pleaser for everyone at the table.
Vegan Delight: For a completely plant-based rendition, substitute the tilapia fillets with thick slices of extra-firm tofu or large portobello mushroom caps. Marinate them in a mixture of vegetable broth, nutritional yeast for a cheesy undertone, garlic powder, and a touch of lemon juice. The garlic butter sauce can be recreated using vegan butter and a splash of olive oil. This vegan version offers a wonderfully savory and satisfying experience, proving that deliciousness knows no bounds.
Low-Carb & Keto Adaptation: This recipe is already wonderfully suited for low-carb and ketogenic diets, as tilapia is naturally low in carbohydrates and high in protein. The primary carb contributors are the lemon juice and zest, which are used in moderation and generally well within keto macro guidelines. Ensure you are using pure butter and avoiding any added sugars in your ingredients. Serve this version with an abundance of non-starchy vegetables like roasted asparagus or a fresh green salad drizzled with a lemon-herb vinaigrette for a complete, guilt-free meal.
Spicy Kick: If you enjoy a bit of heat, incorporating red pepper flakes directly into the garlic butter sauce before pouring it over the fish is a fantastic idea. You can also add a pinch of cayenne pepper for a more pronounced warmth. Garnish generously with more red pepper flakes before serving to allow guests to further customize their level of spice. This variation adds an exciting fiery dimension that complements the richness of the butter and the tang of the lemon beautifully.
How to Prepare Garlic Butter Oven Baked Tilapia
Step 1: Preheating and Preparation of the Tilapia Fillets
The journey to a perfectly baked tilapia begins with setting the stage. Preheat your oven to 400°F (200°C), ensuring it reaches the optimal temperature for searing and cooking the delicate fish evenly. This initial step is crucial for achieving that sought-after flaky texture without drying out the fillets.
Next, gather your tilapia fillets and pat them thoroughly dry with paper towels. This simple action is a game-changer, as it helps to create a better surface for the seasonings to adhere to and promotes a more desirable texture during baking. Moisture on the surface can lead to steaming rather than baking, diminishing the overall crispness.
Arrange the now-dry tilapia fillets in a single layer within a 9×13 inch baking dish. Ensure there’s a little space between each fillet to allow for even heat circulation, which is vital for consistent cooking. This thoughtful arrangement will prevent overcrowding and ensure each piece of fish is cooked to perfection.
Now, it’s time to season these beautiful fillets. Sprinkle them generously with salt and freshly ground black pepper to taste, laying the foundation for all the delicious flavors to come. Don’t be shy with the seasoning; it’s the first layer of flavor development.
Follow this with a dusting of paprika, providing a subtle warmth and a beautiful reddish hue that hints at the deliciousness within. Then, sprinkle on the dried thyme and dried oregano, aromatic herbs that lend a Mediterranean flair and earthy depth to the fish. The combination of these spices creates a savory profile that is both comforting and enticing, setting the stage for the garlic butter sauce.
This meticulous seasoning process ensures that every bite of the tilapia is infused with delightful flavors. It’s a simple yet impactful step that elevates the fish from ordinary to extraordinary. The foundation of great flavor is always built on well-seasoned ingredients.
Step 2: Crafting the Luscious Garlic Butter Sauce
With the tilapia fillets seasoned and ready, the next pivotal step involves preparing the star of the show: the rich, aromatic garlic butter sauce. This component is what truly defines the dish, infusing the fish with its signature flavor and moisture.
In a separate mixing bowl, combine the melted butter with the freshly minced garlic. The aroma that arises at this stage is incredibly enticing, a fragrant promise of the deliciousness to come. Using fresh garlic is highly recommended for the most robust and authentic flavor profile, far superior to garlic powder in this application.
To the butter and garlic mixture, add the freshly squeezed lemon juice. The bright, citrusy notes of the lemon are essential for cutting through the richness of the butter and adding a refreshing counterpoint to the savory garlic. Aim for approximately two tablespoons of juice, adjusting slightly to your preference for tanginess.
Next, incorporate the lemon zest into the sauce. This addition provides an even more concentrated and vibrant lemon essence, as the oils in the zest offer a perfumed quality that complements the juice beautifully. A quarter teaspoon of lemon zest is usually sufficient to impart its delightful aroma without overpowering the other flavors.
Whisk these ingredients together thoroughly until they are well combined, creating a harmonious emulsion. The goal is a smooth, glossy sauce that is ready to envelop the tilapia fillets. This simple blending process unlocks a symphony of flavors that will transform the humble fish into a culinary masterpiece.
This garlic butter sauce is not merely a topping; it’s an integral part of the cooking process, ensuring the tilapia remains moist and flavorful throughout its time in the oven. The combination of fat from the butter, pungency from the garlic, and acidity from the lemon creates a perfectly balanced flavor profile.
Step 3: Pouring and Baking the Tilapia
Now that the delectable garlic butter sauce is prepared and the tilapia fillets are seasoned and arranged in the baking dish, it’s time to bring these elements together. This is where the magic truly happens, as the sauce begins to infuse the fish with its irresistible flavors.
Carefully and evenly pour the prepared garlic butter sauce over each tilapia fillet. Ensure that every piece of fish is generously coated, allowing the sauce to cascade down the sides and pool slightly in the bottom of the baking dish. This ensures that the tilapia bakes in a flavorful, moist environment, preventing it from drying out.
Once the sauce has been distributed, place the baking dish into the preheated oven at 400°F (200°C). The oven’s heat will work its wonders, gently cooking the tilapia and allowing the garlic butter sauce to meld beautifully with the fish. The aim is to achieve a perfectly flaky texture without overcooking the delicate fillets.
Bake the tilapia for approximately 10 to 12 minutes. The exact cooking time can vary slightly depending on the thickness of your fillets and the efficiency of your oven. It is crucial to keep a close eye on the fish as it bakes to prevent it from becoming dry or tough. Overcooked fish is one of the most common culinary mishaps, so vigilance is key here.
The tilapia is done when it flakes easily with a fork. This is the classic test for perfectly cooked fish; insert a fork into the thickest part of a fillet and gently pull. If it separates into opaque flakes, it’s ready. If it still looks translucent or feels firm, allow it to bake for another minute or two, checking frequently.
For those who prefer a more precise method, use an instant-read thermometer. Insert it sideways into the thickest part of the fillet; the internal temperature should register 145°F (63°C). This ensures the fish is cooked through safely and perfectly every time. A perfectly cooked tilapia will be moist, tender, and incredibly flavorful.
Step 4: Achieving Flaky Perfection – The Doneness Test
The critical moment of determining doneness is where culinary intuition meets precise technique. For baked tilapia, achieving that ideal flaky texture is paramount, signaling that the fish has reached its peak of tenderness and flavor absorption.
The most traditional and visually intuitive method is the fork test. Gently insert the tines of a fork into the thickest part of a tilapia fillet. If the fish separates easily into opaque, moist flakes, it is perfectly cooked. This visual cue is often all you need to confirm the fillet is ready to be removed from the oven.
However, if the flesh still appears somewhat translucent or feels firm to the touch, it requires a little more time. In such cases, continue baking in short increments, checking every minute or two. Overcooking can quickly turn tender tilapia into a dry, unappealing meal, so it’s better to undercook slightly and finish it off than to overcook it.
For an even more accurate and foolproof approach, an instant-read meat thermometer is an invaluable tool. Insert the thermometer horizontally into the thickest portion of the fillet. The USDA recommends a safe internal temperature of 145°F (63°C) for fish. Reaching this temperature ensures the fish is cooked through and safe to consume, while also preventing overcooking.
The visual appearance of the fish also provides clues. Perfectly baked tilapia will turn opaque white and will no longer have a glistening, raw appearance. The surface should look cooked through, with the edges just beginning to show a hint of golden-brownness from the butter and seasonings.
Understanding these doneness indicators is key to mastering the art of baking fish. It’s a balance between heat and time, ensuring the delicate protein transforms into a succulent, flavorful dish that delights the palate. This step, more than any other, guarantees a successful outcome for your Garlic Butter Oven Baked Tilapia.
Step 5: Garnishing for Presentation and Extra Flavor
The final flourish of garnishing transforms a beautifully cooked dish into a visually stunning culinary creation, and it also offers opportunities to enhance the flavor profile even further. This step elevates the simple baked tilapia into something truly special, appealing to both the eyes and the taste buds.
Begin by carefully arranging thin slices of fresh lemon around the baked tilapia fillets. These lemon slices not only add a vibrant burst of color but also serve as a beautiful accompaniment, allowing diners to squeeze extra fresh lemon juice over their fish if desired. The visual appeal of bright yellow lemon slices against the white fish is classic and inviting.
Next, sprinkle the fish with red pepper flakes. These tiny flecks of heat provide a delightful pop of color and a subtle warmth that can be adjusted to individual preference. For those who enjoy a bit of spice, this is an essential addition, adding a layer of complexity to the dish’s overall flavor.
Finally, finish with a generous scattering of freshly chopped parsley. The bright green herbs provide a fresh, herbaceous contrast to the richness of the garlic butter sauce and the delicate fish. Parsley not only adds visual appeal but also contributes a clean, slightly peppery note that brightens the entire dish.
The combination of these garnishes – the vibrant lemon, the spicy red pepper flakes, and the fresh green parsley – creates a visually appealing and flavor-rich finale. It’s a simple yet effective way to add the finishing touches that make this Garlic Butter Oven Baked Tilapia a complete and delightful meal. Presentation matters, and these garnishes ensure your dish looks as good as it tastes.
Step 6: Serving Your Masterpiece
With the tilapia perfectly baked and beautifully garnished, the moment has arrived to present your culinary creation. Serving this dish promptly ensures that the fish is at its optimal temperature and texture, providing the most enjoyable dining experience.
Carefully transfer the baked tilapia fillets from the baking dish onto serving plates. If there is any remaining garlic butter sauce in the baking dish, you can spoon a little extra over each fillet to ensure maximum flavor and moisture. This concentrated sauce is liquid gold and adds an extra layer of indulgence.
Present the tilapia immediately while it is hot and fragrant. The enticing aroma of garlic, butter, and lemon should fill the air, signaling a delicious meal is ready to be enjoyed. Encourage your diners to savor the tender, flaky texture of the fish and the delightful interplay of flavors.
This Garlic Butter Oven Baked Tilapia is designed to be a centerpiece, yet it pairs wonderfully with a variety of accompaniments. Consider serving it alongside light and fresh sides that complement its delicate flavor profile. The simplicity of the dish allows for versatile pairings, making it suitable for a casual weeknight dinner or a more elegant gathering.
The goal is to provide a complete and satisfying meal that is both delicious and health-conscious. This final step of serving is where all your preparation and care come to fruition, bringing joy and flavor to your table. Enjoy the fruits of your labor with this wonderfully simple yet incredibly flavorful dish.
Pro Tips for Garlic Butter Oven Baked Tilapia
Selecting the Freshest Tilapia: When purchasing tilapia, look for fillets that are firm to the touch and have a mild, oceanic aroma, not a strong fishy smell. If buying frozen, ensure the packaging is intact and free from ice crystals, which can indicate prior thawing and refreezing.
Don’t Overcrowd the Pan: Give your tilapia fillets ample space in the baking dish. Overcrowding can lead to steaming rather than baking, resulting in a less desirable texture. Ensure each fillet has direct contact with the heat for even cooking.
Adjust Garlic Intensity: The amount of garlic can be adjusted to your personal preference. If you are a garlic lover, feel free to add an extra clove or two. For a milder garlic flavor, you can lightly sauté the minced garlic in the butter for a minute before adding the lemon juice.
Broiling for Crispy Edges: For a slightly crisper finish on the edges of your tilapia, you can place the dish under the broiler for the last minute or two of cooking. Watch it very closely, as broilers can quickly burn food.
Fresh vs. Zest: While fresh lemon juice and zest are highly recommended for their vibrant flavor, in a pinch, you can use high-quality bottled lemon juice. However, the zest from fresh lemons truly imparts an unparalleled aromatic quality that is hard to replicate.
Serving Suggestions for Garlic Butter Oven Baked Tilapia
Decoration
The visual appeal of your Garlic Butter Oven Baked Tilapia can be significantly enhanced with thoughtful garnishes. Fresh lemon slices, artfully arranged around the fillets, provide a burst of sunshine and offer an optional tangy accent for diners. The vibrant yellow contrasts beautifully with the flaky white fish. A sprinkle of bright red pepper flakes adds not only a hint of heat but also a striking visual contrast, like tiny jewels scattered across the plate. Finally, a generous scattering of freshly chopped parsley introduces a lively green hue, signifying freshness and adding a clean, herbaceous aroma that completes the presentation.
Side Dishes
To complement the delicate flavors of the Garlic Butter Oven Baked Tilapia, consider serving it with sides that enhance rather than overpower. Steamed or roasted asparagus, drizzled with a little olive oil and a squeeze of lemon, offers a crisp texture and complementary flavor. A simple Quinoa pilaf provides a nutty, wholesome grain base that absorbs the delicious garlic butter sauce beautifully. For a lighter option, a crisp green salad tossed with a light vinaigrette made from olive oil, white wine vinegar, and a touch of Dijon mustard offers a refreshing counterpoint.
Potatoes are also a classic pairing; consider roasted baby potatoes seasoned with rosemary and garlic, or even a creamy mashed potato to soak up any extra sauce. Another excellent choice is a side of simple steamed broccoli or green beans, tossed with a little butter and salt, to add color and a healthy vegetable component. Even a side of fluffy white rice can be a good option, providing a neutral canvas for the flavorful tilapia and sauce.
Creative Serving Ideas
Elevate your tilapia experience with inventive serving methods. For a more elegant presentation, serve the tilapia over a bed of creamy risotto, allowing the flavorful sauce to meld with the Arborio rice. Another delightful approach is to create individual parchment paper packets, layering the tilapia with thinly sliced vegetables like zucchini, bell peppers, and cherry tomatoes, along with a drizzle of the garlic butter sauce, before baking. This method steams the fish and vegetables together, infusing them with flavor and making for an easy cleanup.
Consider serving the tilapia as part of a build-your-own “bowl” meal. Offer sides like seasoned rice, roasted sweet potatoes, and a fresh slaw, allowing everyone to customize their perfect plate. For a taste of the Mediterranean, serve the tilapia with a side of Greek salad or a scoop of tzatziki sauce and warm pita bread. This adaptability makes it a go-to recipe for any occasion.
Preparation & Storage
Storing Leftovers
Should you be fortunate enough to have any Garlic Butter Oven Baked Tilapia leftovers, proper storage is key to maintaining its quality. Allow the cooked fish to cool down to room temperature before transferring it to an airtight container. This prevents condensation from forming, which can lead to sogginess. Store the container in the refrigerator, ensuring it is sealed tightly to prevent the fish from drying out or absorbing odors from other foods.
When stored correctly in an airtight container in the refrigerator, the leftover tilapia should remain fresh and palatable for up to 3 days. It’s always best to consume leftovers within this timeframe to ensure optimal taste and safety. Avoid leaving cooked fish at room temperature for extended periods, as this can promote bacterial growth and compromise its quality.
If you plan to store it for a slightly longer period, consider freezing the leftovers. Freezing is an excellent method for preserving the fish for future meals, although the texture may be slightly altered upon reheating. Planning ahead for leftovers ensures you can enjoy this delicious dish again without needing to cook a fresh batch.
Freezing
For longer-term storage, freezing the leftover Garlic Butter Oven Baked Tilapia is a highly effective option. Once the fish has cooled completely, arrange the fillets in a single layer on a baking sheet lined with parchment paper. This initial freezing step prevents the fillets from sticking together in a large clump, allowing for easier portioning later on.
Once the fillets are frozen solid, typically within a couple of hours, carefully transfer them into heavy-duty freezer bags. As you place them in the bag, try to push out as much air as possible before sealing it tightly. Removing excess air minimizes the risk of freezer burn, which can degrade the texture and flavor of the fish.
When properly frozen and sealed in freezer bags, your Garlic Butter Oven Baked Tilapia can be stored for up to 3 weeks. While the quality is best within this period, it will remain safe to eat beyond this point if kept consistently frozen. Labeling the bags with the date of freezing can help you keep track of your frozen food inventory.
Remember that while freezing is excellent for preservation, the texture of the fish may become slightly less moist after thawing and reheating compared to freshly cooked tilapia. However, with proper reheating techniques, the flavor remains remarkably well-preserved, making it a convenient option for future meals.
Reheating
To enjoy your stored Garlic Butter Oven Baked Tilapia, a careful reheating process is essential to restore its deliciousness without compromising its texture. If your fish has been frozen, the first and most crucial step is to thaw it completely. The best and safest method for thawing is to transfer the frozen fillets from the freezer bag to a plate and refrigerate them overnight. This slow thawing process helps to maintain the integrity of the fish’s structure.
Once thawed, or if you are reheating refrigerated leftovers, allow the fish to come to room temperature for about 15-20 minutes while your oven preheats. This brings the fish closer to the target cooking temperature, ensuring it heats through evenly without overcooking the exterior. Preheat your oven to 350°F (175°C), a moderate temperature that is ideal for gently warming delicate fish.
Arrange the tilapia fillets in a baking dish. To help retain moisture during reheating, it is highly recommended to cover the dish tightly with aluminum foil. This creates a steamy environment that prevents the fish from drying out. Place the covered dish in the preheated oven.
Bake for approximately 8 to 10 minutes, or until the fish is heated through. You can test for doneness by gently flaking it with a fork; it should separate easily and be warm in the center. Be cautious not to overheat, as this can make the fish tough and dry. Served promptly, the reheated tilapia will be a delightful reminder of its original deliciousness.
Frequently Asked Questions
-
Can I use a different type of fish instead of tilapia for this recipe?
Absolutely! While this recipe is specifically tailored for tilapia due to its mild flavor and delicate texture, it can be adapted for other white fish fillets. Options like cod, haddock, sole, or even flounder would work well. Keep in mind that cooking times may vary slightly depending on the thickness and density of the fish you choose. Thicker fillets might require a few extra minutes in the oven, while thinner ones might cook faster, so it’s always best to check for flakiness and internal temperature.
-
How can I ensure my tilapia doesn’t become dry or rubbery during baking?
The key to perfectly moist tilapia lies in not overcooking it. Tilapia is a delicate fish and cooks very quickly. Always start checking for doneness around the 8-minute mark, and rely on the fork-test (the fish should flake easily) or an instant-read thermometer (should register 145°F or 63°C). The garlic butter sauce also plays a crucial role in keeping the fish moist, so ensure each fillet is well-coated before baking. Additionally, avoid overcrowding the baking dish, as this can lead to uneven cooking and a less desirable texture.
-
What are some gluten-free and keto-friendly side dish options to serve with this tilapia?
This Garlic Butter Oven Baked Tilapia is naturally low in carbohydrates and gluten-free, making it a versatile dish. Excellent gluten-free and keto-friendly side dishes include steamed or roasted asparagus, sautéed spinach with garlic, cauliflower rice seasoned with herbs, zucchini noodles (zoodles) tossed with a light sauce, or a simple green salad with an olive oil and lemon dressing. Roasted Brussels sprouts or green beans are also fantastic options that complement the rich flavors of the fish beautifully. These sides provide a nutritious and satisfying meal without adding excess carbohydrates.