Easy Garlic Butter Oven Baked Tilapia – Quick & Delicious!
Embark on a culinary journey with a dish that promises simplicity, elegance, and an explosion of delightful flavors. This Garlic Butter Oven Baked Tilapia is more than just a meal; it’s an experience designed to impress with its minimal effort and maximum taste impact.
Imagine a flaky, tender fish bathed in a rich, aromatic sauce that sings with the vibrant notes of garlic, butter, and lemon. This recipe is a testament to the idea that truly exceptional food doesn’t need to be complicated, offering a satisfying and wholesome option for any occasion.
Why You Will Love This Recipe
- Speedy Preparation: Get a gourmet-quality meal on your table in under 30 minutes, perfect for busy weeknights or impromptu gatherings.
- Healthy & Light: Enjoy a nutritious dish that is low in carbohydrates, gluten-free, and Keto-friendly without compromising on taste.
- Simple Ingredients: This recipe relies on pantry staples and fresh produce, making it accessible and budget-friendly.
- Versatile Flavor Profile: The classic combination of garlic, butter, and lemon complements the delicate tilapia beautifully, making it a crowd-pleaser.
- Effortless Cleanup: Baked dishes often mean fewer pots and pans, and this recipe is no exception, leading to a quicker tidying-up process after your meal.
Ingredients You Need
The success of any dish hinges on the quality of its ingredients, and this recipe is no exception. Opting for fresh, high-quality components will elevate the final taste and texture. Fresh tilapia fillets, when cooked properly, offer a wonderfully delicate and flaky texture that absorbs the accompanying flavors beautifully. The aromatics like garlic and lemon provide a bright, zesty contrast that cuts through the richness of the butter, creating a perfectly balanced profile.
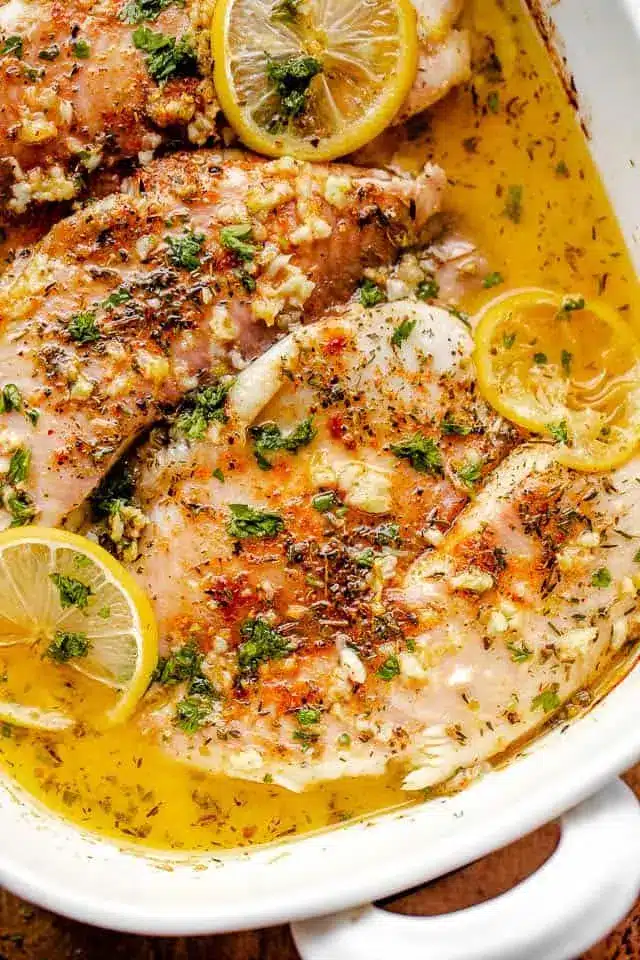
Garlic Butter Oven Baked Tilapia

Light, nutritious tilapia fillets are seasoned with garlic, butter, and lemon and baked to perfection. This simple dinner comes together real fast, seasoned with a classic blend of lemon, garlic, melted butter, and paprika, this simple dinner really hits the spot! And, it's all done in just 20 minutes. FLAKY GARLIC BUTTER BAKED TILAPIA. There are so many great recipes for baked fish out there, but I really love this one because it doesn't require any mayonnaise, breadcrumbs, parmesan, or other toppings. All you need is lemon, garlic, and butter. Super simple, low carb, gluten free, Keto-friendly, AND flavorFUL. Even picky eaters love this tasty fish fillet recipe.
- 4 tilapia fillets
- Salt and freshly ground black pepper, to taste
- ½ teaspoon paprika
- ½ teaspoon dried thyme
- ½ teaspoon dried oregano
- 4 tablespoons butter, melted
- 4 cloves garlic, minced
- 2 tablespoons lemon juice
- ¼ teaspoon lemon zest
- 1 lemon, sliced into rounds, for garnish
- Red pepper flakes, for garnish
- Chopped fresh parsley, for garnish
- Lemon slices, for garnish
- 1Preheat oven to 400°F.
- 2Season tilapia with salt, pepper, paprika, thyme, and oregano; arrange fish in a 9x13 baking dish.
- 3In a mixing bowl, whisk together melted butter, garlic, lemon juice, and lemon zest; pour over tilapia.
- 4Bake tilapia for 10 to 12 minutes, or until fish flakes and is fork-tender.
- 5Garnish with pepper flakes, parsley, and lemon slices. Serve.
Keywords: tilapia, baked fish, seafood, garlic butter, lemon, quick dinner, gluten free, keto
- tilapia fillets: four medium-sized fillets form the base of this delightful dish, offering a lean and flaky protein source.
- salt and pepper: a fundamental seasoning duo to enhance the natural flavors of the fish and the accompanying butter sauce.
- paprika: a touch of vibrant color and subtle warmth is provided by this classic spice, best used in its regular, non-smoked variety.
- dried thyme: this herb brings an earthy, slightly minty note that pairs exceptionally well with fish and lemon.
- dried oregano: a Mediterranean staple, oregano adds a fragrant, peppery undertone that rounds out the herb blend.
- butter: four tablespoons of unsalted butter, melted, form the luscious foundation of the flavorful sauce, providing richness and depth.
- garlic: four cloves of fresh garlic, minced or pressed, are crucial for infusing the sauce with its characteristic pungent aroma and taste.
- fresh lemon juice: two tablespoons of freshly squeezed lemon juice add a bright, zesty acidity that balances the richness of the butter and enhances the fish’s flavor.
- lemon zest: ¼ teaspoon of finely grated lemon zest amplifies the citrus notes, adding a more intense lemon perfume to the dish.
- lemon slices: for garnish, adding a beautiful visual appeal and an extra burst of fresh citrus aroma.
- red pepper flakes: a pinch for garnish, offering a subtle hint of heat that awakens the palate.
- chopped fresh parsley: a sprinkle of fresh parsley for garnish, providing a pop of color and a fresh, herbaceous finish.
The exact quantities for these ingredients are detailed within the accompanying recipe card for your convenience.
Variations
While the classic Garlic Butter Oven Baked Tilapia is a triumph on its own, there’s always room for culinary exploration. Adapting this recipe to suit different dietary needs or flavor preferences can open up a world of delicious possibilities. Consider how subtle changes can lead to entirely new, exciting taste experiences that still maintain the core appeal of this simple fish preparation.
For those following a dinner menu that is strictly vegan, a delightful plant-based transformation is entirely achievable. Instead of tilapia, firm tofu or large portobello mushrooms can be used as the main component. The garlic butter sauce can be recreated using a rich, dairy-free butter alternative. Adding a splash of nutritional yeast to the sauce can impart a subtle, cheesy depth, while a hint of soy sauce or tamari can provide an umami boost, mimicking some of the savory notes often found in seafood.
If you’re exploring a low-carb or Keto lifestyle, this recipe is already wonderfully suited, but further enhancements are possible. To increase the healthy fats and add another layer of flavor, consider serving the tilapia with a generous dollop of avocado crema or a sprinkle of toasted slivered almonds. You could also incorporate other low-carb vegetables directly into the baking dish alongside the fish, such as asparagus spears or broccoli florets, allowing them to roast and absorb the aromatic sauce.
For a touch of Mediterranean flair, a few simple additions can transport this dish to the sun-drenched shores of Greece. Stir a tablespoon of capers into the melted butter mixture before pouring it over the fish, and then sprinkle the baked tilapia with Kalamata olives and crumbled feta cheese just before serving. A few fresh dill sprigs added during the last few minutes of baking would also complement the lemon and garlic beautifully, creating a vibrant and herbaceous twist.
How to Prepare Garlic Butter Oven Baked Tilapia
Step 1: Preparing the Baking Dish and Tilapia
Begin by preheating your oven to a precise 400 degrees Fahrenheit (200 degrees Celsius). This initial step ensures that your oven is at the optimal temperature, ready to cook the tilapia evenly and efficiently. While the oven heats, take a moment to select a suitable baking dish; a 9×13 inch pan is ideal for accommodating four medium-sized tilapia fillets without overcrowding.
Next, carefully arrange the four tilapia fillets in a single layer within your prepared baking dish. It’s important to ensure they are not overlapping, as this allows for consistent cooking and a beautiful presentation. Now, it’s time to season the fish generously. Sprinkle each fillet evenly with salt and freshly ground black pepper, making sure to season both sides if possible. Follow this with a light dusting of paprika, dried thyme, and dried oregano, distributing these dry herbs and spices uniformly across the surface of the fillets.
The Best Part: This initial seasoning is the foundation for the entire dish. The salt and pepper enhance the natural flavor of the tilapia, while the paprika adds a beautiful color and a subtle warmth. The thyme and oregano contribute their aromatic qualities, setting the stage for the rich garlic butter sauce to come. This careful layering of flavors ensures that every bite of the fish is seasoned to perfection.
Step 2: Crafting the Garlic Butter Sauce
In a separate, medium-sized mixing bowl, commence the creation of your luscious garlic butter sauce. This sauce is the heart of the dish, infusing the delicate tilapia with an irresistible depth of flavor. Start by adding the four tablespoons of butter to the bowl; ensure the butter has been properly melted beforehand, either in a small saucepan over low heat or carefully in the microwave. The melted butter will serve as the rich base for the sauce’s aromatic components.
To the melted butter, add the four cloves of freshly minced garlic. The pungent aroma of fresh garlic is essential for the signature taste of this dish, so don’t skimp on this ingredient. Following the garlic, incorporate the two tablespoons of fresh lemon juice. The acidity of the lemon juice will balance the richness of the butter, adding a bright, zesty counterpoint that prevents the sauce from being too heavy. Finally, add the ¼ teaspoon of finely grated lemon zest. The zest provides an even more intense burst of citrus fragrance and flavor, enhancing the overall brightness of the sauce.
Whisk these ingredients together vigorously until they are thoroughly combined. You should aim for a smooth, emulsified mixture where the garlic and lemon are evenly distributed throughout the melted butter. This simple yet potent blend of ingredients is what will transform the ordinary tilapia into an extraordinary culinary delight. The aroma alone will begin to tantalize your taste buds, signaling the delicious meal that is about to unfold.
Step 3: Coating the Tilapia with Sauce
Once your vibrant garlic butter sauce is beautifully emulsified, it’s time to generously coat the seasoned tilapia fillets. Carefully pour the prepared sauce evenly over each fillet in the baking dish. Ensure that every piece of fish is well-covered, allowing the sauce to cascade over the sides and pool slightly at the bottom of the dish. This ensures that the tilapia bakes in a flavorful bath, absorbing all the delicious notes of garlic, butter, and lemon.
Use a spoon or a basting brush to gently spread the sauce if needed, making sure to reach all the nooks and crannies of the fish. The goal is to create a glistening layer that will bake into a slightly caramelized coating, enhancing both the flavor and the visual appeal of the dish. This step is crucial for ensuring that the tilapia remains moist and tender throughout the baking process, as the butter acts as a protective barrier against drying out.
Expert Tip: For an even more intense garlic flavor, you can lightly press or smash the garlic cloves before mincing them. This helps to release more of their aromatic oils into the butter. Additionally, if you find your lemon zest is clumping, lightly toast it in a dry pan for about 30 seconds to help it separate and become more fragrant.
Step 4: Baking the Tilapia to Perfection
With the tilapia fillets coated in the luscious garlic butter sauce and arranged in the baking dish, they are now ready for the oven. Place the baking dish into the preheated 400°F (200°C) oven. It’s important to place it in the center of the oven to ensure even heat distribution all around the fish.
Bake the tilapia for approximately 10 to 12 minutes. The exact cooking time can vary slightly depending on the thickness of your fillets and the accuracy of your oven’s temperature. During this time, the fish will cook through, becoming opaque and flaky. The sauce will bubble and become wonderfully fragrant, creating a beautiful glaze over the fish.
How to Tell When It’s Done: The most reliable indicator that your tilapia is perfectly cooked is its texture. As soon as the fish flakes easily when gently prodded with a fork, it is ready. You can also use an instant-read thermometer inserted into the thickest part of the fillet; it should register an internal temperature of 145°F (63°C). Be careful not to overcook the fish, as this can result in a dry texture. The goal is tender, moist, and flaky tilapia.
Step 5: Garnishing and Serving
Once the tilapia has reached its perfect state of flaky tenderness, carefully remove the baking dish from the oven. The aroma filling your kitchen at this point will be absolutely divine, a testament to the simple yet powerful combination of garlic, butter, and lemon. Before serving, it’s time to add those beautiful finishing touches that elevate the dish from merely cooked to visually stunning and aromatically complete.
Sprinkle the surface of the baked tilapia with red pepper flakes for a hint of gentle heat and a vibrant splash of color. Then, generously scatter the chopped fresh parsley over the fish. The bright green parsley not only adds a fresh, herbaceous note but also provides a beautiful contrast to the golden-baked fish and the rich sauce. Finally, artfully arrange the thin lemon slices around the fillets or on top, adding an extra layer of fresh citrus fragrance and a professional, restaurant-worthy presentation. These garnishes are not just for show; they contribute to the overall sensory experience of the dish.
The Final Touch: Serve the Garlic Butter Oven Baked Tilapia immediately while it is hot and at its most succulent. The warm, flaky fish, bathed in its fragrant garlic butter sauce and adorned with fresh garnishes, is a truly delightful meal that is sure to impress your family and guests alike. This dish is a perfect example of how simple ingredients and a straightforward cooking method can yield exceptional results.
Pro Tips for Garlic Butter Oven Baked Tilapia
Achieving tilapia perfection is within reach with a few expert pointers. These tips are designed to help you get the most out of this recipe, ensuring consistently delicious results every time you make it. From selecting the best fish to ensuring ideal cooking temperatures, these insights will elevate your culinary game.
- Quality of Tilapia Matters: When purchasing tilapia, look for fillets that are firm, moist, and have a fresh, mild odor. Avoid any fish that appears discolored or has a strong, unpleasant smell, as this is a sign of staleness. If buying frozen, ensure the package is well-sealed and free from ice crystals, which can indicate prior thawing and refreezing.
- Don’t Overcrowd the Pan: To ensure your tilapia bakes evenly and develops a nice texture, avoid overcrowding the baking dish. If you are cooking more than four fillets, it’s best to use two separate baking dishes or cook in batches. This allows hot air to circulate freely around each piece of fish, promoting proper cooking.
- Monitor Cooking Time Closely: Tilapia is a delicate fish that cooks very quickly. Keep a close eye on it during the final minutes of baking. Overcooking can lead to dry, rubbery fish, while undercooking leaves it unappetizingly raw. The flaky texture and internal temperature are your best guides.
- Adjust Garlic to Your Liking: The recipe calls for four cloves of garlic, which provides a robust flavor. However, garlic intensity can vary, and personal preferences differ. Feel free to adjust the amount of garlic up or down to suit your taste. For a milder flavor, you can roast the garlic cloves whole before mincing and adding them to the sauce.
- Lemon Zest is Key: While lemon juice provides acidity, lemon zest is where the true citrus aroma lies. Don’t skip this ingredient! The finely grated zest releases essential oils that add a beautiful fragrance and a more complex lemon flavor to the sauce. Ensure you are only zesting the colored part of the peel, avoiding the bitter white pith underneath.
Serving Suggestions for Garlic Butter Oven Baked Tilapia
Decoration
Elevate the visual appeal of your Garlic Butter Oven Baked Tilapia with simple yet impactful garnishes. The final presentation is the first impression, and a beautifully decorated dish enhances the dining experience. Thin slices of fresh lemon, fanned out or placed delicately on top of the fillets, add a vibrant pop of color and an inviting citrus aroma. A generous sprinkle of finely chopped fresh parsley introduces a bright green contrast, lending a sense of freshness and culinary artistry. For those who enjoy a subtle kick of heat, a light dusting of red pepper flakes provides both visual interest and a hint of warmth, creating a dynamic and appetizing look.
Side Dishes
Complement the delicate flavors of your Garlic Butter Oven Baked Tilapia with thoughtfully chosen side dishes that enhance, rather than overpower, the main course. Roasted asparagus spears, with their slightly earthy flavor and tender-crisp texture, are a classic pairing that bakes beautifully alongside the fish. Another excellent option is a simple green salad, dressed with a light vinaigrette, offering a refreshing counterpoint to the richness of the butter sauce. For a more substantial meal, consider serving the tilapia with a side of fluffy quinoa or perfectly steamed rice, which will absorb any extra garlic butter sauce wonderfully. Consider exploring recipes like our German pancake recipe for a surprising, yet delightful, sweet and savory combination if you are feeling adventurous, though traditionally served at breakfast, its versatility can extend to brunch or a light dinner when paired with seafood.
Creative Serving Ideas
Transform your Garlic Butter Oven Baked Tilapia into a memorable meal with creative presentation and pairing ideas. Serve the fillets directly from the baking dish at the table for a rustic, family-style feel, allowing guests to serve themselves. Another idea is to arrange the flaky tilapia over a bed of creamy polenta or mashed cauliflower for a comforting and elegant presentation. For a lighter option, consider serving the fish atop a vibrant bed of mixed greens, drizzled with the pan sauce, turning it into a sophisticated seafood salad. You could also serve it as part of a broader lunch or dinner spread, perhaps alongside other baked seafood dishes like a whole baked branzino or grilled shrimp skewers for a seafood fiesta.
Preparation & Storage
Storing Leftovers
Should you be fortunate enough to have any leftover Garlic Butter Oven Baked Tilapia, proper storage is key to preserving its quality. Allow the cooked fish to cool down to room temperature completely before attempting to store it. This is an important step to prevent the rapid growth of bacteria and to maintain the texture of the fish. Once cooled, transfer the leftovers into an airtight container. Ensuring the container is well-sealed will help to prevent the fish from drying out and absorbing any unwanted odors from the refrigerator.
Store the sealed container in the refrigerator. When stored correctly, leftover tilapia will maintain its best quality for up to 3 days. While it is safe to consume after this period, the texture and flavor might begin to diminish. Always check for any signs of spoilage, such as an off smell or slimy texture, before reheating and consuming leftovers.
Freezing
For longer-term storage, freezing is an excellent option for your Garlic Butter Oven Baked Tilapia. Begin by placing the cooled leftover fillets in a single layer on a baking sheet or a platter lined with parchment paper. Ensure that the fillets are not touching each other to prevent them from sticking together in a solid mass once frozen. Place this baking sheet or platter into the freezer and allow the fillets to freeze completely solid, which typically takes about 1 to 2 hours, depending on your freezer’s temperature and the thickness of the fillets.
Once the fillets are frozen solid, carefully transfer them from the baking sheet into heavy-duty freezer bags. As you place them in the bags, try to push out as much air as possible before sealing them tightly. Removing excess air helps to prevent freezer burn, which can negatively affect the texture and flavor of the fish. Properly frozen tilapia can be stored in the freezer for up to 3 weeks.
Reheating
Reheating your stored or frozen Garlic Butter Oven Baked Tilapia requires a gentle approach to best restore its moist and tender texture. If your fish has been frozen, the first crucial step is to thaw it thoroughly. The best method for thawing is to transfer the frozen fillets from the freezer bag to a plate and let them thaw slowly in the refrigerator overnight. Alternatively, you can thaw them at room temperature for a shorter period, but always ensure they are fully thawed before proceeding to reheat.
Once thawed, allow the fillets to sit at room temperature for about 15-20 minutes while you preheat your oven to 350°F (175°C). Arrange the tilapia fillets in a clean baking dish. To help keep the fish moist during reheating, cover the dish tightly with aluminum foil. Place the covered dish into the preheated oven and bake for approximately 8 to 10 minutes, or until the fish is heated through and tender. It’s important to note that fish, especially after being stored and reheated, may have a slightly less moist texture than when it was first cooked, but this method aims to minimize that change.
Frequently Asked Questions
-
Can I use a different type of white fish instead of tilapia?
Absolutely! This Garlic Butter Oven Baked Tilapia recipe is quite versatile and can be made with a variety of other white fish fillets. Excellent substitutes include cod, haddock, snapper, or sole. The cooking time might vary slightly depending on the thickness and density of the fish you choose, so always rely on the “flakes easily with a fork” test or an internal temperature of 145°F (63°C) to determine doneness. Ensure that whatever fish you select is of good quality for the best results.
-
What can I do if I don’t have fresh garlic?
If fresh garlic is unavailable, you can certainly use garlic powder or granulated garlic as a substitute, although the flavor profile will be slightly different. For the amount of garlic called for (4 cloves), you would typically use about ½ to ¾ teaspoon of garlic powder. If using granulated garlic, start with about 1 teaspoon. Whisk the garlic powder or granulated garlic directly into the melted butter along with the lemon juice and zest. Be mindful that dried garlic can sometimes burn more easily than fresh, so keep an eye on the sauce during preparation.
-
How can I make this dish spicier?
There are several ways to add more heat to your Garlic Butter Oven Baked Tilapia, catering to different spice preferences. The simplest method is to increase the amount of red pepper flakes used as a garnish. You can also add a pinch of cayenne pepper to the spice blend sprinkled on the fish before baking, or stir a teaspoon of your favorite hot sauce into the garlic butter sauce itself. For a more intense heat, consider adding a finely minced fresh chili pepper, such as a jalapeño or serrano, to the butter mixture before pouring it over the fish, ensuring it’s evenly distributed.