Easy Garlic Butter Oven Baked Tilapia – Quick & Delicious!
Embark on a culinary adventure with a dish that promises simplicity, vibrant flavors, and minimal fuss. This Garlic Butter Oven Baked Tilapia is a testament to how a few well-chosen ingredients can transform humble fish into a restaurant-quality meal right in your own kitchen. Prepare to be delighted by its delicate texture and aromatic embrace.
This recipe is designed for the modern home cook, whether you’re a seasoned chef or just starting your journey. It’s a weeknight savior, a weekend treat, and a crowd-pleaser all rolled into one. Get ready to impress yourself and your loved ones with this incredibly satisfying and easy-to-make tilapia creation.
Why You Will Love This Recipe
- Quick Preparation: Dinner is on the table in less than 30 minutes, making it perfect for busy evenings.
- Simple Ingredients: Relies on pantry staples and readily available fresh produce for an effortless shopping trip.
- Healthy and Nutritious: Tilapia is a lean protein source, and the baking method keeps it light and healthy, fitting well into various dietary plans.
- Bursting with Flavor: The classic combination of garlic, butter, and lemon creates a savory and zesty profile that enhances the fish beautifully.
- Minimal Cleanup: Typically prepared and baked in a single dish, reducing the number of dishes to wash afterward.
Ingredients You Need
The beauty of this Garlic Butter Oven Baked Tilapia lies in its commitment to fresh, high-quality ingredients that let the natural flavors of the fish shine. Opting for the freshest tilapia fillets you can find will make a noticeable difference in the final outcome, ensuring a tender and flaky texture. Accompanying these fillets are simple aromatics and flavor enhancers that create a harmonious taste profile.
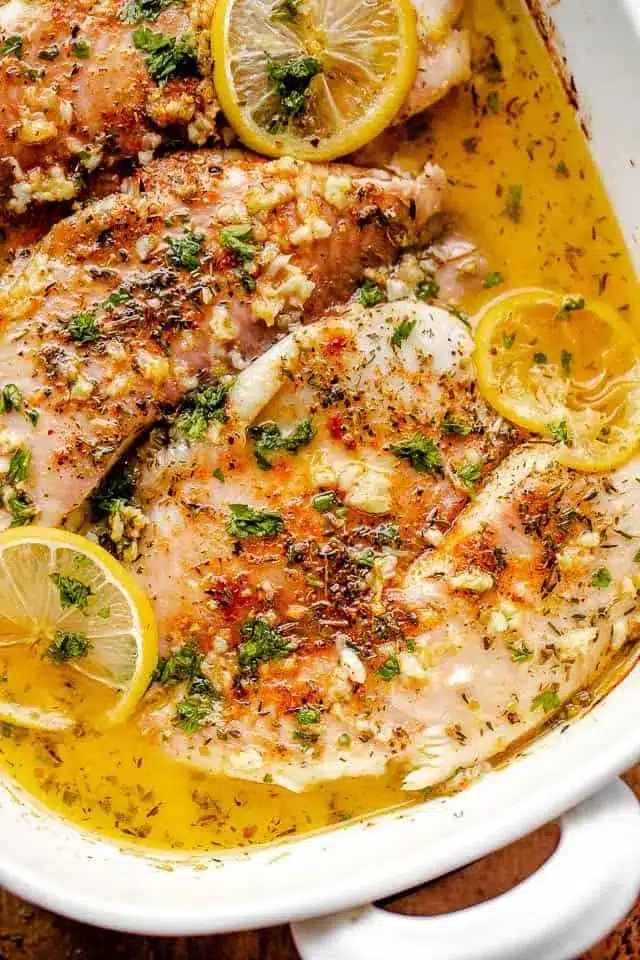
Garlic Butter Oven Baked Tilapia

Light, nutritious tilapia fillets are seasoned with garlic, butter, and lemon and baked to perfection. This simple dinner recipe is low carb, gluten-free, and keto-friendly.
- 4 tilapia fillets
- Salt and freshly ground black pepper, to taste
- ½ teaspoon paprika
- ½ teaspoon dried thyme
- ½ teaspoon dried oregano
- 4 tablespoons butter, melted
- 4 cloves garlic, minced
- 2 tablespoons lemon juice
- ¼ teaspoon lemon zest
- 1 lemon, sliced into rounds, for garnish
- Red pepper flakes, for garnish
- Chopped fresh parsley, for garnish
- Lemon slices, for garnish
- 1Preheat oven to 400°F. Season tilapia with salt, pepper, paprika, thyme, and oregano; arrange fish in a 9x13 baking dish.
- 2In a mixing bowl, whisk together melted butter, garlic, lemon juice, and lemon zest; pour over tilapia.
- 3Bake tilapia for 10 to 12 minutes, or until fish flakes and is fork-tender.
- 4Garnish with pepper flakes, parsley, and lemon slices. Serve.
Keywords: tilapia, baked fish, garlic butter, lemon, easy dinner, seafood, low carb, gluten-free, keto
- tilapia fillets: four medium-sized fillets form the base of this delightful dish.
- salt and pepper: essential seasonings to enhance the natural flavors of the fish.
- paprika: a touch of sweet paprika adds a hint of color and subtle warmth.
- dried thyme: this herb lends an earthy, aromatic note that complements seafood perfectly.
- dried oregano: its slightly peppery and minty undertones add another layer of complexity.
- butter: four tablespoons of melted butter serve as the luscious base for our flavorful sauce.
- fresh garlic: minced garlic provides a pungent, savory kick that is indispensable.
- fresh lemon juice: two tablespoons of bright, zesty lemon juice cut through the richness and add tang.
- lemon zest: a quarter teaspoon of finely grated lemon zest intensifies the citrus aroma and flavor.
- lemon slices: for garnish, adding a visual appeal and extra touch of freshness.
- red pepper flakes: a pinch for garnish, offering a hint of heat for those who enjoy a little spice.
- chopped fresh parsley: for a burst of color and herbaceous freshness as a final flourish.
The precise quantities for each ingredient can be found within the accompanying recipe card, ensuring you have everything you need for success.
Variations
For those following a ketogenic lifestyle, this dish is already a fantastic option, being naturally low in carbohydrates. To further enhance its keto-friendliness, you could serve it alongside steamed asparagus or a fresh avocado salad, ensuring no starchy sides are included.
Vegans can adapt this recipe by substituting the tilapia with thick slices of firm tofu or portobello mushrooms. The garlic butter sauce can be recreated using a plant-based butter alternative and ensuring all other seasonings are vegan-approved. The resulting dish will offer a satisfyingly savory experience.
To add a Mediterranean flair, consider incorporating chopped Kalamata olives and capers into the butter mixture before baking. You could also sprinkle some crumbled feta cheese over the top during the last few minutes of cooking for a salty, tangy boost that pairs wonderfully with the lemon and garlic.
How to Prepare Garlic Butter Oven Baked Tilapia
Step 1: Preheat and Prepare the Baking Dish
Begin by preheating your oven to a steady 400°F (200°C). This crucial first step ensures that the oven is at the optimal temperature when your seasoned tilapia fillets are ready to go in, promoting even cooking and a beautiful finish. Select a suitable 9×13 inch baking dish; its size is ideal for arranging the four tilapia fillets in a single layer, allowing each piece to cook properly without steaming.
Before placing the fish, you might consider lightly greasing the baking dish with a touch of olive oil or cooking spray. While the butter sauce will provide moisture, a light coating can further prevent any potential sticking, ensuring your delicate fillets release cleanly. This simple act of preparation sets the stage for a stress-free cooking experience and easier cleanup later.
Step 2: Season the Tilapia Fillets
Take your four medium-sized tilapia fillets and pat them gently with paper towels to remove any excess moisture. This simple step is key to achieving a better texture and allowing the seasonings to adhere more effectively. Arrange the dried fillets in your prepared baking dish, ensuring they have a little space between them for uniform cooking.
Now, it’s time for the seasoning blend. Sprinkle the fillets evenly with salt and freshly ground black pepper, adjusting to your personal preference. Next, dust them with paprika, dried thyme, and dried oregano. The combination of these herbs and spices will infuse the fish with an aromatic depth that is both comforting and sophisticated. Ensure a light, even coating across all the fillets for consistent flavor in every bite.
Step 3: Prepare the Garlic Butter Sauce
In a separate mixing bowl, combine the four tablespoons of melted butter. This forms the rich, luscious base of your flavorful sauce. Add to the melted butter the minced fresh garlic. The pungent aroma of fresh garlic will begin to release, promising a robust flavor infusion.
Next, incorporate the fresh lemon juice and lemon zest into the butter and garlic mixture. The bright acidity of the lemon will beautifully balance the richness of the butter and the intensity of the garlic. Whisk these ingredients together thoroughly until they are well combined, creating a fragrant and inviting sauce that is ready to be poured over the seasoned tilapia. This sauce is where the magic truly happens, coating the fish and infusing it with irresistible flavor.
Step 4: Coat the Tilapia with Sauce
Carefully pour the prepared garlic butter sauce evenly over the seasoned tilapia fillets in the baking dish. Ensure that each fillet is generously coated, allowing the sauce to seep into the crevices and cling to the surface. This liberal application of the sauce is vital for ensuring that the fish bakes up moist, tender, and incredibly flavorful.
Take a moment to gently tilt the baking dish if needed, to help distribute the sauce further and ensure all parts of the fish are in contact with this delicious mixture. The butter will melt and baste the fish as it bakes, creating a wonderfully succulent outcome. This step is about saturation, making sure every bite will be infused with the delightful garlic-butter-lemon essence.
Step 5: Bake to Perfection
Place the baking dish into the preheated 400°F (200°C) oven. Allow the tilapia to bake for approximately 10 to 12 minutes. The exact cooking time will depend on the thickness of your fillets and the specific calibration of your oven; it’s always best to keep a close eye on the fish during this stage.
The sign of perfectly baked tilapia is when the fish flakes easily with a fork and is no longer translucent. If you’re using a meat thermometer, the internal temperature should reach 145°F (63°C) when inserted into the thickest part of the fillet. Avoid overcooking, as this can lead to dry fish. The goal is tender, flaky perfection that melts in your mouth.
Step 6: Garnish and Serve
Once the tilapia is perfectly baked, carefully remove the baking dish from the oven. The aroma will be incredible, a testament to the simple yet powerful flavors you’ve created. Now it’s time for the final flourish that elevates the presentation and adds extra layers of freshness.
Garnish the baked tilapia fillets with fresh lemon slices, a sprinkle of red pepper flakes for a hint of heat, and a generous scattering of chopped fresh parsley. The vibrant green of the parsley and the bright yellow of the lemon slices create a visually appealing contrast against the white fish. Serve immediately and enjoy the delightful taste of this simple yet elegant dish.
Pro Tips for Garlic Butter Oven Baked Tilapia
Use Fresh Ingredients: For the best flavor and texture, always opt for fresh tilapia fillets and fresh garlic and lemon juice. The difference in taste is significant, and fresh ingredients are key to this recipe’s success.
Don’t Overcrowd the Pan: Ensure your tilapia fillets have a little space between them in the baking dish. This allows hot air to circulate, promoting even cooking and preventing the fish from steaming instead of baking, which leads to a better texture.
Adjust Baking Time: Oven temperatures can vary, so start checking your tilapia around the 10-minute mark. It’s better to undercook slightly and add a minute or two than to overcook, which can make the fish dry and less enjoyable. Look for that tell-tale flakiness with a fork.
Pat Fillets Dry: Before seasoning and saucing, gently pat your tilapia fillets dry with paper towels. Removing excess moisture helps the seasonings adhere better and allows the fish to achieve a more desirable texture during baking, rather than becoming waterlogged.
Infuse the Sauce: For an even deeper garlic flavor, you can gently warm the minced garlic in the melted butter for a minute before adding the lemon juice and zest. This slightly softens the garlic and releases more of its aromatic compounds into the butter.
Serving Suggestions for Garlic Butter Oven Baked Tilapia
Decoration
The visual appeal of your Garlic Butter Oven Baked Tilapia can be significantly enhanced with thoughtful garnishes. Thinly sliced lemon rounds, placed artfully around or on top of the fillets, not only look beautiful but also offer a fresh citrus aroma that complements the dish. A scattering of vibrant red pepper flakes adds a pop of color and hints at a subtle warmth, appealing to those who appreciate a touch of spice. Finally, a generous sprinkle of freshly chopped parsley provides a burst of green, adding a fresh, herbaceous counterpoint to the richness of the butter and garlic.
Side Dishes
To create a complete and satisfying meal, consider pairing your tilapia with dishes that offer textural contrast and complementary flavors. For a classic and comforting choice, consider serving it alongside creamy mashed potatoes or delicately seasoned roasted new potatoes. A simple side salad with a light vinaigrette offers a refreshing counterpoint, adding crisp greens and a touch of acidity to balance the richness of the fish. For a more integrated approach, explore options like steamed asparagus, sautéed green beans, or a medley of roasted seasonal vegetables, ensuring a wholesome and balanced plate.
Creative Serving Ideas
Elevate your presentation by serving the tilapia fillets over a bed of fluffy white rice or quinoa, allowing the flavorful garlic butter sauce to be absorbed by the grains. Consider making it a central component of a larger seafood platter, perhaps alongside grilled shrimp or baked salmon, for a truly impressive culinary display. For a lighter, more elegant option, arrange the fillets atop a fresh bed of mixed greens or spinach, creating a vibrant and healthy entree salad that is both visually appealing and delicious. This dish also lends itself beautifully to being incorporated into wraps or tacos, offering a versatile protein that adapts well to various culinary formats.
Preparation & Storage
Storing Leftovers
Should you be fortunate enough to have any leftover Garlic Butter Oven Baked Tilapia, proper storage is key to maintaining its quality. Allow the cooked fish to cool down to room temperature, which typically takes about an hour. Once cooled, carefully transfer the fillets into an airtight container. Ensuring the container is well-sealed will help prevent the fish from drying out and absorbing any unwanted odors from the refrigerator.
Store the container in the refrigerator for up to three days. While the texture might change slightly upon reheating, the flavor will remain quite good. It’s advisable to consume the leftovers within this timeframe for the best eating experience. Always ensure the refrigerator temperature is set appropriately to maintain food safety standards.
Freezing
If you wish to preserve your Garlic Butter Oven Baked Tilapia for a longer period, freezing is an excellent option. To begin, ensure the cooked fish has cooled completely. Place the individual fillets in a single layer on a baking sheet or a platter that fits inside your freezer. This initial freezing step, known as flash freezing, prevents the fillets from sticking together into a solid mass.
Once the fillets are frozen solid, which usually takes a couple of hours, transfer them into heavy-duty freezer bags. As you place them in the bags, press out as much air as possible before sealing them tightly. Removing excess air is crucial for preventing freezer burn, which can degrade the quality and texture of the fish. Properly frozen tilapia fillets can be stored for up to three weeks.
Reheating
When you’re ready to enjoy your previously stored tilapia, begin by thawing it if it was frozen. The best method for thawing is to place the frozen fillets in the refrigerator overnight. Once thawed, let the fish sit at room temperature for about 15-20 minutes while your oven preheats to 350°F (175°C). This allows the fish to come closer to room temperature, ensuring more even reheating.
Arrange the tilapia fillets in a clean baking dish. It’s recommended to cover the dish loosely with aluminum foil to help retain moisture during the reheating process. Place the covered dish into the preheated oven and bake for approximately 8 to 10 minutes, or until the fish is heated through. Keep in mind that the texture of the fish might be slightly less moist after it has been stored and reheated, but the flavor will still be delicious.
Frequently Asked Questions
-
Can I use frozen tilapia fillets for this recipe?
Yes, you absolutely can use frozen tilapia fillets, but it’s essential to thaw them properly first for the best results. The most recommended method is to transfer the frozen fillets from the freezer to the refrigerator and allow them to thaw gradually overnight. This slow thawing process helps maintain the integrity of the fish’s texture. Avoid thawing at room temperature, as this can encourage bacterial growth. Once thawed, pat the fillets dry with paper towels before proceeding with the recipe as usual, ensuring they are seasoned and coated evenly with the garlic butter sauce for optimal flavor infusion.
-
What is the best way to check if the tilapia is cooked through?
The most reliable way to determine if your tilapia is perfectly cooked is by using a fork to gently flake the thickest part of the fillet. If it flakes easily and the flesh is opaque white, it’s done. You can also use an instant-read thermometer inserted horizontally into the thickest part; the internal temperature should register at 145°F (63°C). Be mindful not to overcook, as tilapia is a delicate fish and can become dry if subjected to prolonged heat. Checking a few minutes before the suggested cook time can help prevent this common pitfall.
-
Can I add other vegetables to the baking dish with the tilapia?
Certainly, you can incorporate other vegetables into the baking dish for a complete one-pan meal! Delicate vegetables like asparagus spears, thinly sliced bell peppers, cherry tomatoes, or broccoli florets can be added during the last 10-12 minutes of baking, or even slightly earlier if they require more time. For heartier vegetables like potatoes or carrots, it’s best to pre-cook them slightly or cut them very thinly so they cook through in the same time as the fish. Ensure the vegetables are coated with a little oil and seasonings, and arrange them around the tilapia, not on top, to allow the fish to bake properly.