Easy Garlic Butter Oven Baked Tilapia – Quick & Delicious!
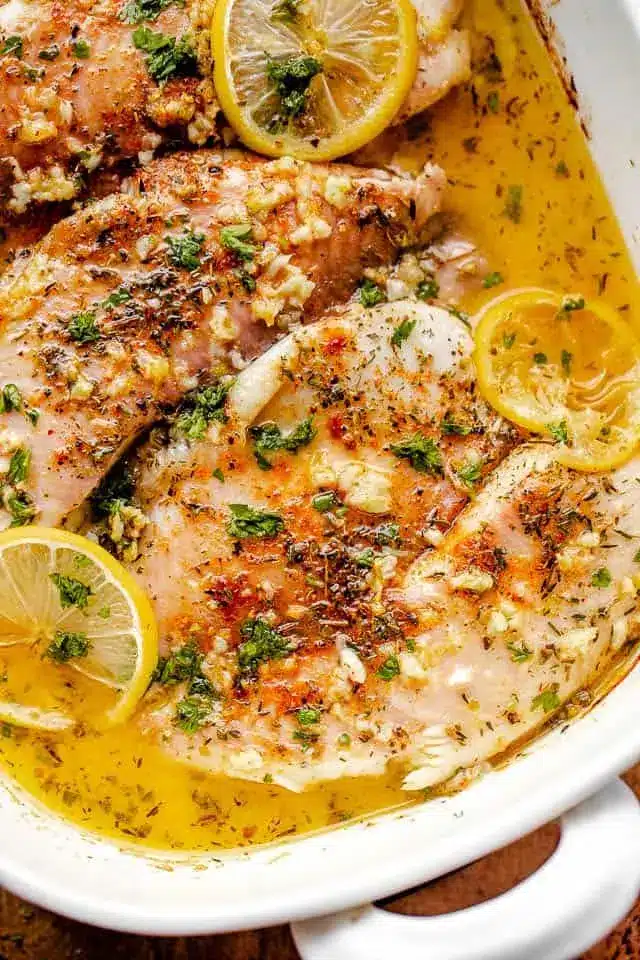
Embarking on a culinary journey that promises both simplicity and exquisite flavor is what this Garlic Butter Oven Baked Tilapia recipe is all about. It’s a dish designed for those who appreciate the beauty of fresh ingredients coming together in perfect harmony without demanding hours in the kitchen.
This particular preparation of tilapia elevates humble white fish into something truly special, coating it in a rich, aromatic garlic butter sauce infused with the bright zest and tang of fresh lemon. The result is a tender, flaky fish that practically melts in your mouth, offering a sophisticated yet incredibly accessible weeknight dinner option.
Why You Will Love This Recipe
- Effortless Elegance: This dish requires minimal hands-on time, allowing you to achieve a restaurant-quality meal with surprising ease. The oven does most of the work, transforming simple ingredients into a delightful experience.
- Healthy & Wholesome: Tilapia is a lean protein source, and this recipe keeps it light and nutritious by focusing on healthy fats from butter and vibrant flavors from lemon and garlic. It’s a fantastic choice for those following a balanced diet.
- Quick to Prepare: With a prep time of just a few minutes and a short baking time, you can have a delicious and satisfying dinner on the table in under 30 minutes, perfect for busy evenings.
- Flavorful & Satisfying: The combination of garlic, butter, and lemon creates a classic flavor profile that is universally loved, ensuring that even the pickiest eaters will enjoy this tender, flaky fish.
- Versatile Serving Options: This recipe pairs wonderfully with a wide array of side dishes, making it adaptable to any meal preference or occasion, from a light lunch to a more elaborate dinner.
Ingredients You Need
The success of any dish hinges on the quality of its components, and this Garlic Butter Oven Baked Tilapia is no exception. Opting for fresh, vibrant ingredients will truly enhance the final taste and texture of the fish. Using good quality butter, freshly minced garlic, and bright, aromatic lemon will make a significant difference in the overall flavor profile.
Garlic Butter Oven Baked Tilapia

Light, nutritious tilapia fillets seasoned with garlic, butter, and lemon, then baked to perfection. This simple and flavorful dish is ready in under 30 minutes.
- 4 tilapia fillets
- Salt and freshly ground black pepper, to taste
- 4 tablespoons butter, melted
- 4 cloves garlic, minced
- 2 tablespoons lemon juice
- 1 lemon, sliced into rounds, for garnish
- Red pepper flakes, for garnish
- Chopped fresh parsley, for garnish
- Lemon slices, for garnish
- 1Preheat oven to 400°F.
- 2Season tilapia with salt, pepper, paprika, thyme, and oregano; arrange fish in a 9x13 baking dish.
- 3In a mixing bowl, whisk together melted butter, garlic, lemon juice, and lemon zest; pour over tilapia.
- 4Bake tilapia for 10 to 12 minutes, or until fish flakes and is fork-tender.
- 5Garnish with pepper flakes, parsley, and lemon slices. Serve.
Keywords: tilapia, baked fish, garlic butter, lemon, easy dinner, seafood, gluten-free, keto
- tilapia fillets: ensure they are of good quality, either fresh or properly thawed if previously frozen.
- salt and freshly ground black pepper: essential for bringing out the natural flavors of the fish.
- paprika: adds a touch of color and a subtle, earthy warmth.
- dried thyme: contributes a classic herby note that complements seafood beautifully.
- dried oregano: provides another layer of aromatic depth to the seasoning blend.
- butter: unsalted is best for controlling the saltiness of the dish.
- garlic: fresh garlic cloves, finely minced or pressed, will provide the most potent flavor.
- lemon juice: freshly squeezed lemon juice offers a bright, tangy contrast to the richness of the butter.
- lemon zest: this adds an intense burst of lemon aroma and flavor without adding extra liquid.
- lemon slices: for garnish and to infuse a gentle lemon essence during baking.
- red pepper flakes: optional, for a hint of heat to awaken the palate.
- chopped fresh parsley: a vibrant green garnish that adds freshness and visual appeal.
The precise quantities for each ingredient are detailed within the accompanying recipe card, ensuring you have everything needed for a perfect bake.
Variations
While the classic Garlic Butter Oven Baked Tilapia is a triumph on its own, the beauty of this recipe lies in its adaptability, allowing for creative twists that cater to diverse dietary needs and flavor preferences.
Vegan Delight: To transform this into a delightful vegan dish, you can substitute the tilapia with thick slices of firm tofu or large portobello mushroom caps. The garlic butter sauce can be recreated using a generous amount of vegan butter, extra minced garlic, fresh lemon juice, and lemon zest, perhaps with the addition of nutritional yeast for a cheesy undertone. Consider adding a sprinkle of smoked paprika for a deeper flavor profile, mimicking the richness of baked fish.
Low-Carb & Keto-Friendly: This recipe is already wonderfully suited for low-carb and ketogenic diets, as tilapia is naturally low in carbohydrates. The primary adjustments would involve ensuring any accompaniments are also keto-friendly. Think about serving it with a vibrant cauliflower rice pilaf, a generous side of roasted asparagus, or a fresh, crisp green salad with an avocado-based dressing. The lemon and garlic flavors are perfectly aligned with the keto ethos.
Spicy Kick: For those who crave a little heat, amplifying the spice element is a fantastic way to add another dimension to the dish. Incorporate more red pepper flakes into the garlic butter sauce itself, perhaps even adding a pinch of cayenne pepper or a finely diced jalapeño pepper. This will infuse the entire dish with a pleasant warmth that can be adjusted to your personal spice tolerance, making each bite more exciting.
How to Prepare Garlic Butter Oven Baked Tilapia
Step 1: Preheat and Prepare the Pan
Begin by preheating your oven to a consistent 400 degrees Fahrenheit (200 degrees Celsius). This crucial first step ensures that the oven is at the optimal temperature when your seasoned fish is ready to go in, promoting even cooking and a beautiful texture. Selecting the right baking dish is also important; a standard 9×13 inch baking dish is ideal as it provides ample space for the tilapia fillets without overcrowding, allowing them to bake properly.
Make sure the baking dish is clean and readily accessible. Some chefs like to lightly grease the dish with a touch of olive oil or cooking spray to prevent any sticking, though the butter in the sauce often provides sufficient non-stick properties. However, an extra layer of protection never hurts, especially when you want the fish to slide out effortlessly for serving. This careful preparation sets the stage for a seamless cooking process.
The Right Temperature is Key: Maintaining this temperature throughout the baking process is vital for achieving perfectly cooked tilapia. Too low, and the fish might steam rather than bake, resulting in a mushy texture. Too high, and the edges could dry out before the center is cooked through. Therefore, trust your oven’s calibration and avoid the temptation to open the oven door too frequently during the initial stages of baking.
Step 2: Season the Tilapia Fillets
Take your tilapia fillets and pat them gently dry with paper towels. This step is often overlooked but is quite significant, as a drier surface helps the seasonings adhere better and promotes a more desirable sear or crispness on the exterior. Once dried, arrange the fillets in a single layer within your prepared 9×13 baking dish. Ensure they have a little space between them; this allows for even heat distribution around each piece of fish.
Now, it’s time to season. Sprinkle the tilapia generously with salt and freshly ground black pepper to taste, acting as the foundational flavor enhancers. Next, add the paprika, dried thyme, and dried oregano over the fillets. These herbs and spices will infuse the fish with their aromatic qualities as it bakes, creating a delicious crust. Ensure an even coating across all the fillets for consistent flavor in every bite.
Building Layers of Flavor: Think of this seasoning process as building the flavor profile from the inside out. The salt and pepper awaken the natural sweetness of the tilapia, while the herbs and paprika introduce complexity and warmth. This initial seasoning is what truly sets the stage for the rich garlic butter sauce that will follow, ensuring the fish itself is as flavorful as the coating.
Step 3: Prepare the Garlic Butter Sauce
In a separate mixing bowl, combine the melted butter. If your butter isn’t already melted, gently warm it in a small saucepan over low heat or briefly in the microwave until it’s liquid. To this melted butter, add the minced fresh garlic. Using fresh garlic is highly recommended for its potent flavor compared to garlic powder; it provides those delightful little pockets of intense garlic goodness.
Next, incorporate the fresh lemon juice and the finely grated lemon zest into the butter and garlic mixture. The lemon juice will add a crucial tangy brightness, cutting through the richness of the butter, while the zest provides a concentrated, aromatic lemon essence that permeates the entire sauce. Whisk these ingredients together vigorously until they are well combined into a luscious, emulsified sauce. This simple yet impactful sauce is the heart of the dish’s flavor.
The Magic of Emulsification: Whisking the lemon juice and zest into the melted butter helps to create a stable emulsion. This means the liquids and fats don’t separate as easily, resulting in a smoother, more cohesive sauce that coats the fish beautifully. It’s a little culinary science at work, turning simple ingredients into something truly special.
Step 4: Coat the Tilapia with Sauce
Once your garlic butter sauce is thoroughly mixed and ready, it’s time to generously coat the seasoned tilapia fillets. Carefully and evenly pour the prepared garlic butter sauce over the arranged tilapia fillets in the baking dish. Ensure that the sauce cascades over each fillet, making sure to get some of that delicious garlic and lemon mixture onto every surface, including the sides.
Use a spoon or a pastry brush to gently spread the sauce if necessary, making sure each piece of fish is well-covered. Don’t be shy with the sauce; it’s what will create that wonderfully moist and flavorful coating as the tilapia bakes. The butter will melt further and baste the fish, while the garlic and lemon will infuse deeply into the delicate flesh.
Basting for Flavor: As the fish bakes, the butter will naturally pool and bubble around the fillets. You can, if you wish, carefully spoon some of this pan sauce back over the fish halfway through the baking time to further enhance moisture and flavor. This extra basting step ensures the tilapia stays incredibly moist and absorbs the delicious garlic butter infusion completely.
Step 5: Bake Until Perfectly Flaky
Place the baking dish with the coated tilapia fillets into the preheated 400°F (200°C) oven. Bake for approximately 10 to 12 minutes. The exact baking time can vary depending on the thickness of your tilapia fillets and the accuracy of your oven. Keep a close eye on the fish, especially as it approaches the 10-minute mark.
The tilapia is done when it flakes easily with a fork inserted into the thickest part of a fillet. The flesh should appear opaque and moist, not dry or rubbery. If you have a food thermometer, the internal temperature should reach 145°F (63°C). Avoid overbaking, as this is the quickest way to dry out delicate fish like tilapia, diminishing its lovely tender texture.
Don’t Overbake!: This is the golden rule for cooking any fish. Tilapia cooks very quickly, and even a few extra minutes can make a significant difference. It’s better to check it a minute or two early and find it needs a tiny bit longer than to discover it’s overcooked. The goal is tender, moist fish that melts in your mouth.
Step 6: Garnish and Serve
Once the tilapia is perfectly baked and flakes beautifully, carefully remove the baking dish from the oven. Let it rest for just a minute or two before garnishing. This brief resting period allows the juices to redistribute, ensuring maximum tenderness and flavor when served.
Now for the final flourish! Garnish the baked tilapia with fresh lemon slices, a sprinkle of red pepper flakes if you desire a touch of heat, and a generous scattering of freshly chopped parsley. The vibrant green of the parsley and the bright yellow of the lemon slices add a beautiful visual appeal to the dish, making it as pleasing to the eye as it is to the palate. Serve immediately while hot.
The Finishing Touches Matter: Garnishes aren’t just for show; they contribute to the overall sensory experience of the meal. The fresh parsley adds a burst of herbaceous freshness, the red pepper flakes offer a subtle warmth, and the lemon slices can be squeezed over the fish at the table for an extra pop of acidity. These elements elevate the dish from simply cooked to a complete culinary presentation.
Pro Tips for Garlic Butter Oven Baked Tilapia
Freshness is Paramount: Always opt for the freshest tilapia fillets available. If using frozen, ensure they are completely thawed and patted thoroughly dry before seasoning. This step is crucial for achieving the best texture and allowing the flavors to penetrate the fish properly.
Don’t Skimp on the Garlic: The recipe calls for fresh garlic, and for good reason. Mince it as finely as possible or use a garlic press to release its full aromatic potential. The flavor of fresh garlic is far superior to garlic powder and makes a significant difference in the final sauce.
Control the Heat: While 400°F is a great starting point, be aware of your oven’s nuances. If your oven tends to run hot, you might want to reduce the temperature slightly or reduce the baking time by a minute or two. Always check for doneness by flaking with a fork.
Zest It Up: Don’t skip the lemon zest. While lemon juice provides acidity, the zest contains the flavorful oils of the lemon peel, offering a more intense and aromatic lemon essence that beautifully complements the garlic and butter.
Pat It Dry: Before seasoning and saucing, gently pat the tilapia fillets dry with paper towels. This removes excess surface moisture, which allows the seasonings to adhere better and promotes a more desirable texture during baking, preventing the fish from steaming.
Serving Suggestions for Garlic Butter Oven Baked Tilapia
Decoration
Elevate the visual appeal of your Garlic Butter Oven Baked Tilapia with simple yet effective garnishes. Thin slices of fresh lemon, artfully arranged around the fillets, not only add a pop of sunny color but also offer an optional burst of citrusy brightness at the table. A sprinkle of vibrant green, freshly chopped parsley or chives, provides a delightful contrast and a hint of herbaceous freshness. For those who enjoy a touch of heat, a light dusting of red pepper flakes adds visual intrigue and promises a subtle warmth to each bite.
Side Dishes
This delectable tilapia dish pairs exquisitely with a variety of accompaniments that complement its light yet flavorful profile. Consider serving it alongside fluffy swirled garlic herb and cheese bread; the savory bread is perfect for soaking up any leftover garlic butter sauce. A fresh, crisp green salad with a light vinaigrette offers a refreshing counterpoint to the richness of the fish and sauce. Roasted vegetables, such as asparagus, broccoli, or green beans, are also excellent choices, providing healthy fiber and complementing the overall meal.
For a heartier meal, consider pairing it with a side of creamy mashed potatoes or a light quinoa pilaf. These options add substance without overpowering the delicate flavor of the tilapia. Steamed rice, particularly jasmine or basmati, also serves as a wonderful base for the fish and sauce. The key is to select sides that enhance, rather than compete with, the star of the plate.
Creative Serving Ideas
Think beyond the traditional plate for a unique dining experience. Serve the baked tilapia fillets nestled on a bed of creamy Cajun chicken pasta for a delightful surf-and-turf inspired meal, where the mild tilapia beautifully balances the bold flavors of the pasta. Another creative approach is to flake the cooked tilapia and fold it into warm tortillas or lettuce wraps for delicious fish tacos, topping them with a zesty slaw and avocado crema. This turns a simple baked fish into an interactive and fun meal.
You could also present the tilapia as part of a larger seafood platter, alongside grilled shrimp or scallops, creating an impressive spread for guests. Alternatively, for a lighter yet satisfying lunch option, flake the tilapia and serve it over a vibrant bed of mixed greens, tossed with cherry tomatoes, cucumber, and a light lemon-herb dressing. This transforms the baked fish into a gourmet salad centerpiece. Sharing this no-bake mango truffles rezept for dessert would be an excellent way to complete a delightful meal.
Preparation & Storage
Storing Leftovers
Should you be fortunate enough to have any Garlic Butter Oven Baked Tilapia leftovers, proper storage is key to maintaining its quality. Allow the cooked fish to cool down to room temperature completely before attempting to store it. This prevents condensation from forming inside the storage container, which can lead to a mushier texture.
Once cooled, transfer the leftover tilapia fillets into an airtight container. Ensure the lid is sealed tightly to prevent air from entering and moisture from escaping. Store the container in the refrigerator. Properly stored, these delicious leftovers should remain fresh and safe to consume for up to three days. Avoid leaving them at room temperature for more than two hours, as this can promote bacterial growth.
Freezing
For longer-term storage, freezing is an excellent option. Begin by placing the cooled leftover tilapia fillets in a single layer on a baking sheet or a platter that fits in your freezer. This initial flash freeze helps to prevent the fillets from sticking together when they are eventually transferred to a freezer bag or container, preserving their individual shape and integrity.
Once the fillets are frozen solid, which typically takes a couple of hours, carefully transfer them into heavy-duty freezer bags or airtight freezer-safe containers. Before sealing the bags, gently press out as much air as possible. Removing excess air minimizes the risk of freezer burn, which can affect the texture and flavor of the fish. Properly packaged, your frozen tilapia should maintain good quality for up to three weeks.
Reheating
When you’re ready to enjoy your stored tilapia, first ensure it is fully thawed if it was frozen. You can do this by transferring it from the freezer to the refrigerator overnight. Once thawed, let the fish sit at room temperature for about 15-20 minutes while you preheat your oven to 350°F (175°C). This allows the fish to warm slightly before being subjected to oven heat, aiding in more even reheating.
Arrange the tilapia fillets in a clean baking dish. To help retain moisture, it’s a good idea to cover the dish loosely with aluminum foil. Place the covered dish in the preheated oven and bake for approximately 8 to 10 minutes, or until the fish is heated through. Be mindful not to overheat, as this can still lead to a drier texture compared to when it was freshly cooked. The goal is to gently warm the fish without overcooking it further.
Frequently Asked Questions
- Can I use frozen tilapia fillets for this recipe?
Yes, you absolutely can use frozen tilapia fillets, and in many cases, they are just as good as fresh. The key is to ensure they are properly thawed before you begin the preparation process. Thaw them gradually in the refrigerator overnight for the best results, and then make sure to pat them thoroughly dry with paper towels. Removing excess moisture is critical for the seasonings to adhere properly and for the fish to bake correctly rather than steam. If you’re in a hurry, you can also thaw them under cold running water, but be sure to pat them very dry afterwards. Once thawed and dried, proceed with the recipe as usual, and you will achieve a delicious result.
- What is the best way to tell if the tilapia is cooked through?
The most reliable method to determine if your tilapia is perfectly cooked is by checking its flakiness and internal temperature. Insert a fork into the thickest part of a fillet and gently twist. If the fish flakes apart easily into opaque, moist pieces, it’s ready. Avoid any signs of translucence, which indicate it needs more time. For ultimate precision, use an instant-read food thermometer inserted sideways into the thickest part of the fillet; it should register 145°F (63°C). Remember that tilapia cooks very quickly, and overcooking is the main culprit for dry fish, so it’s always better to check a minute or two earlier than later.
- Can I prepare this recipe with other types of white fish?
Certainly! While this recipe is specifically designed for tilapia, its flavor profile and cooking method are wonderfully adaptable to other types of mild white fish. Varieties like cod, haddock, sole, or even snapper would work beautifully. These fish share similar delicate textures and neutral flavors that will readily absorb the delicious garlic butter and lemon sauce. Keep in mind that cooking times might vary slightly depending on the thickness of the fillets. Thicker fish might require a minute or two longer in the oven, while thinner fillets may cook slightly faster. Always rely on the flaking test or a thermometer to ensure they are cooked through without becoming dry.