Funfetti Cookies – Colorful Cake Mix Cookies!
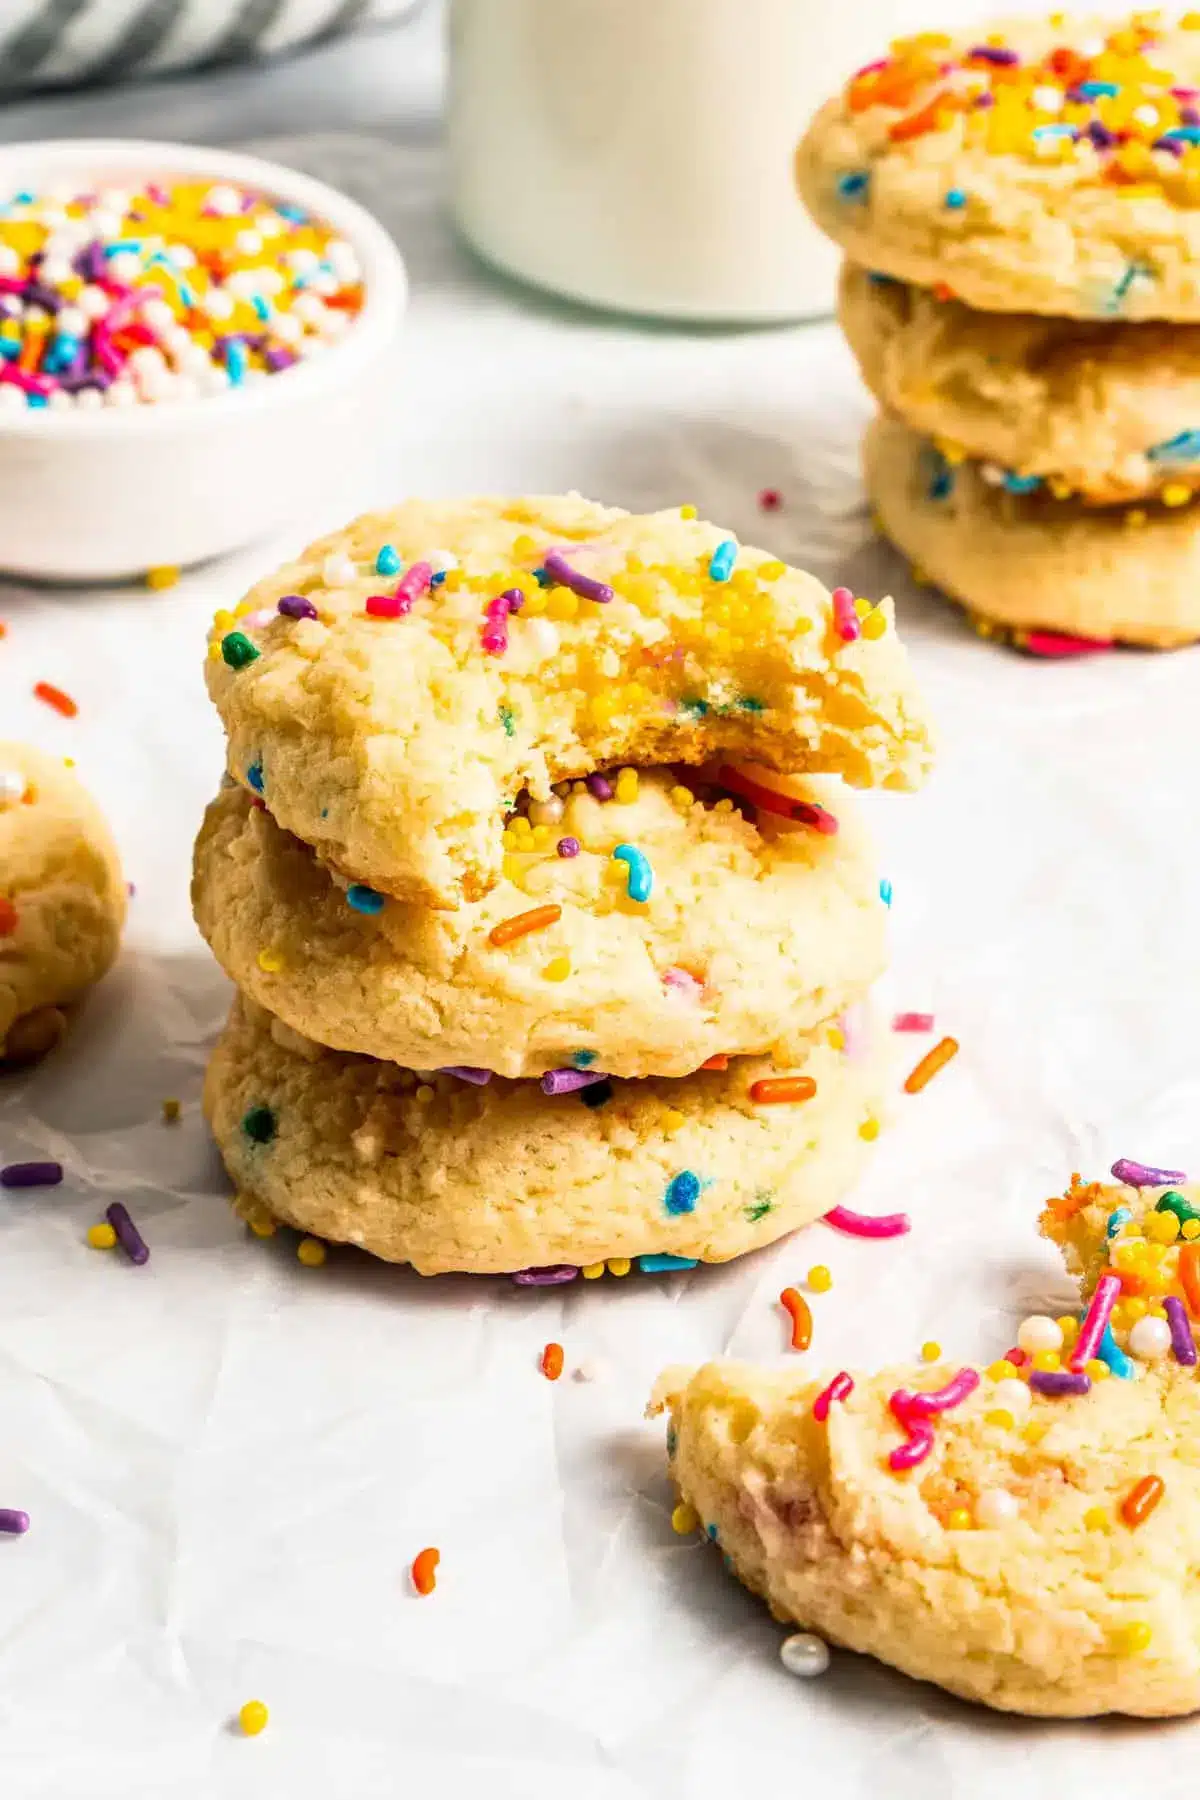
Get ready to experience a burst of pure joy with these delightful funfetti cookies! Inspired by the nostalgic charm of birthday cakes, these cookies are incredibly soft, wonderfully chewy, and absolutely packed with vibrant sprinkles that bring a smile to everyone’s face. They are the perfect treat for celebrations, a fun afternoon baking project with kids, or simply when you need a little bit of cheerful indulgence in your day.
What makes these funfetti cookies truly special is their incredible simplicity and the guarantee of authentic, beloved birthday cake flavor. Using a cake mix as the base means you get that signature taste with minimal effort, making them accessible for bakers of all skill levels. Prepare to fall in love with these cheerful, colorful, and utterly delicious cookies!
Why You Will Love This Recipe
- Effortless Preparation: These cookies come together with just five main ingredients, leveraging the convenience of a cake mix for maximum flavor and minimal fuss.
- Incredibly Soft Texture: Unlike traditional cookies that can sometimes be crisp, these funfetti delights boast a wonderfully tender, cake-like crumb that melts in your mouth.
- Authentic Birthday Cake Flavor: By using a funfetti cake mix, you capture the unmistakable taste of a classic birthday cake in every single bite.
- Visually Appealing: The abundance of colorful sprinkles creates a festive and eye-catching appearance, making them perfect for parties and special occasions.
- Kid-Friendly Fun: This recipe is straightforward enough for little helpers to get involved, and they’ll adore decorating their own cookies with extra sprinkles.
Ingredients You Need
The magic of these funfetti cookies lies in their simplicity, using a handful of pantry staples to achieve a spectacular result. We’re focusing on quality ingredients that ensure the best texture and taste. Using fresh baking powder is crucial for achieving that signature soft and fluffy rise, and room-temperature eggs integrate more smoothly into the dough for a cohesive texture. The type of sprinkles you choose can also impact the final look and flavor; opt for jimmies if you want to avoid color bleeding.
Funfetti Cookies

These funfetti cookies, made with a cake mix, are irresistibly soft and bursting with colorful sprinkles. All you need are 5 ingredients, and they’re packed with real birthday cake flavor.
- 15.25 ounce box of Pillsbury Funfetti Cake Mix
- 1 teaspoon baking powder
- 2 large eggs, at room temperature
- 1 teaspoon pure vanilla extract
- additional sprinkles, optional
- 1Preheat the oven to 350ºF. Line 2 baking sheets with parchment paper and set aside.
- 2In a large mixing bowl, whisk together the cake mix and baking powder; set aside.
- 3In a separate bowl, whisk together the eggs, oil, and vanilla until combined, and the mixture is pale yellow.
- 4Add the egg mixture to the cake-mix mixture; stir until thoroughly incorporated.
- 5Drop 1-inch rounded balls of dough, two inches apart, onto the baking sheets.
- 6Add a few sprinkles on top of each dough ball and press lightly so they do not roll off. Do not flatten the cookie dough balls.
- 7Bake the cookies for 9 minutes.
- 8Remove the Funfetti cookies from the oven and let them stand for 2 minutes on the baking sheet.
- 9Then, transfer the cookies to a wire rack and cool completely before serving.
Keywords: Funfetti Cookies, Cake Mix Cookies, Sprinkle Cookies, Easy Cookies, Kid-Friendly Cookies, Birthday Cookies
- funfetti cake mix: my favorite is Pillsbury, but you can use any brand you’d like for this easy funfetti cookies recipe.
- baking powder: this is an extra add-in to help the cookies bake up soft and fluffy; only use fresh baking powder, or the cookies won’t rise properly.
- large eggs: use room temperature eggs for best results.
- canola oil: any neutral-flavored vegetable oil will work to make tender and moist cookies.
- pure vanilla extract: this is the only instance where I’d recommend substituting vanilla extract with artificial vanilla flavoring if you have it; artificial vanilla tastes just like a traditional birthday cake! You could also use vanilla and a small amount of almond extract in this recipe.
- additional sprinkles: optional, but highly recommended for extra festive flair.
The exact quantities for these ingredients are conveniently listed in the recipe card above, ensuring you have everything you need for perfect results.
Variations
While these classic funfetti cookies are an absolute delight as they are, their adaptable nature opens up a world of creative possibilities. You can easily tailor them to suit different dietary needs or flavor preferences, ensuring everyone can enjoy a taste of this fun treat.
For a delicious vegan twist, simply substitute the eggs with a flax egg (1 tablespoon flaxseed meal mixed with 3 tablespoons water, let sit for 5 minutes) and ensure your cake mix and sprinkles are also vegan-friendly. Many brands offer vegan cake mixes, so check the labels carefully for a truly plant-based indulgence that doesn’t compromise on flavor or texture. This substitution works wonderfully in creating that same soft chewiness.
If you’re looking for a low-carb option, you can experiment with almond flour or coconut flour instead of the cake mix, though this will significantly alter the texture and require careful adjustments to liquid and binding agents. You might also consider using a sugar-free funfetti-style cake mix if available, alongside a sugar substitute. This would involve more experimentation to get the texture just right, but the resulting cookie could still capture the spirit of funfetti.
You can also infuse these cookies with additional flavors by adding a teaspoon of lemon zest for a bright, zesty counterpoint to the sweetness, or a pinch of cinnamon for a warmer, more complex profile. Consider a touch of almond extract alongside the vanilla for a marzipan-like depth that complements the celebratory nature of funfetti. These additions can elevate the cookies from simple to sophisticated.
How to Prepare funfetti cookies
Step 1: Prepare Your Baking Station
Before you even think about mixing ingredients, it’s essential to set up your workspace for optimal baking efficiency. This initial step ensures a smooth flow throughout the entire process, minimizing any potential for ingredients to sit out too long or for your oven to be at the wrong temperature.
Preheat your oven to the specified temperature of 350°F (175°C). This is a crucial step as it ensures the oven is at the correct, stable temperature when your cookies go in, promoting even baking from the start. An accurately preheated oven is the foundation of perfectly baked cookies, preventing them from spreading too much or baking unevenly.
Line two standard baking sheets with parchment paper. Parchment paper is your best friend here; it prevents the cookies from sticking, makes cleanup an absolute breeze, and helps ensure the bottoms of the cookies don’t brown too quickly. Having two sheets ready means you can bake in batches without delay once your dough is ready.
Step 2: Combine the Dry Ingredients
In a large mixing bowl, you will combine the dry components that form the backbone of your cookie dough. This step ensures that the leavening agent is evenly distributed, which is vital for the cookies’ rise and texture. A well-combined dry mixture leads to a more consistent final product.
Whisk together the 15.25-ounce box of funfetti cake mix and 1 teaspoon of baking powder. Whisking is more effective than stirring for aerating the mixture and breaking up any clumps that might be present in the cake mix or baking powder. This thorough incorporation is key to achieving that signature soft and fluffy texture that makes these cookies so beloved.
Once thoroughly combined, set this bowl of dry ingredients aside. It will be ready to welcome the wet ingredients in the next step, forming the delicious dough for your funfetti cookies. Keep it covered lightly if you’re not immediately proceeding, but usually, this step flows directly into the next.
Step 3: Combine the Wet Ingredients
Now, it’s time to bring together the wet ingredients in a separate bowl. This creates a flavorful and moist base that will bind the dry ingredients and contribute significantly to the cookies’ tender texture. Using room-temperature eggs is a pro tip that ensures they emulsify smoothly with the oil and vanilla, preventing a greasy or separated dough.
In this separate bowl, whisk together the 2 large eggs (ensure they are at room temperature), the ⅓ cup of canola oil, and the 1 teaspoon of pure vanilla extract. Continue whisking until the mixture is well combined and takes on a pale yellow hue. The emulsification process here is important for creating a smooth, uniform dough that bakes evenly and results in a tender cookie.
This pale yellow color indicates that the eggs and oil have properly combined, creating a base that will enrich the cake mix and add moisture. Take your time with this step to ensure all components are thoroughly integrated, setting the stage for a perfect dough consistency.
Step 4: Form the Cookie Dough
With both your dry and wet ingredients prepared, the next critical step is to bring them together to form the cohesive cookie dough. This is where the magic truly begins to happen, transforming separate components into a delightful batter ready for baking. Proper integration here is key to avoiding a tough or crumbly cookie.
Gradually add the egg mixture to the cake-mix mixture. Stir or mix until the ingredients are thoroughly incorporated and a soft, slightly sticky dough forms. It’s important not to overmix at this stage; stop as soon as you no longer see streaks of dry cake mix. Overmixing can develop the gluten too much, leading to tougher cookies.
The consistency should be thick but pliable, similar to playdough. If the dough seems excessively sticky, you can add a tiny bit more cake mix, about a tablespoon at a time, until it’s more manageable. Conversely, if it seems too dry, a teaspoon of milk or water can help, though this is rarely necessary with this recipe.
Step 5: Shape and Decorate the Cookies
Now that you have your beautiful funfetti dough, it’s time to shape the cookies and add those signature bursts of color. This step is where the visual appeal of your funfetti cookies truly comes to life. The way you shape them will directly influence their final appearance and texture.
Using a cookie scoop (a small to medium size is ideal for uniformity) or two tablespoons, drop rounded 1-inch balls of dough onto your prepared baking sheets. Ensure you leave at least 2 inches of space between each dough ball. This is critical because the cookies will spread as they bake, and you don’t want them to run into each other, creating one large cookie mass.
This recipe specifically mentions not to flatten the cookie dough balls. This is a key technique to achieve a soft, thick, and slightly domed cookie. The dough will spread naturally during baking. For an extra pop of fun, gently press a few additional sprinkles onto the tops of each dough ball. This ensures that the vibrant sprinkles are prominently featured on the surface of your baked cookies, making them irresistible.
Step 6: Bake and Cool the Cookies
The final stages involve baking the cookies to perfection and then allowing them to cool properly, which is just as important as the mixing and shaping. Patience during this phase is rewarded with perfectly textured, soft funfetti cookies.
Bake the cookies in your preheated oven at 350°F (175°C) for approximately 9 minutes. It’s crucial to keep an eye on them during this time, as oven temperatures can vary. The goal is to bake them until they are just set in the center and the edges are lightly golden; they should not be deeply browned.
Once baked, remove the cookies from the oven and let them stand on the baking sheet for 2 minutes. This brief resting period allows them to firm up slightly on the bottom, preventing them from falling apart when you move them. Afterward, carefully transfer the cookies to a wire rack to cool completely. Cooling on a wire rack allows air to circulate around them, preventing the bottoms from becoming soggy and ensuring they reach their ultimate soft and chewy texture.
Pro Tips for funfetti cookies
Room Temperature Ingredients: Always ensure your eggs are at room temperature before you start. This allows them to emulsify more effectively with the fats and liquids in the dough, resulting in a smoother, more uniform batter and ultimately, a better cookie texture. Cold eggs can cause the fat to seize, leading to a less cohesive dough.
Don’t Overmix the Dough: Mix the wet and dry ingredients until they are just combined. Overmixing can develop the gluten in the cake mix, leading to tough, chewy cookies instead of the desired soft and tender ones. Stop as soon as you no longer see dry streaks.
Use a Cookie Scoop: For consistently sized cookies, a cookie scoop is invaluable. Even portions ensure that all the cookies bake at the same rate, preventing some from being undercooked while others are overbaked. If you don’t have a scoop, a tablespoon is a decent substitute.
Watch the Baking Time Closely: The 9-minute baking time is a guideline. Ovens vary, so watch for visual cues. The edges should be lightly golden, and the centers should look set but still slightly soft. They will continue to cook a bit on the hot baking sheet after removal.
Cool Completely: Resist the urge to eat them hot off the press! Allowing the cookies to cool completely on a wire rack is essential for achieving their final soft and chewy texture. They firm up as they cool, and this process is critical for their perfect consistency.
Serving Suggestions for funfetti cookies
Decoration
The inherent beauty of funfetti cookies lies in their cheerful sprinkle-filled appearance. You can enhance this by adding even more sprinkles before baking for a dazzling effect. Consider using a mix of sprinkle types – rods (jimmies), nonpareils, and even edible glitter – for a textured and multi-dimensional look. For special occasions, use colored sprinkles that match a theme, such as red and pink for Valentine’s Day or pastel colors for Easter.
Side Dishes
These cookies pair wonderfully with a tall glass of cold milk, a classic combination that enhances their sweetness and soft texture. For a more sophisticated pairing, consider a scoop of vanilla bean ice cream, creating a delightful ice cream sandwich. Coffee or a warm cup of tea also provides a comforting contrast to the sweetness of the cookies.
Creative Serving Ideas
Elevate your funfetti cookies by transforming them into a stunning dessert platter. Arrange them artfully with other desserts like brownies or cupcakes for a festive spread. You can also crush them and use them as a topping for ice cream sundaes or as a decorative element on larger cakes. For a playful presentation, stack them high on a tiered stand or serve them in colorful goodie bags for party favors.
Preparation & Storage
Storing Leftovers
To keep your delicious funfetti cookies fresh and soft, store them in an airtight container at room temperature. It’s a good practice to place a layer of parchment paper between batches of cookies to prevent them from sticking together, especially if they are still slightly warm when stored. Properly stored, these cookies typically remain delightful for up to 2-3 days.
Freezing
Funfetti cookies freeze exceptionally well, making them a great make-ahead treat. You can freeze baked and fully cooled cookies for up to 3 months. Ensure they are stored in a freezer-safe airtight container or a heavy-duty zip-top bag, pressing out as much air as possible to prevent freezer burn. This is an excellent way to have homemade cookies ready whenever a craving strikes.
Reheating
If you’re reheating frozen cookies, it’s best to thaw them gradually. Place the frozen cookies in the refrigerator overnight to allow them to come back to room temperature slowly. For a slightly warmed, soft cookie, you can briefly microwave them for about 5-10 seconds. Be very careful not to overheat, as this can make them tough or melt the sprinkles excessively.
Frequently Asked Questions
-
Can I use a different type of cake mix for these funfetti cookies?
While the recipe is specifically designed for funfetti cake mix to achieve that authentic birthday cake flavor and visual appeal, you can experiment with other flavors of cake mix. For instance, using a vanilla cake mix and adding your own sprinkles will yield a similar result, though the “funfetti” speckles will be less inherently built-in. Yellow cake mix is another good alternative. Be aware that using a drastically different flavor, like chocolate or red velvet, will change the overall taste profile of the cookies considerably and may require minor adjustments to other ingredients to maintain balance.
-
Why are my funfetti cookies spreading too much or not spreading enough?
Several factors can influence how your funfetti cookies spread. If they are spreading too much, it could be due to the dough being too warm when baked, the oven temperature being too low, or using too much liquid or fat in the recipe. Ensuring your ingredients are measured accurately and that the dough is chilled slightly before baking can help. Conversely, if your cookies are not spreading enough, the oven temperature might be too high, the dough might be too cold or too dry, or you might have overmixed the dough, leading to a tougher structure that resists spreading. Using room temperature ingredients as specified and not overmixing are key to achieving the perfect spread.
-
How can I make my funfetti cookies softer and chewier for longer?
To achieve and maintain a soft and chewy texture in your funfetti cookies, a few techniques are essential. First, do not overbake them; pulling them out of the oven when the edges are just set and the centers still look slightly soft is crucial. They will continue to bake on the hot cookie sheet for a few minutes after removal, finishing the cooking process. Using oil instead of butter in the dough also contributes to a softer texture, as oil remains liquid at room temperature. Incorporating ingredients like a touch of cornstarch or using brown sugar (if you were to adapt a traditional recipe) can also enhance chewiness, although this cake-mix-based recipe already does a fantastic job by its nature. Storing them correctly in an airtight container also prevents them from drying out.