Funfetti Cookies – Colorful Cake Mix Cookies!
Get ready to unleash your inner child with these incredibly easy and undeniably delicious Funfetti Cookies! These vibrant treats are a celebration in every bite, bursting with the classic flavors of birthday cake and a kaleidoscope of colorful sprinkles.
Perfect for birthdays, holidays, or just a Tuesday afternoon pick-me-up, these cookies are designed for maximum joy with minimal effort. They’re so straightforward, even the littlest bakers can get involved, making them a fantastic activity for the whole family.
Why You Will Love This Recipe
- Effortless Preparation: Utilizing a cake mix as the base means you bypass complex ingredient measurements and steps, getting you to delicious cookies faster.
- Authentic Birthday Flavor: The use of Funfetti cake mix ensures that these cookies deliver that unmistakable, nostalgic taste of a classic birthday cake.
- Incredibly Soft Texture: These cookies boast a wonderfully tender and fluffy interior that practically melts in your mouth, a testament to the careful balance of ingredients.
- Visually Appealing: The colorful sprinkles embedded in each cookie make them a feast for the eyes, instantly brightening any occasion or dessert table.
- Kid-Approved Fun: These cookies are a guaranteed hit with children, offering a fun and engaging baking experience and a delightful treat they’ll adore.
Ingredients You Need
The beauty of these Funfetti Cookies lies in their simplicity, relying on pantry staples and the magic of a cake mix. For the best results, ensure your ingredients are fresh and, where specified, at room temperature, as this promotes better emulsification and a more consistent cookie texture. Using high-quality ingredients will undoubtedly elevate the final flavor and mouthfeel of your cookies, transforming them from good to absolutely spectacular.
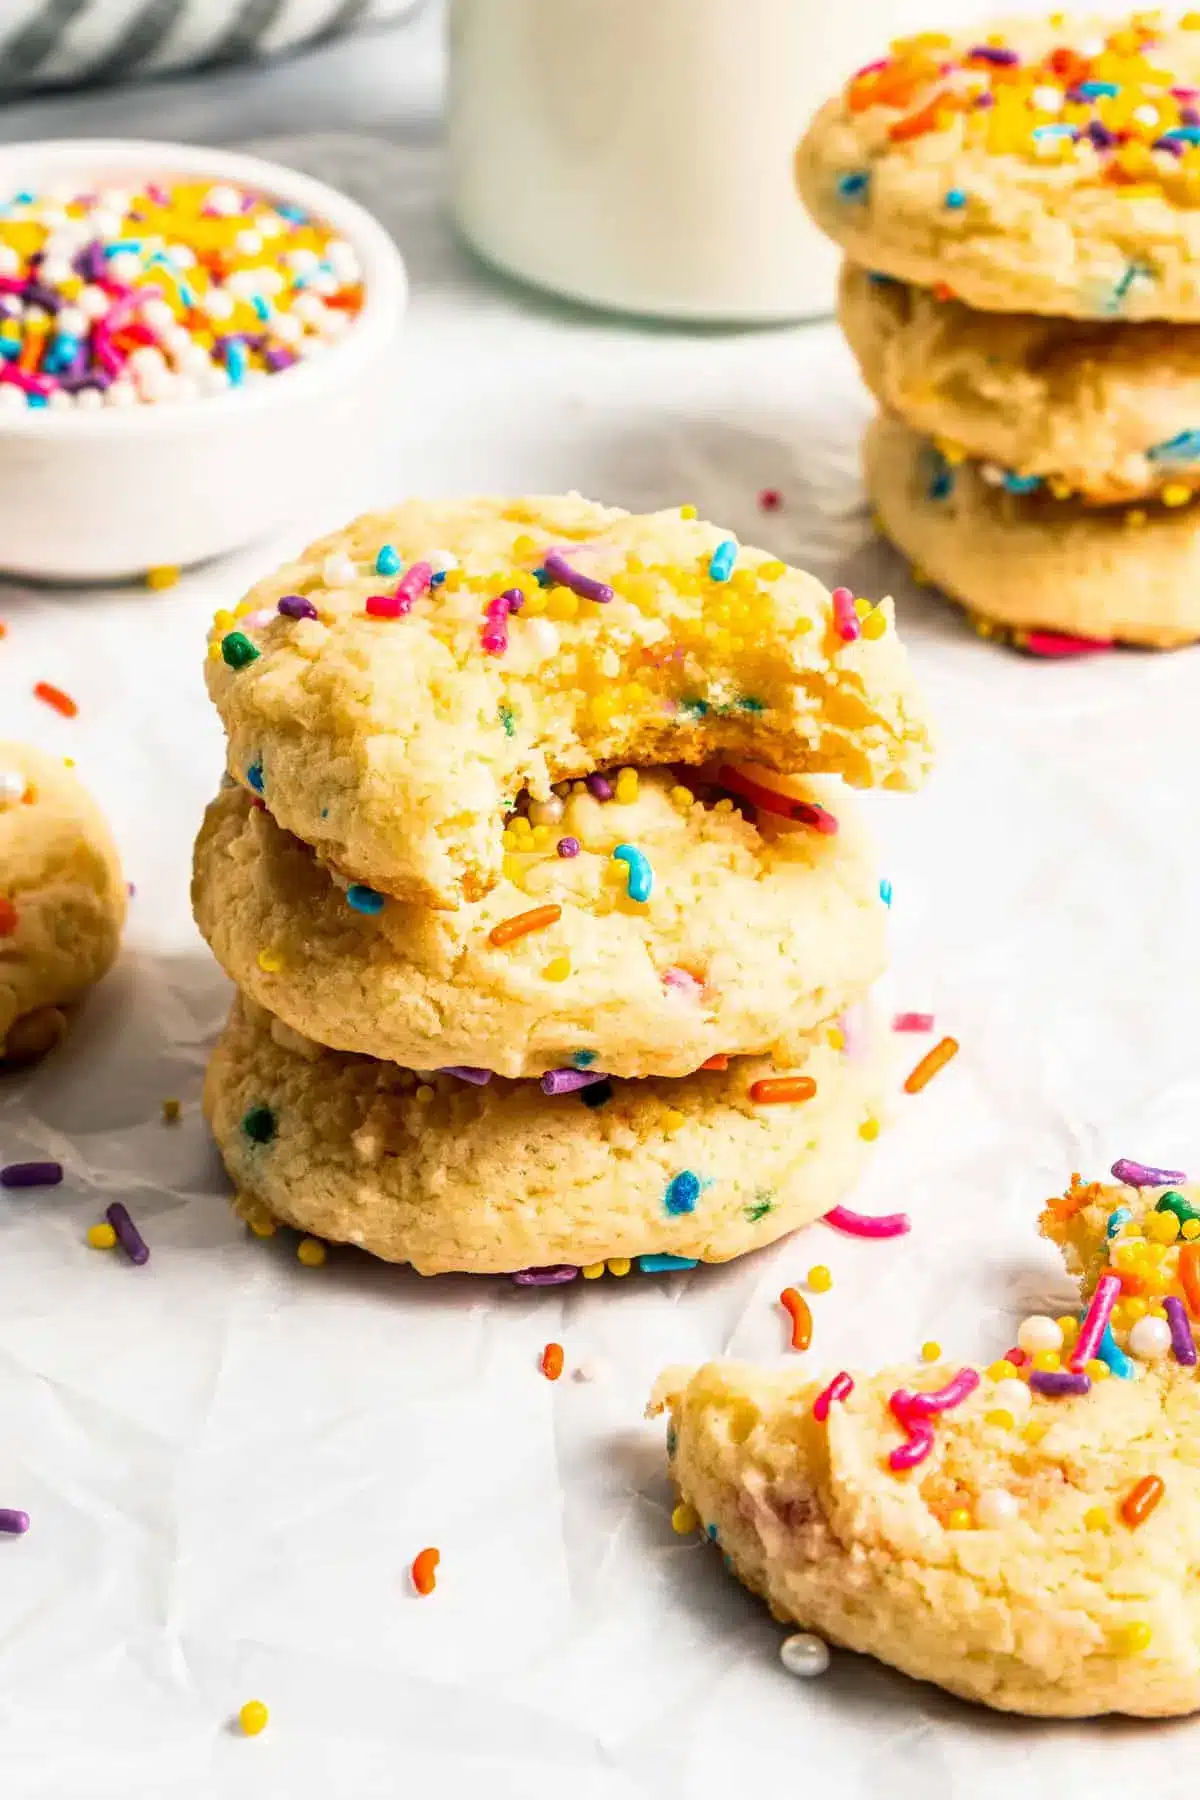
Funfetti Cookies

Irresistibly soft and bursting with colorful sprinkles, these funfetti cookies are made with just 5 ingredients from a cake mix and packed with real birthday cake flavor.
- 15.25 ounce box of Pillsbury Funfetti Cake Mix
- 1 teaspoon baking powder
- 2 large eggs, at room temperature
- 1 teaspoon pure vanilla extract
- additional sprinkles, optional
- 1Preheat the oven to 350ºF. Line 2 baking sheets with parchment paper and set aside.
- 2In a large mixing bowl, whisk together the cake mix and baking powder; set aside.
- 3In a separate bowl, whisk together the eggs, oil, and vanilla until combined, and the mixture is pale yellow.
- 4Add the egg mixture to the cake-mix mixture; stir until thoroughly incorporated.
- 5Drop 1-inch rounded balls of dough, two inches apart, onto the baking sheets. Add a few sprinkles on top of each dough ball and press lightly so they do not roll off. Do not flatten the cookie dough balls.
- 6Bake the cookies for 9 minutes.
- 7Remove the Funfetti cookies from the oven and let them stand for 2 minutes on the baking sheet. Then, transfer the cookies to a wire rack and cool completely before serving.
Keywords: Funfetti, Cookies, Cake Mix, Sprinkles, Easy, Dessert, Baking, Kid-friendly, Birthday
- funfetti cake mix: the star ingredient, providing the base flavor and color.
- baking powder: a leavening agent that helps the cookies achieve their signature fluffy texture.
- large eggs: bind the ingredients together and contribute to the cookie’s structure and richness.
- canola oil: ensures a moist and tender crumb, adding a smooth mouthfeel to each cookie.
- pure vanilla extract: enhances the overall sweetness and adds a warm, comforting aroma.
- additional sprinkles: optional, but highly recommended for an extra pop of color and festive flair.
Detailed quantities for each ingredient are readily available within the accompanying recipe card for your convenience.
Variations
While the classic Funfetti cookie is a masterpiece on its own, there’s always room for a little culinary creativity. These simple variations can transform your beloved cookies into something entirely new, catering to different dietary needs or flavor preferences.
For a delightful vegan twist, you can easily adapt this recipe. Begin by substituting the eggs with a flax egg (one tablespoon of ground flaxseed mixed with three tablespoons of water, left to sit for five minutes) or a commercial egg replacer. Ensure your chosen cake mix is also vegan-friendly, as some contain animal-derived ingredients; many brands offer vegan options or you can use a plain yellow cake mix and add your own sprinkles. The canola oil and baking powder will likely remain the same, but always double-check ingredient labels for peace of mind. The result is a wonderfully chewy and flavorful vegan cookie that everyone can enjoy.
If you’re mindful of carbohydrates, a low-carb version is achievable with a few smart swaps. Opt for a sugar-free Funfetti or vanilla cake mix designed for low-carb baking; these are often made with almond flour or coconut flour. You’ll need to replace the oil with a neutral-flavored low-carb oil like avocado oil or melted coconut oil. Instead of traditional sugar-based sprinkles, seek out sugar-free sprinkle options, which are becoming increasingly available. The baking powder and eggs will likely remain the same. This adaptation allows you to indulge in the festive spirit of Funfetti without derailing your dietary goals.
You can also infuse these cookies with other complementary flavors to create unique taste profiles. Consider adding a teaspoon of lemon zest to the dough for a bright, zesty kick that pairs wonderfully with the sweet cake flavor. Alternatively, a hint of almond extract, used alongside or in place of some of the vanilla, can add a sophisticated depth. For an extra decadent touch, gently fold in some white chocolate chips or chopped macadamia nuts just before baking; these additions create delightful pockets of creamy sweetness or a pleasant crunch.
How to Prepare funfetti cookies
Step 1: Preheating and Pan Preparation
The initial step in crafting these delightful Funfetti Cookies involves preparing your oven and baking sheets. It’s crucial to preheat your oven to the specified temperature of 350°F (175°C) well in advance. This ensures that when the cookies go into the oven, the temperature is stable and consistent, leading to even baking and optimal texture. Allowing the oven to fully preheat is a fundamental aspect of successful baking, preventing any temperature fluctuations that could compromise the final product.
Simultaneously, you need to prepare your baking sheets. Line two standard-sized baking sheets with parchment paper. Parchment paper is invaluable for preventing cookies from sticking and making cleanup a breeze. It also helps to promote more even browning on the bottom of the cookies by creating a slight barrier between the dough and the metal of the baking sheet. Ensure the parchment paper lies flat and covers the entire surface of the baking sheets to provide ample space for the cookies.
Having your oven preheated and baking sheets lined before you even start mixing the dough ensures a smooth and efficient workflow. This preparation is key to avoiding any rushed steps, which can often lead to baking errors. It sets the stage for a stress-free baking experience, allowing you to focus on the dough itself and the subsequent steps with confidence.
Step 2: Combining Dry Ingredients
The next phase involves bringing together the primary dry components of your Funfetti Cookie dough. In a generously sized mixing bowl, you will combine the Funfetti cake mix and the baking powder. Use a whisk to thoroughly blend these two ingredients together.
Whisking ensures that the baking powder is evenly distributed throughout the cake mix. This even distribution is vital for the leavening process; if the baking powder is clumped, some cookies might not rise as much as others, resulting in an inconsistent texture. The goal is to create a homogenous mixture where every speck of cake mix is infused with the leavening power of the baking powder.
Once thoroughly whisked, set this bowl of dry ingredients aside. This prepared dry mixture will be ready to greet the wet ingredients in the subsequent step. This organized approach to combining ingredients ensures that each component plays its role effectively, leading to the perfect Funfetti cookie.
Step 3: Mixing Wet Ingredients and Combining with Dry
Now, it’s time to introduce the wet ingredients into the equation. In a separate mixing bowl, whisk together the large eggs, canola oil, and pure vanilla extract. Continue whisking until the mixture becomes uniformly pale yellow and appears well-emulsified.
Achieving this pale yellow color indicates that the egg yolks and whites have been thoroughly incorporated with the oil and vanilla. This emulsification is key to creating a smooth, cohesive dough. Using room temperature eggs, as recommended, will help them blend more readily with the oil, preventing any greasiness or separation in the final dough mixture.
Once the wet ingredients are perfectly combined, it’s time to unite them with the dry mixture. Gradually add the wet ingredients into the bowl containing the cake mix and baking powder. Stir everything together until just combined and a cohesive dough forms. Be careful not to overmix at this stage, as overworking the dough can lead to tough cookies. A few streaks of cake mix are acceptable; the dough should be thick and slightly sticky.
Step 4: Shaping the Cookies
With the dough ready, the next step is to shape the cookies for baking. Using a small to medium cookie scoop (about 1-inch in diameter) is the most effective way to ensure uniformly sized cookies. This consistency in size is critical for even baking, as smaller cookies will bake faster than larger ones.
If you don’t have a cookie scoop, a tablespoon can be used as a substitute, aiming for rounded, tablespoon-sized portions of dough. Alternatively, you can use your hands to roll the dough into neat balls. The goal is to create compact, 1-inch rounded balls of dough.
Place these dough balls onto the prepared baking sheets, ensuring they are spaced at least two inches apart. This spacing is important because the cookies will spread slightly as they bake. Adequate space prevents them from merging into one large cookie sheet mass. Do not flatten the cookie dough balls; they should retain their rounded shape. This will help them bake up into the desired soft, slightly domed cookie.
Step 5: Adding Sprinkles and Baking
Before these delightful dough balls head into the oven, it’s time for the “funfetti” magic to truly shine. Gently press a few additional sprinkles onto the top of each cookie dough ball. This can be done with your fingertips or by lightly shaking them over the dough. The goal is to adhere them to the surface so they don’t all fall off during baking.
A light press is sufficient to embed the sprinkles into the dough, ensuring they stay put and create that signature festive look. Avoid pressing too hard, as this could flatten the dough ball prematurely and affect the cookie’s final shape and texture. The visual appeal of the sprinkles is a key characteristic of these cookies, so take a moment to make them look extra festive.
Once adorned with sprinkles, it’s time to bake. Place the baking sheets into the preheated oven at 350°F (175°C). Bake the cookies for exactly 9 minutes. This precise baking time is crucial for achieving that signature soft and chewy texture. Overbaking will result in dry, hard cookies, so keep a close eye on them during the final minutes.
Step 6: Cooling the Cookies
As soon as the 9 minutes are up, carefully remove the baking sheets from the oven. The cookies will appear slightly underbaked in the center, which is exactly what you want for a soft texture. Allow the cookies to stand on the hot baking sheet for an additional 2 minutes.
This brief resting period on the baking sheet is important. It allows the cookies to set up just enough so they don’t completely fall apart when you move them. The residual heat from the baking sheet will continue to cook them slightly, achieving that perfect balance of chewy interior and set edges.
After the 2-minute rest, carefully transfer the Funfetti cookies from the baking sheet to a wire cooling rack. Use a spatula to gently lift each cookie to avoid breaking them. Let the cookies cool completely on the wire rack. Cooling on a rack allows air to circulate around the cookies, preventing the bottoms from becoming soggy and ensuring they cool evenly. Once fully cooled, they are ready to be enjoyed or decorated further.
Pro Tips for funfetti cookies
Use Room Temperature Ingredients: For the creamiest, most cohesive dough, ensure your eggs are at room temperature. This helps them emulsify beautifully with the oil and other wet ingredients, leading to a smoother batter and ultimately, a tenderer cookie. Chilled ingredients can lead to a greasier dough and less uniform texture.
Don’t Overmix the Dough: Once you combine the wet and dry ingredients, mix only until the dough just comes together. Overmixing can develop the gluten in the cake mix too much, resulting in tough, dense cookies rather than the desired soft and chewy texture. A few streaks of dry ingredients are perfectly fine.
Invest in a Cookie Scoop: Using a cookie scoop is the secret to perfectly uniform cookies. This ensures that each cookie bakes at the same rate, preventing some from being overcooked while others are undercooked. It also gives your finished cookies a professional, consistent appearance.
Watch the Bake Time Closely: The 9-minute bake time is a guideline; oven temperatures can vary. The cookies should look set around the edges but still slightly soft in the center when you remove them. They will continue to cook slightly on the hot baking sheet, achieving that perfect chewy consistency.
Sprinkle Smarts: When adding extra sprinkles, opt for jimmies (rod-shaped sprinkles) or nonpareils that are less likely to bleed their color into the dough during baking. This keeps the colors vibrant and distinct, enhancing the visual appeal of your Funfetti cookies and maintaining the pristine white of the cookie itself.
Serving Suggestions for funfetti cookies
Decoration
While these cookies are delightful as is, a touch of extra decoration can elevate them for any special occasion. A simple dusting of powdered sugar can add a touch of elegance, mimicking a light snowfall on a bright cookie. You can also pipe a thin layer of white or colored royal icing onto the cookies, either in a simple swirl or a more intricate pattern. Consider using edible glitter or edible shimmer dust for an extra sparkle that catches the light beautifully, making them truly stand out on a dessert table.
Side Dishes
Funfetti cookies pair wonderfully with a variety of beverages and simple accompaniments. A tall glass of cold milk is a classic pairing, evoking childhood nostalgia and perfectly complementing the sweet, cake-like flavor. For a more adult-friendly option, a creamy vanilla latte or a hot chocolate offers a comforting warmth that harmonizes with the cookie’s sweetness. If serving these at a party, consider a small bowl of fresh berries, like strawberries or raspberries, on the side, providing a refreshing tartness that balances the richness of the cookies.
Creative Serving Ideas
Transform these cookies into a show-stopping dessert by stacking them to create a “cookie cake.” Use a simple buttercream frosting to hold the layers together and frost the outside for a festive cake-like appearance. Another fun idea is to serve them as part of a “build-your-own-sundae” bar, where guests can crumble the cookies over ice cream or use them as a base for mini parfaits. For a whimsical touch, arrange them on a colorful platter with other dessert items, perhaps themed for a specific holiday or celebration, making them the vibrant centerpiece of your sweet spread.
Preparation & Storage
Storing Leftovers
To keep your delicious Funfetti cookies fresh and delightful for as long as possible, proper storage is key. Once completely cooled, store them in an airtight container at room temperature. Placing a piece of parchment paper between layers of cookies can prevent them from sticking together, especially if they have any frosting or extra toppings.
At room temperature, these cookies typically maintain their best quality for about 2 to 3 days. After this point, they may begin to lose some of their tender texture and become slightly drier. However, they are still perfectly edible and enjoyable for a few extra days, especially when paired with a drink.
Avoid storing them in direct sunlight or near heat sources, as this can cause them to stale more quickly. An airtight container in a cool, dry pantry or cupboard is the ideal location for everyday storage.
Freezing
Funfetti cookies freeze exceptionally well, making them a perfect candidate for make-ahead baking. You can freeze the baked and completely cooled cookies for up to 3 months. To do this, wrap each cookie individually in plastic wrap or place them in a freezer-safe bag or airtight container. Ensuring they are well-sealed prevents freezer burn.
If you have a large batch, you can also freeze the unbaked cookie dough balls. Roll them into balls, place them on a parchment-lined baking sheet, and freeze until firm. Once frozen, transfer the dough balls to a freezer-safe bag or container. This allows you to bake fresh cookies whenever the craving strikes.
When freezing baked cookies, it’s best to lay them flat in the freezer on a baking sheet until solid before transferring them to a container. This prevents them from getting squished and maintains their shape. Properly frozen cookies retain much of their original texture and flavor.
Reheating
To enjoy frozen cookies, the best method is to thaw them slowly. For baked cookies, remove them from the freezer and let them thaw completely at room temperature. This usually takes a couple of hours, depending on the size of the cookies. You can place them on a wire rack or a plate while they thaw.
If you’re reheating frozen dough balls, you can typically bake them directly from frozen, though you may need to add a minute or two to the baking time. Keep an eye on them to ensure they bake through without overbrowning. This direct baking method is convenient for a quick treat.
For a slightly softer, warmer cookie, you can briefly reheat fully thawed cookies in a low oven (around 300°F or 150°C) for just a few minutes until warmed through. Be cautious not to overheat, as this can quickly turn them dry. The goal is a gentle warming that revives their soft texture.
Frequently Asked Questions
-
Can I use a different flavor of cake mix for these cookies?
Absolutely! While the Funfetti cake mix provides the signature “birthday cake” flavor, you can experiment with other cake mix flavors. A yellow or white cake mix will also work wonderfully, allowing the sprinkles to truly be the star of the show visually, and you can add extra vanilla or even a touch of almond extract to enhance the flavor. A red velvet cake mix would create a festive holiday cookie, and a chocolate cake mix would result in a delightful chocolate funfetti cookie. Just ensure the box size is comparable to the standard 15.25 ounces for the best results in dough consistency.
-
Why are my cookies spreading too much or not spreading enough?
Cookie spread can be influenced by several factors, and achieving the perfect balance is key. If your cookies are spreading too much, it could be due to using melted butter instead of oil (though this recipe uses oil), the dough being too warm, or an oven that’s not hot enough. Ensure your ingredients are measured accurately and that your oven is preheated correctly. If the cookies aren’t spreading enough, it might be because the dough is too cold, the oven temperature is too high, or there isn’t enough fat (oil) in the recipe. Using room temperature ingredients as recommended in the recipe is crucial, and chilling the dough slightly before baking can sometimes help control spread if it’s too soft.
-
How do I ensure my Funfetti cookies are perfectly soft and chewy, not cakey or hard?
The secret to achieving that ideal soft and chewy texture lies primarily in the baking time and not overmixing the dough. For these specific cookies, the 9-minute bake time is critical; they should look slightly underbaked in the center when you pull them out of the oven. The residual heat from the baking sheet will continue to cook them for a few minutes. Additionally, avoid overmixing the dough once the wet and dry ingredients are combined, as this can develop gluten and lead to a tougher, more cake-like cookie. Letting them cool on the baking sheet for a couple of minutes before transferring to a wire rack also helps them set up perfectly without becoming overdone.