The Ultimate Fruity Pebbles Cheesecake Tacos Recipe

Get ready to unleash your inner child with a dessert that’s as fun to make as it is to eat. These Fruity Pebbles Cheesecake Tacos are a viral-worthy treat that combines the nostalgic crunch of cereal with the decadent creaminess of no-bake cheesecake. This recipe is your ticket to creating a show-stopping dessert that perfectly matches the handheld, vibrant treat you’ve been dreaming of.
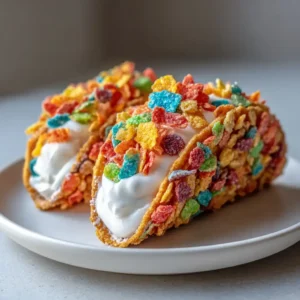
Just imagine a beautifully curved, taco-shaped shell made from a mosaic of brightly colored fruity cereal flakes, bound together with a subtle, glossy sheen. Inside that crisp, rainbow shell is a generous, thick pipe of smooth, bright white cheesecake filling that’s both velvety and rich. To finish, a happy scattering of more loose, dry fruity cereal flakes provides an extra pop of color and texture. It’s a handheld masterpiece, a symphony of crunch and cream that will have everyone asking for the recipe. This is more than just a dessert; it’s an experience.
Why You Will Love This Recipe
- Visually Stunning: With vibrant red, yellow, green, blue, and orange flakes, this dessert is incredibly photogenic and guaranteed to brighten any occasion. The sheer kaleidoscope of colors makes them a guaranteed conversation starter at any gathering or event.
- Irresistible Texture Contrast: The signature crunchy, clustered cereal shell gives way to an ultra-smooth, velvety cheesecake filling, creating a perfect balance in every single bite. This delightful interplay of textures is key to their addictive nature.
- Perfectly Sweet & Simple: This is a surprisingly easy, no-bake recipe that delivers a huge flavor payoff without complex steps, making it accessible for bakers of all skill levels. It’s a testament to how simple ingredients can create something truly spectacular.
- Endless Fun: It’s a fantastic recipe to make with kids and a guaranteed hit at parties, potlucks, or for a unique weeknight treat, fostering creativity and shared enjoyment in the kitchen. The interactive nature of assembly adds an extra layer of excitement for younger participants.
Ingredients You Need
To achieve the perfect structure and flavor, we need a few key components, each playing a critical role in bringing these dessert tacos to life. The quality of your ingredients will directly impact the final taste and texture of your masterpiece. Opting for fresh, full-fat versions where specified will ensure the most luxurious and stable results possible.
Fruity Pebbles Cheesecake Tacos
Unleash your inner child with these viral-worthy Fruity Pebbles Cheesecake Tacos. A fun, no-bake dessert featuring crunchy, colorful cereal shells filled with creamy no-bake cheesecake. Perfect for parties!
- 6 cups (300g) Mini Marshmallows
- 4 tbsp (57g) Unsalted Butter
- 6 cups (240g) Fruity Pebbles Cereal, plus more for garnish
- 2 8-oz blocks (452g) Full-Fat Cream Cheese, softened to room temperature
- 1 cup (120g) Powdered Sugar
- 1 cup (240ml) Cold Heavy Whipping Cream
- 2 tsp (10ml) Pure Vanilla Extract
- 1/8 tsp Fine Sea Salt
- 1Forge the Glossy Cereal Taco Shells: In a large pot over low-medium heat, melt the butter. Add mini marshmallows and stir until completely smooth. Remove from heat, pour in 6 cups Fruity Pebbles cereal, and fold until evenly coated.
- 2Shape and Cool the Taco Shells: Working quickly, scoop about 3/4 cup of mixture onto parchment paper. Press into a 5-inch circle, then drape over an inverted muffin tin or taco mold to create a curved shell. Repeat for remaining mixture. Let cool and harden for 20-30 minutes.
- 3Whip the Velvety Cheesecake Filling: In a mixer bowl, whip cold heavy whipping cream until stiff peaks form. Set aside. In the same bowl, beat softened cream cheese and powdered sugar until smooth. Mix in vanilla and salt. Gently fold in whipped cream until uniform and airy.
- 4The Final Assembly: Carefully remove cooled shells from molds. Transfer cheesecake filling to a piping bag fitted with a large star tip. Pipe filling into each shell. Garnish with extra Fruity Pebbles cereal. Serve immediately.
Keywords: Fruity Pebbles, Cheesecake Tacos, No-Bake Dessert, Cereal Treats, Kids Dessert, Party Food, Viral Recipe
You will find the exact quantities required for each ingredient within the recipe card itself. These ingredients are the building blocks of your cereal and cheesecake masterpiece, carefully selected for their contribution to taste, texture, and visual appeal.
Variations
While the classic Fruity Pebbles version is undeniably spectacular, the possibilities for customization are vast. Imagine a galaxy of flavors waiting to be explored within these delightful taco shells.
For a vegan delight, you can easily adapt this recipe. Substitute vegan butter for the unsalted butter, and use a vegan marshmallow alternative. The cream cheese filling can be recreated using silken tofu or a cashew-based cream cheese blended with coconut cream for richness. Ensure your vegan marshmallows are suitable for melting and binding.
A low-carb variation offers a guilt-free indulgence. For the shells, you might explore using finely crushed sugar-free cereal or even a finely ground almond flour mixed with a sugar-free binder like erythritol and butter. The cheesecake filling can be made with cream cheese, a sugar-free sweetener like stevia or monk fruit, and a touch of xanthan gum to thicken, served in traditional low-carb taco shells or lettuce cups.
Consider a chocolate lover’s dream by using Cocoa Pebbles for the shells, providing a rich, chocolatey base. The cheesecake filling could be infused with a swirl of melted dark chocolate or a hint of cocoa powder for an extra decadent touch. This offers a darker, more intense flavor profile.
How to Prepare Fruity Pebbles Cheesecake Tacos
Step 1: Forge the Glossy Cereal Taco Shells
First, prepare your shaping station meticulously. If you are using a muffin tin as your mold, ensure it is turned upside down, providing the perfect curved surfaces. You will need to cut 8 squares of parchment paper, each measuring approximately 6×6 inches; these will prevent the sticky mixture from adhering to your molds and work surfaces.
In a large pot, set over low-medium heat, begin by melting the unsalted butter. This initial step is crucial for a smooth melting process. Once the butter is fully liquefied and shimmering slightly, add the mini marshmallows to the pot. Stir these continuously with a heat-resistant silicone spatula until they transform into a completely smooth, molten mass. The aroma of sweet, toasty marshmallows will begin to fill your kitchen.
Remove the pot from the heat immediately after the marshmallows achieve their smooth consistency. Working with great speed and efficiency is paramount from this point forward, as the mixture begins to set rapidly. Pour in the 6 cups of Fruity Pebbles cereal directly into the hot marshmallow mixture. Using your spatula, gently fold everything together, ensuring that every single piece of cereal is evenly coated in the glossy marshmallow. The vibrant colors of the cereal should glisten, creating a beautiful mosaic effect.
The texture of the cereal itself is important here; the classic Fruity Pebbles have a light crispness that holds up well when coated. If your cereal is stale, it may become mushy once coated. Ensure you are using a fresh box for optimal crunch. The goal is a well-bound, yet still slightly crunchy, coating of cereal.
Step 2: Shape and Cool the Taco Shells
This critical step demands that you work quickly while the cereal and marshmallow mixture is still warm and delightfully pliable. Generously grease your hands or a sturdy spatula with a little butter or non-stick spray to prevent the incredibly sticky mixture from adhering to your skin or tools. Scoop about 3/4 cup of the warm cereal mixture onto one of your prepared parchment paper squares. Place another piece of parchment paper directly on top of the cereal mound.
Using a rolling pin or the flat bottom of a sturdy glass, gently press the mixture down through the parchment paper into a uniform circle, aiming for a diameter of about 5 inches. The thickness should be consistent throughout for even cooking and structural integrity. Once flattened, carefully peel off the top layer of parchment paper, revealing the beautifully formed cereal disc.
Gently lift the flattened cereal circle, using the bottom parchment paper for support, and carefully drape it over your inverted muffin tin (nestling it between the cups) or your specialized taco mold. The curve of the mold will create that perfect taco shell shape. Gently press the edges to help it conform to the mold’s contours. Repeat this entire process for the remaining cereal mixture, ensuring each shell is shaped consistently.
Allow the shaped shells to cool and harden completely. This cooling period is essential for them to achieve their signature crunch and structural integrity. This typically takes about 20-30 minutes at room temperature, but may take slightly longer in very humid conditions. Resist the urge to touch them before they are fully set, as they can be quite delicate when warm.
Step 3: Whip the Velvety Cheesecake Filling
While the taco shells are diligently setting and hardening, you can focus your attention on crafting the luxuriously smooth no-bake cheesecake filling. In the clean bowl of a stand mixer, preferably fitted with the whisk attachment, pour the cold heavy whipping cream. Ensure the cream is thoroughly chilled for optimal whipping performance.
Whip the heavy cream on medium-high speed until stiff peaks form. This means that when you lift the whisk attachment out of the cream, the peaks that stand up hold their shape without collapsing. This process incorporates air, creating a light yet stable texture for the filling. Once the desired consistency is achieved, carefully transfer the whipped cream to a separate, clean bowl and set it aside, making sure it remains chilled.
Now, switch the mixer to the paddle attachment. In the same mixer bowl (no need to wash if it’s clean), add the softened cream cheese and the powdered sugar. Beat these two ingredients together on medium speed until absolutely no lumps remain and the mixture is completely smooth and velvety. This step is crucial for achieving a silky texture in your final filling, so take your time and ensure thorough blending.
Scrape down the sides of the mixer bowl with a spatula to ensure all ingredients are incorporated into the beating process. Add the pure vanilla extract and the pinch of fine sea salt to the cream cheese mixture. Mix again until just combined; you don’t want to overwork the cream cheese once the vanilla and salt are added.
Finally, gently fold the reserved whipped cream into the cream cheese mixture in two equal parts. Use a spatula and a folding motion to incorporate the airiness of the whipped cream without deflating it. Mix until the filling is uniform in color and has a light, airy consistency. Be careful not to overmix at this stage, as it can lead to a dense rather than fluffy filling.
Step 4: The Final Assembly
With the taco shells perfectly cooled and hardened, and the cheesecake filling whipped to perfection, it’s time for the grand finale: assembly. Carefully remove the hardened, cooled cereal taco shells from their molds or the inverted muffin tin. They should slide off the parchment paper easily if you greased your molds appropriately.
Transfer your luscious cheesecake filling to a piping bag that has been fitted with a large star tip. This tip will create those beautiful, professional-looking swirls and peaks of filling that are so characteristic of this dessert. Gently pipe a generous, thick layer of the cheesecake filling directly into each of the prepared Fruity Pebble taco shells, filling them generously but not overflowing.
For the final decorative flourish, take the remaining loose Fruity Pebbles cereal you set aside earlier and scatter them directly over the top of the white cheesecake filling. This adds an extra pop of color, texture, and reinforces the signature cereal flavor. Your Fruity Pebbles Cheesecake Tacos are now ready to be served immediately, offering a delightful contrast of temperatures and textures.
Present these delightful treats on a platter, allowing their vibrant colors to shine. The contrast between the crispy shell and the cool, creamy filling is best enjoyed shortly after assembly. Ensure you have a good grip on them when serving, as they are a handheld delight.
Pro Tips for Fruity Pebbles Cheesecake Tacos
Work with Speed: The marshmallow cereal mixture hardens very quickly once it cools. If it becomes too stiff to work with during the shaping phase, don’t despair; you can easily make it pliable again by microwaving it in short, 10-second intervals, stirring well after each burst, until it reaches a workable consistency. This is a lifesaver when dealing with a larger batch.
Grease is Your Friend: To prevent the notoriously sticky marshmallow and cereal mixture from creating a significant mess on your hands and tools, keep them lightly greased with butter or non-stick spray throughout the shaping process. This creates a crucial barrier and makes the entire molding experience much smoother and less frustrating.
Room Temperature is Key: For the absolute smoothest and most lump-free cheesecake filling, it is absolutely essential that your cream cheese is fully softened to room temperature before you begin whipping. Cold cream cheese will resist blending properly with the powdered sugar, leading to a grainy texture, which is undesirable in a smooth cheesecake filling.
Don’t Overwhip the Cream Cheese: When you are folding the whipped heavy cream into the cream cheese base, be gentle and avoid overmixing. Overmixing at this stage will deflate the precious air you’ve incorporated into the whipped cream, resulting in a dense, heavy filling rather than the light, airy texture that makes these tacos so delightful.
Parchment Paper is Your Best Friend: For shaping the shells, parchment paper not only prevents sticking but also makes it easier to lift and transfer the delicate cereal discs. Use generously sized squares so you have enough paper to fold over the cereal while pressing, creating a smooth surface for rolling.
Molding Matters: If you don’t have a dedicated taco mold, a lightly greased upside-down muffin tin works wonderfully. You can even drape the cereal circles over the curved spine of a hardcover book wrapped in parchment paper for an impromptu shaping tool. The key is to create a concave form for the filling.
Serving Suggestions for Fruity Pebbles Cheesecake Tacos
Decoration
The primary decoration is already integrated into the design: a generous scattering of loose Fruity Pebbles cereal over the piped cheesecake filling. This provides an immediate visual cue to the flavor profile and adds a delightful textural contrast. For an even more festive look, you could add a few sprinkles of rainbow jimmies or edible glitter over the top of the filling before the cereal is added, especially if serving at a birthday party.
Side Dishes
While these tacos are a complete dessert experience on their own, they can also serve as a delightful finale to a fun meal. If you’re planning a dinner spread with a playful theme, consider starting with something savory that complements the sweetness, such as mini chicken skewers or sliders. For a lighter option, a simple fruit salad with berries and melon would offer a refreshing contrast.
If you’re looking for a full taco-themed night, our readers often love the fun of making Oven-Baked Cheesy Tacos as a savory counterpart. Alternatively, for a simpler meal that lets the dessert shine, consider something like Easy Greek Chicken Bowls. The goal is to complement, not compete with, the vibrant flavors of the dessert tacos.
Creative Serving Ideas
Present these tacos on a colorful platter or individual dessert plates for a whimsical touch. Consider arranging them in a circular pattern, reminiscent of a real taco platter. For a party setting, you could place them in mini cupcake liners to make them easier for guests to handle. Another idea is to serve them alongside a simple vanilla or almond milk “cool” dip, providing a refreshing palate cleanser between bites.
Preparation & Storage
Storing Leftovers
These Fruity Pebbles Cheesecake Tacos are undeniably best enjoyed on the same day they are made. This is primarily to ensure the cereal shells retain their signature crispiness. If, however, you find yourself with any leftovers, the best way to store them is in a single layer within an airtight container in the refrigerator.
Be aware that as they sit in the refrigerator, the shells will gradually absorb moisture from the filling. This means that by the second day, the shells will begin to soften, losing some of their satisfying crunch. While they will still be delicious, the texture will have changed significantly. Aim to consume them within 48 hours for the optimal eating experience.
Freezing
Due to the unique texture of the cereal shells, freezing these Fruity Pebbles Cheesecake Tacos is generally not recommended. The process of freezing and subsequent thawing can dramatically alter the crispness of the shells, making them very hard and chewy, rather than delightfully crunchy. This would detract significantly from the intended sensory experience.
The creamy cheesecake filling itself would likely freeze and thaw relatively well, but the compromise on the shell’s texture makes this an impractical storage method. For the best results and to preserve the intended delightful contrast, it is best to prepare these tacos as needed and enjoy them fresh.
Reheating
Reheating these Fruity Pebbles Cheesecake Tacos is not advisable, as they are designed to be enjoyed chilled or at room temperature, with a distinct contrast between the cool filling and the crisp shell. Applying heat would likely melt the cheesecake filling and make the cereal shell soggy and unappealing. The intention is to preserve the delightful crunch and creamy texture, which heat would actively degrade.
If the tacos have been refrigerated and have become too cold for your preference, simply let them sit at room temperature for about 10-15 minutes before serving. This will bring the filling to a more palatable temperature without compromising the integrity of the shell. The goal is always to maintain that perfect balance of textures.
Frequently Asked Questions
-
Can I make the Fruity Pebble taco shells ahead of time?
Yes, absolutely! You can prepare the Fruity Pebble taco shells up to 24 hours in advance. Store them in a single layer in an airtight container at room temperature, ensuring they are completely cooled before sealing the container. This will help maintain their crispiness until you are ready to assemble and serve them. Avoid refrigerating them before assembly, as the humidity can soften the shells prematurely.
-
Can I use a different type of cereal for the shells?
While Fruity Pebbles provide the signature vibrant look and distinct fruity flavor that makes these tacos so popular, you can certainly experiment with other cereals. Consider using similar brightly colored and crispy cereals like Trix, Cap’n Crunch, or even Cocoa Pebbles for a chocolatey twist. Be aware that the ratio of cereal to marshmallow might need slight adjustments depending on the density and size of the cereal pieces you choose. Always aim for a cereal that holds its shape well and doesn’t become overly soggy when coated.
-
How long do these cheesecake tacos last in the fridge?
Once the Fruity Pebbles Cheesecake Tacos are fully assembled, they are best consumed the same day they are made to preserve the optimal texture of the shells. However, if you have leftovers, they can be stored in an airtight container in the refrigerator for up to 2 days. During this storage period, the shells will gradually soften as they absorb moisture from the cheesecake filling. While they will remain edible and enjoyable, they will lose some of their signature crunch over time.