Easy Chia Pudding with Yogurt (How to Make it Creamy) – Irresistible Delight

This Easy Chia Pudding with Yogurt recipe offers a delightful and wholesome way to start your day or enjoy a satisfying snack. Its creamy texture and customizable nature make it a favorite for many seeking a quick, nutritious, and delicious option that requires minimal effort. The simplicity of its preparation belies the depth of flavor and the abundance of health benefits it provides.
Imagine a breakfast that’s both incredibly easy to make and packed with goodness; that’s exactly what this chia pudding delivers. It’s a testament to how simple ingredients can come together to create something truly special, adaptable to suit any palate or dietary need. Whether you’re a seasoned home cook or just beginning your culinary journey, this recipe is designed to be accessible and enjoyable for everyone.
Why You Will Love This Recipe
- Quick Preparation: You can whip up the base of this delightful pudding in just about 5 minutes, making it an ideal solution for rushed mornings or spontaneous snack cravings.
- Nutrient-Rich: Packed with essential fiber from chia seeds and protein from Greek yogurt, this recipe provides sustained energy and contributes positively to your overall well-being.
- Highly Customizable: The beauty of this pudding lies in its versatility; it serves as a perfect canvas for an endless array of toppings, from fresh fruits and crunchy nuts to sweet drizzles.
- Excellent for Meal Prep: Prepare a batch at the beginning of the week and have healthy breakfasts or snacks readily available, saving you time and effort throughout your busy schedule.
- Diet-Friendly: This recipe is naturally gluten-free and vegetarian, making it a suitable and delicious choice for a wide range of dietary preferences and restrictions.
Ingredients You Need
Choosing high-quality ingredients is paramount to achieving the best flavor and texture in your easy chia pudding. Opt for fresh, unflavored yogurt, preferably Greek style for its inherent creaminess and protein content, and unsweetened plant-based milk to keep it light and adaptable. Using pure maple syrup ensures a natural sweetness that complements the other components beautifully, creating a harmonious and satisfying dish. The quality of your base ingredients will significantly influence the final taste and richness of your pudding, so selecting the best available will undoubtedly elevate your experience.
Easy Chia Pudding with Yogurt
A quick and creamy chia pudding recipe that's perfect for busy mornings or a healthy snack. Customizable with your favorite toppings.
- 1 cup plain Greek yogurt (or yogurt of choice)
- 1 cup unsweetened almond milk (or milk of choice)
- 2 Tbsp pure maple syrup
- 2 tsp vanilla extract
- Optional: ¼ tsp ground cinnamon
- Optional: pinch of sea salt
- 1In a medium bowl, mix yogurt, almond milk, maple syrup, vanilla extract, optional cinnamon, and salt until smooth.
- 2Stir in chia seeds until well combined. Let the mixture rest for 10-15 minutes to avoid clumping.
- 3Transfer to an airtight container and refrigerate for at least 4 hours or overnight.
- 4Before serving, stir again and adjust consistency with more milk if desired. Top with fruits, nuts, or other favorites.
Keywords: chia pudding, yogurt, breakfast, healthy, snack, vegetarian, gluten-free, quick, easy
- plain greek yogurt: use full-fat Greek yogurt for the creamiest results, though any plain yogurt will work.
- unsweetened almond milk: other plant-based milks like oat or soy milk can be substituted.
- pure maple syrup: adjust the amount to your preferred level of sweetness.
- vanilla extract: enhances the overall flavor profile of the pudding.
- chia seeds: these are the stars, providing thickening and nutritional benefits.
- ground cinnamon: optional, but adds a lovely warmth and spice.
- sea salt: optional, a tiny pinch can amplify the sweetness and depth of flavor.
The specific quantities for these ingredients can be found within the recipe card provided.
Variations
For those following a vegan lifestyle, transforming this chia pudding is remarkably simple. You can easily substitute the Greek yogurt with a thick, unsweetened plant-based yogurt such as coconut or soy yogurt, ensuring a rich and creamy base. For the milk, opt for any unsweetened plant-based milk you prefer, like almond, oat, or cashew milk, which will blend seamlessly with the other ingredients without altering the desired outcome.
If you are aiming for a low-carb or keto-friendly version, significant adjustments can be made to tailor the recipe. Instead of maple syrup, incorporate a keto-approved sweetener like erythritol, stevia, or monk fruit to achieve the desired sweetness without the carbohydrate content. You might also consider using a richer, full-fat coconut milk or heavy cream in place of some of the almond milk to boost the fat content and enhance the creamy, decadent texture.
Adding a burst of flavor and nutrients can be achieved through various infusions and mix-ins. Consider incorporating unsweetened cocoa powder for a chocolatey delight, or a swirl of fruit puree like raspberry or mango for a vibrant, fruity twist. A dash of exotic spices such as cardamom or nutmeg can also introduce unique flavor profiles, turning a simple pudding into an adventurous culinary creation.
How to Prepare easy chia pudding with yogurt
Step 1: Mix the Base Ingredients
Begin by gathering a medium-sized bowl, which will serve as your primary mixing vessel for creating the delightful base of your chia pudding. Into this bowl, pour one cup of unsweetened almond milk, which provides a smooth, neutral liquid foundation for the pudding. Next, add one cup of plain Greek yogurt; its thickness and protein content are key to achieving that signature creamy texture.
To introduce a touch of sweetness, measure out two tablespoons of pure maple syrup and add it to the mixture. Vanilla extract is crucial for enhancing the overall aroma and flavor, so add two teaspoons of this fragrant essence. If you enjoy a hint of warmth, this is the stage to incorporate a quarter teaspoon of ground cinnamon and a small pinch of sea salt, though these are entirely optional and can be omitted if preferred.
Once all the liquid and flavor components are in the bowl, it’s time to vigorously whisk them together. You can also employ a handheld milk frother for an even smoother and slightly aerated consistency, aiming to combine all ingredients until the mixture is uniformly creamy, ideally with a few small bubbles beginning to form on the surface. This initial blending ensures that the flavors meld beautifully before the chia seeds are introduced.
Step 2: Add Chia Seeds
With your creamy base perfectly blended and aerated, the next crucial step involves introducing the star ingredient: the chia seeds. Carefully measure out one-quarter cup of these tiny powerhouses and gently sprinkle them into the yogurt and milk mixture. It is essential to add them evenly across the surface to facilitate their eventual distribution throughout the pudding.
Immediately after adding the chia seeds, take your whisk or a fork and stir the mixture thoroughly. You need to ensure that the seeds are fully incorporated and not clumped together at the bottom or sides of the bowl. This initial stir is vital for preventing any pockets of unmixed seeds, which can lead to a less desirable texture later on. Make sure every seed is coated in the liquid.
Allow this mixture to rest for a period of 10 to 15 minutes. During this resting phase, the chia seeds will begin to absorb the liquid and swell, starting the thickening process. Once this initial rest is complete, give the mixture another really good stir. This secondary stir is critical; it breaks up any clumps that may have formed as the seeds started to gel and ensures a uniform consistency throughout the pudding.
Step 3: Refrigerate
After the crucial resting and secondary stirring phase, the mixture is ready for its transformation in the refrigerator. Carefully transfer the entire contents of the bowl into an airtight container. Using a container with a secure lid is important to prevent any odors from the refrigerator from being absorbed by the pudding and to maintain its freshness.
Once sealed in its container, place the mixture in the refrigerator. The chilling process is fundamental to allowing the chia seeds to fully absorb the liquid and expand, which is what creates the signature thick, pudding-like consistency. It’s recommended to let the pudding chill for a minimum of four hours. For the absolute best texture and to allow the flavors to fully meld, overnight refrigeration is ideal.
During this extended chilling period, the chia seeds will work their magic, gradually absorbing the liquid and forming a gel-like matrix that binds everything together. The low temperature of the refrigerator also helps to firm up the pudding, achieving that perfect spoonable consistency. Patience during this stage is key to a successful and delicious outcome. Ensure the container is truly airtight to preserve the pudding’s delicate flavors.
Step 4: Serve
Once the chia pudding has completed its chilling period, usually after at least four hours or preferably overnight, it’s ready to be served. Remove the airtight container from the refrigerator. Before serving, give the pudding another thorough stir. This final stir helps to ensure a uniform consistency, especially if some slight separation has occurred during chilling, and distributes any settled ingredients.
You might find that your chia pudding is exactly the thickness you prefer after chilling. However, if you desire a thinner consistency, this is the time to adjust it. Simply add a splash of your chosen milk (almond milk or any other milk you used for the base) and stir it in until you reach your desired thickness. A little goes a long way, so add milk gradually until it’s just right.
Now comes the most enjoyable part: the serving and topping! Spoon the perfectly chilled and adjusted chia pudding into your serving bowls. This is where you can let your creativity shine. Decorate your pudding with your favorite toppings, which can range from fresh berries and sliced fruits to a sprinkle of granola, nuts, seeds, or even a drizzle of honey or nut butter. Enjoy your delicious and wholesome creation!
Step 5: Optional Step – Flavor Infusion
To elevate your easy chia pudding with yogurt, consider an optional flavor infusion step that can be done either before or during the initial mixing process. This step allows you to add deeper, more complex flavors to the base pudding itself, going beyond toppings. For instance, if you desire a rich chocolate flavor, you could whisk in one to two tablespoons of unsweetened cocoa powder along with the other dry ingredients before adding the liquid components. Ensure it is thoroughly dissolved to prevent any powdery residue.
Another popular infusion method involves using fruit purees. You can blend a handful of ripe berries or other soft fruits until smooth and then stir this vibrant puree into the yogurt and milk mixture before adding the chia seeds. This not only imparts a delicious fruity taste but also adds natural color to your pudding, making it visually appealing. Be mindful that fruit purees can add extra liquid, so you might need to slightly adjust the milk quantity if aiming for a very thick result.
Herbal or spicy infusions offer yet another avenue for creativity. Steep fragrant herbs like mint or lavender in the milk for a short period before using it, or add warming spices like cardamom, ginger, or even a touch of turmeric for an earthy note. These infusions can be done while gently warming the milk (do not boil) and then straining out the solids before proceeding with the recipe. This optional step allows for a truly personalized and gourmet chia pudding experience.
Step 6: Advanced Texture Techniques
For those who appreciate an exceptionally smooth and velvety texture, exploring advanced techniques can further refine this easy chia pudding. While whisking and frothing help, a brief blending of the base mixture before adding the chia seeds can ensure ultimate homogeneity. Use an immersion blender directly in the mixing bowl or transfer the liquid ingredients to a regular blender for a few pulses until absolutely smooth.
Another technique for enhancing creaminess involves a slightly longer initial resting period with more frequent stirring. After adding the chia seeds, stir vigorously for the first 5 minutes, then stir again every 5-10 minutes for the first 30 minutes. This intensive initial agitation helps to break down the gelatinization of the chia seeds more evenly and prevents the formation of larger gel clumps, resulting in a smoother mouthfeel when consumed.
Consider the type of yogurt and milk used for textural impact. Opting for a very thick Greek yogurt, perhaps even straining it further to remove excess whey, can contribute to a denser, creamier outcome. Similarly, using a milk that has a natural creaminess, like full-fat oat milk or even a small amount of cashew cream, can lend a richer mouthfeel. These subtle ingredient choices, combined with careful preparation, contribute significantly to the pudding’s final luxurious texture.
Pro Tips for easy chia pudding with yogurt
Whisk Thoroughly: Always ensure you whisk the base ingredients very well before adding the chia seeds. This step is crucial for preventing clumps and ensuring a smooth, homogeneous mixture from the start. A well-whisked base sets the stage for a superior pudding texture.
Allow Resting Time: Don’t skip the 10-15 minute resting period after adding the chia seeds. This allows them to start absorbing liquid and swelling, making the subsequent stirring more effective and preventing them from settling at the bottom.
Use Full-Fat Yogurt: For the ultimate creamy consistency, opt for full-fat Greek yogurt. Its higher fat content contributes significantly to the richness and decadent mouthfeel of the chia pudding, making it far more satisfying.
Adjust Consistency Post-Chill: After the pudding has chilled, it will have thickened considerably. If it’s too thick for your liking, don’t hesitate to add a small splash of milk and stir it in to reach your preferred fluidity. This allows for perfect customization.
Embrace Overnight Chilling: While four hours is the minimum, chilling the pudding overnight allows the flavors to meld beautifully and the chia seeds to fully hydrate, resulting in the firmest, creamiest texture. This is the secret to professional-level chia pudding.
Serving Suggestions for easy chia pudding with yogurt
Decoration
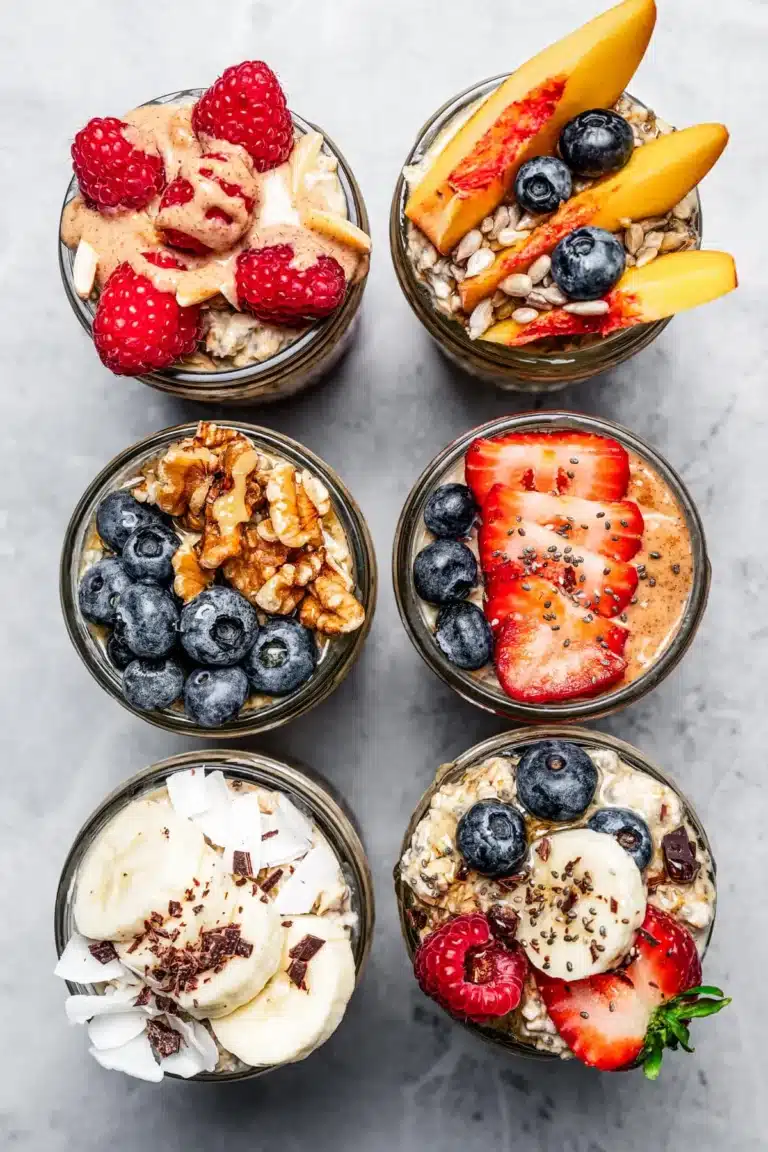
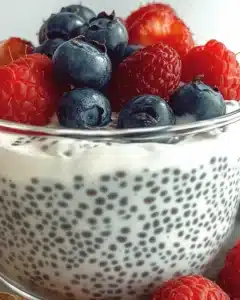
Elevate your chia pudding with vibrant and appealing decorations. Fresh berries, such as plump raspberries, juicy blueberries, and sliced strawberries, add a burst of color and natural sweetness, providing a delightful contrast to the creamy pudding. Sliced bananas offer a soft texture and complementary sweetness, while pieces of ripe mango or kiwi can introduce a tropical flair and striking visual appeal.
For added texture and visual interest, consider a sprinkle of edible flowers like violas or pansies, which bring an elegant and delicate touch. A dusting of finely grated dark chocolate or a few curls of shaved white chocolate can add a touch of indulgence. A light dusting of cinnamon or cocoa powder can also enhance the visual presentation while subtly boosting the flavor profile.
A drizzle of contrasting sauces or syrups can create beautiful patterns and add another layer of flavor. Think about a swirl of bright berry coulis, a delicate cascade of honey, or a rich caramel sauce. Toasted coconut flakes or a scattering of finely chopped nuts can provide both visual texture and a satisfying crunch.
Side Dishes
To create a more substantial meal or a delightful brunch spread, consider pairing your chia pudding with complementary side dishes. A small bowl of mixed fresh fruit salad, featuring seasonal fruits like melon, grapes, and citrus segments, offers a refreshing and vitamin-rich accompaniment that balances the pudding’s richness.
For a more savory option that still complements the sweetness, consider serving alongside whole-grain toast topped with avocado and a sprinkle of everything bagel seasoning. This provides a contrast in texture and flavor, offering healthy fats and satisfying carbohydrates. Lightly toasted muffins or scones, perhaps flavored with lemon or poppy seeds, can also make a lovely addition to a breakfast or dessert spread.
A small side of crunchy granola, either homemade or store-bought, is a classic pairing that adds delightful texture and can be sprinkled directly on top of the pudding. For a protein boost, consider a small portion of scrambled eggs or a few slices of crispy turkey bacon. A refreshing smoothie, perhaps a green blend with spinach and pineapple, can also serve as a light and healthy side.
Creative Serving Ideas
Think beyond the traditional bowl for serving your easy chia pudding. Layer the pudding with fruits and granola in a clear glass or jar to create visually stunning parfait-style desserts. This layering technique showcases the different textures and colors, making for an attractive presentation that’s perfect for entertaining or a special treat.
Consider incorporating the chia pudding into other dessert creations. It can serve as a delightful filling for mini tart shells or as a base layer for a no-bake cheesecake, adding a creamy and nutritious element. You could even freeze portions of the pudding in mini muffin tins to create bite-sized, refreshing pudding pops, perfect for a warm afternoon.
For a more whimsical presentation, use cookie cutters to create fun shapes from thicker portions of set chia pudding, or serve it in hollowed-out fruits like oranges or small melons for an edible serving vessel. This not only looks impressive but also adds an extra layer of natural flavor and freshness to the overall dish. Don’t be afraid to experiment with edible glitter or a few sprigs of fresh mint for that final, artistic touch.
Preparation & Storage
Storing Leftovers
Storing leftover easy chia pudding with yogurt is straightforward and ensures you can enjoy it for days to come. The key is to place the pudding in an airtight container. This prevents it from absorbing any unwanted odors from the refrigerator and helps maintain its freshness and optimal texture. Glass containers with secure lids are ideal, but any good quality airtight container will suffice.
When stored properly in the refrigerator, your chia pudding will remain delicious and safe to consume for up to 5 days. This makes it an excellent candidate for meal prepping, allowing you to prepare a larger batch at the beginning of the week and have a healthy breakfast or snack ready to go each day. Ensure the container is well-sealed after each serving to maximize its shelf life.
The texture of the pudding might continue to thicken slightly over time as the chia seeds absorb more moisture. If you find it becomes too thick for your preference after a few days, simply stir in a small amount of milk or water until you reach your desired consistency before serving. Always use a clean spoon when taking out portions to avoid introducing contaminants.
Freezing
Freezing easy chia pudding with yogurt is a viable option for longer-term storage, though it can slightly alter the texture upon thawing. To freeze, transfer the pudding into freezer-safe containers or individual portions in ice cube trays or small silicone molds. Ensure the containers are completely sealed to prevent freezer burn and maintain quality.
When frozen, the chia pudding can typically maintain its best quality for up to 2 months. Beyond this timeframe, while still safe to eat, the flavor and texture might begin to degrade. It’s always a good practice to label your frozen containers with the date of freezing to keep track of their freshness.
Thawing frozen chia pudding should be done gradually. The best method is to transfer the container from the freezer to the refrigerator and allow it to thaw slowly overnight. This helps the pudding retain as much of its original texture as possible. Once thawed, you may need to stir it well, and potentially add a splash of milk if it appears too thick or watery due to the freezing and thawing process.
Reheating
While chia pudding is typically enjoyed chilled, there might be occasions when you prefer it warm, especially during colder months. Reheating chia pudding requires a gentle approach to avoid cooking the seeds or altering the texture too drastically. The stovetop is often the preferred method for gentle warming.
To reheat on the stovetop, place the chilled chia pudding in a saucepan over low heat. Stir continuously to ensure even heating and prevent sticking or scorching. Warm it through for a few minutes until it reaches your desired temperature. Be careful not to overheat it, as this can make the pudding gummy.
Alternatively, you can reheat small portions in the microwave. Place the pudding in a microwave-safe bowl and heat in short intervals of 30 seconds, stirring well between each interval. This allows you to control the heating process and stop once it’s warmed to your liking. As with stovetop reheating, avoid overheating. If reheating from frozen, allow it to thaw slightly before attempting to warm it.
Frequently Asked Questions
-
What makes this Easy Chia Pudding with Yogurt creamy?
The exceptional creaminess of this easy chia pudding with yogurt is primarily achieved through the synergistic combination of full-fat Greek yogurt and the thickening power of chia seeds. Greek yogurt, with its higher fat content and thicker consistency compared to regular yogurt, provides a rich, luxurious base. As the chia seeds absorb the liquid from the yogurt and milk, they form a gel-like substance that binds everything together, creating a smooth, pudding-like texture that is both satisfying and decadent.
-
Can I use different types of yogurt or milk in this recipe?
Absolutely! This recipe is incredibly versatile, and you can certainly experiment with various types of yogurt and milk to suit your preferences and dietary needs. For yogurt, feel free to use regular plain yogurt, non-dairy options like coconut, soy, or almond yogurt, or even flavored varieties if you wish to add a different taste profile. Similarly, any milk works well, including dairy milk (whole, skim, or 2%), or plant-based alternatives such as oat milk, soy milk, cashew milk, or rice milk. Keep in mind that the fat content and thickness of your chosen yogurt and milk will influence the final creaminess and consistency of the pudding.
-
How do I customize my Easy Chia Pudding with Yogurt for different flavors or dietary needs?
Customization is where this recipe truly shines! For a chocolate version, whisk in 1-2 tablespoons of unsweetened cocoa powder with the dry ingredients. To introduce fruity flavors, blend in fruit purees like berries or mango before chilling, or simply top with fresh or frozen fruits. For a more dessert-like treat, add a touch of honey, agave nectar, or a sugar substitute like stevia or erythritol for sweetness. For a coffee flavor, incorporate a teaspoon of instant coffee granules. If you’re looking for a gluten-free option, ensure all added ingredients are certified gluten-free. For a vegan preparation, use plant-based yogurt and milk, and a vegan sweetener.