Fresh Berry Tart – Light and Easy Berry Dessert!
Imagine a dessert that’s both stunningly beautiful and astonishingly simple to create. This easy berry tart is that dream realized, a delightful creation perfect for any occasion, from a casual afternoon tea to a celebratory gathering. Its charm lies in its minimal ingredient list and remarkably short preparation time, making it an accessible indulgence for bakers of all skill levels.
This tart offers a delightful balance of textures and flavors, with the crisp, buttery puff pastry providing a perfect base for the sweet, slightly tart burst of fresh berries. It’s the kind of dessert that impresses guests without causing the baker undue stress, a true testament to elegant simplicity.
Why You Will Love This Recipe
- Quick Preparation: This exquisite tart comes together in mere minutes, with a prep time of just 10 minutes, making it ideal for spontaneous cravings or unexpected guests.
- Minimal Ingredients: Utilizing only five core components, including convenient puff pastry, this recipe streamlines your grocery list and kitchen pantry.
- Flaky, Buttery Crust: The foundation of this tart is a golden, crisp puff pastry, providing a delightful contrast to the soft, juicy berries.
- Versatile Berry Blend: Feel free to customize with your favorite berries, whether a vibrant mix or a single star fruit, ensuring a personalized touch to every slice.
- Visually Appealing: With its rustic yet elegant presentation, this berry tart is as delightful to look at as it is to eat, perfect for adding a touch of charm to any table setting.
Ingredients You Need
The beauty of this easy berry tart lies in its carefully selected, high-quality ingredients that work harmoniously to create a delightful flavor profile. Focusing on freshness and simplicity ensures that the natural sweetness of the berries shines through, complemented by the rich, buttery pastry. When selecting your components, always opt for the freshest berries available and a good quality puff pastry for the best results. Even a simple store-bought jam can elevate the overall taste experience significantly.
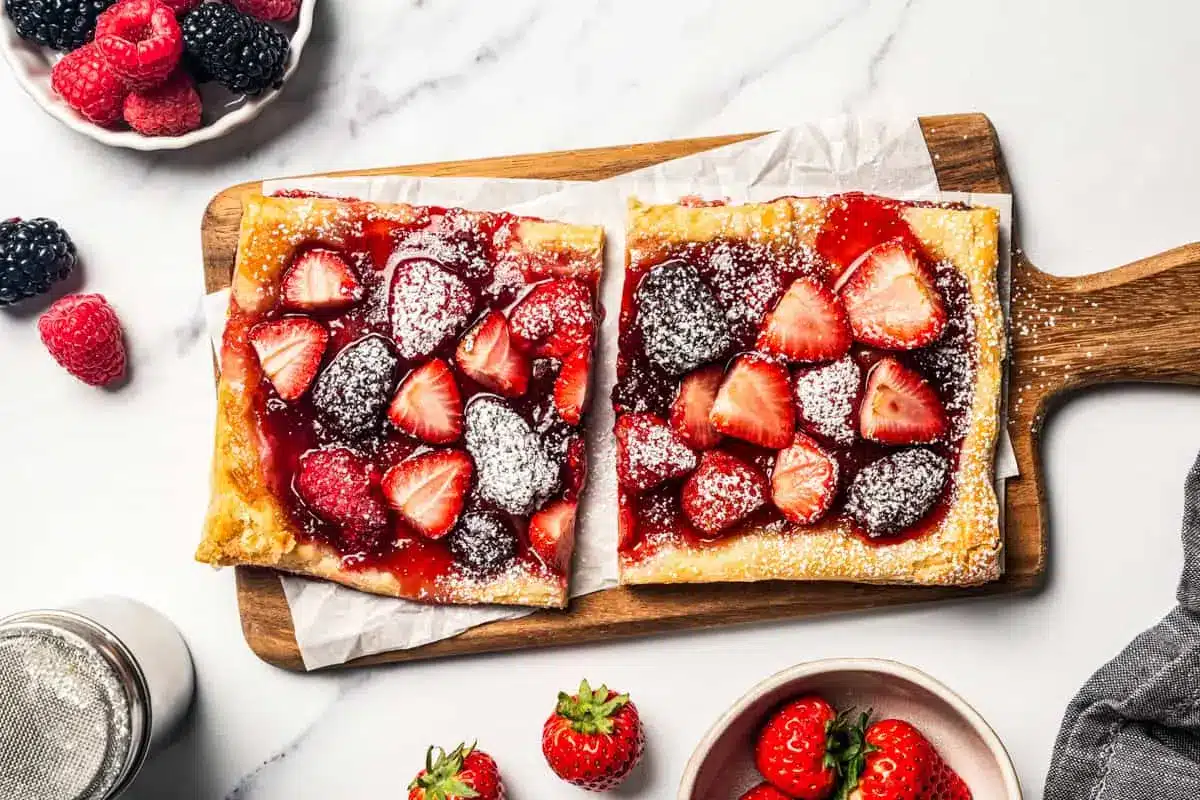
Easy Berry Tart
This easy berry tart needs only 5 ingredients and takes 10 minutes to prepare for the oven. It has a crisp, buttery puff pastry crust covered with strawberry jam and sugar-coated berries.
- 1 sheet puff pastry, thawed, cut in half
- 2 cups mixed fresh berries
- ¼ cup granulated sugar
- 4 tablespoons strawberry jam, divided
- powdered sugar
- 1Preheat the oven to 400ºF. Line a baking sheet with parchment paper.
- 2Combine the berries and sugar in a mixing bowl; lightly stir, then let stand for 5 minutes.
- 3Place the puff pastry dough on the previously prepared baking sheet and cut it in half.
- 4Spread 2 tablespoons of strawberry jam right down the middle of each pastry sheet.
- 5Evenly divide the berries and arrange them over the strawberry jam, down the middle of each pastry sheet.
- 6Bake for 18 to 20 minutes, or until golden brown.
- 7Remove and let the tart stand for a few minutes. Dust with powdered sugar, cut and serve.
Keywords: berry tart, puff pastry, easy dessert, quick dessert, summer dessert, 5 ingredient
The exact quantities for each ingredient are detailed within the comprehensive recipe card, ensuring you have all the precise measurements needed for this delectable creation.
Variations
This easy berry tart is a fantastic canvas for culinary creativity, allowing for numerous delicious variations that cater to different tastes and dietary preferences. One popular adaptation is the vegan version, which can be achieved by using a store-bought vegan puff pastry and ensuring your jam is also free from animal products. The sweetness and tartness remain, simply in a plant-based form, making it a guilt-free indulgence for everyone.
For those following a low-carb lifestyle, a delightful alternative can be crafted by substituting the puff pastry with a nut-based crust, such as an almond flour or pecan crust. Instead of granulated sugar, a sugar substitute like erythritol or stevia can be used to macerate the berries. This allows for a satisfyingly sweet treat without the carbohydrate load, perfect for a keto-friendly dessert.
Another exciting variation involves infusing the jam layer with additional flavors. Consider swirling in a spoonful of lemon curd for a bright, zesty counterpoint to the sweet berries, or even a touch of melted dark chocolate or Nutella for a richer, more decadent experience. These small additions can transform the tart into something truly unique, offering a sophisticated twist on a beloved classic, all while maintaining its inherent simplicity and charm, drawing inspiration from how one might approach similar fruity pastries found in dessert collections.
How to Prepare easy berry tart
Step 1: Prepare to Bake
The initial step in creating this magnificent easy berry tart involves preheating your oven to the optimal baking temperature and preparing a suitable baking surface. This ensures that the tart bakes evenly and achieves that desirable golden-brown crispness on the puff pastry. A properly preheated oven is crucial for puff pastry, as it needs that initial blast of heat to achieve its characteristic airy layers and flaky texture.
For this step, you’ll need to set your oven to 400 degrees Fahrenheit (approximately 200 degrees Celsius). Simultaneously, line a sturdy baking sheet with parchment paper. The parchment paper serves a dual purpose: it prevents the puff pastry from sticking to the baking sheet, making cleanup a breeze, and it also provides a non-reactive surface that helps distribute heat evenly during the baking process, contributing to a uniformly golden crust.
This foundational preparation is simple yet absolutely critical for the success of your berry tart. Taking these few moments at the beginning sets the stage for a beautifully baked dessert, ensuring that the puff pastry achieves its full potential in terms of texture and appearance, much like the careful staging required for other baked goods featured in breakfast or brunch spreads.
Step 2: Coat the Berries
The next vital step in assembling your easy berry tart is to prepare the fresh berries, ensuring they release their natural juices and mingle beautifully with the sugar. This process, often referred to as maceration, not only enhances the flavor of the berries but also contributes a luscious syrupy element to the tart’s filling. It’s a simple technique that yields significant flavor improvements.
In a medium-sized mixing bowl, gently combine your fresh mixed berries with the granulated sugar. A light stir is all that’s needed to evenly coat the berries. Allow this mixture to stand undisturbed for approximately five minutes. During this brief resting period, the sugar will begin to draw out the natural moisture from the berries, creating a delectable, slightly syrupy juice at the bottom of the bowl.
This sugary berry liquid is pure liquid gold, brimming with concentrated fruit flavor. This step is particularly important if you are using berries that are not at the peak of their sweetness, as the sugar helps to balance their tartness and bring out their inherent deliciousness. The quality of your berries will shine through, making this step a highlight in achieving a truly outstanding berry tart, echoing the importance of ingredient preparation found in detailed culinary guides.
Step 3: Prepare the Crust
With your oven preheating and berries beginning to macerate, it’s time to turn your attention to the foundation of your delightful easy berry tart: the puff pastry. Utilizing pre-made puff pastry is a brilliant time-saver, and this recipe leverages its convenience to create a stunning dessert with minimal effort. The key is to handle the pastry gently to maintain its delicate layers.
Carefully place the thawed puff pastry dough onto the parchment-lined baking sheet you prepared earlier. If your puff pastry comes as a single large sheet, you will need to cut it in half. This division creates two individual tart bases, making the assembly and serving much more manageable and visually appealing. Ensure your cuts are clean and precise for the neatest presentation.
The puff pastry itself is a marvel of culinary engineering, designed to puff up dramatically when exposed to heat, creating those signature airy, flaky layers that make this tart so irresistible. By preparing it as instructed, you are setting the stage for that magical transformation in the oven, ensuring a crisp, golden crust that perfectly cradles the sweet berry filling. This foundational work is a testament to how simple, high-quality components can lead to exceptional results, similar to the careful attention given to dough in articles about German pancakes.
Step 4: Assemble the Tart
Now comes the exciting part where the visual appeal of your easy berry tart truly begins to take shape. This assembly stage is wonderfully straightforward, transforming simple components into an elegant dessert ready for the oven. It’s a process that’s as enjoyable to do as it is to witness the final delicious outcome.
Take your prepared strawberry jam and spread about two tablespoons evenly down the center of each puff pastry half. This jam acts as a delightful sweet base, a perfect complement to the tartness of the berries, and it also helps to keep the berries nestled in place during baking. The rich flavor of the jam adds another layer of deliciousness to the overall profile of the tart.
Next, evenly divide the macerated berries between the two pastry sheets, arranging them generously over the strawberry jam layer. Create a beautiful, slightly mounded pile of berries directly down the middle of each pastry half. This placement ensures that the berries are the star of the show, visually and gastronomically, and that they will bake into a gorgeous, bubbling topping. The vibrant colors of the mixed berries will already be a feast for the eyes.
The simplicity of this assembly is part of its genius; there’s no intricate crimping or elaborate shaping required. The rustic charm of berries piled on jam atop flaky pastry is inherently beautiful. This approach ensures that each bite will be a harmonious blend of sweet jam, juicy berries, and crisp pastry, creating a truly delightful eating experience that rivals more complex desserts. The visual appeal is reminiscent of the vibrant fruit toppings seen on many dessert creations.
Step 5: Bake to Golden Perfection
The culmination of your efforts arrives as the easy berry tart enters the heat of the oven to transform into a golden, bubbling masterpiece. This is where the magic of puff pastry truly unfolds, creating a visually stunning and incredibly delicious dessert ready to be enjoyed.
Place the assembled tart(s) into the preheated 400°F (200°C) oven. Bake for approximately 18 to 20 minutes. During this time, keep a watchful eye on the tart as it bakes. You are looking for the puff pastry to become gloriously golden brown, puffed up high, and wonderfully crisp. The berries should soften and begin to bubble, releasing their delicious juices and intensifying their flavor.
The aroma that will fill your kitchen during this baking period is simply divine, a sweet and fruity fragrance that promises a delightful treat. The exact baking time can vary slightly depending on your oven’s calibration and the moisture content of your berries, so visual cues are your best guide. The goal is a perfectly baked crust and lusciously cooked berries.
Once the tart achieves that perfect golden hue and the berry filling is bubbling enticingly, carefully remove it from the oven. The contrast between the crisp, flaky pastry and the soft, warm berries is what makes this tart so utterly irresistible. Allow it to cool slightly before the final decorative touch, ensuring the flavors meld beautifully.
Step 6: Rest, Dust, and Serve
The final steps in bringing your easy berry tart to its full glory involve allowing it to rest briefly, adding a touch of ethereal sweetness with powdered sugar, and then presenting it for everyone to savor. These finishing touches elevate the tart from simply delicious to a truly polished dessert.
Once you’ve removed the golden-brown berry tart from the oven, let it stand on the baking sheet for a few minutes. This brief resting period allows the juices to settle slightly and makes the tart easier to handle. While it’s still warm, but not piping hot, you can administer the final decorative flourish.
Dust the top of the cooled tart generously with powdered sugar. A simple sieve or sifter can be used to create a light, even snowfall of sugar over the berries and pastry. This adds a touch of visual elegance and a subtle sweetness that complements the fruit beautifully. Finally, cut the tart into individual portions and serve immediately to enjoy its peak crispness and warm, juicy filling. This simple yet impressive dessert is perfect for any gathering, a testament to how easy it can be to create something special, much like the refined approach seen in preparing berry tarts or other delightful desserts.
Pro Tips for easy berry tart
To ensure your easy berry tart is an absolute triumph, consider a few expert pointers that can elevate its texture and flavor even further. These small adjustments, born from experience, help to guarantee a superior outcome every time you bake this delightful dessert.
Preventing Soggy Pastry: If you notice that one side of your puff pastry is puffing up significantly more than the other during baking, don’t worry. A simple trick is to gently prick the over-puffed section with the tip of a fork or a small knife. This allows excess steam to escape, helping to deflate that area and create a more even bake across the entire crust.
Jam Leakage is Okay: It’s not uncommon for a little jam to ooze over the sides of the puff pastry as it bakes. This is perfectly normal and actually adds to the rustic charm of the tart. Once the tart has cooled and you move it to a serving plate, any minor leakage will be barely noticeable, and the delicious flavor it imparts is well worth it.
Berry Moisture Control: If you are using frozen berries, it is absolutely crucial to thaw them completely and drain off any excess liquid. For best results, consider gently dabbing the thawed berries with paper towels to remove as much surface moisture as possible. Excessively wet berries can lead to a soggy bottom crust, so taking this extra step is highly recommended for optimal texture.
Sugar’s Role: Tossing the fresh berries with sugar is more than just for sweetness; it encourages the berries to release their natural juices, creating a delightful syrupy consistency. This also helps to slightly break down the berries, making them wonderfully soft and flavorful when baked. The type of sugar matters too; white or light brown sugar works best here.
Flavor Boosts: While the basic recipe is divine, don’t hesitate to experiment with enhancements. A sprinkle of cinnamon or a pinch of nutmeg mixed with the berries can add a warm, cozy note. A tiny splash of lemon or orange zest added to the jam layer before spreading it can also introduce a bright, refreshing citrus undertone that beautifully complements the berries.
Serving Suggestions for easy berry tart
Decoration
The natural beauty of the berries and the golden puff pastry often makes this easy berry tart visually striking on its own. However, a final dusting of powdered sugar adds an elegant, snowy finish that contrasts beautifully with the vibrant fruit. For an extra touch of sophistication, consider adding a few fresh mint leaves or edible flowers scattered artistically over the berries just before serving.
Side Dishes
This delightful tart pairs wonderfully with a dollop of freshly whipped cream or a spoonful of rich vanilla bean ice cream, enhancing its dessert appeal. A side of tart, creamy Greek yogurt can offer a refreshing counterpoint to the sweetness, while a simple fruit salad featuring complementary seasonal fruits can extend the fruity theme of the dessert.
Creative Serving Ideas
For a more playful presentation, consider cutting the tart into smaller, bite-sized squares and serving them on a tiered platter at parties or afternoon tea. Individual mini tarts, made from smaller puff pastry squares, are perfect for a more personalized dessert experience. They also look stunning alongside a scoop of artisanal gelato or a drizzle of raspberry coulis, creating a restaurant-quality dessert presentation with minimal effort, showcasing the versatility of berry tarts.
Preparation & Storage
Storing Leftovers
While this easy berry tart is best enjoyed fresh, any leftovers can be stored in an airtight container at room temperature for up to a day. However, for optimal freshness and to maintain the crispness of the puff pastry, refrigerating leftovers is recommended. Ensure the tart is completely cooled before sealing it in the container.
If stored in the refrigerator, the tart will keep well for up to three days. It’s important to note that the puff pastry will gradually lose its crisp texture over time when refrigerated, becoming softer. Therefore, it’s advisable to consume the leftovers within this timeframe for the best eating experience.
To revive the tart’s texture before serving leftovers, you can gently reheat it. This process can help to crisp up the pastry again, bringing it closer to its original delightful state. This simple step ensures you can still enjoy the wonderful flavors of the tart even a day or two after it was first baked.
Freezing
Freezing this easy berry tart is possible, though it requires a specific approach to preserve the texture of the puff pastry and berries. It is generally recommended to freeze the tart *before* baking if you plan to bake it at a later date. This method yields the best results for a freshly baked tart.
To freeze the unbaked tart, assemble it completely on the baking sheet and then freeze it until firm. Once frozen, carefully wrap the entire tart, still on the baking sheet or transferred to a freezer-safe container, in plastic wrap and then in aluminum foil or a freezer bag. This double layer of protection will prevent freezer burn and preserve the quality.
When you’re ready to bake the frozen tart, you can typically bake it directly from frozen, adding a few extra minutes to the baking time to account for the frozen state. The puff pastry will still puff and crisp up beautifully. Freezing the baked tart is less ideal, as the puff pastry tends to become soggy upon thawing. If you must freeze a baked tart, wrap it very tightly to prevent moisture loss.
Reheating
Reheating this easy berry tart is a straightforward process that can help to bring back some of its original crispness and warm the fruit filling. The best method depends on whether the tart is fresh or has been refrigerated.
If the tart has been refrigerated, the most effective way to reheat it is in a moderate oven. Preheat your oven to around 300°F (150°C). Place the tart on a baking sheet and warm it in the oven for about 5-10 minutes, or until it is heated through and the pastry has regained some of its crispness. Avoid microwaving, as this will make the pastry soft and chewy.
For a tart that has been at room temperature for a short period but has lost some of its warmth or crispness, a similar low-heat oven approach works well. A brief stint in a 300°F (150°C) oven for just a few minutes can often revive its delightful texture. This gentle reheating process ensures you can still enjoy the delicious combination of flaky pastry and warm, jammy berries.
Frequently Asked Questions
-
Can I use different types of berries or fruits in this tart?
Absolutely! This easy berry tart is incredibly versatile. While the recipe calls for mixed berries, you can certainly use any single type of berry, such as just strawberries, blueberries, or raspberries, for a more focused flavor. Beyond berries, other fruits that work beautifully include sliced peaches, nectarines, or even thinly sliced apples or pears. For softer fruits like peaches or nectarines, you might want to consider a quick pre-cook or a slightly longer baking time to ensure they soften adequately. For citrus lovers, a combination of berries with a layer of lemon curd instead of jam can offer a wonderfully bright and zesty flavor profile. Remember that the moisture content of different fruits can vary, so if you’re using particularly juicy fruits, it might be beneficial to drain them slightly, similar to how you’d handle frozen berries to prevent a soggy crust.
-
What is the best way to ensure my puff pastry is perfectly flaky and golden?
Achieving perfect puff pastry requires a few key considerations. Firstly, always ensure your puff pastry is properly thawed according to package instructions; partially frozen pastry won’t puff as well. Secondly, preheating your oven to the correct temperature (400°F/200°C for this recipe) is critical, as puff pastry needs intense heat to activate its layers. Avoid opening the oven door too frequently during the initial baking stages, as this can cause the pastry to deflate. If one side puffs significantly more than the other, as mentioned in the pro tips, gently pricking the over-puffed section with a fork can help even out the bake. Finally, using parchment paper on your baking sheet helps ensure even heat distribution and prevents sticking, contributing to a wonderfully crisp bottom.
-
How can I make this easy berry tart suitable for specific dietary needs, like gluten-free or dairy-free?
Adapting this easy berry tart for dietary needs is quite feasible. For a gluten-free version, you would need to source a gluten-free puff pastry alternative; these are increasingly available in specialty stores or well-stocked supermarkets. If a gluten-free puff pastry isn’t available or suitable, you could consider using a pre-made gluten-free pie crust or creating a crumb crust from gluten-free cookies or nuts. For a dairy-free option, ensure your puff pastry is dairy-free (many commercial puff pastries are already made with vegetable oils) and verify that your jam does not contain any dairy derivatives. If using whipped cream for serving, opt for a dairy-free whipped topping made from coconut cream or soy. These modifications allow everyone to enjoy this delightful tart, fitting seamlessly into dessert planning for various dietary preferences.