Fresh Berry Tart – Light and Easy Berry Dessert!
Discover the delightful simplicity of an easy berry tart, a creation that embodies the essence of fresh, vibrant flavors with minimal fuss. This recipe is a testament to how a few quality ingredients can transform into an impressive dessert, perfect for any occasion that calls for a touch of sweetness and a burst of fruity goodness.
Imagine a flaky, buttery crust cradling a medley of jewel-toned berries, lightly sweetened and baked to perfection. It’s a dessert that looks as beautiful as it tastes, making it a guaranteed crowd-pleaser without demanding hours in the kitchen. Get ready to experience a truly satisfying treat.
Why You Will Love This Recipe
- Effortless Elegance: This tart provides a sophisticated dessert with a surprisingly simple preparation, ideal for both novice bakers and seasoned hosts seeking a quick yet impressive option for gatherings or a quiet indulgence.
- Speedy Assembly: With just minutes of prep time, you can have this beautiful berry tart ready for the oven, making it a perfect last-minute dessert solution when unexpected guests arrive or a sweet craving strikes.
- Versatile Berry Delight: Utilizing a mix of fresh berries allows for a dynamic flavor profile and a visually stunning presentation, offering flexibility to use seasonal favorites or what’s readily available in your pantry.
- Minimal Ingredients: The beauty of this recipe lies in its short ingredient list, highlighting how basic components like puff pastry and fresh fruit can create something truly special without an extensive shopping trip.
- Quick Baking Time: A short baking duration means you won’t be waiting long to enjoy this delicious treat, transforming your kitchen with the comforting aroma of warm berries and pastry in no time at all.
Ingredients You Need
The success of this easy berry tart hinges on the quality of its components. Opting for the freshest berries available will ensure a vibrant, juicy filling that sings with natural sweetness, complementing the rich, buttery notes of the puff pastry beautifully. The strawberry jam provides a luscious base layer, adding depth and a concentrated fruit flavor that marries perfectly with the fresh berries.
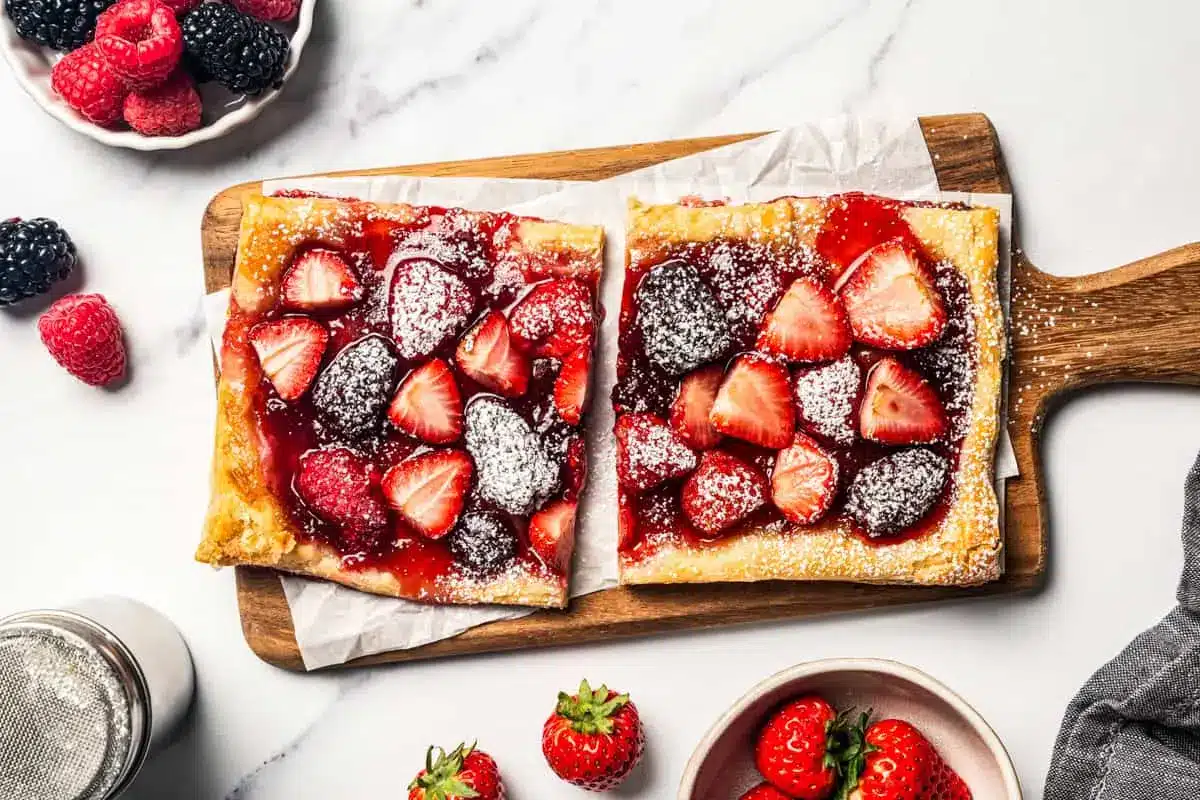
The Easiest Summer Berry Tart
This easy berry tart needs only 5 ingredients and takes 10 minutes to prepare for the oven. It has a crisp, buttery puff pastry crust covered with strawberry jam and sugar-coated berries.
- 1 sheet puff pastry, thawed, cut in half
- 2 cups mixed fresh berries
- 4 tablespoons strawberry jam, divided
- powdered sugar
- 1Preheat the oven to 400°F. Line a baking sheet with parchment paper.
- 2Combine the berries and sugar in a mixing bowl; lightly stir, then let stand for 5 minutes.
- 3Place the puff pastry dough on the previously prepared baking sheet and cut it in half.
- 4Spread 2 tablespoons of strawberry jam right down the middle of each pastry sheet.
- 5Evenly divide the berries and arrange them over the strawberry jam, down the middle of each pastry sheet.
- 6Bake for 18 to 20 minutes, or until golden brown.
- 7Remove and let the tart stand for a few minutes. Dust with powdered sugar, cut and serve.
Keywords: berry tart, puff pastry, easy dessert, summer dessert, fruit tart, 5 ingredient
- puff pastry: one sheet, thawed and cut in half, forms the crisp, golden base of your tart.
- mixed fresh berries: two cups of your favorite berries like strawberries, raspberries, or blueberries, offering a burst of color and tartness.
- granulated sugar: a quarter cup to lightly macerate the berries, encouraging them to release their sweet juices.
- strawberry jam: four tablespoons, divided, to create a flavorful layer beneath the berries and enhance their sweetness.
- powdered sugar: for a delicate dusting over the cooled tart, adding a touch of elegance.
The precise quantities for each ingredient are detailed in the recipe card provided.
Variations
For those following a plant-based lifestyle, transforming this easy berry tart into a vegan delight is remarkably straightforward. Begin by ensuring your puff pastry is vegan-friendly, as many commercially available options contain butter. Then, substitute the strawberry jam with a high-quality vegan fruit spread or a homemade berry compote. The fresh berries and sugar remain the same, making for a delicious dairy-free and egg-free treat that’s just as impressive.
If you’re looking to reduce carbohydrates without sacrificing flavor, this berry tart can be adapted for a low-carb diet. The puff pastry, being a flour-based product, is inherently higher in carbs. For a true low-carb alternative, consider using a base made from almond flour or coconut flour mixed with a binder like psyllium husk and a touch of sweetener. You would then layer your berries over this nut-based crust. This modification requires a different preparation method for the base but still allows for a wonderful berry topping.
To introduce a sophisticated twist, consider adding a layer of lemon curd beneath the strawberry jam. The bright, zesty notes of the lemon curd will cut through the sweetness of the berries and jam, creating a more complex flavor profile. Alternatively, a sprinkle of finely chopped toasted nuts, such as almonds or pecans, can be added over the jam layer before the berries, providing a delightful crunch and nutty aroma that elevates the entire tart. You might also explore adding a hint of cinnamon or cardamom to the berries for a warming spice note.
How to Prepare easy berry tart
Step 1: Prepare to Bake
The very first step towards creating your exquisite easy berry tart involves preheating your oven to the optimal temperature. Set your oven to 400 degrees Fahrenheit (200 degrees Celsius). This ensures that the moment your tart enters the oven, it begins its transformation into a golden, flaky masterpiece. Simultaneously, prepare a baking sheet by lining it with parchment paper.
This parchment paper acts as a non-stick barrier, preventing any potential sticking and making the removal of your baked tart a breeze. It also helps in even heat distribution across the bottom of the pastry, contributing to a perfectly crisp crust. Having your baking sheet ready means you can quickly transfer the assembled tart without any delays once you’re ready to bake.
This initial preparation is crucial for achieving that perfect puff pastry texture; a hot oven is key to achieving maximum lift and crispness. Ensure your oven rack is positioned in the center of the oven for the most even cooking results. A well-preheated oven is the silent partner in creating a beautiful, golden-brown exterior.
Step 2: Coat the Berries
In a medium mixing bowl, gently combine the two cups of fresh mixed berries with the quarter cup of granulated sugar. It’s important to toss them lightly, ensuring each berry gets a delicate coating of sugar without becoming bruised or crushed. This step is often referred to as macerating the berries, a technique that draws out their natural juices.
Allow the berries to stand for approximately five minutes. During this brief period, the sugar will begin to work its magic, drawing out the vibrant juices from the berries. These released juices, infused with the sweetness of the sugar, will create a naturally syrupy sauce as the tart bakes, enhancing the overall flavor and moisture content of the filling.
This maceration process not only sweetens the berries slightly but also concentrates their flavor, ensuring a more intense berry taste in every bite of the tart. It’s a simple yet effective way to elevate the fruit component of your dessert, making it more delicious and visually appealing as the juices begin to pool.
Step 3: Prepare the Crust
Now, take your thawed puff pastry sheet and carefully place it onto the parchment-lined baking sheet you prepared earlier. Puff pastry can be quite delicate, so handle it gently to avoid tearing. If your pastry came folded, gently unfold it, ensuring it lies relatively flat on the baking sheet.
Using a sharp knife or a pizza cutter, carefully slice the puff pastry sheet directly in half. You will now have two distinct rectangles or squares, depending on the shape of your pastry sheet, ready to become the bases for your individual berry tarts. Ensure the cuts are clean to allow for proper puffing during baking.
Once the pastry is cut, you can begin assembling the tart. This immediate preparation ensures the pastry doesn’t sit too long at room temperature, which could affect its delicate layers and puffing ability. Having the pastry ready sets the stage for the delightful layering that is to come.
Step 4: Assemble the Tart
Take your strawberry jam and spread approximately two tablespoons of it evenly down the center of each puff pastry half. Aim to create a neat, elongated layer of jam, leaving a border of about an inch or so around the edges of the pastry. This jam layer will serve as a sweet and slightly tart foundation for the berries.
Next, carefully divide the macerated berries between the two pastry sheets, arranging them generously over the strawberry jam. Distribute them evenly across the jam layer, ensuring they form a beautiful mound down the middle of each pastry half. Try to keep the berries contained within the jam area, as this helps prevent excessive leakage during baking.
The visual appeal of the berries piled atop the jam is part of the charm of this rustic tart. Ensure there’s a good amount of fruit so that the tart is generously filled. This arrangement creates the characteristic “open-faced” style of the tart, allowing the vibrant colors of the berries to be the star.
Step 5: Bake to Golden Perfection
Carefully place the baking sheet with the assembled tarts into your preheated 400°F (200°C) oven. The high heat is crucial for achieving that signature flaky puff pastry. Bake for approximately 18 to 20 minutes, or until the puff pastry is gloriously golden brown and puffed up significantly, and the berries are bubbling merrily.
Keep an eye on the tarts during the last few minutes of baking. If one side of the puff pastry puffs up more dramatically than the other, you can gently prick the puffed-up section with a fork or the tip of a knife. This will help to deflate it slightly and ensure a more even bake across the entire surface of the tart. This is a common occurrence with puff pastry and easily remedied.
The aroma filling your kitchen will be absolutely divine as the berries caramelize and the pastry crisps. Once they’ve reached that perfect golden hue and the berry filling is glistening and bubbly, carefully remove the baking sheet from the oven. The sight of these perfectly baked tarts will bring immense satisfaction.
Step 6: Rest and Serve
Once removed from the oven, allow the berry tarts to stand on the baking sheet for a few minutes. This brief resting period allows the pastry to firm up slightly and the filling to settle, making it easier to handle and serve. Resist the urge to cut into them immediately, as the molten jam and berry juices will be extremely hot.
After they have cooled slightly, you can carefully transfer the tarts to a serving platter. This is the moment to add a final touch of elegance. Dust the tops generously with powdered sugar using a fine-mesh sieve. This creates a beautiful contrast against the vibrant berries and golden pastry, resembling a light snowfall.
Cut the tarts into desired portions and serve them while still warm or at room temperature. They are delightful on their own, but can also be accompanied by a dollop of whipped cream or a scoop of vanilla ice cream for an extra touch of indulgence. Enjoy the simple perfection of your easy berry tart!
Pro Tips for easy berry tart
Thaw Puff Pastry Properly: Ensure your puff pastry is fully thawed according to package directions, but not over-thawed. It should be pliable but still cool. If it becomes too warm or sticky, it won’t puff as well, leading to a less desirable texture. Chill it briefly in the refrigerator if it gets too soft while you’re working with it.
Don’t Overfill: While it’s tempting to pile on the berries, avoid overfilling the pastry. Leaving a small border around the edges helps contain the jam and berry juices, preventing them from spilling excessively over the sides during baking and creating a mess. A neat border ensures the pastry can puff up properly.
Use High-Quality Jam: The jam acts as a flavor enhancer and a binder for the berries. Using a good quality strawberry jam, or even a homemade version, will significantly impact the final taste of your tart. A jam with real fruit pieces will provide a more authentic and delicious experience.
Watch for Browning: Puff pastry can go from perfectly golden to burnt very quickly. Keep a close eye on your tarts during the final stages of baking. If the edges start to darken too rapidly while the center is still pale, you can loosely tent the tart with aluminum foil to protect the edges from over-browning while the rest finishes cooking.
Berry Drainage is Key: If you choose to use frozen berries, ensure they are completely thawed and thoroughly drained. Excess moisture from frozen berries can make the puff pastry soggy. Gently pat them dry with paper towels after thawing to remove as much liquid as possible before adding them to the tart.
Serving Suggestions for easy berry tart
Decoration
To elevate the visual appeal of your easy berry tart, a dusting of powdered sugar is a classic and effective choice. Use a fine-mesh sieve to distribute it evenly, creating a delicate, snowy effect that contrasts beautifully with the vibrant berries and golden crust. For an extra touch of greenery and freshness, consider garnishing with a few small mint leaves, their bright green color popping against the red and purple hues of the berries.
A light drizzle of melted white chocolate or dark chocolate sauce can add a touch of decadence and visual interest. This can be done in a zigzag pattern or a more artistic swirl over the finished tart. If you’ve used a variety of berries, arranging them in a visually appealing pattern before baking can also enhance the tart’s decoration, showcasing the different colors and textures.
For a slightly more elaborate decoration, you could add a few edible flowers like pansies or violas. Ensure they are food-grade and have a mild flavor. A scattering of toasted slivered almonds or chopped pistachios around the edges or over the top can add a textural element and a sophisticated finish.
Side Dishes
This easy berry tart is wonderfully versatile and pairs well with a variety of accompaniments. A dollop of freshly whipped cream, lightly sweetened and perhaps infused with a hint of vanilla extract, provides a creamy, cooling contrast to the tart’s crisp pastry and fruit. For those who enjoy a richer flavor, a scoop of high-quality vanilla bean ice cream is an absolute classic, melting delightfully into the warm tart.
A simple side of fresh fruit salad, perhaps featuring melon, pineapple, or kiwi, can add a refreshing element and extend the fruit theme without competing with the tart. For a more decadent pairing, a rich crème anglaise or a light lemon curd sauce can be served alongside the tart, adding layers of complementary flavors and textures.
If serving this tart as part of a brunch or light meal, consider a refreshing beverage like iced tea, lemonade, or a sparkling fruit punch. For a more adult occasion, a Moscato d’Asti or a sweet dessert wine can complement the berry flavors beautifully. A small side of yogurt or a light berry coulis can also enhance the fruitiness.
Creative Serving Ideas
Transform individual servings of this easy berry tart into elegant mini desserts by cutting the pastry into smaller squares before assembling and baking. These bite-sized treats are perfect for parties and buffets, allowing guests to sample multiple flavors or enjoy a sweet ending without a large portion. You can also arrange these smaller tarts on a tiered stand for a visually stunning presentation.
Consider serving warm slices of the tart with a drizzle of balsamic glaze. The subtle acidity and sweetness of the balsamic reduction beautifully complement the berries and pastry, offering a sophisticated flavor profile. This is especially delightful if you’ve incorporated berries like raspberries or blackberries which have a natural tartness.
For a fun, interactive dessert experience, set up a “tart bar” where guests can add their own toppings. Offer bowls of extra berries, different jams, chocolate shavings, chopped nuts, and various sauces, allowing everyone to customize their slice. This makes the dessert experience memorable and caters to individual preferences.
Preparation & Storage
Storing Leftovers
To store any leftover easy berry tart, it’s best to let it cool completely to room temperature first. Once cooled, transfer the tart to an airtight container. This will help to protect it from absorbing odors from other foods in the refrigerator and will maintain its texture as much as possible. Avoid covering it while it’s still warm, as condensation can make the pastry soggy.
Store the container in the refrigerator. The tart will keep for up to 2-3 days. However, it’s important to note that puff pastry tends to lose its crispness over time, especially when refrigerated. For the best flavor and texture, it’s ideal to consume it within the first day or two.
When you’re ready to enjoy leftovers, it’s highly recommended to allow the tart to come back to room temperature for about 30 minutes before serving. This helps to revive some of the pastry’s texture and brings out the fruity flavors.
Freezing
Freezing the baked easy berry tart is possible, though it will likely affect the crispness of the puff pastry. To freeze, ensure the tart is completely cooled and has not been refrigerated for more than a day. Wrap the tart tightly, first in plastic wrap and then in a layer of aluminum foil, or place it in a freezer-safe airtight container.
Label the container with the date and store it in the freezer for up to 1-2 months. While the texture may change slightly upon thawing, the flavors should remain intact. It’s important to note that freezing is best done with a tart that has already been baked, as unbaked puff pastry can behave unpredictably after freezing and thawing.
If you plan to freeze portions, individual slices can be wrapped and frozen separately. This allows you to thaw only what you need, minimizing the need to thaw and refreeze the entire tart. This method is convenient for smaller households or for ensuring you always have a dessert option available.
Reheating
To reheat a leftover easy berry tart, the goal is to restore some of its original crispness. The best method is to use your oven. Preheat your oven to a moderate temperature, around 300-325°F (150-160°C). Place the tart on a baking sheet, and if it was stored uncovered or you want extra crispness, line the sheet with parchment paper.
Reheat for about 5-10 minutes, depending on the size of the tart and how cold it is. Watch it closely to ensure it doesn’t overcook or burn. The aim is to gently warm the filling and crisp up the pastry again. You can also use an air fryer on a low setting for similar results, checking frequently.
Microwaving is generally not recommended for reheating puff pastry, as it tends to make the pastry soggy and chewy rather than crisp. If you must use a microwave, heat in very short intervals, perhaps 15-20 seconds at a time, and be prepared for a softer pastry texture. The oven or air fryer will provide a far superior result for reheating this type of dessert.
Frequently Asked Questions
-
Can I use a different type of jam instead of strawberry jam in this easy berry tart recipe?
Absolutely! While strawberry jam provides a classic and delightful base, you can certainly experiment with other flavors. Raspberry jam, apricot preserves, or even a tart cherry jam would complement the fresh berries beautifully. The key is to choose a jam that has a good fruit flavor and isn’t overly sweet, as the berries themselves will add a significant amount of sweetness. For an added layer of complexity, consider a mixed berry jam or a rhubarb jam. Ensure the jam has a spreadable consistency; if it’s too stiff, you might need to warm it slightly to make it easier to spread on the puff pastry.
-
What is the best way to prevent the puff pastry from becoming soggy when baking with fresh berries?
The primary culprit for soggy pastry is excess moisture. To combat this, ensure your puff pastry is properly thawed and handled at a cool temperature; warm pastry can lead to less puff. When using fresh berries, tossing them with sugar and allowing them to macerate for a short period helps them release some juices beforehand. You can even drain off any excess liquid that pools at the bottom of the bowl after maceration, although this step is optional. If using frozen berries, thawing them completely and patting them very dry with paper towels is crucial. Additionally, creating a slight barrier with the jam layer underneath the berries helps, and ensuring your oven is hot enough (400°F) promotes quick puffing and crisping of the pastry.
-
How can I make this easy berry tart ahead of time for a party or event?
While this tart is best enjoyed fresh, you can certainly prepare certain components in advance to save time on the day of your event. You can thaw the puff pastry and cut it into the desired shapes a day ahead and keep it chilled. The berries can be washed and mixed with sugar a few hours before baking, and stored in the refrigerator; just be sure to drain any excess liquid that accumulates. The jam can also be measured out. However, it’s highly recommended to assemble and bake the tart as close to serving time as possible to ensure the pastry is at its best, crisp and flaky. If you must bake it ahead, store it at room temperature and gently reheat it in a low oven (around 300°F) for a few minutes before serving to refresh the pastry’s crispness.