Irresistible Curry Chicken Roti for a Delicious Dinner

The vibrant colors and intoxicating spices of Caribbean cuisine have always held a special place in my heart, especially when it comes to a comforting dish like Curry Chicken Roti. Picture this: as the tantalizing scent of garlic and ginger mingles with the warm spices, you’re transported to sun-drenched shores, where every bite bursts with flavor.
I used to think that such a culinary delight was only for grand family gatherings or special occasions, but this quick and easy recipe proves otherwise. Whether you’re hosting friends or simply in need of a cozy weeknight meal, this versatile dish can be whipped up in no time, making it a go-to favorite in my kitchen. With its luscious, creamy curry enveloping tender shredded chicken, all wrapped in soft, flaky roti, it’s the perfect fusion of rich tradition and modern convenience. Even better, this recipe is fully customizable—think vegetarian or vegan options—so everyone can enjoy a taste of the Caribbean. Join me as we dive into this delicious journey!
Why You Will Love This Recipe
- Flavor Explosion: Delight in the rich, aromatic spices that make every bite a tropical getaway, transporting your taste buds with every mouthful.
- Quick to Prepare: This satisfying dish can be whipped up in under 30 minutes, making it an ideal solution for busy weeknights when time is of the essence.
- Versatile Options: Easily adapt the recipe to suit any dietary preference, whether you prefer classic chicken, hearty vegetables, or even a delightful vegan twist for a plant-based meal.
- Cultural Fusion: This recipe expertly brings together the beloved Caribbean and Indian flavors, offering a unique and exciting culinary experience that is truly a treat for the senses.
- Family Favorite: The irresistible combination of warm, fragrant curry and soft, yielding roti is sure to serve up smiles, making it an instant hit at any gathering or family meal.
Ingredients You Need
The foundation of any exceptional dish lies in the quality of its ingredients, and this Curry Chicken Roti is no exception. Using fresh, aromatic spices will elevate the flavors significantly, ensuring an authentic and deeply satisfying taste. Pay attention to the details, like using fresh ginger and garlic, as these aromatics are key to building the complex flavor profile.
Energizing Curry Chicken Roti for a Flavorful Weeknight Feast
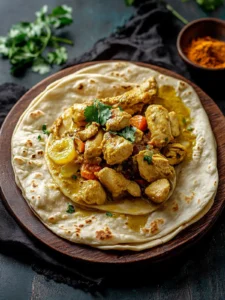
Experience the vibrant flavors of this Curry Chicken Roti, perfect for a cozy weeknight dinner. This dish offers a flavor explosion with aromatic Caribbean and Indian spices, is quick to prepare in under 30 minutes, and is versatile enough for various dietary preferences.
- 1 pound Boneless skinless chicken thighs
- 2 tablespoons Vegetable oil (Coconut oil adds flavor)
- 1 medium Onion (Chopped)
- 2 cloves Garlic (Minced)
- 1 tablespoon Ginger (Freshly grated)
- 2 tablespoons Curry powder (Essential spice)
- 1 teaspoon Ground turmeric
- 1 teaspoon Ground cumin
- 1 teaspoon Ground cinnamon
- Salt and pepper to taste (For seasoning)
- 1 cup Coconut milk (Richness and creaminess)
- 1 cup Chicken broth (Low-sodium is preferred)
- 1 tablespoon Brown sugar (Can swap for honey or maple syrup)
- 1/4 cup Fresh cilantro (Chopped, optional)
- 4 pieces Roti flatbreads (Soft and fluffy)
- 1Heat vegetable oil in a large skillet over medium heat. Once shimmering, add the chopped onion and sauté for 2-3 minutes until softened and translucent.
- 2Stir in the minced garlic and freshly grated ginger. Cook for about 1-2 minutes until the fragrance fills your kitchen.
- 3Sprinkle in the curry powder, ground turmeric, ground cumin, ground cinnamon, salt, and pepper. Mix and let cook for about a minute.
- 4Add the chicken thighs to the skillet, brown each side for approximately 5 minutes.
- 5Pour in coconut milk, chicken broth, and brown sugar. Stir well, bring to a simmer, cover, and cook for 20-25 minutes until chicken is tender.
- 6Remove the chicken, shred it using two forks, and return to the mixture. Stir in chopped cilantro.
- 7Heat roti flatbreads in a skillet for about 1-2 minutes on each side until warm and slightly toasted.
- 8Spoon the curry onto a warm roti, fold or wrap it, and enjoy!
Keywords: Curry Chicken Roti, Caribbean, Indian, Weeknight Dinner, Chicken Curry, Roti
- chicken thighs: boneless and skinless pieces ensure maximum tenderness and absorb the curry sauce beautifully.
- vegetable oil: a neutral oil is perfect for sautéing, but feel free to use coconut oil for an extra layer of tropical flavor.
- onion: a medium yellow or white onion provides a sweet and aromatic base that is essential for building depth.
- garlic: fresh minced garlic cloves offer a pungent aroma and intense flavor that pre-minced versions can’t match.
- ginger: freshly grated ginger root adds a wonderful warmth and zesty kick that is characteristic of this dish.
- curry powder: this is your star spice blend; choose a good quality one for an authentic and robust flavor.
- ground turmeric: adds a beautiful earthy color and a subtle, slightly bitter note to the curry.
- ground cumin: provides a warm, nutty flavor that complements the other spices and adds complexity.
- ground cinnamon: a small amount offers a hint of warmth and subtle sweetness, balancing the savory notes.
- salt and pepper: essential for seasoning and bringing out the full flavor of all the other ingredients.
- coconut milk: full-fat coconut milk is recommended for its rich creaminess, but light can be used for a lower-calorie option.
- chicken broth: low-sodium chicken broth adds depth and a savory undertone to the sauce.
- brown sugar: a touch of sweetness balances the spices and the slight bitterness of turmeric.
- fresh cilantro: chopped cilantro adds a burst of fresh, herbaceous flavor as a garnish.
- roti flatbreads: soft, pliable roti are the perfect vessel for scooping up the delicious curry.
The exact quantities for each ingredient are readily available in the accompanying recipe card, ensuring you have all the precise measurements needed for success.
Variations
This Curry Chicken Roti recipe is wonderfully adaptable, inviting you to experiment and make it perfectly suited to your palate and dietary needs. The core flavors are so robust that they stand up beautifully to substitutions and additions, making it a truly versatile dish.
For a delightful lighter version, consider substituting the chicken thighs with skinless, boneless chicken breasts. Opting for light coconut milk instead of full-fat will also significantly reduce the calorie count without sacrificing too much of that essential creaminess. These thoughtful swaps ensure that you can still indulge in the comforting flavors of this dish, even when mindful of your calorie intake.
If you’re looking to make this recipe entirely vegetarian or vegan, the possibilities are exciting. Hearty vegetables like cubed potatoes, florets of cauliflower, or even a can of drained and rinsed chickpeas make excellent substitutes for the chicken. Simply replace the chicken broth with a good quality vegetable broth to maintain that savory depth.
Craving a bit more heat? You can easily amplify the spice level by adding finely chopped fresh jalapeños or a generous dash of cayenne pepper directly into the curry base. This simple addition will instantly elevate your dish, delivering a warming sensation that ignops up your senses with every flavorful bite. Experiment with different types of chili peppers for a nuanced heat profile.
To infuse an even more pronounced tropical essence, consider incorporating some grated fresh coconut or toasted coconut flakes directly into the curry mixture during the simmering stage. This not only adds a delightful textural contrast with its chewiness but also intensifies the overall coconut flavor, truly transporting you to island shores with each mouthful. It’s a subtle enhancement that makes a significant difference.
Don’t hesitate to play with the herbs used for garnish. While fresh cilantro is traditional and offers a bright, fresh note, you could also try fresh parsley or even mint for a different aromatic dimension. Each herb brings its own unique fragrance, subtly transforming the dish’s overall profile and keeping your mealtime adventures exciting and diverse. It’s a small change that offers a big impact.
When it comes to serving, consider alternatives to traditional roti. Whole wheat roti can offer a slightly heartier bite and added fiber. For those seeking a gluten-free option, savory pancakes or even large, soft corn tortillas can serve as an excellent base, ensuring that everyone can enjoy this delicious curry, regardless of dietary restrictions. The key is to find a soft and yielding base that can hold the flavorful curry.
Another fantastic shortcut for building deep flavor quickly is to use a good quality store-bought curry paste. While homemade is always wonderful, a flavorful paste can offer a different flavor dimension and significantly cut down on prep time. Just remember to taste and adjust the spices and heat levels as you go, as different pastes can vary in intensity.
How to Prepare curry chicken roti
Step 1: Building the Aromatic Base
Begin by heating your vegetable oil in a large, heavy-bottomed skillet or a Dutch oven over medium heat until it shimmers gently. This initial step is crucial for evenly sautéing the aromatics and developing their full flavor potential. Carefully add your finely chopped onion to the hot oil, stirring occasionally as it begins to soften and turn translucent, a process that usually takes about 2 to 3 minutes.
Once the onions are nicely softened and have released their sweet fragrance, it’s time to introduce the garlic and ginger. Stir in the minced garlic and freshly grated ginger, sautéing them for an additional 1 to 2 minutes. Be mindful not to burn the garlic, as this can impart a bitter taste; the goal is to release their wonderful aromas into the oil, creating an intoxicating scent that fills your kitchen.
This combination of sautéed onions, garlic, and ginger forms the flavor foundation for your entire curry. It’s a simple yet incredibly effective technique used across many cuisines to build depth and complexity right from the start. The gentle cooking process sweetens the onions and mellows the sharpness of the garlic and ginger, preparing them to meld beautifully with the upcoming spices.
Step 2: Toasting the Spices for Maximum Flavor
Now comes the magical part: infusing the oil with the vibrant essence of your chosen spices. Sprinkle in your curry powder, ground turmeric, ground cumin, ground cinnamon, along with a good pinch of salt and freshly ground black pepper directly into the skillet with the aromatics. It’s important to let these spices toast gently in the hot oil for about a minute, stirring constantly.
This toasting process is absolutely key to unlocking the full potential of your spices. When heated, the essential oils within the ground spices are released, intensifying their aromas and flavors. This brief sautéing step transforms them from mere powders into a fragrant, complex blend that will form the heart of your curry sauce. If the spices start to stick, you can add a tiny splash more oil to prevent them from burning.
Take a moment to inhale the incredible aroma that this step creates – it’s truly intoxicating and a sure sign that you’re on your way to an amazing meal. The vibrant colors of the turmeric will also begin to bloom, coating the onions and garlic in a rich, golden hue. This is where the magic of the curry truly begins to unfold.
Step 3: Browning the Chicken for Tenderness and Flavor
Gently introduce the boneless, skinless chicken thighs into the skillet, nestling them amongst the spiced aromatics. The goal here is to brown each side of the chicken pieces for approximately 5 minutes, achieving a lovely golden-brown sear. This searing process not only adds a delicious depth of flavor through the Maillard reaction but also helps to seal in the chicken’s natural juices, ensuring a tender and succulent result.
Don’t overcrowd the pan; if necessary, brown the chicken in batches to ensure each piece gets adequate contact with the hot skillet. Overcrowding will cause the chicken to steam rather than sear, diminishing the desired texture and browning. Once browned, you can temporarily remove the chicken from the skillet and set it aside on a plate, leaving the flavorful bits in the pan.
The fond that has developed on the bottom of the skillet from browning the chicken is pure flavor gold. This concentrated essence will dissolve into the sauce, adding an extra layer of richness and complexity to your final dish. The combination of perfectly seared chicken and the spiced aromatic base sets the stage for a truly memorable curry experience.
Step 4: Simmering to Perfection
Pour the creamy coconut milk and the chicken broth into the skillet, ensuring you scrape up any browned bits from the bottom of the pan – this is where all the concentrated flavor resides! Stir these liquids together with the spiced aromatics and chicken, making sure everything is well combined.
Add the tablespoon of brown sugar to the mixture; this small addition is crucial for balancing the vibrant spices and providing a subtle sweetness that rounds out the overall flavor profile. Stir everything gently to ensure the sugar dissolves completely into the sauce. Bring the entire mixture to a gentle simmer over medium-low heat; you should see small bubbles appearing around the edges of the pan.
Once simmering, cover the skillet tightly with a lid, reducing the heat to low. Allow the curry to cook undisturbed for 20 to 25 minutes. During this time, the chicken will become incredibly tender, and the flavors of the spices, coconut milk, and broth will meld together beautifully, creating a rich and fragrant sauce. Resist the urge to lift the lid too often, as this releases precious steam and heat, prolonging the cooking time.
Step 5: Shredding and Finishing the Curry
After the simmering period, carefully remove the tender chicken thighs from the skillet and place them onto a clean cutting board or a sturdy plate. Using two forks, one to hold the chicken steady and the other to pull, shred the chicken into bite-sized pieces. This shredding method ensures a wonderfully tender and easily incorporated texture for the curry.
Return the shredded chicken back into the skillet, nestling it within the luscious curry sauce. Stir gently to ensure the shredded chicken is evenly distributed throughout the sauce, allowing it to absorb all those wonderful flavors. If you’re using fresh cilantro, now is the time to stir in your chopped garnish, adding a burst of freshness and a vibrant green contrast to the rich yellow curry.
Taste the curry at this point and adjust seasonings if necessary. You might want a little more salt, pepper, or even a tiny pinch more sugar depending on your preference. The consistency of the sauce should be creamy and coating; if it seems too thick, you can add a small splash of extra chicken broth or coconut milk. If it’s too thin, you can let it simmer uncovered for a few more minutes to reduce slightly.
Step 6: Warming the Roti and Serving
While the curry is finishing, it’s time to prepare your roti flatbreads. You can warm them in a dry skillet over medium heat for about 1 to 2 minutes per side, or until they are soft and slightly pliable. Alternatively, you can wrap them in a damp kitchen towel and microwave them for about 30 seconds to achieve a soft, steamy texture. Avoid overcooking them, which can make them tough.
Once the roti are warm and the curry is perfectly seasoned and tender, it’s time to assemble and serve. Spoon generous portions of the fragrant Curry Chicken Roti onto each warm roti. You can either fold the roti in half like a taco or wrap it up like a burrito, depending on your preference for how you like to eat your curry.
Serve immediately while everything is piping hot for the best texture and flavor experience. The combination of the warm, soft roti embracing the rich, spiced chicken curry is a truly comforting and delicious meal that is sure to be a hit. Don’t forget to have any extra garnishes or side dishes ready to accompany this fantastic dish!
Pro Tips for curry chicken roti
Use Fresh Spices: For an unparalleled depth of flavor, always opt for high-quality, freshly ground spices whenever possible. The aroma and taste of fresh spices will significantly elevate your Curry Chicken Roti, bringing an authentic and vibrant character to the dish that older, pre-ground spices simply cannot match. This is a small detail that makes a world of difference in the final outcome.
Marinate for Deeper Flavor: To truly infuse the chicken with flavor and enhance its tenderness, consider marinating the chicken thighs for at least 30 minutes, or even up to a few hours, in some of the curry powder, a splash of oil, and a pinch of salt before cooking. This allows the spices to penetrate the meat, creating a more robust and complex flavor profile in every bite.
Control the Spice Level: Your personal preference for heat is paramount. Adjust the amount of chili powder, cayenne pepper, or even the type of curry powder you use to perfectly match your desired spice level. You can always add more heat towards the end of cooking, but it’s harder to cool down a curry that’s too fiery. Start with less and build up if needed.
Perfect Your Roti: The roti are the edible vessel for your delicious curry, so a little attention to them pays off. Ensure the dough is rolled out evenly for consistent cooking. Cook them on medium-high heat to achieve that desirable flakiness; a little bit of oil or water in the dough can help achieve the perfect softness. Practice makes perfect when it comes to roti-making.
Enjoy it Fresh: Curry Chicken Roti is a dish that truly shines when served immediately after preparation. The textures are at their best, with the warm, soft roti perfectly complementing the rich, hot curry. While leftovers are delicious, the immediate enjoyment offers the pinnacle of this dish’s culinary experience, so try to serve it as soon as it’s ready.
Serving Suggestions for curry chicken roti
Decoration
Elevate the visual appeal of your Curry Chicken Roti with a thoughtful garnish that adds both color and freshness. A generous sprinkle of freshly chopped cilantro is the classic choice, its bright green hues contrasting beautifully with the golden curry. If cilantro isn’t your preference, finely chopped fresh parsley or even a few mint leaves can offer a different, yet equally appealing, aromatic and visual flourish.
Side Dishes
To create a balanced and complete meal, consider pairing your Curry Chicken Roti with complementary side dishes that enhance the main course. A simple, crisp green salad tossed with a light citrus vinaigrette provides a refreshing counterpoint to the richness of the curry, cleansing the palate with each bite. Alternatively, serving it alongside fragrant coconut rice amplifies the tropical theme, creating a harmonious flavor pairing that is truly transportive.
For those who enjoy a cooling element, a dollop of yogurt raita, made with plain yogurt, cucumber, and fresh mint, offers a creamy and refreshing contrast to the warm spices. Spicy mango chutney is another excellent accompaniment, providing a delightful balance of sweetness and heat that brightens up every mouthful of curry. Grilled vegetables, such as charred bell peppers and zucchini, add a smoky depth and satisfying texture that complements the soft roti and creamy curry wonderfully.
Creative Serving Ideas
Think beyond the traditional fold. For a more elegant presentation, consider deconstructing the dish by serving the shredded curry alongside neatly arranged warm roti. You can also offer a “build-your-own” roti bar, allowing guests to customize their own servings with various toppings and side dishes. Another fun idea is to serve individual portions of the curry in small bowls, with a single roti placed artfully beside it, perfect for plated meals or casual gatherings.
For a truly immersive Caribbean experience, include crispy plantain chips as a crunchy textural element that harmonizes beautifully with the smooth curry. And to wash it all down, a tall glass of chilled lemonade or refreshing iced tea provides the perfect beverage to cut through the richness and spice, ensuring your palate remains refreshed throughout the meal. Remember, the goal is to create an experience that is as delightful to the eyes as it is to the taste buds.
Preparation & Storage
Storing Leftovers
Should you be fortunate enough to have any Curry Chicken Roti leftover, storing it properly ensures its deliciousness can be enjoyed again. Transfer the cooled curry and any remaining shredded chicken into an airtight container. This will prevent it from absorbing any odors from other foods in the refrigerator and will help maintain its freshness for optimal flavor when reheated.
Leftovers can be safely stored in the refrigerator for up to 3 days. Ensure the container is well-sealed to prevent any drying out. When you’re ready to enjoy them again, the best method for reheating is on the stovetop. This allows for gentle, even heating and helps to restore the creamy consistency of the curry sauce. Be sure to stir it occasionally to prevent sticking.
If the curry seems a bit too thick after refrigeration, you can easily revive its creamy texture by adding a splash of extra coconut milk or chicken broth while it’s reheating. This simple step will bring back the lusciousness of the sauce, making your leftovers taste almost as good as when they were freshly made. It’s a simple technique for extending the enjoyment of this flavorful dish.
Freezing
For longer-term storage, Curry Chicken Roti freezes remarkably well, making it a fantastic candidate for meal prepping. Allow the cooked curry to cool completely before portioning it into freezer-safe airtight containers or heavy-duty freezer bags. Removing as much air as possible before sealing will help prevent freezer burn and maintain the quality of the curry over time.
The curry can be stored in the freezer for up to 2 months. When you’re ready to thaw it, the safest and most effective method is to transfer the frozen container from the freezer to the refrigerator the night before you plan to eat it. This slow thawing process helps to preserve the texture and flavor of the curry better than faster methods.
Once fully thawed in the refrigerator, you can proceed with reheating it on the stovetop as you would with fresh leftovers. Remember that the roti themselves are best enjoyed fresh, so it’s generally recommended to freeze only the curry filling. You can then prepare fresh roti or warm up pre-made ones when you’re ready to serve the thawed curry.
Reheating
Reheating your Curry Chicken Roti is a straightforward process that brings back its delicious flavors and comforting warmth. The most effective way to reheat the curry is gently on the stovetop over medium-low heat. This allows for even heating and helps to re-emulsify the sauce, ensuring it remains creamy and rich.
As you reheat, stir the curry occasionally to prevent it from sticking to the bottom of the pan. If the curry seems a little dry or has thickened too much during storage, don’t hesitate to add a small splash of coconut milk or chicken broth. This will help to loosen the sauce and restore its desirable creamy consistency, making it just as delightful as the first time.
While the curry is best reheated on the stovetop, the roti can be warmed quickly in a dry skillet over medium heat for about 1-2 minutes per side until they are soft and pliable. Alternatively, a few seconds in the microwave wrapped in a damp paper towel will also suffice. Remember, the goal is to warm them through, not to make them crispy, so they can properly embrace the flavorful curry.
Frequently Asked Questions
-
How do I select the right chicken for Curry Chicken Roti?
Absolutely! For the most tender and flavorful outcome, I highly recommend using boneless, skinless chicken thighs. Their higher fat content makes them more forgiving during cooking and results in a juicier dish. If you’re looking for a leaner option, skinless chicken breasts are a perfectly acceptable substitute; just be mindful not to overcook them to maintain their tenderness.
When selecting your chicken, always prioritize pieces that have a vibrant pinkish color and avoid any that appear dull, dark, or have any unusual discolorations. Always check for a fresh, clean smell, and avoid any chicken that carries a foul odor, as this indicates it’s not fresh. Ensuring you start with high-quality chicken is the first step towards a superior Curry Chicken Roti.
-
What’s the best way to store leftover Curry Chicken Roti?
Leftovers from this delightful Curry Chicken Roti are best stored in an airtight container within the refrigerator. This type of container is crucial for preventing the curry from drying out and absorbing unwanted odors from other foods in your fridge. Properly stored, the curry will maintain its optimal flavor and texture for up to 3 days.
When you are ready to enjoy your leftovers, I strongly suggest reheating the curry gently on the stovetop. This method allows for even heating and helps to revive the creamy consistency of the sauce. If the curry appears a bit dry after its time in the fridge, adding a small splash of coconut milk or chicken broth while it heats up will restore its luscious texture beautifully.
-
Can I freeze Curry Chicken Roti?
Yes, you certainly can freeze the Curry Chicken Roti, although it’s best to freeze only the curry filling rather than the assembled dish. This ensures the best texture upon reheating, as roti can become slightly gummy if frozen and thawed.
To freeze, ensure the curry has cooled completely. Transfer it into a freezer-safe airtight container, pressing out as much air as possible before sealing. The curry can be safely stored in the freezer for up to 2 months. For the best results when you’re ready to eat, thaw the frozen curry overnight in the refrigerator before gently reheating it on the stovetop.
-
How can I troubleshoot if the curry is too thick or too spicy?
If you find your curry has become too thick during the cooking or reheating process, the solution is quite simple: just add a bit more liquid. Gradually stir in additional chicken broth or coconut milk, a tablespoon at a time, until you reach your desired creamy consistency. Continue to stir gently while heating to ensure it’s evenly incorporated.
For a curry that’s a bit too spicy for your liking, sweetness can be a wonderful balancing agent. Stirring in a tablespoon of brown sugar, honey, or maple syrup can help to mellow out the heat. For future preparations, you can always adjust the amount of chili powder or curry powder used to better suit your personal taste preferences. Tasting and adjusting as you go is always the best approach.
-
Are there dietary considerations for pets or allergies with this recipe?
When considering feeding any human food to pets, it is always best to consult with your veterinarian first. Many spices and ingredients that are safe for humans can be harmful to animals. For this recipe, specifically, you would want to check about common allergens. It’s worth noting that this recipe contains coconut, which can be an allergen for some individuals, and it might not be suitable for those with severe nut allergies, as cross-reactivity can occur.
For individuals following a gluten-free diet, you can easily adapt this recipe. The key is to substitute the traditional roti flatbreads with certified gluten-free roti or another suitable gluten-free alternative like large corn tortillas or savory pancakes. Always double-check the labels of all other ingredients, such as curry powder and broth, to ensure they are also certified gluten-free to avoid any cross-contamination.
-
Can I prepare the Curry Chicken Roti vegetarian or vegan?
Absolutely, this recipe is wonderfully adaptable for vegetarian and vegan diets! For a delicious vegetarian version, you can swap out the chicken thighs for hearty vegetables. Cubed potatoes, cauliflower florets, or even a can of rinsed chickpeas make excellent protein-rich substitutes that absorb the curry flavors beautifully. Make sure to use vegetable broth instead of chicken broth to keep it strictly vegetarian.
To transform this into a fully vegan dish, you’ll want to ensure all your ingredients are plant-based. Replace the coconut milk with a dairy-free alternative like cashew cream or soy milk, and use vegetable broth. If any part of your curry powder blend contains animal products, opt for a vegan-certified variety. By making these simple substitutions, you can create a vibrant, nourishing, and delicious plant-based meal that everyone can enjoy!