Crispy Chicken Katsu Sandwich Recipe Easy Homemade Tonkatsu Sauce
The aroma of freshly fried chicken, a symphony of savory and sweet, often conjures images of comfort and satisfying indulgence. But what if that comforting crunch came with a sophisticated Japanese twist, nestled between soft bread and drizzled with a tangy, homemade sauce? This is the magic of the crispy chicken katsu sandwich, a dish that has captured hearts and taste buds worldwide.
It’s more than just a sandwich; it’s an experience that combines the simple pleasure of a fried chicken favorite with the nuanced flavors of Japanese cuisine. From the irresistibly crispy exterior to the juicy, tender chicken within, every element is designed to delight. Get ready to elevate your lunch game with a recipe that’s both approachable for beginners and deeply rewarding for seasoned home cooks.
Why You Will Love This Recipe
- Crispy Perfection: The double coating of panko breadcrumbs ensures an exceptionally crunchy and golden-brown exterior on the chicken katsu.
- Flavorful Tonkatsu Sauce: A homemade sauce, balancing sweet, tangy, and savory notes, elevates the sandwich beyond the ordinary.
- Quick Preparation: Despite its impressive taste, this sandwich can be on your table in under 30 minutes, perfect for busy schedules.
- Versatile Enjoyment: Ideal for a hearty lunch, a casual dinner, or even as a delightful snack.
- Customizable Delight: Easily adapt the ingredients and spice levels to suit your personal preferences and dietary needs.
Ingredients You Need
Crafting an exceptional crispy chicken katsu sandwich hinges on the quality and combination of simple, yet impactful ingredients. Selecting fresh chicken and ensuring your panko breadcrumbs are crisp will lay the foundation for success. The true magic, however, comes from the vibrant, homemade tonkatsu sauce which ties all the delicious elements together.
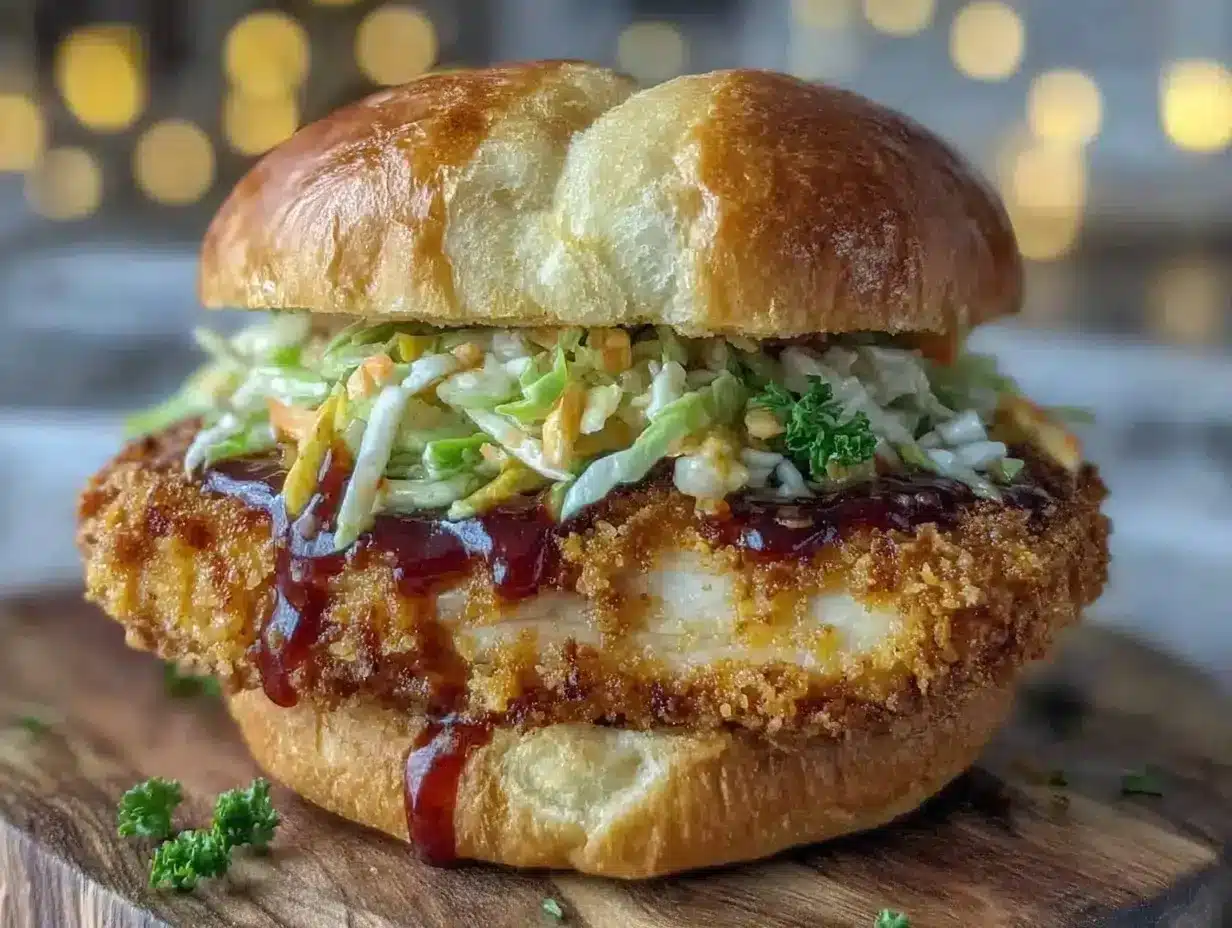
Crispy Chicken Katsu Sandwich with Easy Homemade Tonkatsu Sauce

A crunchy, juicy chicken katsu sandwich layered with tangy-sweet homemade tonkatsu sauce and fresh cabbage, perfect for a quick lunch or casual gathering.
- 2 boneless, skinless chicken breasts (pounded thin to about 1/4 inch thickness)
- Salt and pepper to taste
- 1/2 cup all-purpose flour
- 2 large eggs, beaten
- 1 1/2 cups panko breadcrumbs
- Vegetable or canola oil (about 1/2 inch deep for frying)
- 2 slices soft sandwich bread or Japanese milk bread (shokupan)
- Thinly shredded green cabbage
- For the Tonkatsu Sauce:
- 3 tablespoons ketchup
- 1 tablespoon Worcestershire sauce
- 1 teaspoon soy sauce
- 1 teaspoon mirin or honey
- 1/2 teaspoon mustard
- 1Place each chicken breast between two sheets of plastic wrap and gently pound with a meat mallet or rolling pin until about 1/4 inch thick.
- 2Season both sides of the chicken breasts lightly with salt and pepper.
- 3Set up three shallow bowls: one with 1/2 cup flour, one with 2 beaten eggs, and one with 1 1/2 cups panko breadcrumbs.
- 4Dredge each chicken breast first in flour, shaking off excess, then dip into beaten eggs, and finally press firmly into panko breadcrumbs until fully coated.
- 5Pour about 1/2 inch of vegetable oil into a heavy skillet and heat over medium heat until oil reaches 350°F (175°C).
- 6Carefully place chicken breasts in hot oil and fry for 2-3 minutes per side until golden brown and cooked through (internal temperature 165°F/74°C). Avoid overcrowding the pan.
- 7Transfer fried chicken to a paper towel-lined plate to drain excess oil and let rest for a few minutes.
- 8In a small bowl, whisk together ketchup, Worcestershire sauce, soy sauce, mirin or honey, and mustard to make the tonkatsu sauce. Adjust to taste.
- 9Lightly toast the bread slices. Spread a generous amount of tonkatsu sauce on one slice.
- 10Layer shredded cabbage and the crispy chicken cutlet on the bread slice with sauce. Add more sauce if desired.
- 11Top with the second slice of bread and cut the sandwich in half for easy eating.
Keywords: chicken katsu sandwich, tonkatsu sauce, crispy chicken sandwich, Japanese sandwich, homemade tonkatsu sauce, panko chicken, fried chicken sandwich
These ingredients, when combined with care, promise a sandwich that is both comforting and exciting. All specific quantities are detailed within the recipe card for your convenience.
Variations
For those seeking a plant-based alternative, consider using thick slices of firm tofu or hearty eggplant. These can be pounded slightly, dredged, and fried in the same manner, offering a satisfying vegetarian katsu experience. Ensure you press the tofu well to remove excess moisture for optimal crispiness.
If you’re aiming for a lower-carbohydrate option, simply swap out the traditional sandwich bread for your favorite low-carb or keto-friendly bread alternatives. You can also omit the bread entirely and serve the katsu chicken over a bed of crisp lettuce or cauliflower rice. This allows you to enjoy the core flavors with fewer carbohydrates.
A touch of heat can transform this sandwich. Incorporate a teaspoon of cayenne pepper or red pepper flakes into the panko mixture for a spicy kick. Alternatively, mix a generous dollop of sriracha or your favorite chili sauce directly into the homemade tonkatsu sauce for a fiery finish that awakens the palate.
How to Prepare crispy chicken katsu sandwich
Step 1: Prepare the Chicken Cutlets
Begin by selecting two boneless, skinless chicken breasts. The key to tender, quick-cooking katsu is uniformity in thickness. Place each chicken breast between two sheets of plastic wrap or inside a sturdy zip-top bag. Using a meat mallet, the flat side of a chef’s knife handle, or even a rolling pin, gently but firmly pound the chicken breasts until they are roughly 1/4 inch thick across the entire surface. This even thickness ensures that the chicken cooks through quickly and remains incredibly tender, avoiding any dry or rubbery edges.
Once pounded to the desired thickness, it’s time to season the chicken. Lightly sprinkle both sides of each cutlet with fine sea salt and freshly ground black pepper. This initial seasoning is crucial for building flavor from the inside out, ensuring that each bite is as delicious as the last. Don’t go overboard with the salt; you want a subtle enhancement, not an overpowering taste, as the tonkatsu sauce will provide a good amount of saltiness.
Proper preparation here prevents culinary mishaps later. If you pound too hard, you risk tearing the meat, which can lead to pieces falling apart during frying. Conversely, if you don’t pound enough, you’ll end up with thicker sections that cook unevenly, resulting in some parts being perfectly done while others are still raw or overcooked. Patience and a gentle, consistent hand are your best tools at this stage.
Step 2: Set Up Dredging Stations and Coat the Chicken
Efficient dredging is vital for achieving that signature crispy panko crust. You’ll need three shallow dishes or plates. In the first dish, place about 1/2 cup of all-purpose flour. In the second, whisk two large eggs until they are well combined and slightly frothy; this acts as the binder for the breadcrumbs. In the third dish, spread out 1.5 cups of panko breadcrumbs. Panko, with its larger, airy flakes, is essential for the extra crispiness that defines authentic katsu.
Now, it’s time to coat each pounded chicken breast. First, dredge a seasoned chicken cutlet in the flour, ensuring it’s lightly coated on all sides. Gently shake off any excess flour, as too much can create a gummy layer. Next, dip the floured chicken into the beaten eggs, allowing any excess egg to drip back into the dish. The egg wash will help the panko adhere beautifully.
Finally, transfer the egg-dipped chicken to the panko breadcrumbs. Press the breadcrumbs firmly onto the chicken, ensuring every surface is completely covered. Don’t be shy; really press the panko into the meat. This step is critical for creating that satisfying crunch. If you have time, letting the breaded chicken rest on a wire rack for about 5-10 minutes before frying can help the coating adhere even better, reducing the chance of it flaking off in the hot oil.
Step 3: Fry the Chicken Katsu
Prepare for frying by pouring about 1/2 inch of a neutral oil with a high smoke point, such as vegetable, canola, or grapeseed oil, into a heavy skillet or Dutch oven. Heat the oil over medium heat. The ideal frying temperature for crispy chicken katsu is around 350°F (175°C). If you don’t have a thermometer, you can test the oil’s readiness by dropping a few panko crumbs into it; they should sizzle immediately and rise to the surface without burning too quickly.
Carefully place the breaded chicken cutlets into the hot oil. Do not overcrowd the pan, as this will lower the oil temperature and result in greasy, less crispy chicken. Fry the chicken for approximately 2-3 minutes per side, or until it’s a deep golden brown and cooked through. The internal temperature should reach 165°F (74°C). The thinness of the chicken ensures it cooks rapidly.
Once perfectly golden and cooked, use tongs or a slotted spoon to carefully remove the chicken katsu from the hot oil. Transfer the fried cutlets to a plate lined with paper towels. This crucial step absorbs any excess oil, preventing the sandwich from becoming soggy and preserving that delightful crunch. Allow the chicken to rest for a few minutes while you prepare the other components of the sandwich.
Step 4: Prepare the Homemade Tonkatsu Sauce
While the chicken rests, it’s time to whip up the signature tonkatsu sauce. This sauce is a beautiful balance of sweet, tangy, and savory, and it’s remarkably easy to make from pantry staples. In a small bowl, combine the base ingredients: 3 tablespoons of ketchup, 1 tablespoon of Worcestershire sauce, 1 teaspoon of soy sauce, 1 teaspoon of mirin (or honey if mirin isn’t available), and 1/2 teaspoon of mustard. The ketchup provides a fruity tang, the Worcestershire adds umami depth, soy sauce brings saltiness, mirin or honey offers sweetness, and mustard provides a subtle, sharp counterpoint.
Whisk these ingredients together vigorously until they are thoroughly combined and the sauce has a smooth, uniform consistency. Taste the sauce and adjust it to your personal preference. If you prefer it sweeter, add a touch more mirin or honey. If you like it tangier, a little extra ketchup or a tiny splash of vinegar can work wonders. For a deeper umami flavor, a drop more soy sauce is always an option.
This sauce is incredibly versatile and can be made in larger batches to be stored in the refrigerator for future use. It’s the element that truly makes this sandwich sing, providing a complex flavor profile that perfectly complements the crispy chicken. The combination of simple ingredients creating such a robust sauce is one of the many reasons this recipe is so beloved.
Step 5: Assemble the Sandwich
With all components ready, it’s time for the final assembly. Take two slices of your chosen bread. For the best texture, lightly toast the bread slices. This not only adds a pleasant crunch but also helps create a slight barrier against moisture, preventing the bread from becoming soggy too quickly. Japanese milk bread (shokupan) is ideal for an authentic feel due to its soft, pillowy texture and slightly sweet flavor.
Spread a generous amount of your freshly made tonkatsu sauce onto one of the toasted bread slices. Don’t be shy; this sauce is the star flavor alongside the chicken. Next, layer a good handful of thinly shredded green cabbage over the sauce. The cabbage provides a refreshing crunch and a cool contrast to the warm, savory chicken. Ensure the cabbage is shredded finely for the best eating experience.
Place the perfectly fried, crispy chicken katsu cutlet on top of the cabbage. You might need to slightly trim or fold the chicken to fit neatly onto the bread. If you desire even more sauce, drizzle some over the chicken katsu now. Finally, top with the second slice of toasted bread. For easier handling and eating, it’s recommended to cut the sandwich in half diagonally or into quarters using a sharp knife.
Pro Tips for crispy chicken katsu sandwich
Even Pounding is Key: Always ensure your chicken breasts are pounded to an even 1/4-inch thickness. This prevents uneven cooking, guaranteeing that all parts of the chicken are tender and juicy, and that the crust fries uniformly.
Press the Panko: Don’t just coat the chicken with panko; press it in firmly. This ensures the breadcrumbs adhere well during frying, creating that signature, incredibly satisfying crunch that we all crave in a katsu sandwich. A gentle but firm hand here makes a significant difference to the final texture.
Oil Temperature Matters: Maintain your frying oil temperature between 350°F and 360°F (175°C-180°C). Too hot, and the panko will burn before the chicken is cooked through. Too cool, and the chicken will absorb excess oil, becoming greasy. A good thermometer is an invaluable tool for this.
Drain Properly: After frying, always drain the chicken katsu on a wire rack set over a baking sheet or on paper towels. This allows excess oil to escape, keeping the crust as crisp as possible and preventing the bottom from becoming soggy. This step is crucial for sandwich integrity.
Sauce to Taste: The homemade tonkatsu sauce is highly adaptable. Don’t hesitate to tweak the ratios of ketchup, Worcestershire, soy, mirin, and mustard to perfectly match your palate. Some even add a pinch of garlic powder or a dash of hot sauce for an extra layer of flavor.
Serving Suggestions for crispy chicken katsu sandwich
Decoration
While this sandwich is a star on its own, a few thoughtful touches can enhance its visual appeal. A delicate sprinkle of toasted sesame seeds over the tonkatsu sauce before placing the chicken can add a nice nutty aroma and visual interest. A thin drizzle of mayonnaise or a Japanese-style spicy mayo (like sriracha mayo) artfully placed on top of the chicken or on the top slice of bread can add a creamy, visually appealing contrast. Finally, a small sprig of fresh parsley or a sliver of pickled ginger on the side can provide a pop of color and a hint of freshness.
Side Dishes
To create a complete meal, consider serving your crispy chicken katsu sandwich with complementary side dishes. A crisp, refreshing cucumber salad with a light sesame-ginger dressing provides a cool, palate-cleansing element that cuts through the richness of the fried chicken. Steamed Japanese rice or a small portion of fried rice can also serve as a hearty accompaniment, reinforcing the Japanese theme. For a simpler option, a small bowl of pickled daikon or other Japanese pickles offers a delightful tangy crunch.
Creative Serving Ideas
Elevate your sandwich experience by thinking outside the bun. For a party appetizer, serve mini katsu sliders on small brioche buns or even lettuce wraps. You could also present the katsu chicken as a “deconstructed” katsu bowl, served over rice with shredded cabbage, tonkatsu sauce, and a side of pickles, allowing guests to assemble their own perfect bite. For a brunch twist, serve the katsu chicken alongside a perfectly fried egg, with the tonkatsu sauce drizzled over both.
Preparation & Storage
Storing Leftovers
If you happen to have any leftover crispy chicken katsu sandwich, proper storage is key to maintaining its appeal. It’s best to store the components separately to prevent sogginess. Wrap the fried chicken cutlet tightly in plastic wrap or aluminum foil and refrigerate. Store any leftover shredded cabbage and sauce in separate airtight containers in the refrigerator. The bread is best stored at room temperature, wrapped loosely to avoid it becoming too hard.
Freezing
While the sandwich is best enjoyed fresh, the fried chicken katsu itself can be frozen for later use. Once the cooked chicken has cooled completely, wrap it tightly in plastic wrap, then in aluminum foil or place it in a freezer-safe bag. This will protect it from freezer burn. It can be stored in the freezer for up to 1-2 months. Thaw overnight in the refrigerator before reheating.
Reheating
To reheat leftover chicken katsu and restore its signature crispiness, avoid the microwave, which tends to make it soggy. The best method is to use a preheated oven or an air fryer. Place the chicken on a baking sheet or in the air fryer basket and heat at 375°F (190°C) for about 5-10 minutes, or until heated through and crispy again. For the sandwich, reheat the chicken, then assemble with fresh bread, sauce, and cabbage for the best texture.
Frequently Asked Questions
-
Can I make the tonkatsu sauce ahead of time?
Absolutely! In fact, making the tonkatsu sauce a day in advance can allow the flavors to meld and deepen, resulting in an even more delicious sauce. Store it in an airtight container in the refrigerator, where it will keep well for up to a week. Give it a good stir before using it.
-
What are the best types of bread to use for a chicken katsu sandwich?
For an authentic Japanese experience, Japanese milk bread (shokupan) is highly recommended due to its incredibly soft, fluffy texture and subtle sweetness, which complements the savory katsu perfectly. However, other soft, slightly enriched white breads like brioche or even a good quality standard white sandwich bread will also work wonderfully. Lightly toasting the bread adds a nice textural contrast and helps prevent sogginess.
-
How can I make sure my chicken katsu is extra crispy and not greasy?
Achieving extra crispiness and avoiding greasiness involves a few key steps. Firstly, ensure your oil is heated to the correct temperature (around 350°F/175°C) and maintain it by not overcrowding the pan. Secondly, use panko breadcrumbs, which are lighter and airier than traditional breadcrumbs, for a superior crunch. Finally, drain the fried chicken thoroughly on paper towels or a wire rack immediately after cooking to absorb any excess oil. Proper resting after frying also helps to redistribute the juices and maintain crispness.