Creamy Garlic Sauce Chicken Recipe | Easy Chicken Dinner

Embark on a culinary journey with this exquisite Creamy Garlic Sauce Chicken Breasts recipe, a dish designed to impress with its simplicity and sensational flavor. This creation promises a restaurant-quality experience right in your own kitchen, perfect for any occasion. Get ready to savor tender chicken enveloped in a velvety, aromatic garlic sauce that will leave you utterly delighted and yearning for more.
Imagine a weeknight dinner transformed into a gourmet event with minimal effort, or a special gathering elevated by a dish that’s both visually appealing and incredibly delicious. This recipe is a testament to how a few quality ingredients can coalesce into something truly magical, offering a comforting yet sophisticated taste sensation. It’s a versatile masterpiece that caters to various palates and dietary preferences, ensuring everyone at the table feels catered to and cherished.
Why You Will Love This Recipe
- Effortless Elegance: Prepare a sophisticated meal in under an hour, perfect for busy weeknights without sacrificing taste or presentation.
- Rich and Creamy Sauce: The star of the show, this velvety garlic sauce is deeply flavorful, coating every piece of chicken in pure deliciousness.
- One-Pan Wonder: Minimize cleanup with a recipe that primarily utilizes a single skillet, making the cooking and post-meal process a breeze.
- Adaptable Ingredients: Easily swap out or adjust components like broth for wine or experiment with different herbs and spices to suit your personal taste.
- Crowd-Pleasing Appeal: This dish is a guaranteed hit, offering a universally loved flavor profile that appeals to both seasoned foodies and casual diners.
Ingredients You Need
The foundation of any exceptional dish lies in the quality of its ingredients, and this creamy garlic chicken is no exception. Opting for fresh, high-quality components will elevate the final taste and texture significantly, transforming a simple meal into a memorable culinary experience. The star players here are plump chicken breasts, vibrant garlic, rich heavy cream, and savory Parmesan cheese, all working in harmony to create a symphony of flavors. We also incorporate aromatic herbs and seasonings that add depth and complexity to the sauce, ensuring each bite is a delightful revelation.
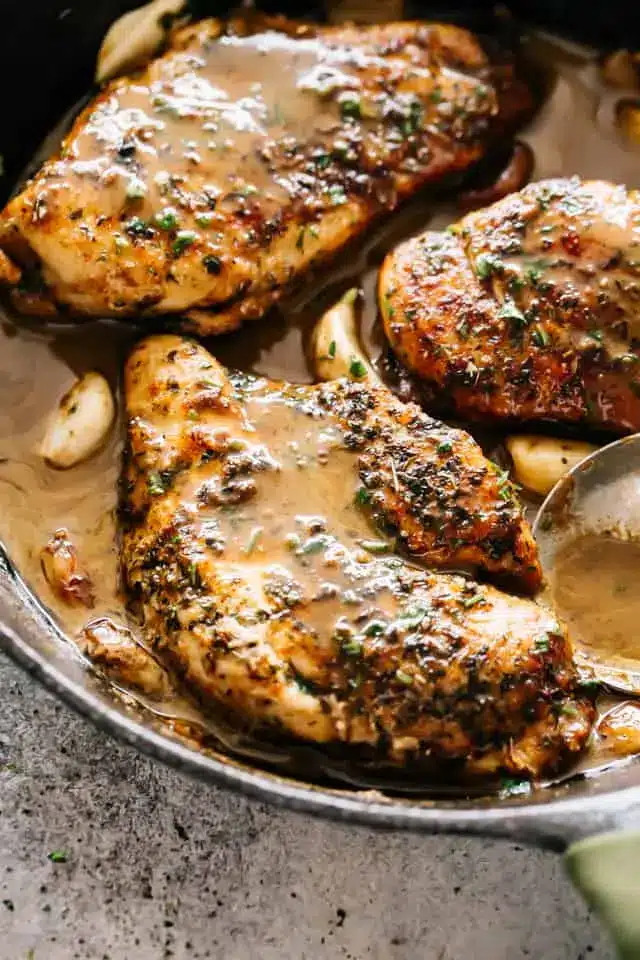
Creamy Garlic Sauce Chicken Breasts

Tender chicken breasts smothered in a mouthwatering creamy garlic sauce! This quick and tasty Creamy Garlic Sauce Chicken Breasts recipe is super easy to make and great for busy weeknights. It’s all made in just one pan in about 30 minutes.
- 4 (1 pound altogether) boneless, skinless chicken breasts
- cooking spray
- 1/2 cup grated parmesan cheese
- salt and fresh ground pepper, to taste
- 1/2 teaspoon Italian Seasoning
- 1/2 teaspoon dried basil
- 1/2 teaspoon dried parsley
- 1/2 teaspoon sweet paprika
- 1 tablespoon olive oil
- 2 tablespoons butter, divided
- 10 cloves garlic
- 1/2 cup low sodium chicken broth (or, you can also use white wine)
- 1 cup heavy cream
- fresh chopped parsley, for garnish
- 1Pound the chicken breasts to an even thickness of 1-inch. Generously spray each chicken breast with cooking spray; set aside.
- 2In a mixing bowl, combine cheese, salt, pepper, Italian Seasoning, basil, parsley, and sweet paprika. Take the seasoning mixture and rub it all over the chicken breasts.
- 3Heat olive oil with 1 tablespoon butter in a large skillet over medium-high heat. Add chicken to the hot oil and cook for 5 minutes; flip and continue to cook for 5 more minutes, or until golden brown. Remove chicken from pan; set aside and keep covered.
- 4Reduce heat to medium and add the remaining butter; let it melt. Stir in the garlic cloves and cook for 3 to 4 minutes, or until they are lightly browned on the outside. Stir often so you do not burn the garlic.
- 5Add chicken broth or wine to the skillet and let cook for 3 minutes, or until the liquid has reduced.
- 6Stir in the heavy cream and add chicken back into the skillet. Cook for an additional 5 minutes, or until the sauce is reduced and chicken is cooked through.
- 7Remove from heat. Garnish with fresh parsley, and serve.
Keywords: creamy garlic chicken, chicken breast recipe, one pan chicken, weeknight dinner, keto chicken
The precise quantities for each ingredient are detailed within the accompanying recipe card, ensuring you have all the necessary information for a perfect execution of this delightful dish.
Variations
For those seeking a plant-based indulgence, transforming this creamy garlic chicken into a vegan delight is wonderfully achievable. Begin by substituting the chicken breasts with firm tofu or thick slices of cauliflower florets, ensuring they are well-pressed and patted dry to absorb the sauce beautifully. The creamy sauce base can be crafted using full-fat coconut milk or a cashew cream, providing a rich and luscious texture. Infuse this vegan base with plenty of garlic, nutritional yeast for a cheesy undertone, and your chosen herbs. Sauté the tofu or cauliflower until golden and slightly crisp before simmering it in the vegan creamy garlic sauce for a truly satisfying meat-free meal that doesn’t compromise on flavor or decadence.
Individuals following a low-carb lifestyle will find this recipe incredibly accommodating and adaptable. The original recipe already incorporates Parmesan cheese for coating the chicken, which is a fantastic low-carb choice, and suggests chicken broth or white wine for deglazing. To further enhance its low-carb credentials, ensure you use a dry white wine or stick to chicken broth. When serving, pair the chicken with low-carb vegetables like steamed broccoli, cauliflower rice, or sautéed zucchini noodles instead of traditional pasta or rice. This thoughtful pairing maintains the meal’s indulgence while keeping the carbohydrate count pleasingly low, making it a perfect choice for a satisfying and guilt-free dinner.
For a delightful twist that introduces a bright, zesty counterpoint to the rich creaminess, consider infusing the sauce with lemon. After the heavy cream has been added and the chicken is simmering, stir in the zest and juice of half a lemon. This citrusy addition cuts through the richness, adding a refreshing tang that complements the garlic beautifully. The lemon brightens the entire dish, offering a more complex flavor profile that is both invigorating and incredibly satisfying. This variation is particularly wonderful when served with lighter side dishes, allowing the bright, zesty notes of the lemon-garlic sauce to truly shine.
How to Prepare creamy garlic sauce chicken breasts
Step 1: Preparing the Chicken for Searing
The journey to a perfect creamy garlic sauce chicken breast begins with meticulously preparing the chicken itself. Start by selecting plump, boneless, and skinless chicken breasts, aiming for uniformity in size and thickness. If your chicken breasts are particularly thick, it is essential to pound them to an even consistency, ideally about one inch thick. This crucial step ensures that the chicken cooks uniformly, preventing any parts from becoming overcooked or undercooked, which is paramount for achieving that tender, melt-in-your-mouth texture we all desire.
Utilize a meat mallet or even the bottom of a heavy pan to gently but firmly pound the chicken. You can achieve this by placing the chicken breasts between two pieces of plastic wrap or inside a large zip-top bag to prevent messes and keep the chicken intact. This careful pounding not only standardizes the thickness but also tenderizes the meat, making it more receptive to the flavors it will soon absorb. Once pounded to perfection, lightly spray each piece with cooking spray; this offers a subtle barrier that aids in browning and prevents sticking in the pan.
Next, it’s time to create a flavorful crust by combining a delightful medley of seasonings. In a separate mixing bowl, whisk together grated Parmesan cheese, salt, freshly ground black pepper, Italian seasoning, dried basil, dried parsley, and sweet paprika. This blend offers a savory, herbaceous, and subtly smoky foundation that adheres beautifully to the chicken. Generously coat each side of the prepared chicken breasts with this exquisite seasoning mixture, ensuring an even distribution for maximum flavor in every bite. This flavorful coating will not only enhance the chicken’s taste but also contribute to a beautiful golden-brown sear.
Step 2: Achieving the Perfect Sear
With the chicken prepped and seasoned, the next critical phase is achieving that coveted golden-brown sear. This process is vital for locking in the chicken’s natural juices, ensuring it remains succulent and tender throughout the cooking process. Heat a large, heavy-bottomed skillet over medium-high heat; a cast-iron skillet is ideal for its excellent heat retention and distribution. Add one tablespoon of olive oil and one tablespoon of butter to the hot skillet; the combination of oil and butter not only adds flavor but also helps prevent the butter from burning too quickly.
Once the butter has melted and the mixture is shimmering, carefully place the seasoned chicken breasts into the hot skillet. Be mindful not to overcrowd the pan; cook in batches if necessary to ensure each piece has ample space to sear properly. Allow the chicken to cook undisturbed for approximately five minutes on the first side. This duration is key to developing a beautiful, caramelized crust that is both visually appealing and delicious, providing an essential textural contrast to the tender interior.
After five minutes, carefully flip each chicken breast to the other side. Continue to cook for an additional five minutes, or until the chicken is golden brown on both sides and cooked through to an internal temperature of 165°F (74°C). Use a meat thermometer to ensure accuracy. Once perfectly cooked and beautifully browned, remove the chicken breasts from the skillet and set them aside on a clean plate. Tent them loosely with foil to keep them warm and allow the juices to redistribute while you proceed with preparing the luscious garlic sauce.
Step 3: Building the Flavorful Garlic Base
Now, the magic of the creamy garlic sauce begins to unfold in the same skillet, capturing all those delicious browned bits left from the chicken. Reduce the heat to medium to prevent the garlic from burning, which can impart a bitter flavor. Add the remaining one tablespoon of butter to the skillet and allow it to melt completely. This butter forms the rich foundation upon which our aromatic garlic base will be built, adding another layer of velvety richness.
Once the butter is melted, add the minced garlic cloves to the skillet. This recipe calls for a generous amount of garlic, as it is the star ingredient of the sauce, so don’t be shy! Stir the garlic frequently as it cooks for about three to four minutes, or until it becomes fragrant and lightly golden. It’s imperative to stir constantly to ensure the garlic cooks evenly and doesn’t scorch or burn, as burnt garlic can ruin the entire dish. The aroma at this stage should be absolutely intoxicating, signaling that the flavor base is developing beautifully.
The goal here is to gently toast the garlic, releasing its pungent sweetness and infusing the butter with its potent flavor. Avoid letting the garlic turn dark brown, as this will result in an unpleasantly bitter taste. A light golden hue indicates that the garlic has reached its peak flavor potential, ready to meld with the other sauce components. This step is fundamental to achieving the deep, savory garlic notes that define this incredible sauce, making it incredibly satisfying and craveable.
Step 4: Deglazing the Pan and Reducing the Sauce
With the fragrant garlic base established, it’s time to deglaze the pan and begin building the liquid foundation of the sauce. Pour in the ½ cup of low-sodium chicken broth (or your chosen white wine) into the skillet. The hot liquid will immediately begin to sizzle and steam as it comes into contact with the bottom of the pan. Use a wooden spoon or spatula to gently scrape up all the delicious browned bits and fond that have adhered to the bottom of the skillet during the searing process.
These browned bits are packed with concentrated flavor from the chicken and seasonings, and deglazing them into the sauce is crucial for enhancing its depth and complexity. Allow the broth to simmer and cook for approximately three minutes. During this time, the liquid will reduce slightly, concentrating its flavor and helping to incorporate the delicious essence of the garlic and chicken drippings into the nascent sauce. This reduction step is vital for building a robust flavor profile that will beautifully complement the creamy elements to come.
This simmering and reducing phase not only infuses the broth with savory notes but also ensures that any raw garlic flavor is mellowed out, resulting in a smoother, more rounded taste. The liquid should begin to take on a slightly richer hue as it absorbs the flavors from the pan. This step is a testament to the power of simple techniques in unlocking immense flavor, laying the groundwork for the creamy richness that will soon transform the dish into an extraordinary culinary creation.
Step 5: Achieving Creamy Perfection
Now that the savory base has been deglazed and slightly reduced, it’s time to introduce the element that gives this dish its name and its signature luxurious texture: heavy cream. Carefully pour the 1 cup of heavy cream into the skillet with the reduced broth and garlic mixture. Stir gently to combine everything smoothly, ensuring the cream is fully incorporated into the liquid base. The color of the sauce will immediately begin to lighten and transform into a beautiful, opaque white, signaling the creation of the luscious sauce.
Bring the sauce to a gentle simmer over medium heat. As it begins to bubble, the cream will thicken slightly. Continue to cook for about five minutes, stirring occasionally, allowing the sauce to reduce and thicken further. The consistency should become velvety and coat the back of a spoon. This is the point where the flavors truly begin to meld together, creating a harmonious and rich sauce that is both comforting and sophisticated. The aroma filling your kitchen at this stage will be absolutely divine, a testament to the power of simple, quality ingredients.
Once the sauce has reached your desired consistency – thick enough to coat the chicken beautifully but still fluid – it’s time to reintroduce the perfectly seared chicken breasts. Gently place the chicken back into the skillet, nestling them into the creamy garlic sauce. Allow the chicken to simmer in the sauce for an additional five minutes. This final cooking period allows the chicken to absorb the rich flavors of the sauce and ensures it is heated through completely. The sauce will continue to thicken slightly as it coats the chicken, creating a truly irresistible dish.
Step 6: Final Touches and Serving Presentation
With the chicken nestled back into the luscious, creamy garlic sauce, the final minutes of cooking are dedicated to ensuring everything is perfectly heated through and the flavors have married beautifully. Let the chicken gently simmer in the sauce for the remaining five minutes, allowing it to absorb the rich, garlicky goodness. This brief simmering period ensures the chicken is warmed thoroughly and is incredibly tender, infused with the essence of the sauce.
As the sauce continues to bubble gently, keep an eye on its consistency. If it seems a bit too thick for your liking, you can add a splash more chicken broth or even a touch more cream to achieve the perfect pourable yet coating texture. Conversely, if it’s too thin, allow it to simmer for a couple of extra minutes uncovered, stirring gently, until it reaches your desired richness. The key is a velvety sauce that beautifully drapes over the chicken without being watery or overly gloopy.
Once the chicken is heated through and the sauce is perfectly creamy, remove the skillet from the heat. For a final flourish and a burst of freshness, garnish the dish generously with freshly chopped parsley. The vibrant green flecks of parsley not only add a pop of color that makes the dish visually stunning but also contribute a subtle, herbaceous note that cuts through the richness of the sauce. Serve immediately, ensuring each piece of chicken is generously coated in the decadent creamy garlic sauce, ready to be enjoyed.
Pro Tips for creamy garlic sauce chicken breasts
Don’t Skimp on the Garlic: While it might seem like a lot, the 10 cloves of garlic are essential for achieving that deep, authentic garlic flavor. If you’re truly averse, you can reduce it slightly, but the sauce won’t have the same impact. Consider mincing it very finely or even using a garlic press for maximum flavor infusion.
Control the Heat for the Garlic: Always reduce the heat to medium or medium-low before adding the garlic. Burnt garlic is bitter and will overpower the entire dish, so constant stirring and careful monitoring are key during this step. The goal is to gently toast the garlic, not to brown it aggressively.
The Right Pan Matters: A heavy-bottomed skillet, like cast iron or stainless steel, is crucial for even heat distribution. This ensures the chicken sears beautifully and the sauce simmers without hot spots that could cause burning. A good sear is the first step to a flavorful outcome.
Adjust Sauce Consistency: If your sauce is too thin after adding the cream, don’t panic. You can gently simmer it uncovered for a few extra minutes, stirring occasionally, until it reaches your desired thickness. If it becomes too thick, a small splash of chicken broth or water can easily thin it out to the perfect consistency.
Consider Using Wine: While chicken broth is excellent, substituting dry white wine (like Sauvignon Blanc or Pinot Grigio) for the broth during the deglazing step adds another layer of complexity and a subtle tang that beautifully complements the garlic and cream. Ensure it simmers sufficiently to cook off the alcohol.
Serving Suggestions for creamy garlic sauce chicken breasts
Decoration
Elevate the visual appeal of your creamy garlic sauce chicken breasts with thoughtful garnishes. A generous sprinkle of fresh, finely chopped parsley is a classic choice, offering a vibrant green contrast to the creamy sauce and tender chicken. For a touch of elegance and a subtle hint of pungency, finely minced chives can be scattered over the top. If you enjoy a little heat, a few thinly sliced red chili flakes can add both visual interest and a pleasant kick. Consider also a delicate dusting of smoked paprika for added color and a hint of smoky depth.
Side Dishes
This rich and decadent dish pairs beautifully with a variety of side dishes that can either balance its richness or complement its flavors. For a classic pairing, consider serving it alongside fluffy mashed potatoes or creamy risotto, both of which are perfect for soaking up the extra sauce. Lighter options include steamed or roasted asparagus, tender green beans, or a simple side salad with a light vinaigrette to cut through the creaminess. For a more substantial accompaniment, consider a side of crusty bread for dipping into the delectable sauce.
Creative Serving Ideas
Transform this delightful chicken dish into a centerpiece for various culinary creations. Serve it over a bed of perfectly cooked pasta, such as fettuccine or linguine, creating a luxurious chicken alfredo-style meal. Another creative option is to spoon the creamy garlic chicken over a mound of fluffy cauliflower rice for a lower-carbohydrate, yet equally satisfying meal. You could also use the leftover chicken and sauce as a filling for savory crepes or blend it into a rich soup base for an elevated comfort food experience. For an impressive appetizer, serve smaller portions over toasted baguette slices for an elegant bruschetta topping.
Preparation & Storage
Storing Leftovers
Should you be fortunate enough to have any delicious creamy garlic sauce chicken breasts leftover, proper storage is key to maintaining their quality. Transfer any cooled leftovers into an airtight container. Ensure the container is completely sealed to prevent the sauce from drying out or absorbing any unwanted odors from the refrigerator. Store the container in the refrigerator, where the dish should remain fresh and safe to consume for up to 3 to 4 days.
When storing, it’s ideal to keep the chicken and sauce together. The sauce helps to keep the chicken moist, preventing it from becoming dry and less palatable upon reheating. If you plan to use the leftovers in a salad or as a topping for pasta, you might find the consistency of the sauce perfectly suited for these applications even when cold. Many people find that the flavors actually deepen and meld further overnight, making cold leftovers a delightful treat in their own right.
Avoid leaving the cooked chicken at room temperature for extended periods. Once the meal is finished, promptly refrigerate any leftovers to adhere to food safety guidelines. This practice ensures that your delicious creation can be enjoyed safely throughout the week, maintaining its fantastic taste and texture for subsequent meals.
Freezing
Freezing creamy garlic sauce chicken is possible, but it comes with a caveat regarding the texture of the sauce upon thawing. Dairy-based sauces, like this one, tend to separate and can become somewhat grainy or watery after being frozen and reheated. This change in texture is due to the fat and water content in the cream and cheese breaking down during the freezing and thawing process.
If you choose to freeze this dish, it’s best to do so without the chicken if possible, or ensure the chicken is well-coated. Allow the dish to cool completely before portioning it into freezer-safe containers or heavy-duty freezer bags. Press out as much air as possible before sealing to prevent freezer burn. Frozen creamy garlic sauce chicken is best consumed within 1 to 2 months for optimal quality.
When you’re ready to use frozen portions, it’s advisable to thaw them in the refrigerator overnight. Upon reheating, be prepared to potentially stir in a bit more fresh cream or a small amount of milk to help emulsify the sauce and restore some of its original creamy consistency. While it may not be exactly like freshly made, it can still be a convenient and tasty meal option.
Reheating
Reheating creamy garlic sauce chicken requires a gentle approach to preserve its delicate texture and flavor. The most recommended method is on the stovetop. Place the cooled leftovers in a skillet over medium-low heat. Add a splash of chicken broth or a tablespoon of cream to help loosen the sauce and prevent it from sticking or becoming too thick.
Stir the chicken and sauce frequently as it heats through. Allow it to simmer gently until it is warmed to your desired temperature. Avoid high heat, as this can cause the sauce to break or the chicken to become tough. The goal is to heat it gently and evenly, allowing the sauce to become luscious again. If the sauce seems a bit separated, stirring vigorously can often help to bring it back together.
If you are in a hurry, you can reheat the chicken in the microwave. Place the leftovers in a microwave-safe dish and cover it loosely to retain moisture. Heat on medium power for short intervals (30-60 seconds), stirring in between, until the chicken is heated through. Again, adding a little liquid before microwaving can help maintain moisture and prevent the sauce from drying out. This method is quick but may not yield the same creamy consistency as stovetop reheating.
Frequently Asked Questions
- Can I use chicken thighs instead of breasts?
Absolutely! Chicken thighs are an excellent substitute for chicken breasts in this recipe and often yield an even more tender and flavorful result due to their higher fat content. If using boneless, skinless chicken thighs, you’ll likely need to increase the cooking time slightly during the searing phase, perhaps by an extra 2-3 minutes per side, to ensure they are cooked through and golden brown. Bone-in thighs will require a longer cooking time overall, so you might opt to sear them first and then let them finish simmering in the sauce until cooked through. The key is to ensure they reach an internal temperature of 165°F (74°C).
- Is it possible to make this recipe dairy-free or vegan?
Yes, it is entirely possible to adapt this creamy garlic sauce chicken for a dairy-free or vegan diet. For a vegan version, replace the chicken breasts with firm tofu, tempeh, or hearty vegetables like cauliflower florets or large mushrooms. For the creamy sauce, substitute the heavy cream with full-fat coconut milk (from a can, not the beverage kind) or a homemade cashew cream. You can create cashew cream by soaking raw cashews in hot water for at least 30 minutes, then blending them with fresh water until smooth and creamy. Nutritional yeast can be added to mimic a cheesy flavor, and vegan butter or olive oil can replace dairy butter. Ensure all other ingredients like broth are also vegan-friendly.
- My sauce seems a bit thin. How can I thicken it?
If your creamy garlic sauce is thinner than you’d prefer, there are a few simple ways to thicken it. The most straightforward method is to allow the sauce to simmer uncovered over low to medium heat for a few extra minutes, stirring occasionally. This allows some of the liquid to evaporate, concentrating the sauce and making it thicker. Another effective method is to create a slurry by whisking together 1 tablespoon of cornstarch with 2 tablespoons of cold water until smooth, then gradually whisking this slurry into the simmering sauce until it reaches your desired consistency. Be sure to let it simmer for another minute or two after adding the slurry to cook out the cornstarch taste. For a richer thickening, you can also whisk in a tablespoon or two of cream cheese or more grated Parmesan cheese.