
Strawberry shortcake is a beloved dessert, perfect for any occasion. This easy recipe guides you through creating a blissful homemade shortcake. Enjoy layers of tender cake, sweet fresh strawberries, and fluffy whipped cream, promising a delightful treat for your family and friends.
Key Takeaways
- Achieve light, tender shortcake with clear, simple steps.
- Master prepping fresh strawberries and whipping cold cream for best results.
- Learn essential baking tips for a consistently delicious dessert.
- Understand quick prep and bake times for convenient sweet treats.
Baking shortcake brings joy. Simple ingredients make magic. Fresh flavors truly shine. Layers of delight await. This sweet treat is pure bliss.
Making Perfect Strawberry Shortcake
Creating a truly perfect strawberry shortcake doesn’t have to be complicated. This classic dessert, with its light, tender cake, sweet ripe strawberries, and billowy whipped cream, is surprisingly approachable for home bakers of all skill levels. Our focus is on achieving that delicate balance of textures and flavors that makes each bite pure heaven. We’ll walk you through every step, ensuring your homemade shortcake is not just good, but exceptional.
Why this recipe is easy
This recipe is designed with simplicity and success in mind. We break down complex baking concepts into straightforward actions, using readily available ingredients and common kitchen tools. There are no fancy techniques required, just careful attention to a few key details. The result is a dessert that looks impressive but is incredibly simple to execute, making it ideal for both seasoned bakers and those new to the kitchen. You’ll find yourself making this desserts recipe again and again.
Overview of blissful steps
The journey to blissful strawberry shortcake begins with gathering high-quality ingredients, particularly fresh strawberries. Next, we’ll guide you through preparing these berries to maximize their sweetness. The shortcake itself comes together quickly, combining pantry staples into a tender, flaky base. Whipping cream to perfection is a crucial, yet easy, step for that cloud-like topping. Finally, assembling the layers allows you to craft a visually stunning and incredibly delicious dessert. Each stage contributes to the overall perfect bliss of this sweet treat, ensuring a memorable experience for anyone who tries a slice.
Gathering Shortcake Recipe Ingredients
The foundation of any great dish lies in its ingredients, and strawberry shortcake is no exception. While the recipe is simple, selecting quality components will undoubtedly elevate your final product. Take a moment to ensure you have everything on hand before you begin, as this streamlines the entire process and makes for a more enjoyable baking experience. From the star fruit to the dairy staples, each ingredient plays a vital role in achieving that sought-after texture and taste profile.
Fresh strawberries are key
When it comes to strawberry shortcake, the name itself highlights the importance of its primary fruit. Fresh strawberries are absolutely non-negotiable for the best flavor and texture. Look for berries that are bright red, plump, and fragrant, with green caps intact. Avoid any that appear bruised, shriveled, or pale. The natural sweetness and slight tartness of ripe strawberries provide a refreshing contrast to the rich cake and cream. For more information on this delightful fruit, consider exploring its history on Wikipedia’s strawberry page. Using frozen berries is an option in a pinch, but fresh truly makes all the difference for this classic dessert.
Pantry staples for cake
The shortcake itself relies on a few common pantry staples. You’ll need all-purpose flour, granulated sugar, baking powder, and salt for the dry ingredients. These are crucial for the cake’s structure and leavening. For the fat, unsalted butter is preferred, as it allows you to control the salt content and contributes to the rich, tender crumb. A little milk or buttermilk will bring the dough together, adding moisture and a slight tang if using buttermilk. Ensuring your baking powder is fresh is important for a good rise, making your cake light and airy. These simple components, when combined correctly, create a wonderful foundation for the dessert. Consider pairing this with other delightful dessert recipes on our site.
Heavy cream for topping
No strawberry shortcake is complete without a generous dollop of freshly whipped cream. For this, you’ll need heavy cream (also known as heavy whipping cream), ideally with a fat content of 36% or higher. This high-fat content ensures that the cream will whip up beautifully, holding its shape without deflating quickly. A touch of granulated sugar or confectioners’ sugar (powdered sugar) and a splash of pure vanilla extract will sweeten and flavor the cream, transforming it into a luxurious, cloud-like topping. Always keep your heavy cream well-chilled before whipping for the best results, a tip we’ll delve into later.
Prepping Strawberries for Shortcake
The preparation of your strawberries is just as important as the cake itself. Properly prepped berries not only taste better but also release their juices to create that wonderful, natural syrup that complements the shortcake perfectly. This step is quick and straightforward, yet it significantly impacts the final flavor and moisture of your dessert. Taking a few moments here ensures the strawberries are at their peak for assembly.
Slicing fresh berries
Once you’ve selected your vibrant, fresh strawberries, it’s time to prepare them. First, gently rinse them under cool water and pat them dry thoroughly with paper towels. Next, hull the strawberries by removing the green leafy caps and the white core underneath. You can use a small paring knife or a strawberry huller for this. After hulling, slice the berries to your desired thickness. A common approach is to slice them into uniform 1/4 to 1/2-inch pieces, ensuring they are easy to eat and distribute evenly throughout the shortcake layers. Some prefer to quarter smaller berries, while larger ones might be better sliced. The key is consistency for even maceration.
Sweetening with sugar
To enhance the natural sweetness of your strawberries and encourage them to release their delicious juices, we macerate them with sugar. Place your sliced berries in a medium bowl and sprinkle them with granulated sugar. The amount of sugar can be adjusted based on the sweetness of your berries and your personal preference, but generally, 1/4 to 1/2 cup for a pound of strawberries is a good starting point. Gently toss the berries to coat them evenly. Let the sugared strawberries sit at room temperature for at least 15-30 minutes, or longer in the refrigerator. As they sit, the sugar draws out moisture, creating a luscious, vibrant syrup that is integral to the authentic shortcake experience. This simple step truly unlocks the berries’ full potential.
Mixing the Cake Batter Right
The heart of a great strawberry shortcake is, of course, the shortcake itself. Achieving a tender, flaky, and slightly crumbly texture requires careful attention to how the batter is mixed. Overmixing can lead to a tough cake, while undermixing might result in an inconsistent texture. Our method focuses on gentle handling and proper incorporation of ingredients to ensure a delightful shortcake base that perfectly complements the fruit and cream. This stage is where a simple combination of ingredients transforms into something truly special.
Creaming butter with sugar
Begin by creaming the softened unsalted butter with the granulated sugar. This process involves beating them together until they are light, fluffy, and pale in color. Creaming incorporates air into the mixture, which is essential for a tender cake texture. Use an electric mixer on medium speed, scraping down the sides of the bowl frequently to ensure everything is evenly combined. This step can take anywhere from 3 to 5 minutes. The aeration created here acts as a leavening agent alongside the baking powder, contributing to the cake’s desirable rise and airy crumb. It’s a foundational step that sets the stage for the rest of the mixing process.
Adding eggs and vanilla
Once the butter and sugar are perfectly creamed, it’s time to incorporate the eggs and vanilla extract. Add the eggs one at a time, beating well after each addition until fully incorporated. Eggs provide structure, richness, and additional moisture to the cake. The vanilla extract, a classic flavor enhancer, adds a warm, aromatic note that deepens the overall taste profile of the shortcake. Use pure vanilla extract for the best flavor; imitation vanilla simply doesn’t compare. Beat just until the eggs are combined and the mixture is smooth and emulsified. Overbeating at this stage can sometimes lead to a denser cake, so gentle incorporation is key.
Blending dry with wet
With the wet ingredients thoroughly mixed, it’s time to bring in the dry components. In a separate bowl, whisk together the all-purpose flour, baking powder, and salt. This ensures that the leavening agent and salt are evenly distributed throughout the flour. Now, with the mixer on low speed, gradually add the dry ingredients to the wet mixture, alternating with milk or buttermilk, starting and ending with the dry ingredients. Mix just until combined; it’s crucial not to overmix the batter once the flour is added. Overmixing develops the gluten in the flour, which can lead to a tough, chewy cake rather than the desired tender, flaky shortcake. A few streaks of flour are acceptable; a light hand here is your best friend for a soft, delicious cake. This method is similar to how you might approach a rich peanut butter brownie swirl cookies recipe, ensuring tender results.
Baking Your Strawberry Shortcake
With your perfectly mixed batter ready, the next crucial step is baking. The oven transforms your humble ingredients into a golden-brown, tender shortcake. Paying attention to oven temperature, pan preparation, and baking time will ensure your cake bakes evenly and achieves the ideal texture. This stage requires a watchful eye but is ultimately rewarding as your kitchen fills with the delightful aroma of freshly baked goods.
Setting oven temperature
Before you even think about putting your cake in, preheat your oven to the correct temperature. For shortcake, a moderate to hot oven, typically around 375°F (190°C), is ideal. This temperature allows the baking powder to activate quickly, producing a good rise and helping the crust develop a lovely golden hue without overbrowning the interior. Give your oven ample time to preheat, usually 15-20 minutes, to ensure it reaches and maintains the set temperature. An accurate oven thermometer can be a valuable tool to verify your oven’s true temperature, as many home ovens can fluctuate.
Greasing the cake pan
To prevent your beautiful shortcake from sticking and to ensure easy removal, properly prepare your cake pan. Whether you’re using a round cake pan, a square pan, or even individual shortcake molds, always grease and flour the pan. You can use butter, shortening, or a non-stick baking spray to coat the inside surfaces. After greasing, dust the pan lightly with flour, tapping out any excess. This creates a non-stick barrier that allows the cake to release cleanly once baked. Alternatively, for round pans, you can line the bottom with parchment paper after greasing, which provides an extra layer of insurance. Proper pan preparation is a small step that prevents big headaches later.
Checking cake doneness
Baking times are always approximate, as oven calibrations and pan materials can vary. Therefore, checking for doneness is essential. For most shortcake recipes, baking usually takes between 25-35 minutes. To check if your shortcake is ready, insert a wooden skewer or toothpick into the center of the cake. If it comes out clean or with a few moist crumbs attached, the cake is done. If it comes out with wet batter, continue baking for a few more minutes and retest. The top of the cake should be golden brown, and the edges might start to pull away slightly from the sides of the pan. Avoid opening the oven door too frequently during the first two-thirds of the baking time, as this can cause the cake to sink. Once baked, let the cake cool in the pan for 10-15 minutes before inverting it onto a wire rack to cool completely. This resting period helps the cake set and prevents it from breaking.
Whipping Cream for Perfect Bliss
The luxurious, cloud-like topping is a signature element of strawberry shortcake, providing a creamy contrast to the tender cake and sweet berries. Achieving perfectly whipped cream is not difficult, but it does require a few specific conditions to ensure it holds its shape and maintains its delightful texture. This step is quick and transformative, turning simple heavy cream into an irresistible accompaniment. For more culinary inspiration, check out our Pinterest account.
Chilling cream beforehand
The golden rule for successful whipped cream is to start with chilled cream. Heavy cream whips best when it’s very cold, as the fat globules are more stable and can trap air more efficiently. To maximize your chances of success, place your heavy cream, mixing bowl (preferably a metal one), and even your whisk attachments in the refrigerator for at least 15-20 minutes before you plan to whip. A super-chilled environment significantly speeds up the whipping process and helps the cream achieve stiff, stable peaks. Don’t skip this step; it truly makes a difference in the volume and stability of your whipped cream.
Achieving soft peaks
Pour your well-chilled heavy cream into the cold mixing bowl. Add your preferred sweetener (granulated sugar or confectioners’ sugar) and vanilla extract. Start whipping on medium-low speed with an electric mixer, gradually increasing to medium-high as the cream thickens. Keep a close eye on it, as cream can go from perfectly whipped to over-whipped (bordering on butter) very quickly. You’re aiming for “soft peaks”—this means when you lift the whisk, the cream forms soft, gentle mounds that hold their shape for a moment before drooping slightly. For strawberry shortcake, soft peaks are often preferred as they have a more luxurious, yielding texture. If you prefer a firmer topping, continue whipping until “medium peaks” or even “stiff peaks” form, where the cream holds its shape more rigidly. Be careful not to overmix; once you reach your desired consistency, stop immediately. This fresh, airy topping is also a fantastic addition to other desserts, like a vanilla bean creme brulee cheesecake cupcakes.
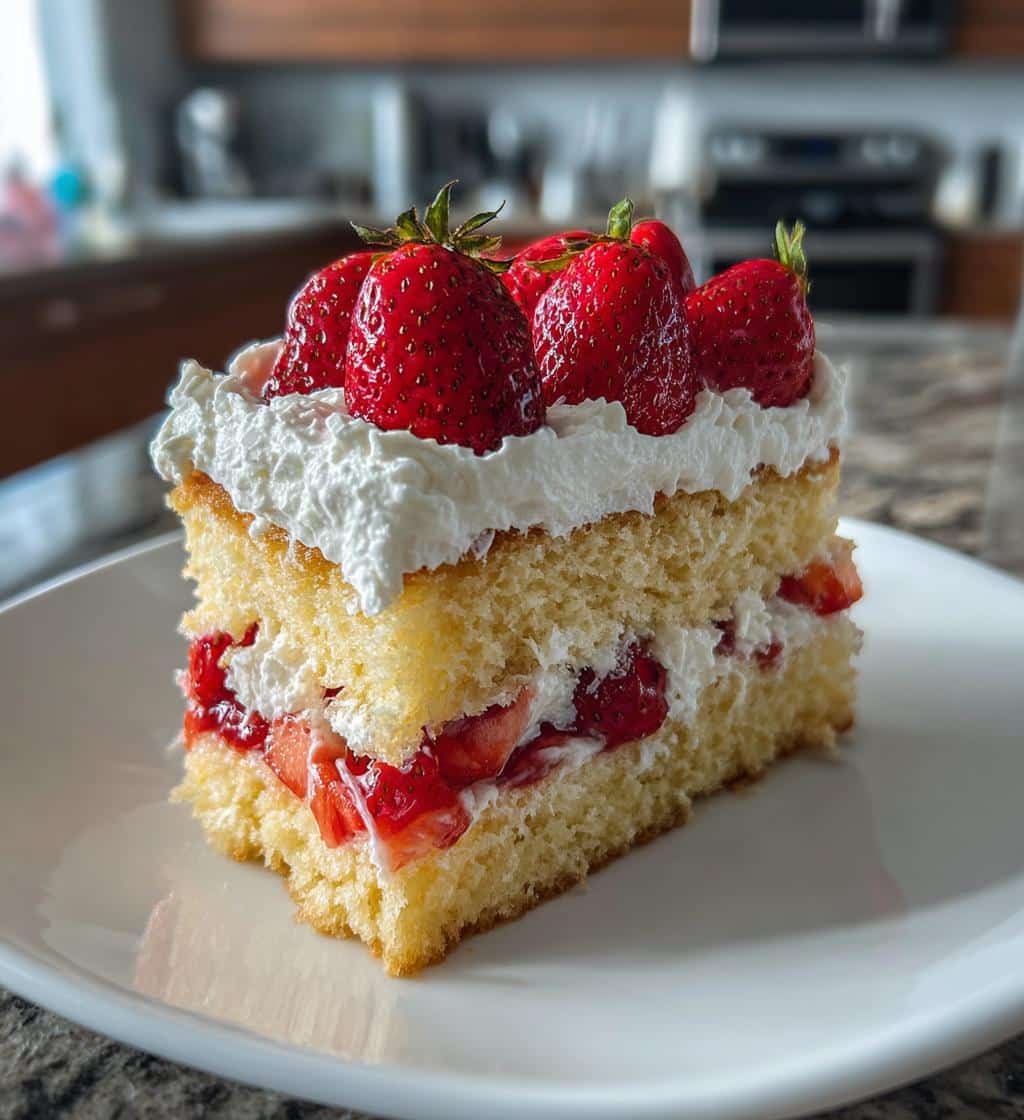
Assembling Your Shortcake Layers
The grand finale of your strawberry shortcake journey is the assembly. This is where all your carefully prepared components come together to create a show-stopping dessert. Layering the cake, berries, and cream is a simple yet artistic process that allows you to build a dessert that is not only delicious but also visually appealing. Each layer contributes to a balanced bite, ensuring a truly satisfying experience.
Cooling cake completely
Before you even think about slicing and assembling, it is absolutely crucial that your shortcake is cooled completely. Attempting to slice or layer a warm cake will lead to crumbling and a messy presentation. Warm cake will also melt the delicate whipped cream, resulting in a soggy disaster. Once baked, allow the cake to cool in its pan for about 10-15 minutes before carefully inverting it onto a wire rack to finish cooling. Depending on the size of your cake, this could take an hour or two. Patience here is key to a clean, stable shortcake structure.
Slicing and layering cake
Once your shortcake is thoroughly cooled, you can proceed with slicing. If you baked a single large cake, you can carefully slice it horizontally into two or three layers using a serrated knife. Alternatively, many prefer to cut the cake into individual servings, then slice each portion horizontally. If you’ve made individual shortcakes or biscuits, simply slice each one in half. For assembly, place the bottom half of your cake layer or biscuit on a serving plate. You can lightly brush it with some of the strawberry syrup that has accumulated from the macerated berries for extra moisture and flavor. This foundational layer is ready for its delicious toppings. The traditional presentation of strawberry shortcake typically involves a biscuit-like base, which you can learn more about on Wikipedia’s shortcake article.
Adding berries and cream
Now for the most visually appealing part: adding the luscious berries and fluffy cream. Spoon a generous amount of your macerated fresh strawberries (including their delicious syrup) over the bottom cake layer. Next, dollop or pipe a generous amount of your freshly whipped cream over the strawberries. Place the top cake layer or biscuit half over the cream. Repeat with another layer of strawberries and cream, if your cake allows for it. For a truly indulgent finish, you can add an extra dollop of cream and a few whole or fanned strawberry slices on top. Serve immediately for the best experience, as the cream and cake are at their freshest. This homemade shortcake bliss is a simple joy.
Key Tips for Shortcake Success
While the recipe itself is straightforward, a few expert tips can elevate your strawberry shortcake from good to truly unforgettable. These insights come from years of baking and understanding what makes this classic dessert shine. Paying attention to these small details can make a significant difference in the final taste, texture, and overall enjoyment of your sweet treat.
Always use fresh berries
This cannot be stressed enough: for the best strawberry shortcake, always use fresh berries. While frozen strawberries can be used in a pinch for other desserts, their texture changes dramatically upon thawing, often becoming mushy. Fresh, ripe strawberries provide the perfect balance of sweetness and a slight tartness, along with a firm yet juicy texture that is essential to the shortcake experience. They also macerate beautifully, releasing a vibrant, natural syrup that is far superior to any artificial flavoring. Prioritize quality, in-season strawberries for a truly blissful dessert.
Whip cold heavy cream
As mentioned earlier, the temperature of your heavy cream is paramount for successful whipping. Ensure your heavy cream, mixing bowl, and whisk attachments are thoroughly chilled before you begin. Cold cream whips up faster, achieves greater volume, and produces more stable peaks that won’t deflate as quickly. If your cream is too warm, it will take much longer to whip and may never reach the desired consistency, resulting in a runny topping. A little foresight here guarantees that luxurious, cloud-like texture for your shortcake. For more recipe inspiration and delicious ideas, visit our Instagram page.
Store leftovers properly
While strawberry shortcake is undeniably best served fresh, sometimes you might have leftovers. Proper storage is key to maintaining its quality. If the cake has already been assembled with cream and berries, it’s best consumed within 1-2 days. Store it loosely covered in the refrigerator. The cake may soften slightly, and the cream might lose some of its aeration, but it will still be delicious. For longer storage, it’s preferable to store the components separately. Keep the baked shortcake wrapped tightly at room temperature or refrigerated for a few days. Store whipped cream in an airtight container in the fridge, and the macerated berries separately. Assemble individual servings just before eating to ensure optimal freshness and texture. This ensures that even “leftovers” maintain a taste of that perfect bliss.
Strawberry Shortcake Recipe Times
One of the many appealing aspects of this strawberry shortcake recipe is its relatively quick turnaround time. It’s a dessert that feels special and indulgent but doesn’t require an entire afternoon in the kitchen. Understanding the preparation and baking durations can help you plan your time effectively, ensuring you can whip up this delightful treat whenever the craving strikes.
Fast prep (20 minutes)
The beauty of this recipe lies in its efficiency. The hands-on preparation for the cake batter and the strawberry maceration can typically be completed in about 20 minutes. This includes hulling and slicing the fresh strawberries, creaming the butter and sugar, adding the eggs and vanilla, and finally blending the dry and wet ingredients. This quick prep time makes it an ideal dessert for last-minute gatherings or when you want a homemade treat without extensive effort. While the cake bakes, you can also prepare your heavy cream, making the overall process feel very streamlined and manageable. It’s a truly simple steps process.
Quick bake (30 minutes)
After your swift preparation, the shortcake itself bakes relatively quickly. Depending on your oven and the size of your cake pan, the baking time typically ranges around 30 minutes. This allows for a golden-brown exterior and a tender, cooked-through interior. The aroma filling your kitchen during this time is an added bonus, building anticipation for the deliciousness to come. Once out of the oven, remember to account for cooling time, which is essential before assembly. The combination of fast prep and quick bake means you can enjoy this homemade shortcake bliss relatively soon after you start.
Servings from This Shortcake Recipe
Knowing the yield of a recipe is incredibly helpful for planning, whether you’re hosting a dinner party or simply making a treat for your family. This strawberry shortcake recipe is designed to serve a good number of people, ensuring everyone gets to enjoy a generous slice of this delightful dessert. It’s a versatile recipe that can be easily scaled if you need to serve more or fewer guests.
Yields 8 delicious slices
This particular strawberry shortcake recipe is crafted to yield 8 delicious slices. Each slice is a perfect portion, offering a balanced taste of the tender shortcake, sweet fresh strawberries, and light whipped cream. This makes it an excellent choice for a family dessert or for entertaining a small group of friends. If you need to cater to a larger crowd, you can easily double the recipe and bake two cakes, or opt for individual shortcake biscuits which can be scaled up more simply. Regardless of the quantity, each serving promises a moment of pure, sweet bliss.
Shortcake Nutrition at a Glance
For those mindful of their dietary intake, understanding the nutritional profile of a dessert is often helpful. While strawberry shortcake is undeniably a sweet indulgence, it’s also made with fresh ingredients, offering a balance of flavors and some nutritional benefits from the fruit. This overview provides a quick snapshot of what you can expect from each serving.
Calories per serving
A typical serving of this strawberry shortcake recipe, which yields 8 slices, generally contains approximately 300-350 calories per serving. This estimate can vary slightly based on the specific ingredients used (e.g., full-fat vs. lighter cream, amount of sugar added) and the exact portion size. It’s a moderately indulgent dessert that can fit into a balanced diet, especially when enjoyed as an occasional treat. The calories primarily come from the flour, butter, and sugar in the cake, as well as the heavy cream.
Sugar and fat content
In terms of sugar and fat content, each serving typically contains around 25-30 grams of sugar and 15-20 grams of fat. The sugar comes from both the added sugar in the cake and cream, and the natural sugars in the fresh strawberries. The fat content is mainly from the butter in the shortcake and the heavy cream in the topping. While these figures represent a delightful dessert, it’s worth noting that the fat is mostly from dairy and butter, contributing to the richness and tender texture. The fresh fruit also provides vitamins and fiber, making it a more wholesome sweet treat compared to some heavily processed desserts. Remember to enjoy this homemade shortcake bliss in moderation as part of a varied diet.
Enjoying Your Homemade Shortcake Bliss
After all your careful preparation and baking, the moment of truth arrives: enjoying your homemade strawberry shortcake. This dessert isn’t just about the flavors; it’s about the experience – the visual appeal, the delightful aroma, and the shared joy with loved ones. Here are a few ideas to make the most of this perfect sweet treat.
Best serving ideas
Strawberry shortcake is traditionally served slightly warm or at room temperature, allowing the tender cake to shine and the whipped cream to remain luscious. Plate each individual slice or assembled shortcake, ensuring a good balance of cake, berries, and cream. Garnish with a fresh whole strawberry, a mint sprig, or a light dusting of powdered sugar for an extra touch of elegance. It makes a fantastic dessert for summer picnics, barbecues, or any gathering where you want to serve something fresh and celebratory. It’s a versatile dessert that fits any occasion, from casual family dinners to more formal events. This family favorite always brings smiles.
Making it your own
While this recipe provides a classic foundation for strawberry shortcake, feel free to personalize it and make it truly your own. Consider adding a hint of lemon zest to the cake batter or the whipped cream for a bright, citrusy note. You could also infuse the strawberries with a splash of Grand Marnier or balsamic vinegar for a more sophisticated twist. Don’t be afraid to experiment with other berries like blueberries or raspberries, or a mix of seasonal fruits. For a richer shortcake, some recipes incorporate cream cheese into the topping. This dessert is wonderfully adaptable, inviting you to experiment and discover your perfect version of this sweet treat. Enjoy the process of creating your own unique homemade shortcake bliss!
