
Homemade lime marmalade offers a delightful way to capture vibrant citrus flavors. This easy-to-follow recipe helps you transform fresh limes and lemons into a sweet and tangy preserve. Learn simple steps for preparing, cooking, and canning your own bright jars of sunshine, perfect for any kitchen.
Key Takeaways
- Making your own lime marmalade ensures fresh, natural flavors without additives.
- Careful preparation of citrus fruits, especially zesting and juicing, is crucial.
- Achieving the correct set requires attention during the boiling process and proper testing.
- Sterilizing jars and sealing correctly are key for long-lasting, safe preserves.
- Enjoy this versatile preserve on toast, with desserts, or as a thoughtful gift.
Making marmalade is rewarding. It fills your home with citrus scent. Fresh flavors shine through every jar. This simple process yields delicious results. Share your homemade sunshine today.
Making Your Own Lime Marmalade
There’s something truly special about the process of making your own lime marmalade. It’s not just a recipe; it’s an experience that fills your kitchen with invigorating citrus aromas and culminates in jars of vibrant, homemade goodness. Unlike store-bought varieties, your homemade version guarantees no artificial flavors, colors, or preservatives, giving you full control over the quality and taste. This careful attention ensures a superior product that’s both healthier and more flavorful. Crafting your own sweet and tangy preserve is a fantastic way to engage with traditional cooking methods, creating something unique and deeply satisfying.
Why Homemade Marmalade is Best
Homemade marmalade stands out for its unmatched freshness and depth of flavor. When you make it yourself, you select the ripest, most aromatic limes, ensuring that every spoonful bursts with natural zest and sweetness. The process allows for customization, letting you adjust sugar levels or add subtle spices to suit your palate perfectly. Furthermore, the satisfaction of presenting a jar of your own creation, perhaps as a thoughtful gift, is immense. It’s a culinary journey that celebrates simple ingredients and yields delicious results, often becoming a cherished kitchen tradition. You’ll find that the nuanced bitter-sweet balance of a homemade marmalade is far superior to anything you can purchase off the shelf.
Capture Sunshine in a Jar
Lime marmalade isn’t just a spread; it’s like bottling sunshine. The bright, tangy flavor of fresh limes, combined with the subtle sweetness of sugar, creates a preserve that instantly brightens up any breakfast table or dessert. Imagine spreading this golden, glistening preserve on toast on a dreary morning, or swirling it into yogurt for a taste of summer. Each jar represents hours of careful preparation and a commitment to deliciousness, ready to be enjoyed whenever you need a little burst of warmth and flavor. It’s a wonderful way to preserve the seasonal bounty of citrus, making its lively essence accessible all year round. The vibrant color and intense flavor of this citrus preserve truly make it a joy to behold and consume.
Ingredients for Your Lime Marmalade
Starting with the right ingredients is the foundation of any great recipe, and homemade lime marmalade is no exception. While the process might seem intricate, the ingredient list is surprisingly simple, focusing on the natural goodness of fresh produce and common pantry staples. The key to exceptional flavor lies in the quality of your citrus fruits; vibrant, unblemished limes and lemons will yield the best zest and juiciness, which are critical for the marmalade’s signature taste and texture. Don’t underestimate the power of these few items to create something truly spectacular. For other delightful recipes that highlight fresh ingredients, you might enjoy our Southern-Style Collard Green and Potato Stew, which also celebrates wholesome produce.
Fresh Citrus Fruits Needed
For an authentic and robust lime marmalade, you’ll primarily need fresh limes. Look for those that are firm, heavy for their size, and have a glossy, unblemished skin. These indicators suggest they are full of juice and rich in essential oils in their zest. While the star is the lime, incorporating a lemon or two can add an extra layer of brightness and provide additional pectin, which is vital for the marmalade’s setting. Lemons also contribute to the overall tartness, balancing the sweetness beautifully. Ensure your citrus is unwaxed, or thoroughly scrub waxed fruit to remove any coatings, as you’ll be using the zest and, in some methods, even the pith. A good rule of thumb is to choose organic whenever possible for maximum flavor and fewer residues.
Simple Pantry Items
Beyond the citrus, the rest of your ingredient list is straightforward. You’ll need granulated sugar, which not only sweetens the marmalade but also acts as a preservative. The ratio of sugar to fruit is crucial for both taste and shelf life. Water is used to help extract the pectin and soften the fruit during the initial cooking stages. Lastly, a little bit of commercial pectin might be added, especially if your fruit is low in natural pectin or if you prefer a quicker, more reliable set. While limes and lemons inherently contain a fair amount of natural pectin, a boost can ensure a consistently firm marmalade. Make sure you have enough jars and lids ready for the canning process, as detailed in our Crispy Parmesan Chicken with a Rich Garlic Sauce recipe which also benefits from quality pantry staples.
Preparing Limes and Lemons Correctly
The success of your homemade lime marmalade heavily relies on the meticulous preparation of your citrus fruits. This stage is where you unlock the intense aromas and flavors that will define your preserve. Taking the time to properly wash, zest, and juice each piece of fruit ensures that you extract every bit of goodness without introducing unwanted elements. It’s a delicate balance of careful handling and precise technique that lays the groundwork for a truly outstanding marmalade. This preparatory phase, though seemingly simple, is critical for achieving that perfect sweet and tangy balance, characteristic of the best citrus preserves. For other fruit-focused preparations, consider our Balsamic Strawberry Caprese, which also emphasizes fresh fruit handling.
Wash and Zest Tips
Begin by thoroughly washing your limes and lemons under cold running water. Use a stiff brush to scrub the skins, especially if they are not organic, to remove any dirt, wax, or residues. Pat them dry completely. For zesting, use a fine grater, microplane, or a vegetable peeler to remove only the outermost layer of the peel, which contains the flavorful essential oils. Be careful to avoid the white pith directly underneath the zest, as it can impart a bitter taste to your marmalade. If using a peeler, you can then thinly slice the zest into fine strips. This zest is where much of the bright, aromatic flavor of your homemade lime marmalade comes from, so don’t skip this step!
Squeeze Out All Juice
After zesting, it’s time to extract the juice. Cut the limes and lemons in half and use a citrus juicer to squeeze out as much juice as possible. Collect the juice in a separate bowl. As you juice, pay attention to any seeds that might fall in; these should be removed. Some recipes also call for saving the squeezed-out pith and remaining fruit membranes, as they contain a significant amount of natural pectin. If you choose this method, tie them in a piece of cheesecloth to form a sachet, which can then be added to the pot during cooking and removed before jarring. This technique helps ensure a good set for your easy marmalade recipe.
Combining Your Marmalade Base Mix
With your limes and lemons meticulously prepared, the next step involves combining the core ingredients to form the base of your marmalade. This stage is where the magic truly begins to happen, as sugar, water, and the vibrant citrus zest come together. It’s a foundational step that requires careful measurement and gentle handling to ensure all components are properly integrated before the cooking process intensifies. The initial mix will start the process of drawing out the natural flavors and setting agents from the citrus, preparing it for its transformation into a glistening, tangy preserve. Precision here contributes significantly to the final taste and texture of your citrus preserve recipe.
Sugar, Water, and Zest
In a large, heavy-bottomed pot, combine your measured granulated sugar, the exact amount of water specified in the recipe, and the freshly prepared lime and lemon zest. Some recipes might also include the thinly sliced or chopped fruit pith (often soaked overnight) at this stage. Stir these ingredients gently until the sugar begins to dissolve. The goal is to create a syrupy mixture that will gradually absorb the citrus flavors. This initial combination is crucial for ensuring that the sugar fully integrates and that the zest’s aromatic oils are released, infusing the liquid with that signature bright flavor of homemade lime marmalade. The correct ratio of these elements is key for a well-balanced taste.
Start Heating on Stove
Once your marmalade base mix is assembled, place the pot over medium-low heat. Continue to stir gently and intermittently, allowing the sugar to dissolve completely. It’s important not to rush this process; fully dissolved sugar prevents crystallization later on and ensures a smooth texture. Once the sugar has dissolved and the mixture is warm, increase the heat slightly. Bring the mixture to a gentle simmer, ensuring that all ingredients are well combined. At this point, the mixture should look somewhat clear, and you’ll start to notice the wonderful citrus aroma filling your kitchen, signaling that your easy marmalade making is well underway. This gentle heat prepares the fruit for the more vigorous boiling to come.
Cooking Your Lime Marmalade Quickly
The cooking phase is arguably the most dynamic part of making lime marmalade, as it involves transforming a liquid mixture into a thick, shimmering preserve. This stage requires your full attention, as precise timing and consistent stirring are essential to achieve the perfect set and prevent burning. While the name suggests “quickly,” it refers to the concentrated boiling period once all ingredients are combined, rather than a hurried process from start to finish. Mastering this phase ensures your homemade lime marmalade reaches its ideal consistency and flavor profile. It’s a rewarding challenge that culminates in delicious, spreadable goodness. Check out our main course recipes for more culinary adventures.
Adding the Pectin
If your recipe calls for commercial pectin, this is the stage where you will incorporate it. Pectin is a natural gelling agent found in fruits, and adding extra can help ensure a firm, consistent set, especially with fruits that might be lower in natural pectin or if you prefer a thicker marmalade. Follow the package directions carefully, as pectin usually needs to be added at a specific point—often mixed with a small amount of sugar before stirring it into the hot fruit mixture to prevent lumps. Ensure it is fully dissolved before proceeding. This step is crucial for the gelling process, ensuring your citrus preserve recipe sets beautifully and maintains its structure when cooled.
Boil and Stir for Ten
Once all ingredients, including any added pectin, are combined, increase the heat to bring the marmalade mixture to a rolling boil. This is a vigorous boil that cannot be stirred down. Start a timer and boil rapidly, stirring continuously to prevent sticking and ensure even cooking. Most lime marmalade recipes require a rapid boil for about 10-15 minutes, or until it reaches the setting point. During this period, the mixture will thicken, and the bubbles will become smaller and more frequent. This quick, intense boil helps to activate the pectin and evaporate excess water, concentrating the flavors and allowing the marmalade to set properly. This is the heart of easy marmalade making, transforming simple ingredients into a complex preserve.
Checking for Perfect Marmalade Set
Determining when your lime marmalade has reached its optimal setting point is a critical skill in preserve making. It’s a moment of truth that can mean the difference between a perfectly spreadable marmalade and one that’s too runny or too stiff. While approximate cooking times are helpful, relying solely on the clock isn’t sufficient, as variables like fruit ripeness and humidity can affect the outcome. Instead, several reliable tests can help you ascertain when your bright citrus preserve is truly ready for jarring. Patience and keen observation are your best allies during this important phase, ensuring a flawless result for your homemade lime marmalade.
How to Test Doneness
There are a few popular methods for checking the marmalade’s set. One common technique is the “wrinkle test.” Before you start cooking, place a few small plates or saucers in the freezer. When you think the marmalade is ready, spoon a small amount onto one of the chilled plates. Let it sit for about a minute to cool, then gently push your finger through the marmalade. If it wrinkles and forms a skin, it has reached its setting point. Another method involves using a candy thermometer; the setting point for most marmalades is around 220°F (104°C). However, the wrinkle test is often preferred by seasoned canners for its practicality and accuracy in assessing the texture. A proper test ensures your canning fruit preserves will have a delightful consistency.
Knowing When It’s Ready
Beyond the wrinkle test, you can also observe the marmalade’s consistency on the spoon. As it approaches the setting point, it will thicken noticeably and fall from the spoon in a sheet rather than individual drops. The rapid boil will also subside slightly, and the color will deepen. It’s better to slightly undercook than overcook, as an overcooked marmalade can become too stiff or even caramelized, losing its fresh citrus flavor. If you’re unsure, it’s always safer to remove it from the heat, perform the wrinkle test again, and if it’s still too thin, return it to a rolling boil for a few more minutes. Precision in knowing when it’s ready will yield a perfect easy marmalade recipe every time.
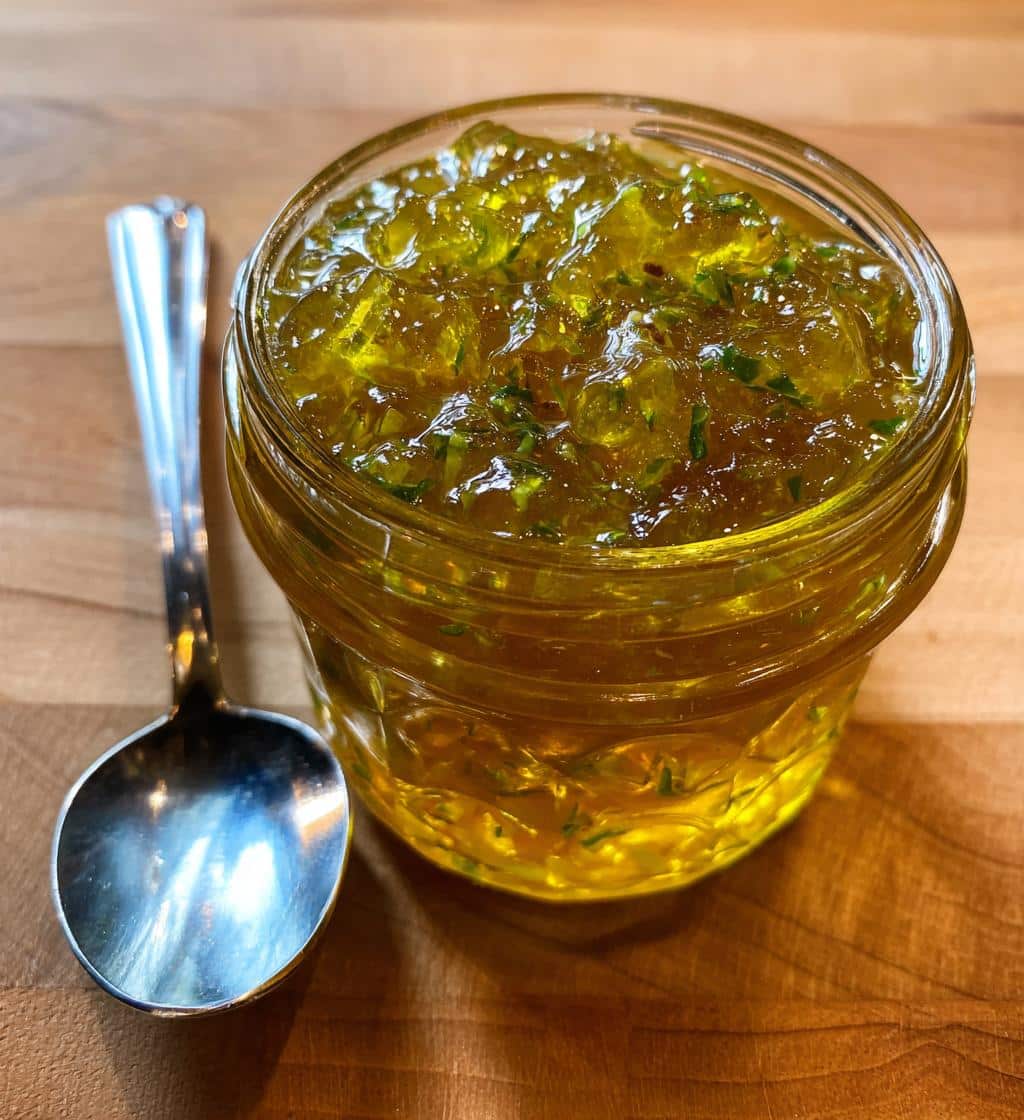
Filling Jars with Lime Marmalade
Once your lime marmalade has reached its perfect set, the final steps involve safely transferring it into jars for storage. This process, known as canning, is crucial not only for preserving the marmalade’s freshness and flavor but also for ensuring its safety for consumption over time. Proper jar sterilization and sealing techniques are paramount to prevent spoilage and extend the shelf life of your homemade citrus preserve. This meticulous attention to detail at the end of the cooking process guarantees that your efforts in crafting this bright flavor will be rewarded with long-lasting, delicious results. For more information on canning, you might want to visit our Pinterest page: Carina Recipes Pinterest.
Sterilize Jars First
Before filling, your canning jars and lids must be thoroughly sterilized. This eliminates any bacteria or microorganisms that could cause spoilage. There are several methods for sterilization:
- Boiling Water Bath: Submerge clean jars in boiling water for at least 10 minutes.
- Dishwasher: Run jars through a hot wash cycle, ensuring they remain hot until filled.
- Oven: Place clean jars in an oven at 275°F (135°C) for 15-20 minutes.
Keep jars hot until you are ready to fill them. Lids should also be simmered in hot (not boiling) water to soften the sealing compound, but never boiled vigorously. This preparation is a non-negotiable step for safe canning fruit preserves.
Pour Hot and Seal
Carefully ladle the hot marmalade into the sterilized, hot jars, leaving about a 1/4-inch headspace from the rim. This headspace is essential for creating a vacuum seal. Use a clean, damp cloth to wipe the rims of the jars clean, ensuring there are no sticky residues that could interfere with the seal. Place the prepared lids on the jars, and then screw on the bands until they are fingertip tight – not overly tight. Process the filled jars in a boiling water bath for the time specified in your recipe (typically 5-10 minutes for preserves). Once processed, carefully remove the jars and let them cool undisturbed on a wire rack. As they cool, you should hear the satisfying “pop” as the lids seal, confirming your jars are ready for storage and your homemade lime marmalade is perfectly preserved. Follow us on Instagram for more kitchen tips: @carinarecipes20.
Times and Servings for Recipe
Understanding the time commitment and the yield of a recipe is crucial for planning your cooking session, especially when venturing into easy marmalade making. While the act of making lime marmalade can be a relaxing and meditative experience, knowing the approximate preparation and cooking durations allows you to schedule accordingly, ensuring you have ample time without feeling rushed. Furthermore, having an idea of how many jars you can expect helps in anticipating your storage needs and potential gifting opportunities. This section provides a clear outline of what to expect, making your canning fruit preserves project even more manageable and enjoyable.
Prep and Cook Time
The total time required for your homemade lime marmalade can vary slightly depending on your efficiency and the specific steps in your chosen recipe (e.g., whether you soak the pith overnight). Generally, you can expect the following breakdown:
- Preparation Time: Approximately 45-60 minutes. This includes washing, zesting, juicing, and preparing any pith or membranes.
- Cooking Time: Approximately 60-90 minutes. This covers the initial simmering to soften the fruit and dissolve the sugar, followed by the rapid boil to reach the setting point.
- Processing Time (Water Bath): An additional 5-10 minutes for actual processing, plus cooling time.
Overall, plan for about 2 to 3 hours from start to finish for this sweet and tangy citrus preserve. This duration doesn’t include any overnight soaking steps if your recipe calls for them.
How Many Jars You Get
The yield of your lime marmalade recipe will depend on the initial quantity of fruit used and the size of your canning jars. A standard recipe using around 2 pounds of limes and lemons typically yields approximately 4-6 half-pint (8 oz) jars of marmalade. It’s always a good idea to have a couple of extra sterilized jars on hand, just in case your batch is particularly generous. This yield is perfect for personal enjoyment, sharing with friends and family, or perhaps using as a base for other delightful creations. Knowing your potential output helps in planning for storage and gifting, ensuring you make the most of your bright flavor creation. Remember to label your jars with the date for best freshness!
Quick Look at Marmalade Nutrition
While homemade lime marmalade is a delicious treat, it’s also helpful to have a general understanding of its nutritional content, especially if you’re mindful of your dietary intake. Like most fruit preserves, marmalade is primarily composed of fruit and sugar, making it a source of carbohydrates and natural sugars. This section offers a simplified overview, allowing you to enjoy your easy marmalade making creation with an informed perspective. It’s worth noting that specific nutritional values can vary based on the exact recipe, especially the sugar-to-fruit ratio, so these figures should be considered approximate. For delicious dessert options, explore our desserts category.
Calories Per Serving
A typical serving size of lime marmalade, usually about one tablespoon (approximately 20-25 grams), will contain around 40-50 calories. This can fluctuate based on the amount of sugar used in your specific recipe. The majority of these calories come from the carbohydrates, primarily sugars. While marmalade is not a significant source of protein or fat, it does offer a quick energy boost. It’s a delightful addition to breakfast or a snack, providing a burst of flavor without being excessively high in calories when consumed in moderation. Enjoying your bright citrus preserve in small portions allows you to savor its sweet and tangy notes without overindulging.
Sugar and Carb Details
Given that sugar is a primary ingredient, lime marmalade is relatively high in carbohydrates, predominantly in the form of sugars. One tablespoon typically contains about 10-12 grams of carbohydrates, with almost all of that being sugar. These sugars can include natural fruit sugars (fructose) from the limes and added granulated sugar. For those monitoring sugar intake, it’s possible to adjust the sugar content in homemade recipes, though reducing sugar too much can affect the set and shelf life of the marmalade, as sugar also acts as a preservative. This homemade lime marmalade is a sweet indulgence, best enjoyed as part of a balanced diet. Consider pairing it with something savory, like our Vanilla Bean Creme Brulee Cheesecake Cupcakes, for a varied treat.
Helpful Tips for Best Marmalade
Achieving a truly outstanding batch of homemade lime marmalade often comes down to a few key insights and practices. Even with a well-structured recipe, little adjustments and attentive care can elevate your citrus preserve from good to exceptional. These helpful tips are gleaned from years of preserving experience, designed to troubleshoot common issues and ensure your easy marmalade making efforts yield the most flavorful and perfectly set results. Paying attention to these nuances will significantly enhance your experience and the quality of your finished product. Consistent attention to detail, such as maintaining cleanliness, is vital for any successful kitchen project.
Adjust Sugar to Taste
While most marmalade recipes provide a specific sugar-to-fruit ratio, remember that it’s a starting point. Your personal preference for sweetness, as well as the inherent tartness of your specific limes, can influence the ideal sugar content. If you prefer a less sweet, more intensely tart lime marmalade, you can slightly reduce the sugar. Conversely, if your limes are particularly sour, a touch more sugar might create a better balance. Be aware that significant reductions in sugar can impact the marmalade’s ability to set and its shelf stability, as sugar plays a role in both. Always taste a small, cooled sample before jarring to make final adjustments to your bright citrus preserve.
Keep Jars Sterilized
The importance of thoroughly sterilized jars and lids cannot be overstated. Any bacteria or contaminants introduced during the jarring process can lead to spoilage, mold growth, or even dangerous pathogens. Ensure your jars are not only clean but also hot when you fill them to prevent thermal shock and facilitate a proper seal. Using a jar lifter is essential for safely handling hot jars. Always follow recommended processing times for canning fruit preserves in a boiling water bath to create a strong vacuum seal. This diligence guarantees the long-lasting freshness and safety of your homemade lime marmalade, allowing you to enjoy your bright flavor creation for months to come. For another sweet treat that requires careful handling, try our Peanut Butter Brownie Swirl Cookies.
Storing Your Sunshine-Filled Jars
Once your homemade lime marmalade is perfectly crafted and sealed, proper storage is the final step to ensure its longevity and maintain its vibrant flavor. Correct storage conditions protect your canning fruit preserves from degradation, allowing you to enjoy that taste of sunshine long after the harvest season. Think of your sealed jars as little time capsules, preserving the bright flavor for future enjoyment. Adhering to these simple storage guidelines will maximize the shelf life of your easy marmalade recipe, keeping it delicious and safe for many months. This final phase of care ensures all your hard work truly pays off.
Best Cool, Dark Place
For optimal preservation, store your sealed jars of lime marmalade in a cool, dark place. A pantry, cellar, or cupboard away from direct sunlight and heat sources is ideal. Exposure to light, especially sunlight, can degrade the marmalade’s color and flavor over time. Heat can also compromise the seal and shorten the shelf life. An ideal storage temperature is consistently below 70°F (21°C). Once a jar is opened, it must be refrigerated and typically consumed within 2-3 weeks. Unopened, properly processed and stored jars of homemade lime marmalade can last for up to 1-2 years, though its peak flavor is usually best within the first year.
Ensure Long-Lasting Freshness
To ensure long-lasting freshness, always double-check that your jar seals are intact before storing. A properly sealed jar will have a concave lid that doesn’t flex when pressed. If a lid does not seal, refrigerate that jar and consume its contents within a few weeks. When retrieving a jar for use, always check for any signs of spoilage, such as mold, off-odors, or a bulging lid, and discard if present. By following these storage best practices, you can confidently enjoy your sweet and tangy citrus preserve for an extended period, making the most of your easy marmalade making efforts and the delicious bright flavor it offers.
Enjoying Fresh Lime Marmalade Now
After all your efforts in crafting this delightful homemade lime marmalade, the best part is finally here: enjoying your labor of love! This bright citrus preserve is incredibly versatile and can elevate a multitude of dishes, from simple breakfast staples to more sophisticated desserts. Don’t limit its use to just toast; explore its potential to add a zesty, sweet-tart kick to various culinary creations. Sharing your easy marmalade recipe is also a wonderful way to spread joy and showcase your culinary skills. Let’s explore some simple yet delightful ways to incorporate this vibrant sweet and tangy treat into your everyday meals and special occasions.
Simple Serving Ideas
Lime marmalade shines in many contexts. Here are a few simple serving ideas:
- Classic Toast or Scones: Spread generously on warm buttered toast, crumpets, or fresh scones for a traditional breakfast.
- Yogurt or Oatmeal: Swirl a spoonful into plain Greek yogurt or hot oatmeal for a burst of citrus flavor.
- Dessert Topping: Drizzle over vanilla ice cream, cheesecake, or pancakes. It adds a refreshing zing.
- Glaze for Poultry: Whisk with a little soy sauce and ginger for a unique glaze on roasted chicken or duck.
- Cheese Board: Serve alongside sharp cheddar or creamy goat cheese on a charcuterie board.
- Cocktail Mixer: Use a small amount to sweeten and flavor a gin fizz or a margarita for a bright flavor twist.
The possibilities are truly endless for this vibrant citrus preserve.
Share Bright Flavors
One of the most rewarding aspects of making homemade lime marmalade is sharing it with others. Package your beautifully sealed jars with a ribbon and a handwritten label, and they make thoughtful, personalized gifts for friends, family, or neighbors. These jars of sunshine are perfect for holidays, birthdays, or just as a token of appreciation. Encourage recipients to try the simple serving ideas or create their own. Sharing your bright flavor creations is a wonderful way to connect and spread culinary delight, demonstrating the joy of homemade goodness. This easy marmalade recipe isn’t just food; it’s a gesture of care and deliciousness, perfect for any occasion.
