
A homemade nutella recipe brings incredible flavor to your kitchen. This delicious spread is surprisingly simple to create from scratch. Enjoy a richer taste and control over ingredients. Making your own chocolate hazelnut spread is a rewarding culinary adventure.
Key Takeaways
- Craft fresh, delicious chocolate hazelnut spread at home.
- Customize sweetness and texture for your ideal treat.
- Master roasting hazelnuts for optimal flavor.
- Learn proper storage for extended enjoyment.
- Find diverse ways to serve your homemade delight.
Crafting nutella at home is simple. You control the sweetness. Fresh ingredients shine in every bite. Enjoy a richer, healthier spread. This DIY treat is truly special.
Get Ready for Homemade Nutella
Why Make Your Own Nutella?
Making your own homemade nutella recipe offers numerous benefits over store-bought varieties. Firstly, you gain complete control over the ingredients. This means no artificial flavors, preservatives, or excessive sugars that are often found in commercial products. You can choose high-quality, fresh hazelnuts and cocoa, resulting in a significantly more vibrant and authentic chocolate hazelnut spread. For those with dietary concerns or allergies, customizing the recipe becomes a simple task, allowing you to tailor it to your specific needs. The satisfaction of creating something so delicious from scratch is also immensely rewarding, transforming a simple pantry staple into a gourmet treat.
Beyond health benefits, the flavor profile of DIY nutella is often superior. Freshly roasted hazelnuts lend a deeper, more aromatic taste that can’t be replicated by mass-produced spreads. The texture can also be adjusted to your preference, from a thick, spoonable paste to a smooth, pourable sauce. This homemade approach not only enhances your culinary skills but also ensures a product that is perfectly aligned with your palate. Imagine spreading a warm, fragrant chocolate hazelnut creation on your morning toast or using it in your favorite dessert recipes. It truly makes a difference.
The Joy of DIY Nutella
The process of creating your own nutella is an enjoyable culinary experience. It starts with selecting quality ingredients, moves through the sensory pleasure of roasting nuts, and culminates in the mesmerizing transformation of simple components into a luxurious spread in your food processor. This hands-on method allows for experimentation, such as adjusting the sweetness, the intensity of the chocolate, or even adding a hint of vanilla or sea salt to create a unique twist. The “DIY” aspect brings a sense of accomplishment and pride, knowing exactly what goes into your food. It’s also an excellent activity to share with family, making it a fun and educational experience for all ages.
Moreover, homemade nutella isn’t just about the spread itself; it’s about the connection to the food you consume. It encourages mindful eating and an appreciation for wholesome ingredients. Once you taste the difference, you’ll find it hard to go back to store-bought versions. This simple nutella creation is a testament to how fresh, real ingredients can elevate everyday indulgences, making them healthier and infinitely more flavorful. Get ready to impress yourself and others with this delightful spread that embodies both simplicity and gourmet quality.
Quick Facts: Your Homemade Nutella
Preparation and Cook Times
Crafting your own creamy nutella doesn’t demand an entire afternoon. The hands-on preparation time is surprisingly minimal, usually ranging from 15 to 20 minutes. This includes measuring ingredients and setting up your equipment. The most significant portion of the process involves the roasting of the hazelnuts, which typically takes about 10-15 minutes in the oven, followed by a cooling period of another 10-15 minutes. The actual blending time in a high-powered food processor can vary but generally falls between 10 to 15 minutes, as you wait for the hazelnuts to transform from a crumbly meal into a smooth, buttery paste. In total, you can expect to spend approximately 45 to 60 minutes from start to finish, making this an achievable project even on a busy schedule. This quick turnaround ensures you can enjoy a fresh chocolate hazelnut spread with minimal effort.
Servings and Total Yield
A standard homemade nutella recipe, using about 2 cups of hazelnuts, typically yields approximately 1.5 to 2 cups of finished spread. This quantity is perfect for enjoying over a week or two, depending on how frequently you indulge. It’s enough for several breakfasts, a few baking projects, or simply for spooning directly from the jar. The yield can be easily scaled up or down based on your needs. If you’re preparing it for a party or as a gift, doubling the recipe is straightforward. Conversely, if you want a small batch for personal enjoyment, halving the ingredients works just as well. The rich, concentrated flavor means a little goes a long way, ensuring that your batch of healthy nutella provides ample servings for various uses.
Ingredients for Homemade Nutella
Everything You Will Need
Creating your delicious homemade nutella recipe requires a few key, simple ingredients. The quality of these components significantly impacts the final taste, so opt for the best you can find. Here’s a rundown of what you’ll need to make this creamy nutella:
- Hazelnuts: Approximately 2 cups (250g) of raw, unsalted hazelnuts. These are the star of your chocolate hazelnut spread, providing its distinctive nutty flavor.
- Powdered Sugar: 1/2 to 3/4 cup (60-90g), or to taste. Powdered sugar dissolves easily, ensuring a smooth texture.
- Unsweetened Cocoa Powder: 1/4 to 1/2 cup (20-40g). Choose a high-quality cocoa powder for rich chocolate flavor.
- Neutral Oil: 2-4 tablespoons of a neutral-flavored oil like grapeseed, sunflower, or melted coconut oil. This helps achieve the perfect creamy consistency.
- Vanilla Extract: 1-2 teaspoons, for a touch of warmth and sweetness.
- Salt: A pinch (1/4 teaspoon) of fine sea salt, to enhance the flavors and balance the sweetness.
Optional additions include a splash of milk or cream for an even richer, silkier texture, or a small amount of chocolate chips (melted) for a more intense chocolate flavor. Using quality ingredients ensures your DIY nutella will be truly exceptional. For another delightful dessert, consider making Quick Italian Cream Cake, which also benefits from high-quality components.
Prepping Hazelnuts for Homemade Nutella
Roasting Nuts to Perfection
Roasting hazelnuts is the critical first step for making a flavorful homemade nutella recipe. This process deepens their flavor, making them more aromatic and complex. Preheat your oven to 350°F (175°C). Spread the raw hazelnuts in a single layer on a baking sheet. Roast them for 10-15 minutes, tossing halfway through, until they are lightly golden brown and fragrant. Be careful not to burn them, as this can make your chocolate hazelnut spread bitter. The skins will also begin to crack and peel, which is a good indicator of readiness. Roasting helps release the natural oils, which are essential for creating a smooth, creamy nutella later during blending. For more information on the hazelnut, its origins, and cultivation, you can visit its Wikipedia page.
Cooling and Removing Skins
Once roasted, immediately transfer the hot hazelnuts to a clean kitchen towel. Fold the towel over them and let them cool for about 5-10 minutes. While still warm, vigorously rub the hazelnuts within the towel. This friction helps loosen and remove their papery skins. Removing the skins is important because they can add a slightly bitter taste and a gritty texture to your simple nutella. Don’t worry if a few stubborn skins remain; perfection isn’t necessary, but try to remove as many as possible for the smoothest, most delicious result. This step is crucial for achieving the silky texture expected from a high-quality homemade nutella. The roasted and skinned hazelnuts are now ready for the blending stage, poised to become the foundation of your incredible creamy nutella.
Blending Your Homemade Nutella
Making Hazelnuts Smooth
The transformation of roasted hazelnuts into a creamy spread is truly magical and happens in your food processor. First, add the cooled, skinned hazelnuts to the bowl of a powerful food processor. Begin processing them on high speed. Initially, the hazelnuts will chop into coarse crumbs, then evolve into a finer meal. Continue processing; after several minutes, the natural oils will begin to release, causing the meal to clump together. Patience is key here. Keep processing, scraping down the sides occasionally. Eventually, the mixture will turn into a thick, glossy, and very smooth hazelnut butter. This stage might take 8-10 minutes, depending on your food processor’s power. It’s the foundation for your delicious chocolate hazelnut spread.
Adding Other Ingredients
Once your hazelnut butter is smooth and creamy, it’s time to introduce the remaining ingredients to create the distinctive homemade nutella flavor. Add the unsweetened cocoa powder, powdered sugar, vanilla extract, and a pinch of salt to the food processor with the hazelnut butter. These ingredients will infuse the spread with its beloved chocolatey sweetness and depth. For a richer chocolate experience, using high-quality cocoa powder makes a significant difference. You might also consider adding a small amount of melted good-quality chocolate for an extra indulgent touch. For more on the history and various uses of chocolate, check out its Wikipedia page.
Blending Until Creamy
With all ingredients now in the food processor, continue to blend. The mixture will initially thicken due to the addition of dry ingredients. Gradually drizzle in the neutral oil while the processor is running. The oil helps achieve the desired creamy, spreadable consistency. Add it slowly, a tablespoon at a time, until your homemade nutella reaches your preferred thickness. Some prefer a thicker, more spoonable spread, while others might like a slightly runnier version for drizzling. Blend until all ingredients are thoroughly combined and the texture is perfectly smooth, glossy, and uniform. Taste and adjust sweetness or chocolate intensity if needed. This step completes your simple nutella, ready to be enjoyed.
Step-by-Step Homemade Nutella
Detailed Instructions Guide
Creating your own delicious homemade nutella recipe is a straightforward process when you follow these steps:
- Preheat Oven & Roast Hazelnuts: Preheat your oven to 350°F (175°C). Spread 2 cups of raw, unsalted hazelnuts in a single layer on a baking sheet. Roast for 10-15 minutes, stirring once, until fragrant and lightly browned. Skins should start to crack.
- Cool & Skin Hazelnuts: Immediately transfer the hot hazelnuts to a clean kitchen towel. Fold the towel over them and let cool for 5-10 minutes. While still warm, rub the hazelnuts vigorously in the towel to remove as many skins as possible. Discard skins.
- Process Hazelnuts: Place the skinned hazelnuts into a high-powered food processor. Process on high speed. Initially, they will become coarse crumbs, then a fine meal. Continue processing for 8-10 minutes, scraping down the sides occasionally, until the nuts release their oils and turn into a smooth, glossy butter. Be patient, as this takes time.
- Add Flavorings: Add 1/2 to 3/4 cup powdered sugar, 1/4 to 1/2 cup unsweetened cocoa powder, 1-2 teaspoons vanilla extract, and 1/4 teaspoon salt to the hazelnut butter in the food processor.
- Blend to Creaminess: Process again until all ingredients are well combined. While the processor is running, slowly drizzle in 2-4 tablespoons of neutral oil (grapeseed, sunflower, or melted coconut oil) until your homemade nutella reaches your desired smooth, spreadable consistency.
- Taste & Adjust: Stop the processor, taste the nutella, and adjust sweetness, cocoa, or salt as needed. Blend again briefly to incorporate any additions.
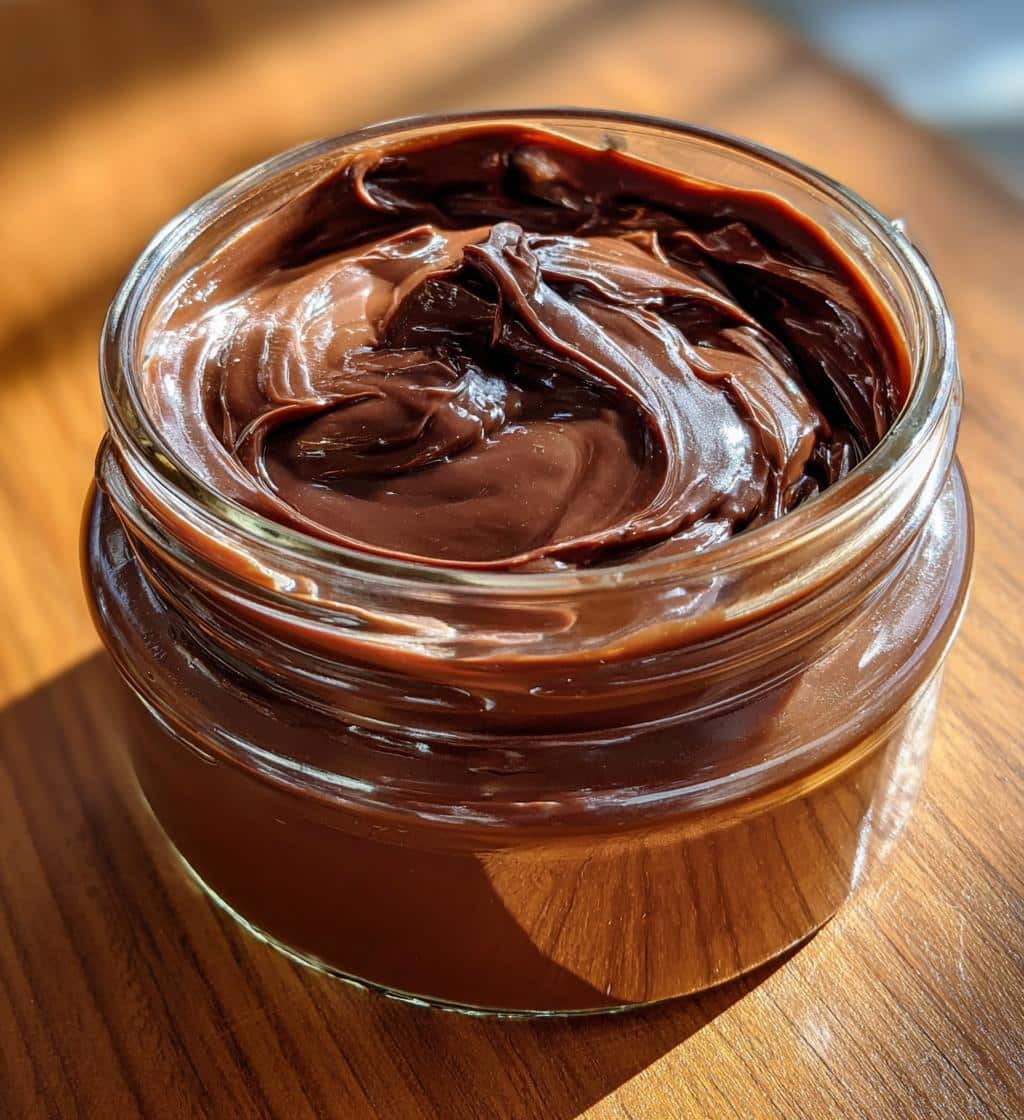
- Store: Transfer your freshly made chocolate hazelnut spread to an airtight jar or container.
This simple nutella creation is now ready for enjoyment!
Storing Your Homemade Nutella
Shelf Life and Refrigeration
Proper storage is key to enjoying your delicious homemade nutella recipe for as long as possible. Unlike commercial spreads filled with preservatives, your DIY nutella is made from fresh ingredients, which means its shelf life is shorter. Store your homemade chocolate hazelnut spread in an airtight container, such as a glass jar, at room temperature in a cool, dark pantry. In these conditions, it typically stays fresh and delicious for up to 1-2 weeks. However, if you live in a very warm climate, or prefer to extend its freshness, refrigeration is a good option. When refrigerated, your simple nutella can last for up to 3-4 weeks. Keep in mind that refrigeration will cause the spread to firm up considerably, making it less spreadable straight from the fridge. For a creamier consistency, allow it to sit at room temperature for about 30 minutes before serving. Freezing is generally not recommended as it can alter the texture of the creamy nutella.
Homemade Nutella Nutrition Info
Calories and Macronutrients
While a homemade nutella recipe is a treat, it’s helpful to have a general idea of its nutritional content. Since it’s made with natural ingredients, it offers a different profile than commercial versions. Hazelnuts are rich in healthy fats, protein, fiber, and vitamin E. Cocoa powder contributes antioxidants. Given the ingredients (hazelnuts, sugar, cocoa, oil), homemade nutella will be calorie-dense, primarily from fats and carbohydrates. A typical serving will provide a good source of healthy fats and some protein. Exact figures vary based on the specific quantities of sugar and oil you use. This healthy nutella offers the benefit of knowing exactly what’s in it, allowing for better dietary choices.
Serving Size Details
A standard serving size for any nut butter or spread is usually around 1-2 tablespoons (about 15-30 grams). This amount provides a satisfying taste without overindulging. For your homemade nutella, sticking to this serving size helps manage calorie intake while still enjoying its rich flavor. Spread it thinly on toast, swirl it into oatmeal, or pair it with fruit. Remember that while this DIY nutella can be a part of a balanced diet, it’s still an indulgent item. Enjoy it mindfully, savoring each spoonful of this delicious chocolate hazelnut spread. For a different type of healthy indulgence, consider making Snickerdoodle Cobbler.
Tips for Perfect Homemade Nutella
Adjusting Sweetness to Taste
One of the greatest advantages of making your homemade nutella recipe is the ability to customize it precisely to your taste. Sweetness is highly personal, and what one person considers perfect, another might find too sweet or not sweet enough. When you’re adding the powdered sugar, start with the lower end of the recommended amount (e.g., 1/2 cup). Blend thoroughly, then taste a small spoonful. If you prefer a sweeter chocolate hazelnut spread, add more powdered sugar, one tablespoon at a time, blending after each addition until you reach your desired level of sweetness. This careful adjustment ensures your simple nutella is exactly how you like it, making every bite a delight. Remember, it’s easier to add more sweetness than to reduce it.
Hazelnut Type Options
While standard raw hazelnuts are ideal for this recipe, you do have some options that can slightly alter the flavor profile of your creamy nutella. If you can find them, blanched hazelnuts (with skins already removed) can save you a step, though roasting them yourself is still crucial for flavor. Some specialty stores might offer organic hazelnuts, which can yield a purer taste. Avoid pre-roasted or salted hazelnuts, as these can overpower the delicate chocolate and hazelnut balance. The fresher your hazelnuts, the more vibrant and intense the flavor of your homemade nutella will be. Always start with good quality nuts for the best results, ensuring your healthy nutella foundation is strong. For another delicious recipe featuring nuts, check out Peanut Butter Brownie Swirl Cookies.
Customizing Your Nutella Spread
Varying Thickness Options
The beauty of a homemade nutella recipe lies in its adaptability, especially when it comes to texture. You can easily adjust the thickness of your chocolate hazelnut spread to suit different uses. If you prefer a thicker, more spoonable consistency – perfect for spreading generously on toast or enjoying straight from the jar – you might use less of the neutral oil during the blending stage. Start with the minimum recommended amount and only add more if the mixture is too dry or not blending smoothly. For a thinner, more pourable simple nutella, ideal for drizzling over pancakes, ice cream, or fruit, you can add an extra tablespoon or two of oil (or even a splash of milk or cream for added richness) until the desired runny consistency is achieved. Always add liquids slowly while the food processor is running, allowing the mixture to fully emulsify and achieve that perfect creamy texture. This control over thickness makes your DIY nutella incredibly versatile in the kitchen. Explore more dessert ideas on our Desserts category page.
Enjoying Your Homemade Nutella
Ideas for Serving Nutella
Once you’ve crafted your perfect batch of homemade nutella recipe, the possibilities for enjoying it are endless. This versatile chocolate hazelnut spread is not just for breakfast; it can elevate snacks, desserts, and even some savory dishes. Here are some delightful ideas for serving your simple nutella:
- Classic Toast or Pancakes: Spread generously on warm toast, English muffins, bagels, or fluffy pancakes and waffles for a decadent breakfast.
- Fruit Dip: Pair with fresh fruit like sliced bananas, strawberries, apples, or pear wedges for a healthy nutella snack.
- Baking Ingredient: Swirl into brownies, cookies, muffins, or cheesecakes for an extra layer of chocolate hazelnut goodness.
- Dessert Topping: Drizzle over ice cream, yogurt, or even a slice of apple pie for an instant upgrade.
- Smoothie Boost: Add a spoonful to your morning smoothie for a rich, nutty flavor and a boost of healthy fats.
- Sandwich Filler: Combine with sliced bananas or peanut butter in a sandwich for a comforting treat.
- Dessert Pizzas or Crepes: Use as a base for sweet pizzas topped with fruit or fill delicate crepes.
No matter how you choose to enjoy it, your creamy nutella will bring a gourmet touch to any dish, proving that homemade truly is best. For another fantastic dessert, try Balsamic Strawberry Caprese.
Frequently Asked Nutella Questions
Storing Homemade Nutella
A common question regarding homemade nutella recipe centers around its storage and longevity. To reiterate, store your chocolate hazelnut spread in an airtight container at room temperature for up to 1-2 weeks. If you live in a warmer climate or wish to extend its shelf life, refrigerate it for up to 3-4 weeks. Remember that refrigeration will cause the spread to harden; simply allow it to come to room temperature for about 30 minutes before use to regain its spreadable consistency. Do not freeze homemade nutella, as the texture can become grainy and unappetizing upon thawing. Always use clean utensils to scoop out the simple nutella to prevent contamination and prolong its freshness. For more recipe inspiration and visual guides on making delicious treats, follow us on Pinterest and Instagram!
