
Red Velvet Oreo Cheesecake is a truly decadent dessert, perfect for any celebration or a special weeknight treat. This recipe combines the classic tang of cheesecake with the rich flavor of red velvet cake and the delightful crunch of an Oreo crust. Get ready to bake a show-stopping dessert that everyone will adore.
Key Takeaways
- Craft a simple yet delicious Oreo cookie crust.
- Prepare a smooth, vibrant red velvet cream cheese filling.
- Follow precise baking and cooling steps for perfection.
- Enjoy a stunning, shareable dessert that impresses guests.
This dessert truly brings joy. Rich flavors mingle perfectly. The texture is incredibly smooth. An Oreo crunch adds delight. Everyone will ask for the recipe.
Start Your Red Velvet Cheesecake Journey
Embarking on the creation of a Red Velvet Oreo Cheesecake is an exciting culinary adventure. This dessert recipe promises a luxurious taste and a stunning presentation, making it ideal for gatherings, holidays, or simply as a special treat for yourself and your loved ones. The process, while requiring a few steps, is straightforward and rewarding, especially when you follow these baking instructions carefully. Prepare to transform simple ingredients into a truly unforgettable homemade cheesecake that marries the classic tang of cream cheese with the unique, subtle cocoa notes of red velvet, all resting on a beloved Oreo crust. The key to success lies in meticulous preparation and patience, ensuring each layer contributes to a harmonious whole. As you gather your tools and ingredients, think about the joy this sweet treat will bring.
Oven Prep For Baking
Before you even begin mixing, proper oven preparation is crucial for achieving a perfectly baked Red Velvet Oreo Cheesecake. Start by preheating your oven to the specified temperature. For most cheesecakes, this is usually around 325-350°F (160-175°C). It’s also wise to prepare a water bath for baking. A water bath, or bain-marie, helps to cook the cheesecake gently and evenly, preventing cracks on the surface and ensuring a creamy, smooth texture throughout. To set up a water bath, you’ll need a large roasting pan or baking dish. Once your springform pan with the crust is ready, you’ll place it inside this larger pan. Then, you’ll carefully pour hot water into the larger pan, reaching about halfway up the sides of the springform pan. This creates a moist, consistent heat environment, which is especially important for delicate desserts like this Red Velvet Oreo Cheesecake. Always ensure your springform pan is well-sealed to prevent water from seeping in. A good trick is to wrap the bottom and sides of the springform pan tightly with heavy-duty aluminum foil.
Gather All Cheesecake Ingredients
Success in baking, especially with a layered dessert like our Red Velvet Oreo Cheesecake, often begins with having all your ingredients measured and ready to go. This practice, known as mise en place, streamlines the baking process and prevents last-minute scrambles. Taking the time to gather everything ensures you don’t miss any critical components, from the simple yet crucial cream cheese to the vibrant red velvet cake mix. This section will break down exactly what you need, ensuring your Red Velvet Oreo Cheesecake turns out perfectly every time. From pantry staples to the star flavorings, each ingredient plays a vital role in crafting this sweet treat.
What you need for crust
The foundation of any great cheesecake is its crust, and for our Red Velvet Oreo Cheesecake, we’re using a wonderfully crunchy and flavorful Oreo crust. You will need one standard package of Oreo cookies (about 36 cookies). You don’t need to remove the cream filling; just crush them whole. The cream adds to the richness and helps bind the crust together. Alongside the crushed Oreos, you’ll need unsalted butter, melted. The butter acts as the binding agent, holding the cookie crumbs together to form a firm base. Make sure it’s melted completely but not browned. Sometimes, a touch of granulated sugar is added for extra sweetness, but with Oreos, it’s often not necessary. A perfectly prepared Oreo crust provides a delightful contrast to the creamy filling.
What you need for filling
The heart of our Red Velvet Oreo Cheesecake is its luxurious, vibrant filling. This requires several key ingredients to achieve its characteristic flavor and silky texture. You’ll need several blocks of full-fat cream cheese, softened to room temperature. This is non-negotiable for a smooth, lump-free batter. Granulated sugar provides sweetness, while large eggs add structure and richness. For the distinct red velvet flavor and color, a box of red velvet cake mix is a fantastic shortcut, providing both color and a hint of cocoa flavor. Additionally, sour cream or Greek yogurt adds a lovely tang and moisture, contributing to the cheesecake’s creamy consistency. Vanilla extract enhances all the flavors, and a pinch of salt balances the sweetness. Ensure all dairy ingredients are at room temperature to prevent a lumpy batter. For another delightful dessert, consider making a Vanilla Bean Creme Brulee Cheesecake Cupcakes, which also relies on high-quality cream cheese. Having these items ready guarantees a perfect cream cheese filling.
Craft The Perfect Oreo Crust
The foundation of your Red Velvet Oreo Cheesecake is the crunchy, flavorful Oreo crust. This easy cheesecake step sets the stage for the rich filling that will follow. A well-made crust not only provides textural contrast but also a delightful base flavor that complements the red velvet perfectly. It’s an easy cheesecake component to master, making this whole dessert recipe accessible even for novice bakers. The key is achieving the right consistency for your crumbs and ensuring they are evenly mixed with the butter before pressing them firmly into the pan. This process prevents crumbling slices later on and ensures every bite of your sweet treat includes that satisfying crunch. You’ll find that making your own Oreo crust is far superior to store-bought versions.
Combining crumbs and butter
To start your Oreo crust, you’ll need to finely crush your Oreo cookies. A food processor is the quickest and most efficient way to achieve fine, uniform crumbs. Simply place the whole cookies (no need to remove the cream) into the food processor and pulse until they resemble fine sand. If you don’t have a food processor, you can place the cookies in a Ziploc bag, remove excess air, and crush them with a rolling pin or the bottom of a heavy pan. Once you have your crumbs, transfer them to a medium-sized bowl. Pour the melted unsalted butter over the crumbs and mix thoroughly with a spoon or your hands until all the crumbs are moistened. The mixture should resemble wet sand and hold together when pressed. This combination creates the ideal base for your Red Velvet Oreo Cheesecake.
Pressing into springform pan
Once your crumb mixture is ready, it’s time to press it into your springform pan. A 9-inch (23 cm) springform pan is typically used for cheesecakes. Ensure the bottom of the pan is lined with parchment paper and the sides are lightly greased. This will help with easy release later. Pour the moistened Oreo crumbs into the bottom of the prepared springform pan. Using the bottom of a flat glass or a measuring cup, firmly and evenly press the crumbs across the bottom of the pan. You want a compact, even layer. You can also press some crumbs up the sides of the pan slightly for a more pronounced crust edge, though this is optional. Once pressed, place the pan in the refrigerator for at least 15-20 minutes to allow the butter to firm up, creating a stable base before you add the filling. This chilling time is essential for a crisp, intact crust. For another delightful baked good, consider making Snickerdoodle Cobbler, which also features a delightful buttery base.
Make Creamy Cheesecake Filling Base
The core of your Red Velvet Oreo Cheesecake lies in its creamy, luscious filling. Achieving a perfectly smooth and lump-free cheesecake batter is paramount for that classic melt-in-your-mouth texture. This stage requires attention to detail, particularly regarding ingredient temperatures and mixing techniques. A successful cream cheese filling starts with softened ingredients and careful incorporation. Avoid overmixing, as this can introduce too much air, leading to cracks during baking. This homemade cheesecake technique is vital for delivering a professional-looking and tasting dessert. Remember, this is where the magic happens, setting the stage for the vibrant red velvet flavors.
Beating cream cheese with sugar
Begin by ensuring your full-fat cream cheese is at room temperature. This is perhaps the most critical baking tip for a smooth cheesecake. Cold cream cheese will result in a lumpy batter. In a large mixing bowl, using an electric mixer (either stand or hand-held) fitted with the paddle attachment, beat the softened cream cheese on medium speed until it is light and fluffy, usually about 2-3 minutes. Scrape down the sides of the bowl frequently to ensure even beating. Gradually add the granulated sugar, beating until it is fully incorporated and the mixture is smooth and creamy, with no visible sugar granules. This step creates the essential sweet, tangy base for your Red Velvet Oreo Cheesecake. Proper beating at this stage will prevent lumps later on.
Adding eggs one by one
Once the cream cheese and sugar mixture is perfectly smooth, it’s time to incorporate the eggs. Eggs provide structure and richness to the cheesecake filling. The key here is to add them one at a time, beating on low speed just until each egg is combined before adding the next. Overmixing at this stage can incorporate too much air into the batter, which can cause the cheesecake to puff up too much during baking and then crack as it cools. Gentle mixing ensures a dense, smooth, and crack-free surface on your finished Red Velvet Oreo Cheesecake. After all eggs are just combined, resist the urge to keep beating. You’re aiming for a unified, not airy, mixture. This careful addition is a small but significant baking instruction for cheesecake perfection.
Fold In Red Velvet Flavors
Now that your creamy cheesecake base is ready, it’s time to infuse it with the signature tang and subtle cocoa notes that define a Red Velvet Oreo Cheesecake. This stage is where the color truly comes alive, transforming a simple cream cheese filling into something visually stunning and deliciously unique. The careful addition of these final flavoring agents ensures a balanced taste profile and the rich, moist texture characteristic of classic red velvet desserts. Pay close attention to gentle mixing to maintain the smooth consistency you’ve worked hard to achieve. For another colorful and delicious dessert, check out Peanut Butter Brownie Swirl Cookies, which also highlight distinct flavor pairings.
Stirring in sour cream and vanilla
After incorporating the eggs, gently stir in the sour cream and vanilla extract. The sour cream plays a vital role in creating that wonderfully rich, moist, and tangy texture that complements the sweetness of the cheesecake and the red velvet flavor. It also helps to prevent the cheesecake from becoming too dense. Vanilla extract, on the other hand, enhances all the other flavors, adding a warm, aromatic depth that is essential in any dessert. Use a spatula to gently fold these ingredients into the cream cheese filling until just combined. Overmixing at this point can develop gluten in the flour component of the cake mix, which you want to avoid, and introduce unwanted air. The goal is a uniform, vibrant batter.
Mixing red velvet cake mix
The final and most defining step for your Red Velvet Oreo Cheesecake filling is incorporating the red velvet cake mix. While some recipes use cocoa powder and food coloring, using a cake mix provides a convenient and consistent way to achieve both the iconic color and the delicate red velvet flavor profile. Slowly add the dry red velvet cake mix to your cheesecake batter. Again, use a spatula to gently fold it in until no streaks of dry mix remain. It’s crucial not to overmix; just combine until the color is uniform and vibrant. This step truly transforms your cream cheese filling into a festive, irresistible red velvet concoction, ready to be poured over your crunchy Oreo crust. This blend of flavors will make your sweet treat truly special.
Assemble Your Oreo Cheesecake Masterpiece
With your perfect Oreo crust chilled and your vibrant red velvet cream cheese filling prepared, it’s time for the exciting step of assembling your Red Velvet Oreo Cheesecake. This stage is relatively quick but requires care to ensure an even distribution of the filling over the crust. Proper assembly sets the stage for a beautifully baked dessert that will impress both in taste and appearance. Taking a moment to double-check your springform pan setup, especially if using a water bath, is a wise move before you pour in the luscious batter. This sweet treat is almost ready for the oven!
Pouring batter over the crust
Carefully retrieve your chilled springform pan with its firm Oreo crust from the refrigerator. Place the springform pan into the larger roasting pan if you are using a water bath method, ensuring the foil wrap is secure. Gently pour the prepared Red Velvet Oreo Cheesecake batter evenly over the chilled Oreo crust. Use a spatula to ensure all the delicious batter is transferred and spread smoothly across the surface. Once poured, gently tap the pan a few times on the counter. This helps to release any trapped air bubbles, which can cause cracks or an uneven surface during baking. A smooth, level surface ensures an aesthetically pleasing finished cheesecake. If using a water bath, now is the time to carefully add hot water to the larger pan, making sure it comes about halfway up the sides of the springform pan, but without splashing into the cheesecake itself. You are now ready to bake this homemade cheesecake to perfection. For more desserts, visit our collection.
Bake To Red Velvet Bliss
Baking is the magical step where all your carefully combined ingredients transform into a cohesive, creamy Red Velvet Oreo Cheesecake. This stage requires patience and precision, as improper baking can lead to cracks, dryness, or an unset center. The goal is a gentle, even bake that results in a perfectly set cheesecake with a velvety texture. Following the recommended baking time and temperature, especially if using a water bath, is crucial for achieving this sweet treat’s ideal consistency. Resist the urge to open the oven door frequently; sudden temperature changes can contribute to cracking.
Baking time and temperature
Place your assembled Red Velvet Oreo Cheesecake, ideally within its water bath, into the preheated oven. Bake at the recommended temperature, typically around 325°F (160°C), for an initial period of 60 to 80 minutes, depending on your oven and pan size. The lower temperature and water bath create a moist environment, preventing quick browning and cracking. After the initial baking, you might reduce the oven temperature or simply turn off the oven and leave the cheesecake inside with the door ajar for passive cooling. This slow cooling process is a crucial baking instruction for crack-free cheesecakes, ensuring a flawless homemade cheesecake.
Checking for readiness
Knowing when your Red Velvet Oreo Cheesecake is perfectly baked is key. The edges should appear set, while the very center (about a 2-inch diameter) should still have a slight wobble when you gently jiggle the pan. If the entire cheesecake is firm, it’s likely overbaked. Conversely, if the center is very liquid, it needs more time. An instant-read thermometer inserted into the center should register around 150°F (65°C) for ideal doneness. Once ready, turn off the oven and leave the cheesecake inside with the door slightly ajar for about an hour. This gradual cooling helps prevent cracks caused by drastic temperature changes. For dinner ideas, why not try a Garlic Honey Chicken recipe?
Cooling For Cheesecake Perfection
The journey to a perfect Red Velvet Oreo Cheesecake doesn’t end when it comes out of the oven. In fact, the cooling process is just as critical as baking for achieving that signature creamy texture and preventing unsightly cracks. This stage requires patience, but the rewards are well worth it: a beautifully set, smooth, and delicious dessert. Proper cooling ensures the cheesecake finishes cooking gently and firms up to its ideal consistency, delivering pure bliss in every slice. This step is a vital part of preparing a show-stopping homemade cheesecake.
Letting cheesecake cool down
Once your Red Velvet Oreo Cheesecake has finished its gradual cooling period in the turned-off oven (door ajar), carefully remove it from the oven and the water bath (if used). Place the springform pan on a wire rack to continue cooling at room temperature. It’s important not to rush this step. Allow the cheesecake to cool completely, which can take anywhere from 1 to 3 hours, depending on your kitchen’s ambient temperature. Cooling on a wire rack allows air circulation around the entire pan, ensuring even cooling. Avoid placing it directly into the refrigerator while still warm, as this can create condensation and affect the texture. Patience during this initial cooling stage is a key baking tip for cheesecake perfection.
Refrigerating for at least four hours
After the Red Velvet Oreo Cheesecake has cooled completely to room temperature, it’s ready for its final, crucial step: refrigeration. Cover the cheesecake loosely with plastic wrap or aluminum foil and transfer it to the refrigerator. It needs to chill for a minimum of four hours, but ideally overnight. This extended chilling time allows the cheesecake to fully set, firm up, and develop its flavors. The cold helps solidify the cream cheese filling, making it easier to slice cleanly and ensuring that rich, dense texture. Rushing this chilling time will result in a softer, less stable cheesecake that won’t hold its shape as well. This dedicated chilling time is non-negotiable for a truly perfect Red Velvet Oreo Cheesecake experience, ensuring that every slice of this sweet treat is pure bliss. For another impressive dessert requiring chilling, try our Quick Italian Cream Cake.
Your Red Velvet Oreo Cheesecake Times
Understanding the time commitment for any recipe, especially a delicious dessert recipe like this Red Velvet Oreo Cheesecake, helps with planning and ensures a stress-free baking experience. While some components require active work, a significant portion of the time involves waiting for chilling and baking processes. Don’t let the total time deter you; much of it is passive, allowing you to focus on other tasks. Breaking down the quick prep and cooking times from the overall waiting period will give you a clear picture of what to expect, guiding you towards that moment of pure bliss when you finally enjoy your creation.
Quick prep and cooking times
The active preparation for your Red Velvet Oreo Cheesecake is surprisingly efficient. Expect to spend approximately 20-30 minutes on hands-on prep, which includes crushing Oreos, mixing the crust with butter, and beating together the cream cheese filling ingredients. The baking time in the oven typically ranges from 60 to 80 minutes, plus an additional 60 minutes for cooling inside the turned-off oven with the door ajar. So, your active involvement is less than an hour, with the oven doing most of the work. This makes it a feasible project even on a moderately busy day, especially if you consider preparing the crust a day ahead. These baking instructions are straightforward.
Total time until pure bliss
While the active prep and cooking times are relatively short, the total time until you can truly enjoy a perfectly set Red Velvet Oreo Cheesecake includes crucial cooling and chilling periods. After oven baking and initial cooling, the cheesecake needs to chill in the refrigerator for a minimum of 4 hours, though ideally, you should plan for overnight chilling (8+ hours). This extended chilling time is vital for the cheesecake to firm up completely and for the flavors to meld beautifully. Therefore, from start to pure bliss, plan for a total of approximately 7-10 hours, or even up to 12-14 hours if chilling overnight. This makes it an excellent make-ahead dessert for special occasions. Your patience will be rewarded with a spectacular homemade cheesecake. Consider pairing this with a baking category visit for more inspiration!
Servings And Nutrition Details
When preparing a delicious dessert recipe like the Red Velvet Oreo Cheesecake, it’s always helpful to consider both the generous servings it provides and a general understanding of its nutritional aspects. While this sweet treat is undoubtedly an indulgence, knowing these details helps in planning for gatherings or managing personal dietary preferences. This rich and decadent homemade cheesecake is designed for sharing, making it a perfect centerpiece for celebrations. Understanding its composition can add to your enjoyment, appreciating it as a special occasion dessert.
How many people it serves
A standard 9-inch (23 cm) Red Velvet Oreo Cheesecake typically yields between 12 to 16 generous slices. For larger events or if serving alongside other desserts, you can easily cut smaller portions, extending its reach to 18-20 servings. The richness of this dessert means that even a moderate slice is incredibly satisfying, ensuring that everyone gets a taste of this luxurious creation. Whether you’re hosting a dinner party, celebrating a birthday, or bringing a dish to a potluck, this cheesecake is perfectly scaled to share. Its impressive appearance and delightful taste ensure it will be a crowd-pleaser, providing plenty for all your guests to enjoy.
Healthy facts about a slice
It’s important to approach the “healthy facts” of a Red Velvet Oreo Cheesecake with a realistic perspective. This is a rich, indulgent sweet treat, meant for enjoyment in moderation rather than as a health food staple. A typical slice will contain significant calories, fats (primarily from cream cheese, butter, and Oreos), and sugar. While precise nutritional values vary based on specific ingredients and portion sizes, it is high in energy. However, it’s also worth noting that it provides calcium and protein from the dairy components. The joy derived from savoring a slice of this delicious dessert can contribute to overall well-being and happiness. As with all decadent foods, portion control is key. Enjoy this special occasion dessert as a delightful part of a balanced diet, appreciating the labor of love that went into its creation. For a lighter, yet flavorful option, consider a visit to our Pinterest for other recipe ideas.
Helpful Cheesecake Tips And Notes
Crafting a Red Velvet Oreo Cheesecake is a rewarding endeavor, and a few extra baking tips can elevate your creation from great to absolutely exceptional. These insights cover optimal serving practices and smart storage solutions, ensuring you get the most out of your delicious dessert. Paying attention to these small details can significantly enhance the overall enjoyment and longevity of your homemade cheesecake, making it a truly flawless sweet treat experience. These notes will prove invaluable for any baker.
Best ways to serve
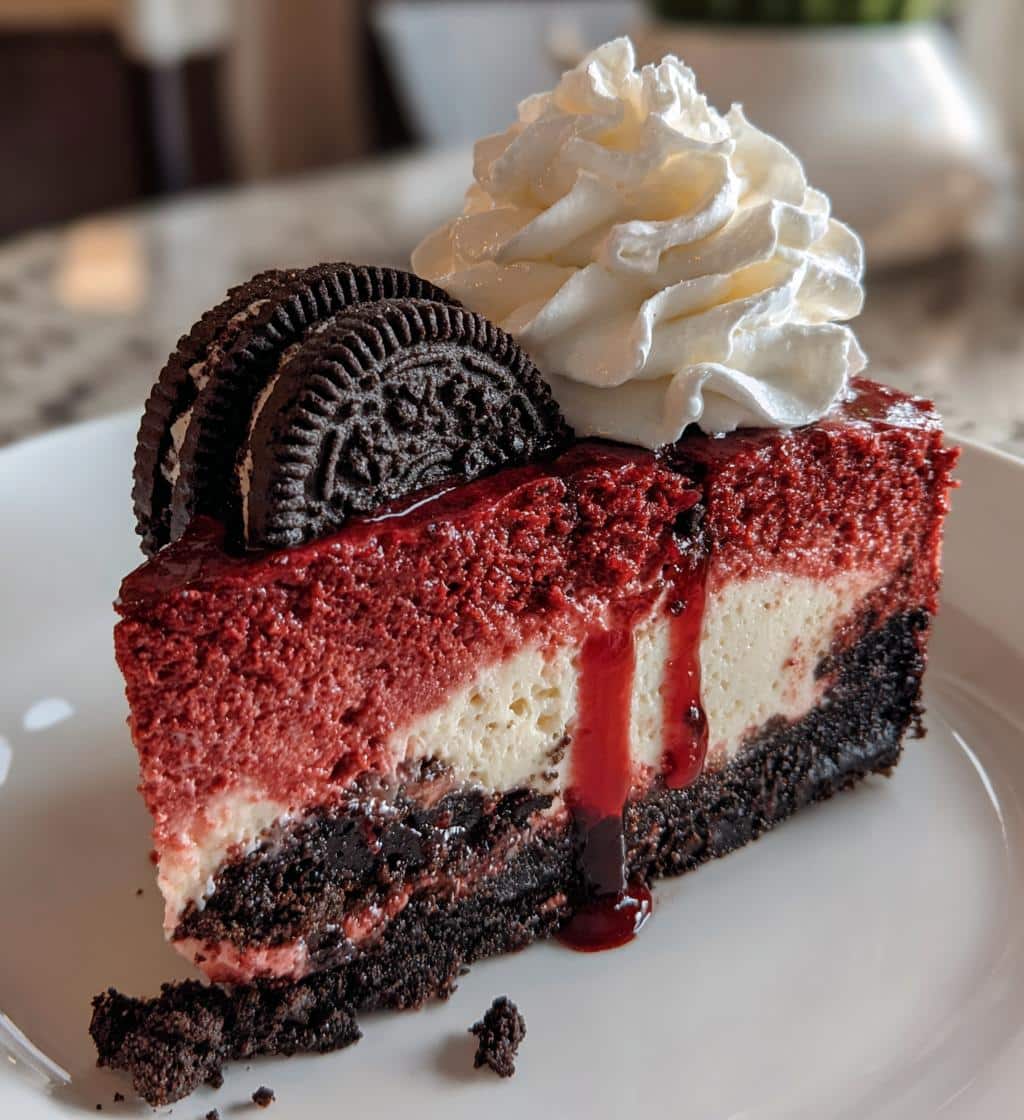
Always ensure the Red Velvet Oreo Cheesecake is thoroughly chilled before slicing; this prevents crumbling and ensures clean, sharp edges. For the cleanest slices, use a sharp, thin-bladed knife, warmed under hot water and wiped clean between each cut. Garnish options add elegance: a dollop of fresh whipped cream, a sprinkle of extra Oreo crumbs, a drizzle of chocolate sauce, or fresh berries like raspberries or strawberries for contrast. A sprig of fresh mint also adds a beautiful touch. This sweet treat is best served at a slightly cool room temperature, allowing flavors to fully bloom, so take it out of the fridge about 15-20 minutes before serving. These serving ideas elevate this delicious dessert.
How to store leftovers
Proper storage is essential to maintain the freshness and quality of your Red Velvet Oreo Cheesecake. Tightly wrap any remaining slices or the entire cheesecake in plastic wrap, then place it in an airtight container or cover with aluminum foil. This dual protection prevents the cheesecake from absorbing refrigerator odors and drying out. Stored properly in the refrigerator, your cheesecake will remain fresh for 3-5 days. For longer storage, freeze individual slices for up to 1-2 months. Wrap slices tightly in plastic wrap, then foil, and place them in a freezer-safe bag. Thaw frozen slices in the refrigerator overnight before serving. This homemade cheesecake stores exceptionally well, ensuring pure bliss for days. For more culinary inspiration, consider browsing our Instagram page.
Enjoy Your Cheesecake Pure Bliss!
You’ve meticulously followed each step, from crafting the perfect Oreo crust to gently folding in the vibrant red velvet flavors, enduring the baking and the crucial chilling time. Now, the moment has arrived to savor the fruits of your labor: your stunning Red Velvet Oreo Cheesecake. This isn’t just a dessert; it’s a testament to your patience and passion in the kitchen. Each slice offers a symphony of textures and tastes – the satisfying crunch of the Oreo base, the rich and tangy cream cheese filling, and the subtle cocoa notes of red velvet, all coming together in pure bliss. Share this masterpiece with loved ones, or indulge in a quiet moment of personal enjoyment. This homemade cheesecake is more than a sweet treat; it’s an experience. Embrace the joy and satisfaction that comes with creating such a magnificent delicious dessert. Congratulations on your culinary achievement!
We hope this detailed dessert recipe has empowered you to create an unforgettable Red Velvet Oreo Cheesecake. May it bring smiles and delight to every table it graces. Don’t forget to visit our social media for more sweet inspiration and baking tips!
Visit us on Pinterest and Instagram for more inspiring recipes!
