
Stuffed Hens offer an elegant and delightful meal, perfect for any special occasion or a comforting dinner. This guide walks you through every step, from preparing your Cornish game hens to crafting a flavorful stuffing and achieving that coveted perfectly roasted finish. Get ready to impress with tender, juicy results.
Key Takeaways
- Properly thaw and prepare Cornish game hens for best results.
- Craft a delicious, flavorful stuffing mix with sautéed aromatics.
- Stuff hens correctly and season them for a crispy, golden roast.
- Ensure hens reach a safe internal temperature using a meat thermometer.
- Resting hens after roasting is crucial for juicier, more tender meat.
- Explore various stuffing options and meal prep strategies.
Roasting stuffed hens is rewarding. It brings warmth to any table. Fresh ingredients make a difference. Patience yields tender, juicy meat. Enjoy creating this wonderful dish.
Getting Ready: Stuffed Hens
Preparing delicious stuffed hens begins with gathering the right components and tools. Cornish game hens are small, young chickens that are perfect for individual servings, making them an impressive centerpiece for any meal. Their delicate flavor pairs beautifully with a well-seasoned stuffing, offering a delightful culinary experience. Understanding what you need before you start ensures a smooth and enjoyable cooking process.
Ingredients for Stuffed Hens
To prepare your flavorful stuffed hens, you’ll need a selection of fresh and pantry staples. For the hens themselves, you’ll typically use 2-4 Cornish game hens, depending on your serving needs. For a classic bread-based stuffing, gather stale bread cubes (about 4-6 cups), which absorb moisture well. Essential aromatics include one medium onion, finely chopped, and two stalks of celery, also finely chopped. You’ll also need about 1/2 cup of unsalted butter or olive oil for sautéing and enriching the stuffing. For liquids, have 1-1.5 cups of chicken or vegetable broth ready. Fresh or dried herbs are crucial for taste; consider a blend of sage, thyme, and rosemary. One egg can act as a binder for the stuffing, ensuring it holds together beautifully. Don’t forget salt, black pepper, and garlic powder for seasoning both the stuffing and the hens themselves. Optionally, you can include other elements like chopped apples, cranberries, or sausage for added complexity and texture in your flavorful stuffing.
Tools for Roasting Hens
Having the correct equipment makes the roasting process much easier and more effective. A sturdy roasting pan is essential, preferably one with a rack to allow air circulation around the hens, promoting even cooking and crispy skin. A reliable meat thermometer is indispensable for ensuring your hens are cooked to the safe target internal temperature without overcooking them. Kitchen twine might be useful for trussing the hens, which helps them cook more evenly and maintain their shape. Aluminum foil will be needed for covering the hens during part of the roasting process, preventing the skin from browning too quickly and keeping the meat moist. Lastly, a sharp knife and cutting board are necessary for preparing your stuffing ingredients, and mixing bowls for combining them. A good set of tongs or a large spatula will assist with handling the hens in and out of the hot oven safely.
Crafting the Flavorful Stuffing
The heart of a stuffed hen lies in its stuffing. A well-prepared stuffing elevates the entire dish, adding moisture, flavor, and an aromatic contrast to the tender poultry. Creating a truly memorable stuffing involves careful attention to ingredient preparation and proper mixing techniques. This section will guide you through building the foundation of your delicious filling, ensuring it’s packed with flavor and has the perfect texture.
Sautéing Onion and Celery
The first step to a truly flavorful stuffing is establishing a robust aromatic base. Heat about 2 tablespoons of unsalted butter or olive oil in a large skillet over medium heat. Add your finely chopped onion and celery. Sauté these vegetables until they become translucent and tender, usually about 5-7 minutes. This process softens the vegetables, brings out their natural sweetness, and creates a foundational layer of savory flavor for your stuffing. Avoid browning them too much; the goal is to soften without burning. Some cooks like to add a clove or two of minced garlic during the last minute of sautéing for an extra layer of aroma. This simple step is critical for developing the depth of flavor that distinguishes an ordinary stuffing from an extraordinary one, much like the savory beginnings of a cheesy chicken and rice casserole.
Mixing Stuffing Ingredients
Once your aromatics are prepared, it’s time to combine all the stuffing components. In a large mixing bowl, gently add your stale bread cubes. If your bread is fresh, you might want to toast it lightly in the oven first to dry it out; this prevents soggy stuffing. Add the sautéed onion and celery mixture to the bread cubes. Now, incorporate your chosen herbs, such as 1 teaspoon dried sage, 1/2 teaspoon dried thyme, and a pinch of dried rosemary, or their fresh equivalents, finely chopped. Season generously with salt and black pepper to taste. Pour in about 1 to 1.5 cups of chicken or vegetable broth, starting with less and adding more as needed to achieve a moist but not soggy consistency. The goal is for the bread to absorb the liquid and flavors without becoming a paste. Finally, whisk one egg and gently fold it into the mixture; this acts as a binder, helping the stuffing hold its shape during cooking. Gently mix all ingredients until everything is evenly combined. The texture should be fluffy and moist, ready to infuse your hens with incredible taste.
Stuffing Your Cornish Game Hens
Stuffing your Cornish game hens correctly is crucial for both flavor and ensuring proper cooking. While the stuffing adds immense taste and moisture to the poultry from the inside out, it’s important not to overfill the cavities. This section provides detailed instructions on how to fill each hen and season them externally to achieve that coveted golden, crispy skin that complements the tender, flavorful meat.
How to Fill Each Hen
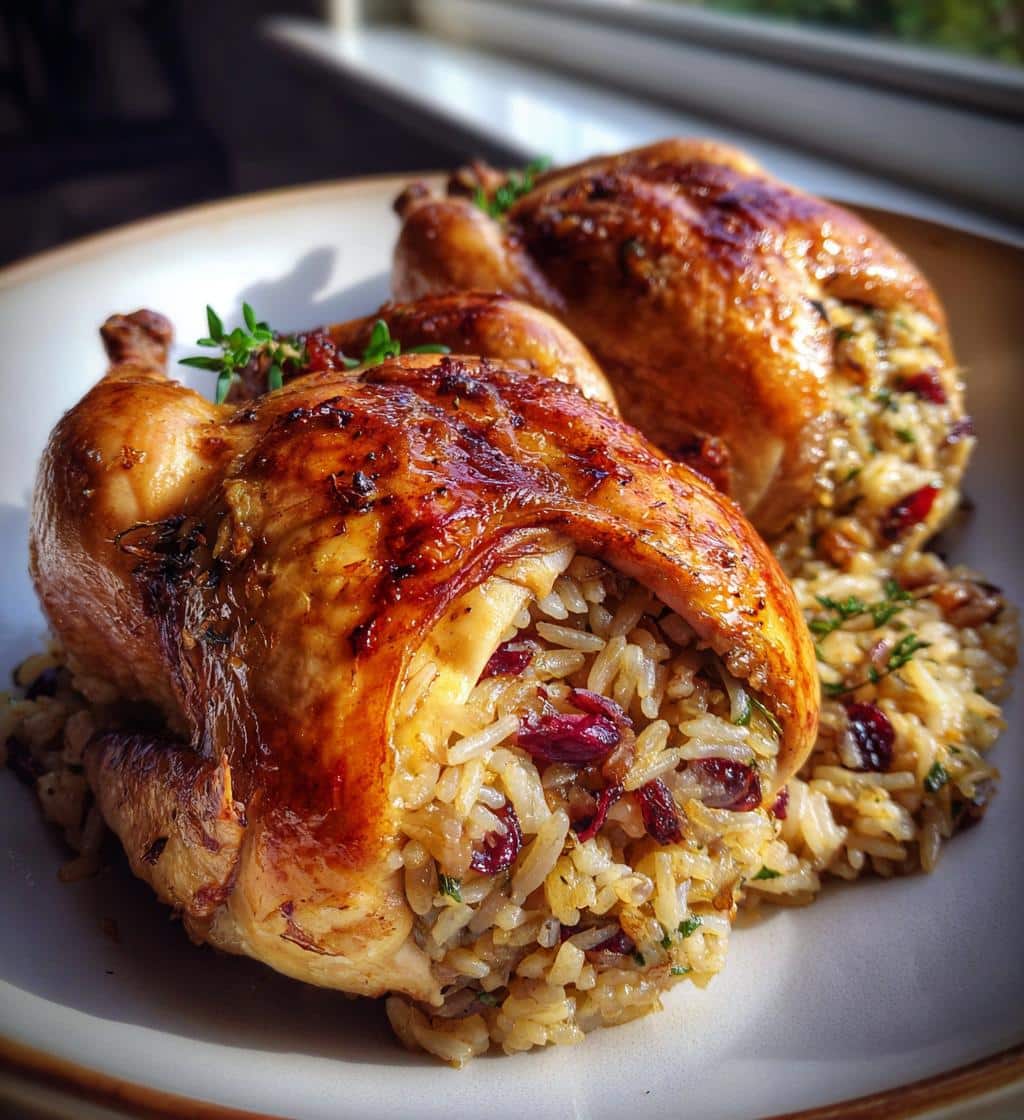
Once your flavorful stuffing mixture is ready, it’s time to prepare your Cornish game hens. Gently pat the hens dry with paper towels; this helps the skin crisp up beautifully. Using a spoon or your hands, loosely fill the cavity of each hen with the prepared stuffing. The key here is to avoid packing the stuffing too tightly. Stuffing expands during cooking, and if it’s too dense, it won’t cook thoroughly, and the hen itself might cook unevenly. Aim for a loose fill that leaves a bit of space for expansion. Depending on the size of your hens and your stuffing recipe, each hen will typically hold about 1/2 to 3/4 cup of stuffing. Once filled, you can optionally truss the legs of each hen together with kitchen twine. This helps maintain a neat shape and prevents the legs from splaying, leading to more even cooking. Secure the wings close to the body as well, if desired, to prevent them from burning. Remember, any leftover stuffing can be baked separately in a small baking dish alongside the hens, resulting in delicious, crispy baked stuffing.
Seasoning Hens Before Roast
After stuffing, external seasoning is paramount for a perfectly roasted hen. This step ensures that every bite, from the crispy skin to the succulent meat, is bursting with flavor. Begin by brushing the exterior of each stuffed hen with melted unsalted butter or olive oil. This not only helps the skin brown beautifully but also provides a base for your seasonings to adhere. Next, generously sprinkle the hens with salt and freshly ground black pepper. Don’t be shy; the salt helps draw out moisture from the skin, leading to a crispier finish, and seasons the meat beneath. For additional flavor, you can add a medley of dried herbs such as paprika, garlic powder, onion powder, and a touch more sage or thyme. Rub the seasonings evenly over the entire surface of the hens, including under the wings and around the legs. This meticulous seasoning process ensures a deep, rich flavor profile and contributes significantly to the appetizing golden-brown color and irresistible aroma of your perfectly roasted birds. This thoughtful preparation mirrors the care taken in crafting dishes like bacon brown sugar chicken, where every layer of flavor counts.
Prepping Hens for Roasting
Proper preparation before the hens even enter the oven is critical for achieving a successful and safe roast. From ensuring your poultry is thawed correctly to arranging them perfectly in the pan, each step contributes to even cooking, optimal texture, and delicious results. Following these guidelines will set you up for success, leading to tender, juicy stuffed hens that are a delight to serve.
Thawing Hens Properly
If you’re using frozen Cornish game hens, proper thawing is the first and most important step to prevent foodborne illness and ensure even cooking. The safest method for thawing poultry is in the refrigerator. Place the frozen hens on a plate or in a shallow dish to catch any drips and transfer them to the refrigerator. Allow approximately 24 hours of thawing time for every 5 pounds of poultry. Since Cornish game hens are typically small (1-2 pounds each), they usually require at least 12-24 hours in the refrigerator. Never thaw hens at room temperature, as this can lead to bacteria growth. If you’re short on time, a cold water thawing method can be used: place the hens (still in their original packaging or a sealed plastic bag) in a large bowl or sink filled with cold water, changing the water every 30 minutes. This method is faster but requires constant attention. Always ensure the hens are fully thawed before proceeding with stuffing and roasting to guarantee they cook thoroughly.
Arranging Hens in Pan
The way you arrange your stuffed hens in the roasting pan significantly impacts how evenly they cook and how crispy their skin becomes. For the best results, use a roasting pan equipped with a rack. This elevates the hens, allowing hot air to circulate all around them, which is essential for achieving that desirable crispy skin on all sides. If you don’t have a rack, you can create a makeshift one using thick slices of vegetables (like carrots or onions) or crumpled aluminum foil balls. Place the stuffed hens breast-side up on the rack, ensuring there’s adequate space between each hen. Overcrowding the pan can lead to steaming rather than roasting, resulting in less crispy skin and potentially uneven cooking. Aim for at least an inch or two of space between each bird. This arrangement promotes even browning and allows any drippings to collect below, which can be used later to make a delicious gravy. For more detailed information on Cornish game hens, you can consult Wikipedia’s entry on the subject.
Achieving Perfectly Roasted Hens
Roasting stuffed hens to perfection involves a delicate balance of temperature control and timing. The goal is to achieve succulent, juicy meat with a beautifully golden and crispy skin, while ensuring the stuffing is also thoroughly cooked. This section outlines the key phases of roasting, from initial temperature settings to the final browning, guaranteeing a truly impressive dish that will delight your family and guests.
Oven Temperature Settings
Optimal oven temperature settings are crucial for a perfectly roasted stuffed hen. Start by preheating your oven to a relatively high temperature, typically around 400°F (200°C). This initial burst of high heat helps to crisp the skin quickly and seal in the juices. After about 15-20 minutes at this higher temperature, reduce the oven temperature to a moderate 350°F (175°C) for the remainder of the cooking time. This two-stage approach ensures that the hens brown nicely on the outside without drying out the interior. The exact timing will depend on the size of your Cornish game hens and whether they are stuffed, but this temperature strategy provides an excellent framework for achieving ideal results. Always ensure your oven is fully preheated before placing the hens inside to maintain consistent cooking conditions from the very beginning.
Roasting Covered with Foil
To keep your stuffed hens moist and prevent the skin from over-browning too early in the cooking process, it’s often beneficial to roast them covered with aluminum foil. After the initial high-heat searing phase (if you opt for one, or simply from the start), loosely tent the roasting pan with foil. This creates a steamy environment that helps the meat stay tender and juicy, especially crucial for the breast meat which can dry out quickly. The foil also ensures that the stuffing cooks evenly without becoming too dry. Roast the hens covered for approximately 25-30 minutes, or about two-thirds of the estimated total cooking time. This step is particularly important for allowing the internal temperature to rise steadily and for the moisture to be retained, setting the stage for a succulent bird. The cover helps facilitate thorough cooking, much like slow-roasting techniques used for other poultry dishes, ensuring tenderness before a final crisping stage.
Browning Hens Uncovered
The final stage of roasting is all about achieving that irresistible golden-brown and crispy skin. After roasting covered for the designated time, carefully remove the aluminum foil. Increase the oven temperature back to 400°F (200°C) if you initially lowered it, or maintain 350-375°F (175-190°C) if you’ve been cooking at a lower constant temperature. Continue to roast the hens uncovered for another 15-25 minutes, or until the skin is beautifully golden, crisp, and the internal temperature reaches the safe minimum. Keep a close eye on the hens during this phase to prevent burning. If one hen starts browning too quickly, you can loosely cover just that hen with a small piece of foil. This uncovered roasting period is what transforms the appearance and texture, delivering a visually appealing dish with a delightful crunch, similar to how you would achieve crispy Parmesan chicken.
Ensuring Hens are Fully Cooked
The most critical aspect of cooking any poultry, especially stuffed hens, is ensuring they are fully cooked to a safe internal temperature. Undercooked poultry poses health risks, while overcooked poultry can be dry and unappetizing. This section focuses on the proper techniques and target temperatures to guarantee your stuffed hens are both safe to eat and perfectly tender, making them a truly enjoyable dish.
Using a Meat Thermometer
A reliable meat thermometer is your best friend when roasting stuffed hens. It takes the guesswork out of cooking and ensures food safety. To use it correctly, insert the probe into the thickest part of the thigh, avoiding contact with any bone. The bone conducts heat differently and can give a false reading. For stuffed poultry, it’s also crucial to check the temperature of the stuffing itself. Insert the thermometer into the center of the stuffing within the hen’s cavity. Ensure your thermometer is calibrated correctly for accurate readings. Different types of thermometers are available, including instant-read, digital, and oven-safe models. An instant-read thermometer is often preferred for quick and precise checks, allowing you to monitor progress without leaving the oven door open for too long.
Target Internal Temperature
According to the USDA, all poultry, including Cornish game hens, must reach a minimum internal temperature of 165°F (74°C) to be considered safe for consumption. This temperature kills any harmful bacteria. For stuffed hens, both the meat (in the thigh) and the center of the stuffing must register 165°F (74°C). It’s common for the stuffing to take slightly longer to reach this temperature than the hen meat itself, so always check both. If the hen’s meat is done but the stuffing isn’t, remove the hen from the oven, scoop out the stuffing, and continue to cook it in a separate dish until it reaches 165°F (74°C). However, with proper initial temperature settings and covered roasting, both should typically finish together. Always ensure the thermometer reading is steady before concluding the hens are fully cooked, providing peace of mind and delicious results.
Resting Hens for Juicier Taste
Once your beautifully roasted stuffed hens emerge from the oven, it can be tempting to carve into them immediately. However, resisting this urge and allowing the hens to rest is a crucial step that significantly impacts the final taste and texture of your dish. This often-overlooked phase is vital for redistributing juices, ensuring every bite is moist and flavorful rather than dry and tough. Understanding why and how long to rest your poultry will elevate your cooking to the next level.
Why Resting is Important
Resting cooked poultry is a non-negotiable step for achieving truly juicy and tender meat. During the roasting process, the muscle fibers contract, pushing the internal juices towards the center of the bird. If you carve the hen immediately after removing it from the oven, these concentrated juices will simply gush out onto your cutting board, leaving the meat dry and less flavorful. Allowing the hens to rest gives the muscle fibers a chance to relax and reabsorb those precious juices, distributing them evenly throughout the meat. This scientific principle ensures that when you finally carve into your stuffed hen, each slice will be wonderfully moist, tender, and bursting with flavor. It makes a significant difference in the dining experience, transforming a good roast into an excellent one.
How Long to Rest Hens
The duration for resting your stuffed hens depends on their size, but for Cornish game hens, typically 10-15 minutes is sufficient. Once you remove the hens from the oven, transfer them from the roasting pan to a cutting board or serving platter. Loosely tent them with aluminum foil. This helps to retain their warmth while allowing the juices to redistribute. Avoid wrapping them tightly, as this can trap too much steam and make the skin soggy. During this resting period, the internal temperature of the hens will actually continue to rise slightly, a phenomenon known as “carryover cooking.” After 10-15 minutes, the hens will be ready to carve and serve. This short wait is well worth the reward of perfectly tender and incredibly juicy meat, making your stuffed hens a highlight of any dinner table.
Presenting Your Stuffed Hens
The visual appeal of your dish is almost as important as its taste. After all the effort in preparing, stuffing, and perfectly roasting your Cornish game hens, a thoughtful presentation can elevate the entire meal. A beautifully garnished plate not only looks inviting but also hints at the delicious flavors waiting within, making your culinary creation truly stand out.
Garnish for an Inviting Look
Presenting your stuffed hens with an inviting garnish transforms a simple meal into a feast for the eyes. Once the hens have rested, transfer them to a large serving platter. Arrange them artfully, perhaps slightly overlapping or in a row down the center of the table. A classic and effective garnish involves fresh herbs like rosemary and thyme sprigs. These not only add a touch of vibrant green but also complement the savory aromas of the roasted poultry. Thin slices of fresh lemon or orange can also be placed around the hens; their bright color and citrusy scent provide a lovely contrast. For added visual appeal and flavor, consider scattering some roasted cranberries, small roasted potatoes, or blanched green beans around the base of the platter. You can also place small bowls of any extra stuffing or gravy alongside. For more inspiration on beautiful food presentation, check out Carina Recipes on Pinterest.
Varying Your Hen Stuffing
While a classic bread stuffing is always a crowd-pleaser, the beauty of stuffed hens lies in the endless possibilities for customization. Experimenting with different stuffing mixes allows you to tailor the flavors to your preference, seasonal ingredients, or specific dietary needs. This section offers creative ideas to inspire new and exciting stuffing combinations, ensuring your stuffed hens are never boring and always delicious.
Ideas for New Stuffing Mixes
Diversifying your hen stuffing can transform the dish for different occasions or to simply add variety. Here are several ideas to spark your culinary imagination:
- Sausage and Apple Stuffing: Brown breakfast sausage or Italian sausage, then combine with diced apples (Granny Smith works well), sautéed onions, celery, and classic bread cubes. The sweetness of the apple balances the savory sausage.
- Wild Rice and Mushroom Stuffing: Cook wild rice according to package directions. Sauté a medley of mushrooms (cremini, shiitake), onions, and garlic. Mix with the rice, vegetable broth, and fresh parsley for an earthy, wholesome stuffing.
- Cornbread Stuffing with Cranberries: Use crumbled cornbread for the base. Add sautéed onions, celery, dried cranberries, and toasted pecans. A touch of maple syrup can enhance the flavor.
- Spinach and Feta Stuffing: Combine sautéed spinach, crumbled feta cheese, pine nuts, garlic, and a hint of lemon zest with a bread crumb or rice base for a Mediterranean-inspired twist.
- Herb and Garlic Stuffing: For a simpler but robust flavor, focus heavily on fresh herbs like rosemary, thyme, sage, and plenty of roasted garlic, mixed with a good quality sourdough bread.
These variations allow you to keep your stuffed hen recipes exciting and fresh, inviting you to experiment with new flavor profiles for every meal. For more culinary creativity, explore Carina Recipes on Instagram.
Prepping Hens Ahead of Time
Meal preparation is a fantastic way to save time and reduce stress on busy cooking days. Stuffed hens, while impressive, can seem like a daunting task if you’re trying to do everything at once. Fortunately, many components can be prepped in advance, allowing you to enjoy the cooking process more and serve a delicious meal with ease. Knowing how to store uncooked hens safely is a key part of this efficiency.
Refrigerating Uncooked Hens
You can certainly prepare your stuffed hens ahead of time, which is especially convenient for entertaining or holidays. After thawing the Cornish game hens (if frozen), stuffing them with your chosen filling, and seasoning their exterior, you can refrigerate them. Place the prepped hens on a plate or in a shallow dish, covered loosely with plastic wrap or foil, to avoid cross-contamination with other foods in your refrigerator. Stuffed, uncooked hens can be safely stored in the refrigerator for up to 24 hours before roasting. This allows the flavors of the stuffing to meld with the hen and saves considerable time on the day you plan to serve them. When you’re ready to roast, simply remove them from the refrigerator about 30-60 minutes before placing them in the oven to allow them to come closer to room temperature, promoting more even cooking.
Storing and Reheating Stuffed Hens
Proper storage and reheating of stuffed hens are essential to maintain food safety and ensure that your delicious leftovers are just as enjoyable as the freshly cooked meal. Whether you’re planning to freeze uncooked hens for future use or simply want to savor your roasted birds for another day, following the correct procedures will help preserve their quality and prevent spoilage.
Freezing Uncooked Hens
If you’ve purchased more Cornish game hens than you need or want to prepare them for future meals, freezing uncooked hens is an excellent option. For best results, it’s generally recommended to freeze the hens unstuffed. If you freeze them stuffed, ensure the stuffing itself is not wet or prone to spoilage quickly. Wrap each hen tightly in plastic wrap, then again in aluminum foil, or place them in freezer-safe bags, removing as much air as possible. Label with the date. Uncooked hens can be frozen for up to 3-4 months. When ready to use, thaw them properly in the refrigerator for 24-48 hours before stuffing and roasting as usual. This method allows for convenient meal planning and reduces food waste.
Reheating Leftovers Safely
Reheating leftover stuffed hens requires care to ensure both safety and taste. First, separate any remaining stuffing from the hen meat. Store both in airtight containers in the refrigerator for up to 3-4 days. To reheat the hen meat, preheat your oven to 325°F (160°C). Place the hen pieces in an oven-safe dish with a splash of chicken broth or water to keep them moist, and cover with foil. Reheat for 15-20 minutes, or until the internal temperature reaches 165°F (74°C). The stuffing can be reheated separately in the oven (uncovered for crispiness) or in the microwave until it also reaches 165°F (74°C). Reheating ensures any potential bacteria are killed and helps maintain the delicious flavors. For more insight into the history and variations of poultry fillings, consult the Stuffing (food) Wikipedia page.
Understanding Hen Nutrition Facts
For those mindful of their dietary intake, understanding the nutritional profile of stuffed hens is beneficial. Cornish game hens themselves are a lean protein source, and their overall nutritional value can vary significantly based on the stuffing ingredients and cooking methods. This section provides a general overview of the calories, protein, fats, and carbohydrates you might find in a typical serving.
Calories and Protein
A single roasted Cornish game hen, without stuffing, typically contains around 300-400 calories and is an excellent source of protein, offering approximately 35-45 grams per hen, depending on its size. Protein is crucial for muscle repair, growth, and overall bodily functions. When stuffing is added, the calorie and protein content will increase. A standard bread-based stuffing can add another 100-200 calories and additional protein, depending on ingredients like sausage or nuts. The lean nature of the hen combined with a wholesome stuffing makes for a satisfying and nutrient-dense meal. This makes stuffed hens a solid choice for a main course meal, much like other protein-rich dishes you might find in the main course category of recipes.
Fats and Carbohydrates
The fat content in a Cornish game hen largely depends on whether the skin is consumed. Without the skin, hens are very low in fat. With the skin, a roasted hen might contain 15-25 grams of fat, with a portion of that being saturated fat. The stuffing will also contribute to the fat content, especially if it includes butter, oil, or high-fat ingredients like sausage. A typical bread-based stuffing will introduce carbohydrates, mainly from the bread itself, along with fiber from vegetables like celery and onion. A serving of stuffing can add 20-30 grams of carbohydrates. If the stuffing includes fruits like apples or cranberries, these will also contribute natural sugars and additional carbs. Overall, stuffed hens offer a balanced meal with a good mix of macronutrients, making them a nutritious option when prepared thoughtfully.
