
Mini fruit tarts are a charming and delicious dessert, perfect for any occasion. These individual treats feature crisp tart shells, a luscious pastry cream, and a vibrant fresh fruit topping. Making them from scratch is rewarding, offering a taste of homemade sweetness that everyone will appreciate. This recipe simplifies the process for beautiful results.
Key Takeaways
- Bake crispy, golden mini tart shells from scratch using simple ingredients.
- Prepare a smooth, rich pastry cream to fill your elegant dessert.
- Select fresh, seasonal fruits for vibrant and delicious toppings.
- Learn quick prep and baking times, making these sweet treats accessible.
- Understand proper storage and serving ideas to keep tarts fresh and appealing.
These beautiful tarts impress guests. They look fancy but are simple to bake. Crisp shells hold creamy filling. Fresh fruit adds bright flavors. Enjoy this delightful dessert creation.
Baking Mini Fruit Tarts with Pastry Cream
Baking mini fruit tarts with pastry cream is a delightful culinary adventure that yields charming, individual desserts. These sweet treats are not only visually appealing but also offer a wonderful balance of textures and flavors. The process involves crafting delicate tart shells, preparing a silky smooth pastry cream, and artfully arranging fresh, vibrant fruits on top. Each component plays a crucial role in creating a harmonious bite. The crispness of the crust provides a satisfying contrast to the creamy filling, while the natural sweetness and slight tartness of the fruit cut through the richness, leaving a refreshing sensation. It’s a dessert that feels both indulgent and light, making it a perfect choice for various occasions, from casual gatherings to elegant celebrations.
What makes them so good?
What truly sets these mini fruit tarts apart is the combination of their individual components, meticulously balanced for flavor and texture. Firstly, the buttery, shortbread-like tart shell provides a sturdy yet tender foundation. It’s often baked to a golden perfection, offering a subtle sweetness and a satisfying crunch. Secondly, the pastry cream, or Crème Pâtissière, is the heart of the tart. This rich, vanilla-infused custard is cooked until thick and smooth, offering a luxurious mouthfeel that melts in your mouth. Its creaminess is often enhanced with a hint of citrus or a touch of liqueur, adding depth to the flavor profile. Lastly, the fresh fruit topping is not just for decoration; it introduces bursts of natural sweetness and often a pleasant acidity that brightens the entire dessert. Seasonal fruits like berries, kiwi, and mandarin oranges provide varied textures and colors, making each tart a small piece of edible art. The contrast between the crisp shell, smooth cream, and juicy fruit creates an irresistible treat that is both sophisticated and comforting. These desserts are a wonderful way to showcase fresh produce while satisfying your sweet tooth. Consider pairing them with a light Vanilla Bean Creme Brulee Cheesecake Cupcake for an even more decadent spread.
Gathering Tart Ingredients for Baking
Before you begin the exciting process of baking mini fruit tarts, it’s crucial to gather all your tart ingredients. Having everything measured and ready will streamline your baking experience and ensure a smooth preparation. The beauty of this dessert recipe lies in its relatively simple components, which, when combined correctly, yield an extraordinary result. Pay attention to the quality of your ingredients, as fresh, high-quality items will significantly impact the final taste and texture of your tarts. From the flour for the crust to the milk for the cream and the fruit for the topping, each element contributes to the overall deliciousness. A well-stocked pantry makes any baking project much easier, and for these tarts, a few staples are all you need.
Essential items for the crust
For the delicate tart shells, you’ll need basic baking staples. All-purpose flour forms the structure, so make sure it’s fresh. Cold unsalted butter is critical for creating a flaky, tender crust; cut it into small cubes to keep it chilled. Granulated sugar adds a touch of sweetness, while a pinch of salt balances the flavors. An egg yolk helps bind the dough and adds richness, and a splash of ice water brings everything together without developing too much gluten. These simple ingredients, when combined with proper technique, create the perfect foundation for your mini fruit tarts.
Ingredients for creamy filling
The star of the show, the pastry cream, requires whole milk for richness, granulated sugar for sweetness, and egg yolks for color and thickening. Cornstarch or all-purpose flour acts as a thickening agent, ensuring a perfectly smooth and stable cream. A good quality vanilla extract or a vanilla bean is absolutely essential for that classic, aromatic flavor. Some recipes might also call for a touch of butter at the end for extra silkiness and sheen. Having these ingredients ready will make whisking up your luscious filling a breeze.
Fresh fruit topping choices
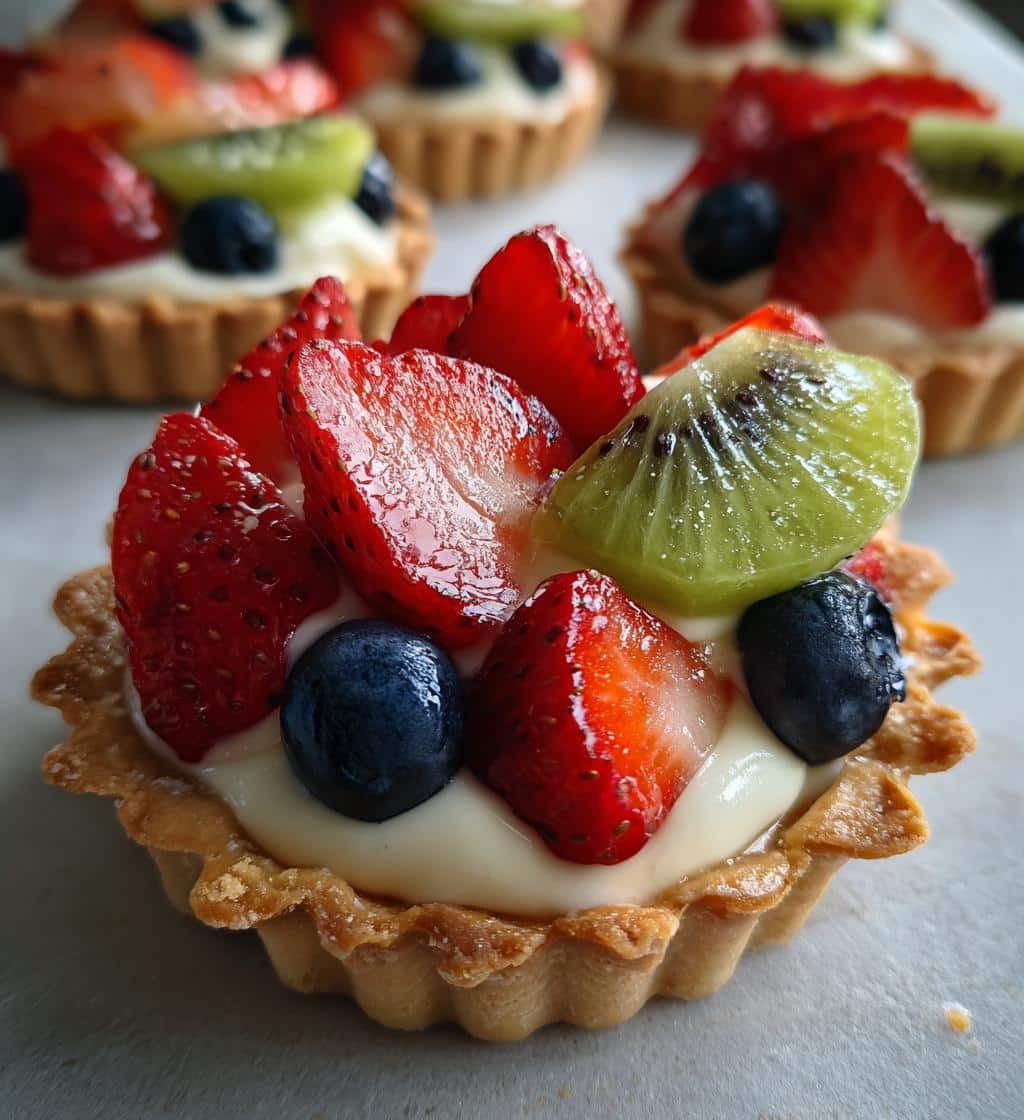
The fresh fruit topping is where you can truly let your creativity shine. Berries like strawberries, blueberries, raspberries, and blackberries are always popular choices due to their vibrant colors and varying levels of sweetness and tartness. Sliced kiwi, mandarin orange segments, grapes, and even thinly sliced peaches or nectarines can add a beautiful array of colors and textures. Ensure your fruits are ripe but firm, washed, and thoroughly dried before arranging them. A quick brush of apricot glaze or clear fruit glaze can add shine and help preserve the fruit’s freshness, making your mini fruit tarts even more appealing.
Making Your Own Tart Shells
Creating your own tart shells from scratch is a rewarding part of baking mini fruit tarts. While store-bought shells are an option for convenience, homemade shells offer a superior flavor and texture that truly elevate the dessert. The process, often referred to as making pâte sucrée or sweet shortcrust pastry, is surprisingly straightforward and doesn’t require complex equipment. The key is to work with cold ingredients and avoid overworking the dough, which can lead to a tough crust. A perfectly baked tart shell should be golden brown, tender, and slightly crisp, providing the ideal counterpoint to the smooth pastry cream and fresh fruit. Don’t be intimidated; with a little patience, you’ll master this fundamental skill.
Mixing the simple dough
To mix the dough, start by combining the all-purpose flour, granulated sugar, and salt in a large bowl. Next, add the cold, cubed unsalted butter. Using your fingertips or a pastry blender, cut the butter into the dry ingredients until the mixture resembles coarse crumbs with some pea-sized pieces of butter remaining. This step is crucial for achieving a flaky texture. In a separate small bowl, whisk together the egg yolk and ice water. Gradually add this liquid mixture to the flour and butter mixture, mixing just until the dough comes together. Be careful not to overmix, as this develops gluten and can make the crust tough. Once formed, flatten the dough into a disc, wrap it tightly in plastic wrap, and refrigerate for at least 30 minutes, or up to an hour. Chilling the dough makes it easier to handle and prevents shrinkage during baking.
Shaping and baking crusts
After chilling, lightly flour your work surface and rolling pin. Roll out the dough to about 1/8-inch thickness. Using a round cookie cutter slightly larger than your mini tart molds, cut out circles of dough. Gently press each dough circle into the cavities of a greased mini tart pan, ensuring it fits snugly against the bottom and sides. Trim any excess dough from the edges. Prick the bottom of each shell multiple times with a fork; this “docking” prevents the crust from puffing up during baking. For best results, consider blind baking. Line each tart shell with parchment paper or foil, then fill with pie weights, dried beans, or rice. Bake in a preheated oven (usually around 375°F or 190°C) for 10-15 minutes, then remove the weights and parchment and continue baking for another 5-10 minutes, or until the shells are golden brown and cooked through. Let them cool completely in the pan before carefully removing them. This preparation ensures your individual tart shells are perfectly crisp and ready for filling.
Preparing The Creamy Pastry Filling
The pastry cream, or Crème Pâtissière, is what gives these mini fruit tarts their luxurious texture and rich flavor. It’s a classic custard that might seem intimidating but is quite simple to master with a little attention. The key is to cook it slowly and stir continuously to prevent scorching and ensure a smooth, lump-free consistency. This creamy filling is incredibly versatile and forms the perfect base for the fresh fruit, adding a comforting sweetness that complements the crisp tart shells. A well-made pastry cream will be thick enough to hold its shape but still wonderfully silky on the palate, making every bite of your fruit tart a truly delightful experience. Mastering this component is a significant step in creating restaurant-quality desserts at home.
Whisking milk and sugar
To begin preparing the creamy pastry filling, start by gently warming the whole milk in a saucepan over medium heat. You want it to be hot but not boiling. Meanwhile, in a separate heatproof bowl, whisk together the granulated sugar, egg yolks, and cornstarch (or flour) until the mixture is pale yellow and smooth, with no lumps. This is your tempering base. Once the milk is hot, slowly pour about half of it into the egg yolk mixture, whisking constantly. This tempering step gradually raises the temperature of the egg yolks, preventing them from scrambling. Once combined, pour the tempered egg mixture back into the saucepan with the remaining hot milk. Continue to whisk constantly over medium heat. The mixture will begin to thicken as it heats. Keep stirring vigorously, especially reaching into the corners of the pan, to ensure an even cook and prevent any sticking. Once it reaches a boil and thickens considerably, resembling a pudding, cook for another minute or two while still whisking. This ensures the cornstarch is fully cooked out and the cream will set properly. Remove from heat and stir in your vanilla extract or vanilla bean paste for an incredible aroma and flavor. This quick and easy method results in a wonderful creamy texture.
Cooling the pastry cream
Properly cooling the pastry cream is just as important as cooking it. Immediately after removing it from the heat and adding the vanilla, transfer the hot pastry cream to a clean, shallow bowl or baking dish. This helps it cool down faster and more evenly. To prevent a skin from forming on the surface, which can lead to lumps, cover the surface directly with plastic wrap, pressing it down so it touches the entire surface of the cream. This creates an airtight seal. Allow the cream to cool at room temperature for about 30 minutes, then transfer it to the refrigerator for at least 2-3 hours, or preferably overnight. Chilling is essential for the pastry cream to firm up and reach its ideal consistency for filling the tart shells. Before using, give the chilled cream a good whisk to restore its smooth, velvety texture. This ensures that your custard filling is perfect for your mini fruit tarts.
Assembling Delicious Mini Fruit Tarts
Assembling your mini fruit tarts is perhaps the most satisfying step, as you watch all your hard work come together into beautiful, individual desserts. This is where your crisp tart shells and luscious pastry cream unite with the vibrant fresh fruit to create a truly elegant and delicious treat. The process is straightforward, but a little care and artistic flair in arranging the fruit can transform a simple tart into a showstopper. Ensure all components—the shells, cream, and fruit—are fully cooled and ready before you begin. This helps maintain the structure and freshness of the tarts, especially important for those beautiful presentation photos. Take your time with this stage, enjoying the creative process.
Filling baked tart shells
Once your baked tart shells are completely cooled and your pastry cream is thoroughly chilled and re-whisked to a smooth consistency, you’re ready to fill. You can use a spoon or a piping bag fitted with a round tip for this step. If using a spoon, simply scoop generous amounts of pastry cream into each tart shell, spreading it evenly to the edges. If using a piping bag, pipe the cream neatly into each shell, creating a smooth, domed surface. The goal is to fill the shells to just below the rim, leaving enough space for the fruit topping without it overflowing. Be mindful not to overfill, as this can make the tarts difficult to handle and eat. A perfectly filled tart provides the ideal canvas for your colorful fruit arrangement, ready for the next delightful step in creating these sweet treats.
Arranging colorful fruit
Now for the artistic touch: arranging the colorful fruit. This is where your mini fruit tarts truly come alive. Start with your largest pieces of fruit, such as sliced strawberries or kiwi, creating a base or a focal point. Then, fill in the gaps with smaller fruits like blueberries, raspberries, or mandarin orange segments. Experiment with patterns – concentric circles, alternating colors, or simply a vibrant mix. The goal is to create a visually appealing display that highlights the natural beauty of the fruit. After arranging the fruit, you can brush a thin layer of warmed apricot jam or a clear fruit glaze over the top. This not only adds a beautiful sheen but also helps to protect the fruit from drying out and keeps it securely in place. The glaze adds a professional finish, making these delicious mini fruit tarts look even more enticing and ready for any gathering. Share your creations on Instagram!
Quick Prep and Baking Times
One of the appealing aspects of mini fruit tarts, especially for those who enjoy baking for entertaining, is understanding the overall time commitment. While the process involves several steps—making the dough, preparing the cream, baking shells, and assembly—the individual tasks can often be broken down and even prepared ahead of time, making the entire project quite manageable. This flexibility allows you to fit the baking into a busy schedule, ensuring you can enjoy fresh, homemade desserts without feeling rushed. Knowing the quick prep and baking times helps in planning, whether you’re making them for a last-minute gathering or a planned celebration. Efficiency in the kitchen often comes down to good planning and understanding each stage of your recipe.
How long does it take?
The total time to make mini fruit tarts from scratch typically ranges from 2.5 to 3.5 hours, but this includes significant chilling time. Let’s break it down:
- Dough Preparation: Mixing the tart dough takes about 15-20 minutes.
- Dough Chilling: This requires a minimum of 30 minutes, but ideally 1 hour.
- Pastry Cream Preparation: Cooking the cream takes about 15-20 minutes of active whisking.
- Pastry Cream Chilling: This is the longest passive step, requiring at least 2-3 hours, or overnight for best results.
- Shaping & Blind Baking Shells: Rolling out the dough, pressing into pans, and blind baking will take approximately 25-35 minutes, including two baking stages.
- Cooling Shells: Allow about 20-30 minutes for shells to cool completely before filling.
- Assembly & Fruit Arrangement: Filling the shells and decorating with fruit can be done in 20-30 minutes, depending on your artistic ambition.
If you prepare the dough and pastry cream the day before, the active assembly on serving day can be as little as 45-60 minutes, making these sweet treats an excellent choice for parties or when time is tight. This easy recipe offers flexibility for your baking schedule.
Serving Ideas for Your Sweet Tarts
Once your beautiful mini fruit tarts are assembled, the presentation becomes just as important as the taste. Thoughtful serving ideas can elevate the entire dessert experience, making them even more inviting and special for your guests. These tarts are inherently elegant due to their individual size and colorful topping, but a little extra effort in how they are presented can truly make them shine. Whether you’re hosting a formal dinner party, a casual brunch, or simply enjoying them with family, there are various ways to showcase these delightful sweet treats. Consider the occasion and your audience when deciding on the best presentation method to ensure they leave a lasting impression.
Best ways to present them
For an elegant presentation, arrange the mini fruit tarts on a large, flat serving platter or a multi-tiered cake stand. This showcases their vibrant colors and makes them easily accessible. Garnish the platter with a few fresh mint leaves or a dusting of powdered sugar around the tarts for an extra touch of sophistication. If serving at a casual gathering, individual paper liners or cupcake wrappers can make them easier to pick up and serve. For a more rustic appeal, place them on a wooden board with a scattering of additional fresh berries. Consider pairing them with a small dollop of whipped cream or a scoop of vanilla bean ice cream on the side for an added indulgence. They are also wonderful served alongside coffee or tea, making them a perfect ending to any meal. Their charming size makes them ideal for dessert buffets, allowing guests to sample various sweet treats without feeling overwhelmed. These versatile desserts are perfect for entertaining and always a crowd-pleaser.
Nutrition Details Per Mini Tart
Understanding the nutrition details for mini fruit tarts can be helpful for those monitoring their dietary intake. While these are sweet treats, their small size often means portion control is naturally built-in. The nutritional content will vary significantly based on specific ingredients used, such as the type of flour, sugar, butter, and the fruits chosen. Homemade versions allow for more control over these factors, enabling you to adjust ingredients to suit particular dietary preferences or needs. For instance, using less sugar in the pastry cream or opting for whole wheat flour in the crust can subtly alter the nutritional profile. It’s always a good idea to consider your own recipe’s exact components for a precise calculation, but we can offer a general breakdown of what typically contributes to the overall values.
Understanding calories and sugar
Mini fruit tarts, like most desserts, contain a moderate amount of calories and sugar. The primary contributors to calorie count are typically the butter and sugar in the tart shell, and the sugar, egg yolks, and milk in the pastry cream. The fresh fruit, while containing natural sugars, also provides beneficial fiber and vitamins, generally adding fewer calories compared to the other components. On average, a single mini fruit tart can range from 150-250 calories, depending on its size and ingredient ratios. Sugar content will also vary, but typically a significant portion comes from added sugars in the pastry and cream. Mindful consumption of these delicious treats, especially when considering them as part of a balanced diet, is key. Choosing fruits that are naturally sweet can help reduce the need for excessive added sugars.
Fat and protein breakdown
The fat content in mini fruit tarts primarily comes from the butter in the tart shell and the egg yolks and whole milk in the pastry cream. Butter provides saturated fats, which contribute to the crust’s flakiness and flavor. Egg yolks also add dietary cholesterol. Proteins are present from the egg yolks and milk in the pastry cream, though typically in smaller amounts compared to carbohydrates and fats. Fresh fruits contribute minimal fat and protein but are rich in vitamins, minerals, and dietary fiber, which are crucial for overall health. A typical mini fruit tart might contain 8-15 grams of fat and 3-5 grams of protein. If you’re looking to reduce fat, you might consider lighter milk alternatives in the cream or reducing the butter in the crust, though this can affect the texture. Balancing these components ensures a delicious yet reasonable dessert treat.
Tips for Perfect Mini Fruit Tarts
Achieving truly perfect mini fruit tarts involves more than just following the recipe; it often comes down to incorporating a few expert tips that can make a significant difference in both taste and presentation. From ingredient selection to prep strategies, these insights can help you avoid common pitfalls and ensure your sweet treats are consistently outstanding. Whether you’re a seasoned baker or new to making tarts, these pieces of advice are designed to refine your technique and enhance the overall enjoyment of your baking process. Paying attention to these small details can transform a good tart into an exceptional one, making your efforts truly shine.
Using seasonal fruits
One of the best tips for perfect mini fruit tarts is to always use seasonal fruits. Fruits that are in season are at their peak flavor, sweetness, and freshness, requiring less additional sugar and offering the best possible taste experience. For instance, in spring and summer, berries like strawberries, raspberries, and blueberries are abundant and vibrant. In the fall, thinly sliced apples or pears might make an interesting, albeit less traditional, topping. Beyond flavor, seasonal fruits are often more affordable and readily available, making your baking more economical. Visiting local farmer’s markets can be a great way to discover the freshest produce. The natural beauty and quality of seasonal ingredients will make your fruit tart recipe truly shine.
Making cream ahead of time
To streamline your baking process and reduce stress on the day of serving, a fantastic tip is to make your pastry cream ahead of time. Pastry cream needs to chill for at least 2-3 hours, or even better, overnight, to fully set and develop its ideal consistency. Preparing it a day or two in advance allows it to cool thoroughly and intensifies its flavors. When you’re ready to assemble the tarts, simply give the chilled cream a vigorous whisk to bring it back to a smooth, pipeable consistency. This not only saves you significant time on assembly day but also ensures your cream is perfectly set and easy to work with. Having the cream ready makes the final assembly quick and enjoyable, allowing you to focus on the artistic arrangement of the fresh fruit. This kind of quick prep strategy is invaluable for any baker.
Why These Mini Tarts Are Special
Mini fruit tarts hold a special place in the world of desserts, distinguishing themselves through a combination of elegance, flavor, and practicality. They are not just another sweet treat; they embody a certain charm and sophistication that makes them memorable. Their individual serving size is a significant part of their appeal, offering a perfectly portioned indulgence without the need for slicing or extensive plating. This makes them ideal for a variety of settings, ensuring each guest receives a pristine, beautiful dessert. The harmonious blend of a crisp, buttery crust, smooth, vanilla-scented pastry cream, and vibrant, fresh fruit creates a sensory experience that is both refreshing and deeply satisfying. These qualities collectively contribute to why mini fruit tarts are consistently a favorite and a genuinely special addition to any table.
Perfect for any gathering
One of the primary reasons these mini tarts are so special is their incredible versatility, making them perfect for any gathering.
- Elegant Appearance: Their small, artfully decorated form factor makes them look incredibly sophisticated, suitable for formal events like weddings, baby showers, or holiday parties.
- Easy to Serve: Being individually portioned, they eliminate the need for cutting and serving, simplifying the host’s duties and making them ideal for buffets or stand-up receptions.
- Variety of Flavors: While the base is consistent, the choice of fresh fruit allows for customization, catering to different tastes and seasons. You can even offer a mix of fruit toppings on one platter.
- Crowd-Pleaser: The combination of textures and flavors appeals to a broad audience, from children to adults, ensuring everyone finds something to love.
- Make-Ahead Friendly: Components can be prepared in advance, easing the stress of entertaining on the day of the event.
Whether it’s a backyard barbecue, a sophisticated tea party, or a simple family dinner, these mini fruit tarts always fit the bill. Their ability to adapt to various settings while always delivering on taste and presentation solidifies their status as truly exceptional sweet treats for entertaining.
Storing Leftover Fruit Tarts Properly
Once you’ve enjoyed your delicious mini fruit tarts, you might find yourself with a few leftovers. Proper storage is crucial to maintain their freshness, texture, and flavor. Because these tarts contain fresh fruit and a dairy-based pastry cream, they are perishable and require specific care to prevent spoilage and keep them tasting great. Storing them incorrectly can lead to soggy crusts, dried-out fruit, or compromised cream. By following a few simple guidelines, you can extend the life of your sweet treats and ensure that every subsequent bite is as enjoyable as the first. This is an important aspect of food safety and culinary quality, particularly for desserts that are often prepared in advance or in larger batches.
Keeping them fresh and tasty
To keep your mini fruit tarts fresh and tasty, immediate refrigeration is key.
- Refrigerate Promptly: As soon as the tarts have been served and any remaining have cooled to room temperature (if they were briefly out), place them in an airtight container.
- Airtight Container: This is essential to prevent the crust from becoming soggy and the fruit from drying out or absorbing refrigerator odors. Place a layer of parchment paper between layers of tarts if stacking them, though a single layer is best to avoid bruising the delicate fruit.
- Do Not Freeze (Generally): While some baked goods freeze well, fruit tarts with fresh fruit and pastry cream generally do not. Freezing can cause the pastry cream to weep and become grainy upon thawing, and the fresh fruit can become mushy. It’s best to enjoy these within a few days of making them.
- Consume Within 2-3 Days: For optimal taste and safety, consume refrigerated mini fruit tarts within 2 to 3 days. The crust will naturally soften slightly over time, but the flavors should remain excellent.
- Serving from Fridge: You can serve them directly from the refrigerator; they are often best chilled.
By following these simple storage tips, you can ensure your elegant dessert treats remain delightful for longer, allowing you to savor their deliciousness over several days.
Enjoying Your Elegant Dessert Treat
After all the effort put into baking, assembling, and perfecting your mini fruit tarts, the final and most important step is simply to enjoy them. These elegant dessert treats are designed to be a delightful sweet indulgence, a moment of culinary bliss that brings joy to both the maker and the consumer. Take a moment to appreciate the visual artistry of the colorful fruit, the delicate sheen of the glaze, and the perfectly golden crust. Each bite offers a symphony of textures and flavors – the gentle crunch of the shell, the smooth, rich pastry cream, and the burst of fresh, juicy fruit. It’s a testament to the fact that homemade desserts, even those that seem intricate, can be incredibly rewarding and deeply satisfying. This entire baking experience culminates in a truly special moment of enjoyment.
A delightful sweet indulgence
Mini fruit tarts truly are a delightful sweet indulgence, offering a balanced and sophisticated dessert experience. They strike a perfect harmony between sweetness and tartness, richness and freshness. The individual portions make them feel extra special and luxurious, like a little gift just for you. They are ideal for capping off a lovely meal, accompanying an afternoon tea, or simply enjoying as a well-deserved personal treat. The satisfaction of creating something so beautiful and delicious from scratch adds to the indulgence. So, whether you’re sharing them with loved ones or savoring one all by yourself, allow yourself to fully appreciate the craftsmanship and delicious flavors of these charming baked goods. Each element works together to create an unforgettable and truly pleasant sweet treat. Revel in the simple pleasure of a perfectly made mini fruit tart.
