
Vanilla macarons are delicate French pastries, often intimidating to bake. This guide simplifies the process, breaking down each step to help you achieve flawless results. Master the art of macaron making, from precise ingredient preparation to achieving those coveted “feet,” ensuring a sweet success every time.
Key Takeaways
- Accurate measurements and quality ingredients are crucial for macaron success.
- Mastering egg white consistency and folding technique ensures proper batter.
- Piping consistency and adequate resting time are key for perfect feet.
- Careful oven temperature control and cooling prevent common issues.
Baking macarons needs patience and precision. Small details truly matter. Follow each step closely. Sweet rewards await your effort. This guide helps.
Achieve Vanilla Macarons Perfection
Baking vanilla macarons might seem challenging, but with the right approach and a clear understanding of each stage, you can create these beautiful, delicate French treats right in your own kitchen. Many home bakers find immense satisfaction in perfecting their macaron technique, transforming simple ingredients into elegant confections. The process involves specific steps, from preparing the meringue to mastering the “macaronage” – the art of folding the batter. This article breaks down every detail to help you achieve professional-quality results, ensuring your vanilla macarons are both visually appealing and incredibly delicious. Remember, practice makes perfect, and each attempt brings you closer to macaron mastery. For more baking inspiration, check out our collection of desserts.
Why homemade macarons?
Choosing to make macarons at home offers several advantages. Firstly, you have complete control over the quality of ingredients, opting for the freshest eggs and finest almond flour. This ensures a superior flavor and texture compared to many store-bought varieties. Secondly, it’s a deeply rewarding experience. There’s immense satisfaction in presenting a tray of perfectly baked, vibrant macarons that you’ve crafted yourself. Lastly, homemade allows for endless customization. While we focus on vanilla here, understanding the basic technique opens the door to countless flavor combinations and colors, truly making the recipe your own. Homemade macarons also tend to be fresher, with that characteristic chewy-crisp texture at its peak.
The irresistible taste explained.
The irresistible taste of vanilla macarons comes from a delightful combination of textures and flavors. Each bite delivers a crisp, delicate shell that gives way to a soft, slightly chewy interior. The subtle sweetness of the meringue-based cookie pairs beautifully with the rich, aromatic vanilla buttercream filling. This contrast – crispiness against chewiness, and sweetness balanced by the depth of vanilla – creates a truly addictive experience. The fine almond flour adds a nuanced, nutty undertone, complementing the vanilla without overpowering it. It’s a sophisticated flavor profile that appeals to a wide range of palates, making vanilla macarons a timeless treat. Learn more about the history of this classic cookie on Wikipedia’s Macaron page.
Gathering Ingredients for Macarons
The success of your vanilla macarons largely hinges on the quality and precise measurement of your ingredients. Macaron baking is a science, and even slight variations can impact the final outcome. It’s crucial to gather everything before you begin, ensuring all components are at the correct temperature and ready for use. High-quality ingredients contribute significantly to both the texture and flavor, so investing in good almond flour and pure vanilla extract is highly recommended. Make sure your egg whites are aged if possible, as this can enhance stability.
Almond flour and sugar types.
For macaron shells, two types of sugar are essential: granulated sugar for the meringue and powdered sugar (also known as confectioners’ sugar or icing sugar) for the dry mix. Ensure your powdered sugar does not contain cornstarch, as this can affect the texture; if it does, sift it thoroughly. The almond flour must be finely ground and blanched. Coarse almond flour will result in bumpy shells, while unblanched flour can alter the color and texture. Sifting both the powdered sugar and almond flour together is a non-negotiable step to remove any lumps and ensure a smooth, uniform batter. This dry mixture is often referred to as “T.P.T.” (tant pour tant), meaning “as much for as much” of almond flour and powdered sugar by weight.
Egg whites and vanilla.
Egg whites are the foundation of a stable meringue, which gives macarons their characteristic lift and “feet.” It is often advised to use “aged” egg whites, meaning they have been separated from the yolks a day or two in advance and stored in the refrigerator in an airtight container. This process helps them dry out slightly, leading to a more stable meringue. Bring them to room temperature before whipping. For the vanilla flavor, pure vanilla extract is preferred over imitation vanilla. The quality of your vanilla extract will significantly impact the overall aroma and taste of your vanilla macarons. Consider using vanilla bean paste for a more intense flavor and beautiful specks in your filling.
Buttercream filling basics.
A classic vanilla macaron is beautifully complemented by a rich, smooth vanilla buttercream filling. The basic components of buttercream typically include unsalted butter, powdered sugar, vanilla extract, and a touch of milk or cream. Ensure your butter is at room temperature – soft but not melted – for easy creaming. The powdered sugar should be sifted to avoid lumps. Gradually adding these ingredients together creates a light, fluffy, and flavorful filling that balances the sweetness of the macaron shells. You can also experiment with other fillings, but vanilla buttercream offers a timeless appeal. For another delightful dessert idea, consider trying our Vanilla Bean Creme Brulee Cheesecake Cupcakes.
Key Tools for Macaron Success
While seemingly simple, making macarons requires a few specific tools that greatly enhance your chances of success. Having the right equipment can make the difference between flat, cracked shells and perfectly formed, footed vanilla macarons. Don’t underestimate the impact of these items on your overall baking experience. Investing in quality tools will not only make the process easier but also more enjoyable. Beyond the basics, a good stand mixer is often recommended for consistent meringue.
Kitchen scale importance.
A digital kitchen scale is arguably the most crucial tool for macaron making. Baking, especially delicate pastries like macarons, relies on precise measurements by weight, not volume. Flour, sugar, and egg whites can vary significantly in weight depending on how they are packed into a measuring cup. Using a scale eliminates these inconsistencies, ensuring that your ingredient ratios are exact, which is vital for the macaron batter’s proper consistency and stability. This accuracy helps prevent common issues such as hollows or cracked shells, making a scale an indispensable item for any serious macaron baker.
Piping bag and tips.
To achieve uniformly sized and shaped macaron shells, a good quality piping bag and a round piping tip are essential. A sturdy, reusable silicone or disposable plastic piping bag works best. A Wilton 1A or Ateco 805 round tip is commonly recommended for creating consistent circles. The proper technique involves holding the bag vertically and applying even pressure to create symmetrical shells. Having the right tools makes the piping process much smoother and reduces frustration, contributing significantly to the aesthetic appeal of your finished vanilla macarons. Consistent piping is a key step towards achieving those coveted “feet.”
Preparing the Macaron Batter
The macaron batter, often referred to as “macaronage,” is where much of the magic happens – or where mistakes can easily occur. This stage combines the dry ingredients with the meringue, and the technique used is paramount to the final texture and appearance of your vanilla macarons. Proper preparation involves careful attention to detail, from sifting to folding. Understanding the desired consistency is critical, as over-mixing or under-mixing can both lead to undesirable results. Take your time with these steps; patience is a virtue in macaron making.
Sifting dry ingredients.
Before any mixing begins, sifting your dry ingredients is a non-negotiable step. This includes both the finely ground almond flour and the powdered sugar. Sifting removes any lumps and ensures a uniformly fine texture, which is essential for smooth macaron shells. Skipping this step can lead to bumpy, unattractive shells. You can use a fine-mesh sieve or a flour sifter. For best results, sift them together twice to guarantee maximum airiness and integration. This meticulous preparation sets the foundation for a perfectly smooth macaron batter, reducing the risk of imperfections later on.
Beating egg whites precisely.
The meringue forms the backbone of your macaron shells. Beating egg whites precisely is vital for achieving the correct consistency. Start by beating room-temperature egg whites on medium speed until foamy. Gradually add granulated sugar in a slow, steady stream while increasing the speed to medium-high. Continue beating until you achieve stiff, glossy peaks. The meringue should hold its shape when you lift the whisk, and when you rub a tiny amount between your fingers, you shouldn’t feel any sugar crystals. A stable meringue is crucial for holding the structure of the macaron and preventing hollow shells. This process is a foundational element in many delicate meringue-based pastries.
Folding technique secrets.
The “macaronage” is the art of folding the dry ingredients into the meringue. This step determines the final texture of your shells. You need to fold until the batter reaches the “lava-like” consistency, often described as a thick ribbon that slowly flows off your spatula. To fold, gently scrape the spatula around the bowl’s edge and then through the center, repeating the motion while rotating the bowl. Do not overmix, as this will deflate the meringue and result in flat, oily shells. Under-mixing will result in lumpy batter and pointy shells. Stop folding when the batter forms a ribbon that breaks every 10-15 seconds when lifted. This perfect consistency ensures beautiful “feet” and a smooth finish.
Piping Vanilla Macarons Perfectly
Piping is one of the most visually important steps in making vanilla macarons. Achieving uniform circles not only makes your finished product look professional but also ensures even baking. This stage requires a steady hand and consistent pressure, but with a little practice, it becomes second nature. Proper piping technique contributes significantly to the characteristic shape and foot development of your macaron shells. Don’t rush this step; precision here pays off in the final presentation.
Uniform circle technique.
To pipe uniform macaron circles, use a round piping tip and hold the piping bag perpendicular (straight up) to your baking mat or parchment paper. Apply steady, even pressure, allowing the batter to flow out until it forms a circle of the desired size (typically 1.5 to 2 inches). Stop applying pressure, then quickly flick the bag upwards to create a clean break. The batter should flatten out on its own. If it maintains a peak, your batter might be under-mixed. If it spreads too much, it might be over-mixed. Having a template underneath your parchment paper or using a silicone macaron mat can greatly assist in maintaining consistent sizes.
Lined baking sheets.
Using properly lined baking sheets is crucial for preventing your vanilla macarons from sticking and for ensuring even baking. Parchment paper or silicone baking mats (like Silpats) are the preferred choices. Silicone mats often have pre-drawn macaron templates, which can be very helpful for beginners to maintain consistent sizing. If using parchment paper, you can draw your own circles on the underside of the paper as a guide. Ensure your baking sheets are flat and sturdy to support the macarons evenly in the oven, as warped sheets can cause uneven heating and baking, leading to lopsided shells or cracks. For another wonderful baked dessert, try our Snickerdoodle Cobbler.
The Macaron Resting Phase
After piping, the macaron shells must undergo a crucial resting phase, often referred to as “curing” or “drying.” This step is essential for developing the characteristic “feet” (pieds) during baking and preventing cracks in the shells. Patience is key during this stage, as rushing it can lead to disappointing results. The environment in your kitchen, specifically humidity levels, will significantly influence the duration of this rest.
Why skin formation matters.
During the resting phase, a delicate skin forms on the surface of each piped macaron shell. This skin is critical because it traps the air and steam inside the shell during baking. As the macaron bakes and expands, this skin prevents the shell from cracking. Instead, the pressure forces the batter to expand outwards and upwards at the base, creating the ruffled “feet” that are the hallmark of a perfectly baked macaron. Without a proper skin, the hot air escapes, resulting in flat, cracked, or footless shells. You can gently touch a shell; if it feels dry and doesn’t stick to your finger, it’s ready.
Ideal rest time.
The ideal rest time can vary significantly depending on the humidity in your kitchen. On a dry day, your macarons might be ready in as little as 30 minutes, while on a humid day, it could take up to 2 hours or even longer. There’s no fixed time; instead, rely on the “touch test.” The shells are ready to bake when you can lightly touch them without any batter sticking to your finger. The surface should feel smooth and dry. Placing the baking sheets in a draft-free area, or using a fan on a low setting, can help speed up the drying process. Do not attempt to bake them until this crucial skin has formed, as it is foundational for macaron success.
Baking Vanilla Macarons Right
Baking is where all your careful preparation comes to fruition. The oven temperature and baking duration are critical for achieving perfect vanilla macarons with delicate shells and well-developed feet. This step requires close monitoring, as ovens can vary, and what works perfectly in one might need slight adjustments in another. Consistency and attention to detail remain paramount. Getting the baking right ensures a crisp exterior and a chewy interior.
Oven temperature control.
Oven temperature is paramount for macaron success. Too hot, and they’ll crack or brown too quickly; too cold, and they won’t develop feet or might spread too much. A moderate temperature, typically between 285°F to 325°F (140°C to 160°C), is often recommended, but every oven is different. It’s highly advisable to use an oven thermometer to ensure accuracy, as built-in oven thermostats can be unreliable. Preheat your oven thoroughly and ensure it maintains a stable temperature throughout the baking process. Some bakers also rotate their trays halfway through to ensure even baking.
Achieving perfect feet.
The “feet” are the ruffled bases of the macaron shells and are a key indicator of a well-made macaron. Perfect feet are evenly spread, slightly ruffled, and rise uniformly around the base of the shell. They are achieved when the skin on the macaron surface prevents upward expansion, forcing the batter to erupt at the base. This happens when the oven temperature is just right – hot enough to create steam and lift, but not so hot that it causes cracking. If your macarons consistently lack feet, troubleshoot your resting time, oven temperature, or macaronage consistency. With practice, you’ll learn to read your oven and batter to consistently achieve these delightful little ruffles. Baking can be a rewarding journey, just like crafting other baked goods such as Blueberry Muffin Cookies with Streusel.
Cooling and Filling Macarons
Once your vanilla macarons are perfectly baked, the process isn’t quite over. Proper cooling and thoughtful filling are the final steps to creating an irresistible dessert. Rushing these stages can compromise the texture and overall integrity of your delicate shells. Patience at this point ensures that the shells retain their structure and that the filling can marry beautifully with the cookie.
Complete cooling is key.
After removing your macaron shells from the oven, resist the urge to immediately peel them off the baking sheet. It is absolutely crucial to allow them to cool completely on the sheet. Hot macarons are fragile and can easily break or stick if handled too soon. As they cool, the shells firm up and naturally release from the parchment paper or silicone mat. Attempting to remove them prematurely can result in sticky bottoms or cracked shells. Wait until they are completely cool to the touch, typically 15-30 minutes, before gently lifting them. This patience ensures a clean release and preserves their delicate structure.
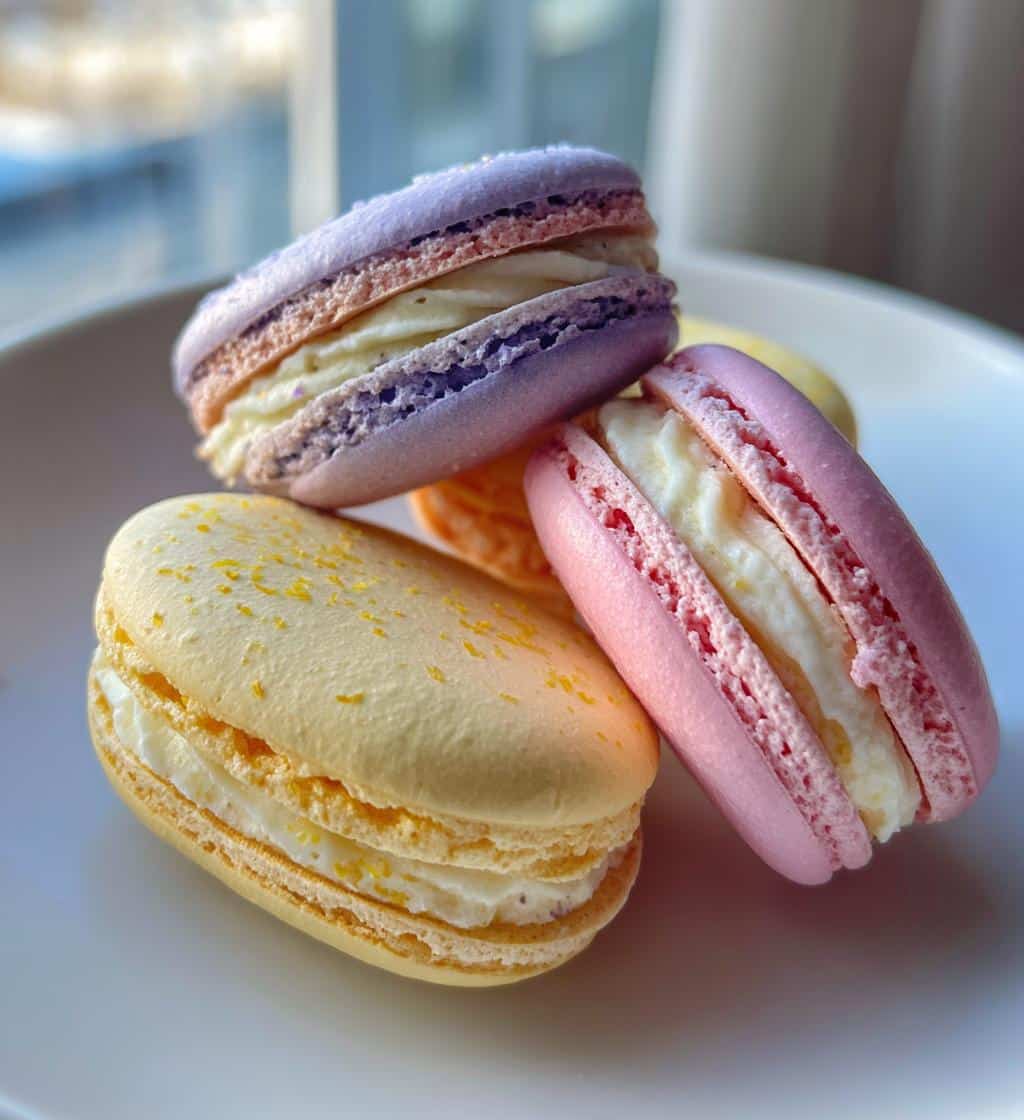
Adding buttercream filling.
Once cooled, it’s time to fill your vanilla macarons. Use your prepared vanilla buttercream or a filling of your choice. Pipe a dollop of buttercream onto the flat side of one macaron shell, then gently place another shell on top, twisting slightly to create a neat sandwich. Be careful not to press too hard, as the shells are still delicate. The amount of filling can be adjusted to your preference, but aim for a balanced ratio that complements the sweetness and texture of the shells. This step brings the individual components together, creating the complete, delightful macaron experience. Don’t forget to follow Carina Recipes on Pinterest and Instagram for more delicious recipes and tips!
Secrets to Perfect Macaron Texture
Achieving that coveted perfect macaron texture—crisp exterior, chewy interior—is the hallmark of a successful baker. While many steps contribute to this, paying attention to a few specific details can significantly improve your results. It’s about consistency, precision, and understanding how ingredients react. These “secrets” aren’t magic but rather foundational principles that guide bakers to consistent excellence in their vanilla macarons.
Room temperature eggs.
Using room temperature egg whites is a subtle but impactful secret to perfect macaron texture. Cold egg whites are tighter and do not whip up to their full volume or stability as easily as those at room temperature. Allowing egg whites to sit out for at least 30 minutes (or even longer if aged from the fridge) before whipping helps them relax, enabling them to incorporate more air and create a more voluminous, stable meringue. A stable meringue is fundamental for achieving the desired lift, structure, and chewy-soft texture of macaron shells, preventing many common issues.
Precise measurements matter.
This point cannot be overstressed: precise measurements are the absolute most important factor in macaron baking. Unlike some other recipes where a little extra flour or sugar might not matter, macarons are extremely sensitive to ingredient ratios. Using a digital kitchen scale to measure all ingredients by weight ensures accuracy. Even a few grams off can throw the entire batter off balance, leading to issues like hollows, flat shells, or cracks. Consistency in measurement is the true secret behind replicating perfect vanilla macarons batch after batch, ensuring that desired delicate, chewy texture every time.
Storing Your Vanilla Macarons
Once you’ve gone through the effort of baking beautiful vanilla macarons, proper storage is essential to maintain their delicate texture and fresh flavor. Macarons actually benefit from a little time in the refrigerator, allowing the filling to soften the shells slightly and meld the flavors together. This maturation period is key to their signature texture, making them even more delightful a day or two after baking.
Airtight container benefits.
Storing your vanilla macarons in an airtight container is crucial for preserving their freshness and preventing them from becoming stale or absorbing odors from your refrigerator. Exposure to air will quickly dry out the shells and harden the filling, diminishing their delightful chewy texture. An airtight container also protects them from humidity, which can make them soggy. Layer the macarons between sheets of parchment paper if stacking to prevent them from sticking together or crushing. This simple step ensures that each macaron maintains its delicate balance of crispness and chewiness.
Keeping them fresh.
To keep your vanilla macarons fresh, store them in an airtight container in the refrigerator for up to 3-5 days. In fact, many bakers find that macarons taste even better after being refrigerated for 24 hours, as the moisture from the filling softens the shells slightly, creating that perfect chewy consistency. If you plan to store them for longer, macarons freeze exceptionally well. Place them in an airtight container, layered with parchment paper, and freeze for up to 1-2 months. Thaw them in the refrigerator overnight and then bring them to room temperature before serving for the best texture and flavor.
Nutrition Facts for Macarons
While vanilla macarons are a delightful treat, it’s also helpful to understand their nutritional content. As with most sweet baked goods, they are typically calorie-dense due to their sugar and fat content. However, knowing the approximate nutrition facts can help in mindful consumption, especially when enjoying these delicate pastries as part of a balanced diet. Keep in mind that homemade macarons allow for some flexibility in ingredients, which can slightly alter the nutritional profile compared to commercially produced versions.
Serving size details.
A typical serving size for vanilla macarons is generally considered to be one or two pieces. Due to their small size and rich flavor, macarons are often enjoyed as a small indulgence rather than a large dessert. When considering nutrition facts, these values are usually based on a single macaron. It’s important to note that the exact size of your homemade macarons can vary, so adjust your serving estimations accordingly. Being aware of the serving size helps in tracking intake accurately.
Calorie and sugar info.
Vanilla macarons, being made primarily from almond flour, sugar, and egg whites, with a buttercream filling, are relatively high in calories and sugar. A single macaron can range from approximately 70 to 120 calories, largely depending on its size and the richness of the filling. The sugar content per macaron is typically between 6-10 grams. While they offer a small amount of protein from the almond flour and egg whites, they are mainly a source of carbohydrates and fats. Enjoying them in moderation is key to incorporating them into a healthy lifestyle, much like any other sweet treat.
Troubleshooting Common Macaron Issues
Macaron baking can be a journey of trial and error, and it’s common to encounter issues along the way. Don’t be discouraged if your first few batches aren’t perfect. Understanding common problems and their solutions is a key part of mastering the art of vanilla macarons. This section addresses some of the most frequent challenges faced by home bakers, providing practical tips to help you diagnose and fix your macaron woes, leading you closer to consistent success.
Flat macarons solutions.
If your vanilla macarons are coming out flat, there are a few potential culprits. The most common reason is over-mixing the macaronage. If the batter is too runny, it won’t hold its shape and will spread excessively. Solution: Fold the batter just until it reaches the “lava-like” consistency, where it flows slowly off the spatula. Another reason could be an unstable meringue. Ensure your egg whites are at room temperature and whipped to stiff, glossy peaks. Lastly, high humidity can also cause flatness; try baking on a less humid day or using a fan to aid the resting phase.
Hollow shell fixes.
Hollow shells are another common macaron dilemma, where the top crust separates from the base, leaving an empty space inside. This often points to incorrect baking temperature or an unstable meringue.
- Oven Temperature: If the oven is too hot, the shells bake too quickly, forming a crust before the inside has a chance to fully expand. Try lowering your oven temperature slightly and extending the baking time.
- Meringue Stability: An under-whipped meringue lacks the structure to support the shell. Ensure your meringue is firm and glossy.
- Under-mixed Batter: If the macaronage is under-mixed, trapped air can create hollows. Ensure the batter is folded enough to release excess air.
- Hard Taps: After piping, firmly tap the baking sheets on the counter several times to release air bubbles. This step is crucial.
Experimenting with these variables will help you achieve full, chewy vanilla macaron shells over time. Remember, every oven is different, so fine-tuning your technique is a process of observation and adjustment.
