
Chocolate Peanut Butter Krispie Cups are a fantastic, no-bake dessert that brings joy to every bite. These easy-to-make treats combine the classic flavors of rich chocolate and creamy peanut butter with a satisfying crispy texture, making them a perfect snack or dessert for any age group, especially those looking for plant-based options.
Key Takeaways
- These Krispie Cups are a simple, no-bake treat, ideal for quick preparation.
- They cater to various dietary needs, including plant-based preferences.
- Perfect for family activities, involving kids in the kitchen fun.
- Customizable with different nut butters, chocolates, and add-ins.
- Proper storage ensures freshness and extends shelf life.
Quick to assemble, these treats require no baking. They blend creamy peanut butter with crisp cereal. Enjoy them chilled for a delightful dessert. Simple ingredients yield delicious results. Everyone will love this recipe.
About Chocolate Peanut Butter Krispie Cups
Chocolate Peanut Butter Krispie Cups are a beloved dessert for their simplicity and irresistible flavor combination. Imagine the satisfying crunch of cereal coated in a rich peanut butter mixture, topped with a smooth layer of chocolate. These no-bake delights offer a quick solution for sweet cravings without turning on the oven, making them an ideal choice for busy schedules or warm weather. Their charm lies in their nostalgic appeal, reminiscent of childhood favorites, yet they are versatile enough to impress at any gathering. They are not only easy to prepare but also provide a delightful texture contrast that keeps you coming back for more.
What makes them special?
What truly sets these krispie cups apart is their effortless preparation coupled with a fantastic flavor profile. Unlike many desserts that require precise baking times and temperatures, these cups come together with minimal fuss. The combination of salty peanut butter and sweet chocolate creates a harmonious balance that appeals to a wide range of palates. Furthermore, the crispy texture provided by the cereal adds a delightful element that elevates them beyond a simple candy. They are individually portioned, making them convenient for serving and controlling portion sizes, whether for a casual treat or a more formal event. Their adaptability means they can be tailored to suit specific tastes and dietary requirements, offering a truly special experience.
Perfect for any occasion
Whether you’re hosting a birthday party, preparing snacks for a school event, or simply craving a sweet bite at home, these chocolate peanut butter krispie cups fit the bill perfectly. Their grab-and-go nature makes them excellent for lunchboxes or picnics. They are a hit with children, who often enjoy helping with the simple assembly process, and adults appreciate their nostalgic charm and satisfying taste. From holiday gatherings to casual movie nights, these treats are always a welcome addition. They can be made ahead of time, allowing you to focus on other preparations, and their robust structure means they travel well, making them a reliable choice for potlucks or gifts. Consider pairing them with other desserts like a peanut butter brownie swirl cookie for a complete dessert spread.
Why Make These Easy Krispie Cups?
There are numerous compelling reasons to whip up a batch of these delightful chocolate peanut butter krispie cups. Beyond their incredible taste, they offer practical benefits that make them a go-to recipe for many. They are a wonderful alternative to more complex baked goods, providing a satisfying sweet treat without the extensive effort. This makes them a perfect entry point for beginner bakers or a quick win for seasoned cooks looking for a simple yet impressive dessert. Plus, their versatility allows for easy customization to fit various dietary needs or flavor preferences, ensuring everyone can enjoy a bite. You might find them just as appealing as a hearty chicken bacon ranch tater tot casserole for dinner, just in a sweet form.
Quick and simple to make
One of the primary advantages of these krispie cups is their incredible ease of preparation. With no baking involved, you can have a batch ready to chill in a fraction of the time it would take for many traditional desserts. The steps are straightforward: melt, mix, press, and top. This simplicity means less time in the kitchen and more time enjoying your delicious creations. The minimal ingredient list also contributes to the quick process, reducing shopping time and kitchen clutter. It’s the perfect recipe for those moments when you need a speedy dessert fix without compromising on flavor or quality. The simplicity truly shines, making these cups a reliable choice for spontaneous cravings or last-minute needs.
Fun for kids and adults
These krispie cups are not just a treat to eat; they’re also a joy to make, especially with little helpers. The process involves mixing, pressing, and drizzling, all tasks that children can easily participate in, fostering a love for cooking and creating lasting memories. For adults, the nostalgic appeal brings a sense of comfort and fun, reminding them of classic childhood treats. It’s a fantastic activity for family bonding or a lighthearted baking session with friends. The absence of hot ovens and sharp tools makes it a safer kitchen project for younger participants, adding to its appeal as a family-friendly activity. Plus, everyone gets to enjoy the delicious reward at the end!
Great for plant-based diets
For those following plant-based diets, these chocolate peanut butter krispie cups are a fantastic dessert option. By simply selecting plant-based chocolate chips and a vegan-friendly sweetener (like maple syrup or agave instead of honey), these treats can easily be adapted to be entirely dairy-free and egg-free. Most crispy rice cereals are already plant-based, making the conversion straightforward. This inclusivity means that individuals with dietary restrictions or ethical preferences can still indulge in a decadent, satisfying dessert without missing out on flavor or texture. It highlights the versatility of simple ingredients and how they can be transformed into widely enjoyable treats, making them a superb addition to any plant-based menu. You can find more plant-based inspiration in our main course recipes.
Ingredients to Make Krispie Cups
Creating these delightful chocolate peanut butter krispie cups requires a surprisingly short and accessible list of ingredients. The beauty of this recipe lies in its reliance on pantry staples, meaning you likely have most, if not all, of what you need on hand already. This not only makes the process more convenient but also cost-effective. Each component plays a crucial role in building the desired texture and flavor profile, from the crispy base to the decadent topping. Understanding the purpose of each ingredient can also help with substitutions if you’re looking to customize your treats further, ensuring delicious results every time. For other sweet options, you might also like Quick Italian Cream Cake.
Cereal and chocolate chips
The foundation of these krispie cups is, of course, the crispy cereal. Rice krispies are the traditional choice, providing that signature light, airy crunch that defines these treats. However, feel free to experiment with other puffed cereals if you desire a different texture or flavor profile. For the chocolate layer, high-quality chocolate chips are essential. You can opt for semi-sweet, milk chocolate, or dark chocolate, depending on your preference. Vegan chocolate chips are readily available for plant-based versions. The chocolate not only adds a rich, sweet topping but also helps to bind the cup and provides a beautiful finish. Melting them carefully ensures a smooth, glossy layer that sets perfectly.
Peanut butter, honey, salt
The heart of the krispie cup base is the creamy peanut butter. Smooth peanut butter works best for a consistent texture, but if you enjoy a little extra crunch, crunchy peanut butter can be a fun variation. Look for natural peanut butter with minimal added sugars for the best flavor balance. Honey acts as the primary sweetener and binder, helping to hold the cereal mixture together. For a vegan option, substitute maple syrup or agave nectar in equal amounts. A pinch of salt is crucial as it enhances the flavors, balancing the sweetness of the honey and chocolate while bringing out the nutty notes of the peanut butter. Don’t skip this small but mighty ingredient, as it truly makes a difference in the overall taste profile.
Make Easy Chocolate Peanut Butter Rice Krispie Cups
Making easy chocolate peanut butter rice krispie cups is a straightforward and rewarding process. This section provides a high-level overview of the creation, emphasizing the simplicity and joy of assembling these treats. It’s about combining a few key ingredients in a specific order to achieve that perfect balance of crunch, creaminess, and sweetness. The beauty of this recipe lies in its no-bake nature, meaning you’re just a few steps away from a delightful dessert without the complexities of an oven. It’s an ideal activity for a relaxed afternoon, yielding impressive results with minimal effort. The anticipation of the finished product, ready to be enjoyed, is part of the fun.
Step-by-Step Krispie Cup Instructions
Follow these simple steps to create your perfect batch of chocolate peanut butter krispie cups. The process is designed to be quick and efficient, ensuring you spend less time preparing and more time savoring these delicious treats. Each stage is crucial for achieving the desired texture and distinct layers. Pay attention to the details, especially when melting ingredients, to prevent burning and ensure a smooth consistency. The beauty of a no-bake recipe is its forgiving nature, making it hard to go wrong, but these instructions will guide you to a flawless outcome every time. Remember, a little patience during chilling is key to perfection.
Prepare muffin tin and base
First, prepare your muffin tin. Line a 12-cup muffin tin with paper liners; this makes for easy removal and serving. In a large microwave-safe bowl, combine the peanut butter and honey. Microwave on high for 30-60 seconds, or until the mixture is warm and easy to stir. Stir in the vanilla extract and salt. Add the rice krispies cereal to the peanut butter mixture and stir gently until the cereal is fully coated. Divide the mixture evenly among the prepared muffin cups, pressing it firmly into the bottom of each liner to form a compact base. Use the back of a spoon or your fingers to create a slight indentation in the center, ready for the chocolate layer. This firm base is essential for the structural integrity of your krispie cups. For a different type of treat, you could also check out our Pinterest page for more recipes.
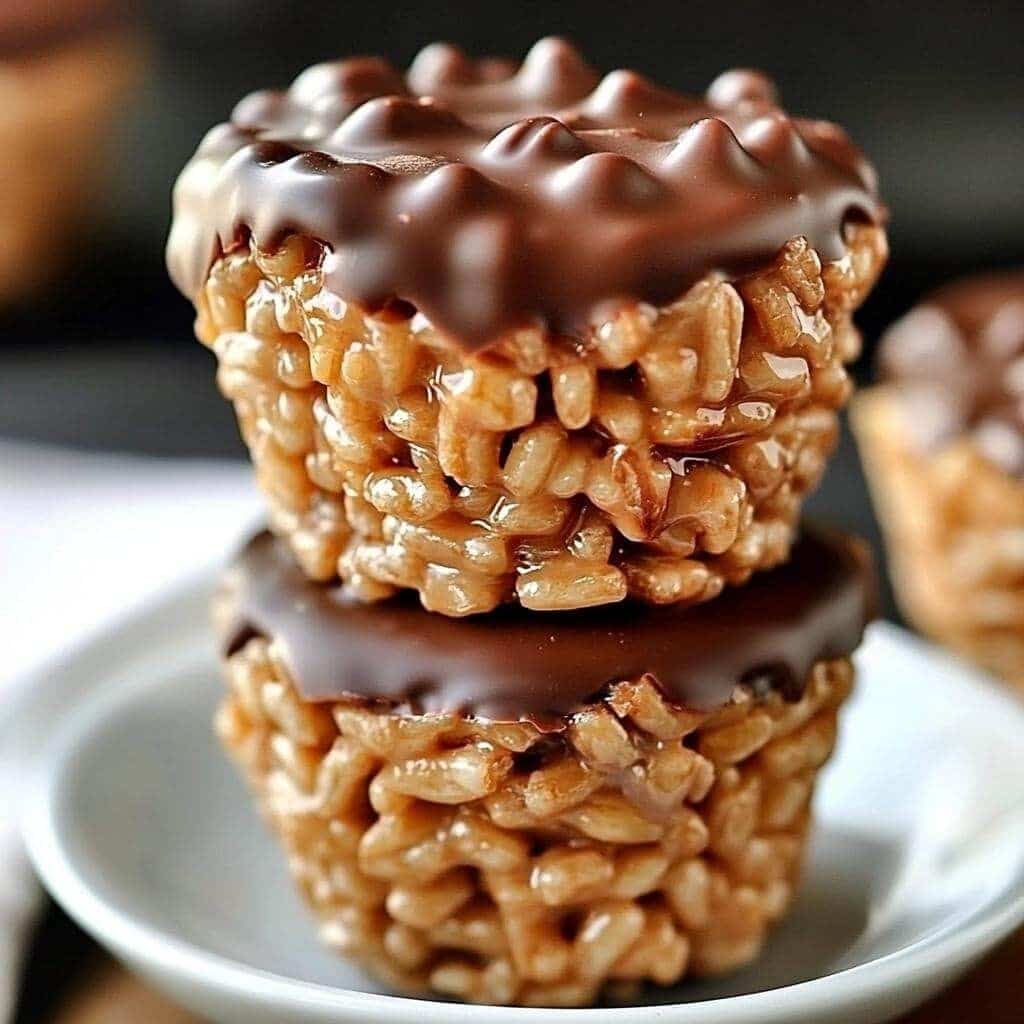
Add chocolate layer
Next, it’s time for the decadent chocolate topping. In a separate microwave-safe bowl, melt the chocolate chips. You can do this in 30-second intervals, stirring after each, until smooth and creamy. Alternatively, you can use a double boiler on the stovetop for a more controlled melting process. Once melted, spoon the chocolate evenly over the peanut butter krispie bases in each muffin cup. Gently spread the chocolate to cover the top of the krispie mixture. If desired, you can sprinkle a little sea salt on top of the melted chocolate for an extra burst of flavor and a touch of visual appeal. This step is where the classic flavor combination truly comes to life, creating a beautiful two-layered effect that’s as appealing to the eye as it is to the palate.
Chill and enjoy your treats
The final crucial step is chilling. Place the muffin tin with the krispie cups into the refrigerator for at least 1-2 hours, or until the chocolate layer is completely set and firm. This chilling time is essential not only for the chocolate to harden but also for the peanut butter krispie base to firm up, making the cups easier to handle and preventing them from falling apart. Once thoroughly chilled, remove the cups from the muffin tin and peel off the paper liners. Your easy chocolate peanut butter krispie cups are now ready to be enjoyed! They are best served cold, offering a refreshing and satisfying bite. These treats are perfect for satisfying those sweet cravings, whether for a quick snack or a delightful dessert after a meal. For more recipe inspiration, follow us on Instagram.
Key Ingredients for Krispie Cups
While the recipe for these chocolate peanut butter krispie cups is straightforward, understanding the nuances of the key ingredients can elevate your treats from good to truly exceptional. The quality and type of each component significantly impact the final taste and texture. From selecting the right cereal to choosing your preferred sweetener, each decision contributes to the overall success of the dessert. This section dives deeper into these core ingredients, offering tips and considerations to help you create the most delicious and satisfying krispie cups every time. Think of it as refining your craft, even for a simple, no-bake recipe.
Choosing the right cereal
For the quintessential krispie cup experience, puffed rice cereal (like Rice Krispies) is the traditional and highly recommended choice. Its light, airy, and neutral flavor provides the perfect crunchy canvas for the rich peanut butter and chocolate. However, don’t limit yourself! If you’re feeling adventurous, other puffed cereals can also work, such as corn flakes for a different kind of crunch, or even a mixed grain puffed cereal for added texture and nutrients. Just ensure the cereal isn’t overly sweet or flavored, as it might clash with the peanut butter and chocolate combination. The goal is a crisp, light base that contrasts beautifully with the creamy layers above it, creating a delightful textural harmony in every bite.
Peanut butter and sweetener options
The quality of your peanut butter significantly impacts the flavor of these cups. Opt for a creamy, natural peanut butter with minimal added sugars and oils for the best results. If you prefer a slightly less sweet treat, a unsweetened peanut butter can be a great choice, allowing the chocolate and honey to provide the sweetness. For sweeteners, honey is traditionally used, providing a lovely floral note and excellent binding properties. For a vegan alternative, pure maple syrup or agave nectar work wonderfully, offering similar sweetness and binding capabilities. Experiment with these options to find your preferred balance of sweetness and texture. Some people might even like a combination of sweeteners for a more complex flavor profile, similar to the depth found in various peanut butter recipes.
Chocolate and salt tips
The chocolate layer is the crown jewel of these krispie cups. High-quality chocolate chips will melt more smoothly and provide a richer flavor. Semi-sweet chocolate chips are a popular choice, offering a balanced sweetness that complements the peanut butter. Dark chocolate chips will yield a more intense, less sweet dessert, while milk chocolate chips will result in a sweeter, creamier topping. Don’t forget the salt! A pinch of sea salt in the peanut butter mixture and a sprinkle on top of the chocolate layer isn’t just for flavor; it’s a critical element that cuts through the sweetness and enhances the nutty and chocolatey notes, creating a more sophisticated and balanced taste. It’s a small addition with a big impact, much like the precision needed in fine chocolate making.
Serving Your Chocolate Peanut Butter Cups
Once your chocolate peanut butter krispie cups are perfectly chilled and set, the next delightful step is serving them. While they are wonderful as-is, a little thought into presentation can elevate these simple treats into something truly special. Whether you’re presenting them at a party or simply enjoying them as a personal indulgence, there are various ways to make them even more appealing. This section offers ideas to enhance their visual appeal and ensures they are enjoyed at their absolute best, creating a memorable experience for anyone lucky enough to take a bite.
Garnish and presentation ideas
To add an extra touch of elegance or whimsy, consider various garnishes. A final sprinkle of flaky sea salt on top of the set chocolate layer not only looks appealing but also provides a delightful contrast in flavor. You could also drizzle a little extra melted peanut butter or chocolate in a decorative pattern. Finely chopped peanuts or other nuts sprinkled over the top can add another layer of texture and visual interest. For a pop of color, a few colorful sprinkles can make them even more kid-friendly and festive. Arranging them on a pretty platter or in mini cupcake wrappers makes them easy to grab and enjoy, adding to their overall charm and making them perfect for any dessert table.
Best served cold
These chocolate peanut butter krispie cups are undeniably at their best when served chilled. The cold temperature helps to firm up both the peanut butter krispie base and the chocolate topping, ensuring a clean bite and preventing them from becoming too soft or messy. When cold, the textures are distinct: a firm, crispy base and a snappy chocolate layer, creating a satisfying mouthfeel. If left at room temperature for too long, especially in warmer environments, the chocolate can become too soft and the peanut butter base might lose some of its structural integrity. Always store them in the refrigerator until ready to serve, and if transporting, keep them in a cooler to maintain their optimal texture and deliciousness. This ensures a delightful experience every single time.
Storing Your Krispie Cups
Proper storage is key to maintaining the freshness, texture, and deliciousness of your chocolate peanut butter krispie cups. Since these are no-bake treats with layers of chocolate and peanut butter, they require specific storage conditions to prevent them from becoming sticky, melting, or losing their delightful crispness. Planning for storage also allows you to make batches ahead of time, which is perfect for meal prepping desserts or preparing for future events. This section will guide you through the best practices for refrigerating and even freezing your krispie cups, ensuring they remain enjoyable for as long as possible.
Refrigeration tips
For short-term storage, keeping your chocolate peanut butter krispie cups in the refrigerator is ideal. Once they are fully set, transfer them to an airtight container. Layer them with parchment paper between each layer to prevent them from sticking together. Stored this way, they will remain fresh and firm for up to one week. The cool temperature helps maintain the crispness of the cereal and keeps the chocolate and peanut butter layers from becoming too soft. Always ensure the container is tightly sealed to protect them from absorbing any odors from other foods in the refrigerator, which could alter their flavor. This method is perfect for keeping a stash of treats readily available for daily enjoyment.
Freezing for longer storage
If you’ve made a large batch or want to keep your krispie cups fresh for an extended period, freezing is an excellent option. First, arrange the set krispie cups in a single layer on a baking sheet lined with parchment paper. Place the baking sheet in the freezer for about 1-2 hours, or until the cups are frozen solid. This step, known as flash freezing, prevents them from sticking together when stored. Once frozen, transfer the individual cups to an airtight freezer-safe container or a heavy-duty freezer bag, again using parchment paper between layers if necessary. They can be stored in the freezer for up to 2-3 months. To enjoy, simply thaw them in the refrigerator for a few hours or at room temperature for about 30 minutes until softened enough to eat. For other dessert ideas, explore our desserts category.
Fun Variations for Krispie Cups
While the classic chocolate peanut butter combination is undeniably delicious, these krispie cups are incredibly versatile, lending themselves to a myriad of exciting variations. Don’t be afraid to get creative and customize your treats to suit your personal preferences or to cater to different tastes. By simply swapping out a few ingredients or adding some extra elements, you can transform these simple cups into a whole new dessert experience. This section explores some popular and innovative ideas to inspire your next batch, ensuring that your krispie cups are always a delightful surprise.
Different nut butters
Peanut butter is the traditional choice, but feel free to experiment with other nut butters for distinct flavor profiles. Almond butter offers a milder, slightly sweeter taste, while cashew butter provides a rich, buttery consistency. For those with nut allergies, sunflower seed butter (SunButter) is an excellent and safe alternative that still delivers a delightful nutty flavor. Each nut butter will impart its unique characteristics to the krispie base, so consider which flavors you’d like to highlight. Ensure that whatever nut butter you choose is creamy and natural, as chunky versions might make the base harder to press firmly. This simple swap can completely change the character of your krispie cups.
Chocolate and extra add-ins
Beyond the classic chocolate chips, the topping layer can be customized with various types of chocolate. White chocolate, milk chocolate, or a blend of dark and milk chocolate can create different levels of sweetness and richness. For extra flavor and texture, consider folding in mini marshmallows, sprinkles, chopped nuts (like pecans or walnuts), shredded coconut, or even crushed pretzels into the krispie base for a salty-sweet crunch. A swirl of caramel or a sprinkle of mini M&Ms on top of the melted chocolate before it sets can also add a fun twist. These add-ins allow for endless creativity, making each batch of krispie cups uniquely yours and perfectly tailored to any craving.
Quick Notes for Perfect Krispie Cups
Achieving truly perfect chocolate peanut butter krispie cups is within easy reach with a few essential tips and tricks. These small insights can make a significant difference in the final outcome, ensuring your treats are not only delicious but also boast the ideal texture and presentation. From enhancing the flavor profile to mastering the art of storage, these quick notes are designed to elevate your krispie cup game, making every batch a resounding success. Pay attention to these details, and you’ll be consistently turning out professional-looking and tasting desserts.
Try a sprinkle of sea salt
A subtle yet impactful addition to your chocolate peanut butter krispie cups is a light sprinkle of flaky sea salt on top of the freshly melted chocolate layer. This isn’t just for aesthetics; the salt acts as a flavor enhancer, cutting through the sweetness of the chocolate and peanut butter and bringing out their individual nuances. It creates a sophisticated salty-sweet contrast that elevates the entire treat, making it more complex and incredibly satisfying. The crunchy texture of the salt crystals also adds another pleasant dimension. Don’t underestimate the power of this simple garnish; it transforms a good treat into a truly exceptional one.
How to store them effectively
Effective storage is paramount for maintaining the quality of your krispie cups. Always store them in an airtight container in the refrigerator to keep the chocolate firm and the krispie base crisp. Layering with parchment paper will prevent them from sticking together. If you need to store them for longer periods, freezing is an excellent option. Flash-freeze individual cups on a baking sheet before transferring them to a freezer-safe bag or container. This ensures they don’t clump together and allows you to grab just one or two at a time. Proper storage not only preserves their delicious taste but also their appealing texture, making them a convenient treat to enjoy anytime.
Total Time for Krispie Cups
One of the most appealing aspects of these chocolate peanut butter krispie cups is the minimal time investment required to create them. Unlike many desserts that demand hours of baking and intricate steps, these treats come together remarkably quickly. This makes them an ideal choice for last-minute cravings, spontaneous gatherings, or when you simply don’t have a lot of time to dedicate to the kitchen. The focus is on efficiency without compromising on flavor or satisfaction, proving that delicious doesn’t always have to mean time-consuming. You’ll be surprised how fast you can go from craving to enjoying these delightful cups.
Quick prep and cook times
The total time for these krispie cups is incredibly efficient. The “cook” time, in essence, is zero, as no baking is involved. The active preparation time, which includes melting the peanut butter and honey, mixing in the cereal, pressing the bases, and melting and spreading the chocolate, typically takes no more than 15-20 minutes. The longest part of the process is the chilling time, which is passive. You’ll need at least 1-2 hours in the refrigerator for the cups to properly set. So, from start to finish, including passive chilling, you’re looking at about 1 hour and 15 minutes to 2 hours and 20 minutes, with most of that time allowing the refrigerator to do the work. This quick turnaround makes them a perfect last-minute dessert or snack.
Nutrition for Krispie Cups
Understanding the nutritional aspects of your chocolate peanut butter krispie cups can help you enjoy them as part of a balanced diet. While these are sweet treats, knowing their caloric and macronutrient breakdown allows for mindful consumption. The nutritional content will vary slightly depending on the specific brands of peanut butter, cereal, and chocolate chips you use, as well as any added sweeteners or variations. This section provides a general overview, focusing on common dietary considerations to help you make informed choices about your indulgences. Remember that these are meant to be an enjoyable dessert or snack, and moderation is always key.
Calories per serving
The exact calorie count per serving for your chocolate peanut butter krispie cups will depend on the size of your cups and the specific ingredients used. Generally, a single krispie cup, made according to standard proportions, can range anywhere from 150 to 250 calories. This includes the calories from the cereal, peanut butter, honey (or other sweetener), and chocolate. Factors like using full-fat vs. reduced-fat peanut butter, dark vs. milk chocolate, and the amount of honey can influence the final number. For a precise count, you would need to calculate based on the exact ingredients and serving sizes from your batch. However, this range provides a good estimate for those monitoring their caloric intake while still enjoying a delicious treat.
