
Cream Cheese Filled Pumpkin Bread is a beloved seasonal delight, marrying moist pumpkin spice bread with a luscious, tangy cream cheese filling. This homemade bread recipe offers a comforting aroma and taste, perfect for autumn gatherings or a cozy afternoon treat. Prepare to create a truly irresistible fall baking masterpiece.
Key Takeaways
- Simple steps for a moist pumpkin bread batter and a creamy filling.
- Guidance on layering, baking, and achieving perfect doneness.
- Helpful tips for cooling, slicing, and effective storage options.
- Ideas for enhancing flavor with fresh puree and nutritional insights.
Autumn flavors are truly special. Pumpkin bread offers warmth and comfort. Cream cheese adds a delightful tang. This recipe brings joy. It is perfect for sharing.
Your Irresistible Cream Cheese Filled Pumpkin Bread
Creating your own homemade cream cheese filled pumpkin bread is a rewarding experience, yielding a delicious treat far superior to anything store-bought. This recipe balances the warm spices of autumn pumpkin with the creamy, slightly tangy sweetness of a classic cream cheese filling. It’s an ideal seasonal dessert, perfect for breakfast, brunch, or a comforting snack with your coffee or tea. The aroma alone will fill your kitchen with inviting fall scents, making it a favorite for family and friends. We aim to make this a straightforward baking project, even for those new to working with yeast-free breads. Imagine a perfectly moist loaf, rich with pumpkin flavor, cradling a decadent pocket of sweetened cream cheese. It’s a taste sensation that captures the essence of the season.
What You Will Need
To begin your delightful baking journey, you’ll need standard baking equipment: a large mixing bowl, a whisk, a rubber spatula, measuring cups and spoons, and a 9×5 inch loaf pan. A hand mixer or stand mixer can make blending the cream cheese filling incredibly smooth, though it’s certainly achievable by hand. Quality ingredients are key to a successful loaf, so ensure your pumpkin puree is 100% pure pumpkin, not pumpkin pie filling, and that your cream cheese is full-fat for the best texture and flavor. Having all your ingredients at room temperature, especially the wet ingredients and cream cheese, will ensure a smoother, more evenly mixed batter and filling. Don’t forget parchment paper for easy removal!
Quick Prep and Cook Time Overview
Efficiency in the kitchen doesn’t mean compromising on flavor. This cream cheese filled pumpkin bread recipe is designed to be manageable, allowing you to enjoy a homemade treat without spending your entire day baking. The preparation phase, including gathering and measuring ingredients, along with mixing both the batter and the filling, is surprisingly quick. We’ve streamlined the steps so you can move from prep to oven in a reasonable amount of time, perfect for a weekend project or even a dedicated weeknight bake. This simple approach ensures that even busy schedules can accommodate this delicious fall baking endeavor. For more quick dessert ideas, check out our quick Italian cream cake recipe.
Total Time Estimate
Plan for approximately 20-25 minutes of active preparation time. This includes mixing your dry and wet ingredients, preparing the luscious cream cheese filling, and layering it into the loaf pan. The baking process will then take about 60-70 minutes, depending on your oven and the loaf pan material. After baking, a crucial cooling period of at least 30-45 minutes is recommended before slicing, ensuring the bread sets properly and the filling doesn’t ooze out. Therefore, from start to first slice, you’re looking at a total of roughly 2 hours to 2 hours and 20 minutes. The majority of this is passive cooking and cooling time, leaving you free to enjoy the wonderful aromas filling your home. This makes it an achievable and delightful project for anyone looking to make homemade bread.
Gather Ingredients for Your Bread
The foundation of any great pumpkin bread recipe lies in the quality and precise measurement of its ingredients. Taking a few moments to gather and prepare everything before you start mixing, often called “mise en place,” will significantly smooth your baking process. This helps prevent frantic searches for forgotten items and ensures accuracy. We’ve broken down the ingredients into three distinct categories: dry, wet, and filling, to simplify your preparation and ensure you have everything needed for both the moist pumpkin bread batter and the creamy, tangy center. Precision here guarantees the perfect texture and flavor balance for your seasonal dessert.
Dry Ingredients List
- 2 ½ cups All-Purpose Flour: Provides the main structure for the bread.
- 2 cups Granulated Sugar: Sweetens the loaf and contributes to moisture.
- 1 ½ teaspoons Baking Soda: A leavening agent that helps the bread rise.
- 1 teaspoon Salt: Balances the sweetness and enhances overall flavor.
- 1 teaspoon Ground Cinnamon: Essential for that classic warm, spicy pumpkin flavor.
- ½ teaspoon Ground Nutmeg: Adds a deeper, aromatic spice note.
- ¼ teaspoon Ground Cloves: Provides a hint of intense, sweet spice.
- ¼ teaspoon Ground Ginger: Gives a subtle zesty warmth.
Wet Ingredients List
- 1 (15-ounce) can Pumpkin Puree: The star ingredient, providing moisture and a rich pumpkin flavor. Ensure it’s 100% pure pumpkin, not pie filling. You can learn more about pumpkin bread history here.
- ½ cup Vegetable Oil: Contributes to the bread’s moist and tender crumb.
- 2 Large Eggs: Act as a binder, adding richness and structure.
- 1 teaspoon Vanilla Extract: Enhances all the other flavors.
Filling Ingredients
- 8 ounces Cream Cheese, softened: The base for your delightful, tangy filling. Softening ensures a smooth, lump-free mixture.
- ¼ cup Granulated Sugar: Sweetens the cream cheese to complement the pumpkin bread.
- 1 Large Egg Yolk: Adds richness and helps the filling set properly during baking.
- ½ teaspoon Vanilla Extract: Provides an extra layer of flavor to the creamy center. For other recipes featuring a creamy filling, check out our vanilla bean creme brulee cheesecake cupcakes.
Simple Steps for Pumpkin Bread Batter
Crafting the perfect pumpkin bread batter is key to achieving that wonderfully moist and flavorful loaf. The process is straightforward, focusing on proper mixing techniques that ensure an even distribution of ingredients without overworking the gluten in the flour. This attention to detail contributes significantly to the final texture of your homemade bread. We’ll guide you through each stage, from combining the aromatic dry spices to gently folding in the wet pumpkin mixture, ensuring your batter is ready for its creamy center. Taking your time with these initial steps will lay a strong foundation for a truly delicious cream cheese filled pumpkin bread that everyone will love.
Mixing Dry Ingredients
In a large mixing bowl, begin by whisking together the flour, granulated sugar, baking soda, salt, cinnamon, nutmeg, cloves, and ginger. This step is crucial for ensuring that all the leavening agents and spices are evenly distributed throughout the flour. An even distribution guarantees a consistent rise and flavor in every slice of your pumpkin bread. Whisk thoroughly for about 30 seconds to a minute, breaking up any lumps and incorporating air, which helps create a lighter texture. Set this bowl aside once mixed, preparing it for the wet ingredients.
Combining Wet Ingredients
In a separate medium-sized bowl, combine the pumpkin puree, vegetable oil, eggs, and vanilla extract. Use a whisk to blend these ingredients until they are well combined and smooth. It’s important that your eggs and pumpkin puree are at room temperature, as this helps them incorporate more easily and creates a more homogeneous mixture. This wet mixture will provide the primary moisture and rich pumpkin flavor to your bread. Ensure there are no streaks of unmixed oil or egg yolk for the best results in your homemade pumpkin bread recipe.
Mixing Wet into Dry
Now, pour the wet ingredients into the bowl containing your dry ingredients. Using a rubber spatula, gently fold the wet into the dry until just combined. The key here is to avoid overmixing. Overmixing can develop the gluten in the flour too much, leading to a tough or dense bread. Mix only until no dry streaks of flour remain; a few small lumps are perfectly acceptable. This gentle approach ensures your pumpkin bread remains wonderfully moist and tender, a hallmark of excellent fall baking. This careful combination sets the stage for a delightful cream cheese filled pumpkin bread.
Preparing Cream Cheese Filling Delight
The cream cheese filling is the star element that elevates this pumpkin bread from delicious to absolutely irresistible. Its tangy sweetness perfectly complements the warm spices of the pumpkin bread, creating a harmonious flavor profile. Achieving a smooth, lump-free filling is essential for a pleasant eating experience and an appealing visual inside your loaf. This section outlines the simple yet important steps to prepare this delightful component, ensuring it’s perfectly blended and ready to be layered into your homemade bread. The contrast of the creamy filling with the moist bread makes this a standout seasonal dessert. Cream cheese is a versatile ingredient, often used in desserts.
Blending Cream Cheese Smooth
In a medium bowl, combine the softened cream cheese, granulated sugar, egg yolk, and vanilla extract. It’s crucial that your cream cheese is truly softened to room temperature before you begin; otherwise, you’ll end up with lumps that are difficult to smooth out. Using a hand mixer or stand mixer fitted with a paddle attachment, beat the ingredients on medium speed until the mixture is completely smooth and creamy. Scrape down the sides of the bowl as needed to ensure everything is fully incorporated. The egg yolk not only adds richness but also helps to stabilize the filling during baking, preventing it from becoming too runny. This smooth, luxurious filling is what will create that amazing surprise center in your cream cheese filled pumpkin bread.
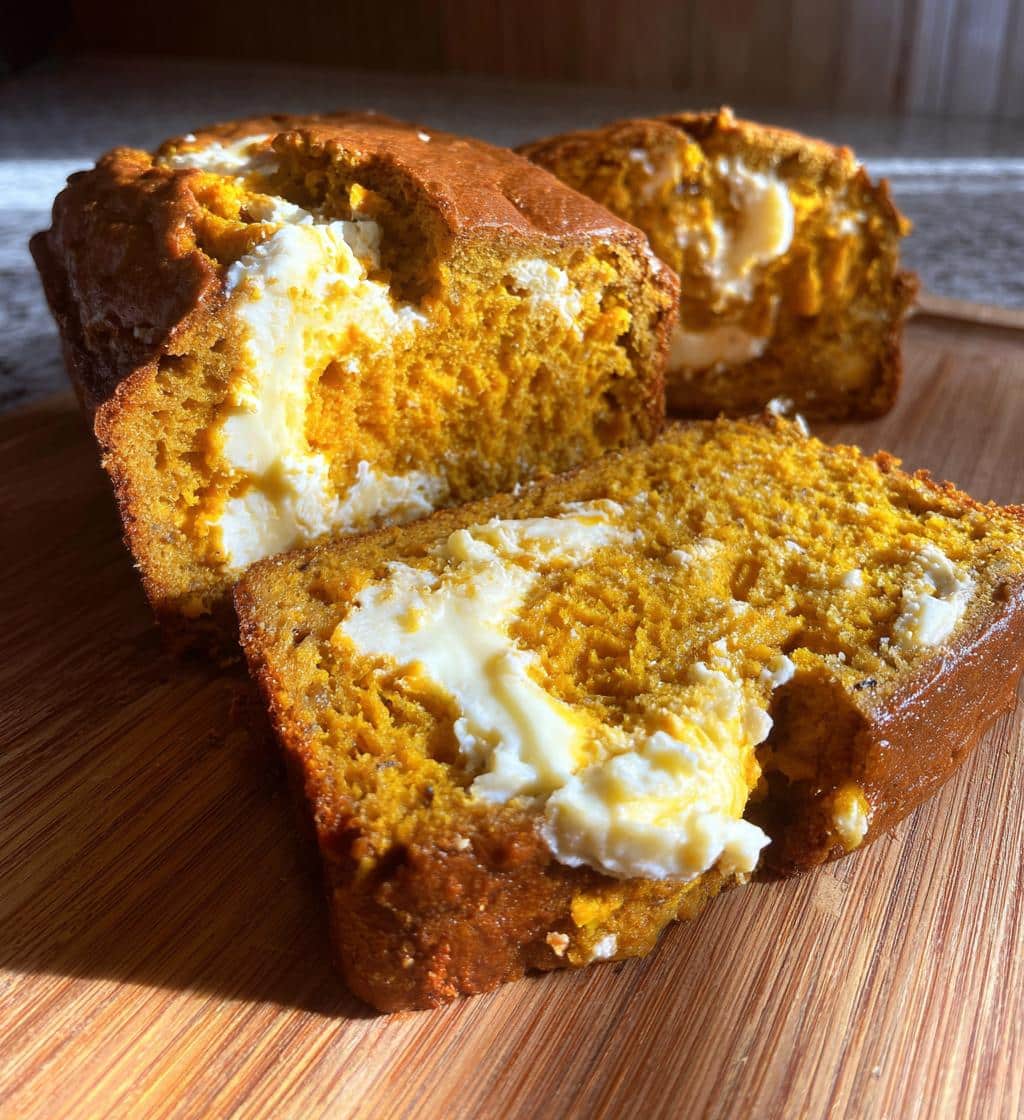
Layering Your Delightful Pumpkin Bread Loaf
Proper layering is crucial for ensuring that every slice of your cream cheese filled pumpkin bread offers a beautiful swirl and a balanced taste of both the moist pumpkin bread and the luscious cream cheese filling. This step is simple but requires a little care to ensure the filling stays centered and doesn’t get completely mixed into the batter. Using parchment paper to line your loaf pan will also make removal much easier. The visual appeal of this layered effect is almost as satisfying as the taste itself, promising a delightful surprise with each bite. This method ensures that the creamy filling remains distinct, providing a wonderful textural and flavor contrast.
Pouring First Batter Layer
Grease and flour a 9×5 inch loaf pan, or line it with parchment paper, leaving an overhang on the sides to easily lift the bread out later. Pour approximately half of the pumpkin bread batter into the prepared loaf pan. Use your spatula to gently spread it evenly across the bottom. This first layer acts as a sturdy base for your cream cheese filling. Don’t worry if it’s not perfectly level; the bread will even out as it bakes. This initial layer ensures you have a good foundation, preventing the filling from sinking to the very bottom during baking, which is a common issue for many homemade bread recipes with fillings.
Spreading Cream Cheese Layer
Carefully spoon the entire cream cheese filling mixture over the first layer of pumpkin batter. Use a clean rubber spatula to gently spread the cream cheese filling evenly over the batter, making sure to leave a small border (about ½ inch) around the edges. This border helps to encapsulate the filling and prevents it from oozing out during baking, keeping your loaf neat and tidy. This is the heart of your cream cheese filled pumpkin bread, so take your time to distribute it well. The smooth, white layer of filling will contrast beautifully with the vibrant orange batter.
Adding Final Batter Layer
Finally, spoon the remaining pumpkin bread batter over the cream cheese filling. Again, use your spatula to gently spread it evenly, completely covering the cream cheese layer. Be gentle to avoid disturbing the filling too much. Once covered, lightly tap the loaf pan on your counter a few times to release any large air bubbles and ensure the batter settles. This final layer encases the creamy delight, ensuring it bakes perfectly within the moist pumpkin bread. Your loaf is now ready for the oven, set to become a delicious seasonal dessert.
Baking Cream Cheese Filled Pumpkin Bread
Baking is where the magic happens, transforming your carefully prepared batter and filling into a golden-brown, aromatic loaf. Achieving the correct oven temperature and baking for the right duration are critical for a perfectly cooked pumpkin bread recipe with a set, creamy center. An underbaked bread might be too moist or gooey, while an overbaked one can become dry. We’ll guide you through setting your oven and understanding the signs of doneness, ensuring your cream cheese filled pumpkin bread comes out beautifully. The anticipation of that first slice, revealing the swirling layers of pumpkin and cream cheese, is part of the joy of fall baking.
Oven Temperature Setting
Preheat your oven to 350°F (175°C). It is essential to allow your oven ample time to reach and stabilize at this temperature before placing the loaf pan inside. Using an oven thermometer can help verify accuracy, as oven temperatures can sometimes fluctuate. A properly preheated oven ensures that the bread starts baking immediately and rises consistently, setting its structure correctly. This initial heat surge is important for activating the leavening agents in the batter, creating a light and airy texture around your creamy filling. Be sure your oven is ready before you start, which is a key step in many dessert recipes.
Baking Time and Doneness
Place the loaf pan in the preheated oven and bake for approximately 60-70 minutes. Baking times can vary slightly depending on your oven and the material of your loaf pan. To check for doneness, insert a wooden skewer or toothpick into the pumpkin bread portion of the loaf (avoiding the cream cheese filling, as it will always be moist). If it comes out clean or with a few moist crumbs attached, the bread is ready. If it comes out with wet batter, continue baking for another 5-10 minutes and recheck. The top should be golden brown, and the edges should start to pull away slightly from the pan. The internal temperature, if you have a thermometer, should register around 200-205°F (93-96°C) in the pumpkin bread sections. This careful check ensures a perfectly baked, delicious homemade bread.
Cooling and Slicing Your Delicious Bread
While the aroma of freshly baked cream cheese filled pumpkin bread might tempt you to slice into it immediately, patience is truly a virtue when it comes to cooling. This step is just as important as the baking itself for achieving the ideal texture, especially with a moist loaf and a soft, creamy filling. Rushing the cooling process can lead to a crumbly bread and a messy, unappealing filling. Allow your delicious creation to rest properly, and you’ll be rewarded with perfectly set layers and clean slices, ready for serving. This is a crucial final touch for any successful fall baking project.
Why Cooling Matters
Once baked, remove the loaf pan from the oven and let it cool in the pan on a wire rack for at least 15-20 minutes. This initial cooling in the pan allows the bread to continue cooking slightly from residual heat, and more importantly, it helps the structure firm up. After this period, carefully lift the bread out of the pan using the parchment paper overhangs (if used) and transfer it directly to the wire rack to cool completely. Allowing the bread to cool for at least 30-45 minutes, or even longer, until it’s just warm or at room temperature, is essential. This cooling period allows the steam to escape gradually, preventing a soggy bottom, and permits the cream cheese filling to fully set, making it much easier to slice cleanly without it oozing out. Properly cooled bread also tastes better, as flavors meld and deepen. For other recipes that require careful cooling, consider our Hawaiian roll French toast, where texture is key.
Storage Tips for Pumpkin Bread Recipe
Once you’ve enjoyed your first delightful slices of cream cheese filled pumpkin bread, you’ll want to ensure the remaining loaf stays fresh and delicious for as long as possible. Proper storage is key to maintaining its moist texture and preventing the filling from spoiling. Given the cream cheese component, this homemade bread requires specific handling to preserve its quality and safety. Following these guidelines will help you extend the enjoyment of your fall baking masterpiece, ensuring every subsequent slice is just as good as the first. This is important for any seasonal dessert with a dairy component.
Airtight Container Use
Due to the perishable cream cheese filling, your pumpkin bread recipe loaf must be stored in the refrigerator. After the bread has completely cooled to room temperature, wrap it tightly in plastic wrap or aluminum foil, then place it inside an airtight container. This double layer of protection helps to prevent the bread from drying out and absorbing odors from the refrigerator. Stored correctly in the refrigerator, your cream cheese filled pumpkin bread will remain fresh and delicious for up to 5-7 days. Always ensure it’s fully cooled before wrapping, as warmth can create condensation, leading to sogginess or mold. This careful storage ensures you can savor your homemade bread for days.
Freezing Your Pumpkin Bread Recipe Loaf
If you’ve baked a large batch or simply want to enjoy homemade pumpkin bread throughout the season, freezing is an excellent option for long-term storage. This allows you to preserve the fresh taste and texture of your cream cheese filled pumpkin bread for weeks or even months. With a few simple steps, you can ensure your frozen loaf thaws beautifully, tasting almost as good as it did fresh out of the oven. This is a fantastic strategy for meal prepping or always having a delicious seasonal dessert on hand for unexpected guests or cravings. Enjoy more recipes and tips on our Pinterest and Instagram!
How to Freeze Safely
To freeze your pumpkin bread, first ensure it is completely cooled to room temperature. You can freeze the entire loaf or slice it into individual portions before wrapping. For best results, wrap the loaf or slices tightly in plastic wrap, then an additional layer of aluminum foil. This double wrapping helps prevent freezer burn and preserves moisture. Place the wrapped bread in a freezer-safe airtight container or heavy-duty freezer bag. Label with the date. Frozen pumpkin bread will maintain its quality for up to 2-3 months. To thaw, simply remove the desired portion from the freezer and let it sit at room temperature for several hours, or overnight in the refrigerator. You can gently warm slices in a microwave or oven for an even fresher taste. This method ensures your homemade bread remains a delightful treat for an extended period. For more baking tips, check our desserts category.
Enhance Taste with Fresh Pumpkin Puree
While canned pumpkin puree is convenient and works wonderfully in this cream cheese filled pumpkin bread recipe, making your own fresh pumpkin puree can truly elevate the flavor profile of your homemade bread. The subtle nuances and vibrant freshness of homemade puree add a depth of flavor that is hard to replicate. This approach is a bit more time-intensive but offers a rewarding culinary experience, connecting you more deeply with the fall baking process. It allows you to control the sweetness and consistency, ensuring the very best foundation for your seasonal dessert.
Using Fresh Puree Benefits
Using fresh pumpkin puree offers several distinct advantages. Firstly, it often has a brighter, more pronounced pumpkin flavor compared to canned versions, which can sometimes taste a bit muted. Secondly, you control the moisture content. After roasting and pureeing your pumpkin, you can drain off excess liquid, resulting in a thicker puree that prevents a watery batter. This leads to a richer, more concentrated pumpkin taste and a perfect, moist texture in your pumpkin bread. While more effort, the superior flavor and quality of a homemade puree make it a worthwhile endeavor for any true fall baking enthusiast looking to perfect their cream cheese filled pumpkin bread. It’s a small detail that can make a big difference.
Nutrition Facts: Cream Cheese Pumpkin Bread
Understanding the nutritional content of your homemade cream cheese filled pumpkin bread can be helpful, especially if you’re mindful of dietary intake. While this seasonal dessert is undoubtedly a treat, it’s also packed with wholesome ingredients like pumpkin, which provides vitamins and fiber. The cream cheese filling adds a creamy richness that contributes to its overall profile. Remember that homemade recipes allow for some flexibility, so the exact nutritional values can vary based on specific ingredients, portion sizes, and any substitutions you might make. This section provides a general overview, encouraging mindful enjoyment of your delicious fall baking creation.
Per Slice Details
Providing exact nutrition facts for a homemade recipe like cream cheese filled pumpkin bread can be challenging without precise calculations based on specific brands and measurements. However, generally speaking, a single slice (approximately 1/12th of a loaf) will contain a balance of carbohydrates from the flour and sugar, fats from the oil and cream cheese, and some protein from the eggs and dairy. It will also offer vitamins and fiber from the pumpkin. As a rich seasonal dessert, it’s best enjoyed in moderation. If specific nutritional data is critical for your dietary needs, we recommend inputting your exact ingredients into an online nutrition calculator. This homemade bread is intended as a delightful indulgence, perfect for a special occasion or a cozy treat.
