
Honeycrisp Apple Galette offers a delightful and simple approach to fruit desserts. This rustic pastry highlights the crisp sweetness of Honeycrisp apples, encased in a flaky, free-form crust. It’s an ideal choice for bakers seeking a less fussy alternative to traditional pies, perfect for family dinners or a casual gathering.
Key Takeaways
- The Honeycrisp apple galette is a simple, free-form pastry that showcases the fruit’s natural sweetness.
- Minimal ingredients are required, focusing on fresh Honeycrisp apples and a ready-made or homemade pie crust.
- Assembly is straightforward, involving slicing apples, mixing with spices, and folding the crust edges.
- Baking results in a golden-brown crust and tender, caramelized apples, ready to be enjoyed warm.
- This dessert is easily customizable for sweetness and pairs perfectly with a scoop of vanilla ice cream.
Baking with apples is pure joy. A simple galette impresses guests. Sweet flavors burst forth. The aroma fills your kitchen. Enjoy this easy dessert.
Making Your Honeycrisp Apple Galette
A Simple, Delicious Dessert
Creating a Honeycrisp apple galette is a wonderfully rewarding experience, offering all the delightful flavors of a traditional apple pie but with a charming, rustic elegance. This free-form tart is less intimidating to prepare, making it accessible even for novice bakers. The beauty of a galette lies in its simplicity; there’s no need for a perfectly crimped pie crust or intricate designs. Instead, you embrace the natural, slightly imperfect edges that give it a homemade, inviting appeal. Using Honeycrisp apples is key to this recipe’s success. These apples are renowned for their incredible crispness and a perfectly balanced sweet-tart flavor profile, which holds up beautifully during baking. They don’t become overly mushy, retaining a pleasant bite that complements the tender, flaky crust. This dessert serves as an excellent centerpiece for any fall gathering, a cozy treat on a cool evening, or a delightful finish to a family meal. Its versatility means it can be served warm with a scoop of vanilla ice cream, a drizzle of caramel sauce, or simply on its own. It’s a truly satisfying and delicious sweet treat that embodies comfort and home baking.
Gathering Galette Ingredients
What You Will Need
Before you begin the delightful process of assembling your Honeycrisp apple galette, ensuring all your ingredients are readily available and properly measured is paramount. The list for this rustic dessert is refreshingly short, emphasizing the quality of each component. At the heart of this dish are, of course, the Honeycrisp apples. You’ll need approximately 4-5 medium-sized apples, which should yield enough slices to generously fill your galette. Beyond the fruit, a good quality pie crust is essential. While a store-bought, refrigerated pie crust works perfectly for convenience, a homemade pastry will elevate the flavor profile even further, adding a depth of buttery richness. For seasoning, granulated sugar is typically used to enhance the natural sweetness of the apples, alongside a touch of ground cinnamon for warmth and a hint of nutmeg for complexity. A squeeze of fresh lemon juice is crucial; it brightens the apple flavor and prevents browning. Finally, a small amount of unsalted butter, diced, is scattered over the apples before baking to create a rich, bubbly sauce as the galette bakes. A little egg wash (egg mixed with water) is often brushed on the crust edges to achieve a beautiful golden-brown finish, and a sprinkle of turbinado sugar adds a lovely crunch and sparkle. These simple ingredients combine to create an unforgettable homemade galette experience.
Preparing the Apples (Step 1)
Slicing and Seasoning Apples
The first crucial step in making your Honeycrisp apple galette involves preparing the star ingredient: the apples. Begin by thoroughly washing your Honeycrisp apples. While some recipes suggest peeling, leaving the skin on adds a beautiful reddish hue and some extra texture and nutrients to your rustic dessert. Core each apple carefully, then slice them thinly, about 1/8 to 1/4 inch thick. Uniform slices are important for even cooking, ensuring that all pieces become tender at the same rate without turning mushy. A mandoline slicer can achieve perfectly consistent slices, but a sharp knife works just as well with a steady hand. Once sliced, place the apple pieces into a large mixing bowl.
Mixing with Lemon and Spice
With your apples sliced, it’s time to infuse them with flavor. To the bowl of sliced Honeycrisp apples, add the granulated sugar, ground cinnamon, and a pinch of nutmeg. The amount of sugar can be adjusted based on the sweetness of your apples and your personal preference, though Honeycrisps are naturally quite sweet. Next, add a generous squeeze of fresh lemon juice. This isn’t just for flavor; the acidity helps prevent the apples from oxidizing and turning brown while you prepare the rest of the galette. Toss all the ingredients gently with your hands or a spoon until the apple slices are evenly coated. Allow the mixture to sit for about 10-15 minutes. This brief resting period helps the sugar draw out some of the apple’s natural juices, creating a delicious syrupy base that will caramelize beautifully during baking. This step ensures your homemade pastry is bursting with flavor.
Getting the Crust Ready (Step 2)
Preheating the Oven
Proper oven temperature is paramount for achieving a perfectly golden and flaky galette crust. Before you even think about rolling out your pastry, preheat your oven to 400°F (200°C). This ensures that the oven is consistently hot throughout, allowing the crust to cook evenly from the moment the galette is placed inside. Placing the galette into a preheated oven is crucial for preventing a soggy bottom and promoting a crisp, beautifully browned crust. While the oven preheats, you can prepare a baking sheet by lining it with parchment paper. This step is a non-negotiable for easy cleanup and preventing the galette from sticking, especially if any delicious apple juices bubble over during baking.
Rolling Out the Pie Crust
Whether you’re using a store-bought pie crust or a homemade version, this step requires a bit of finesse. If using a refrigerated pie crust, allow it to sit at room temperature for about 10-15 minutes; this makes it more pliable and less prone to cracking when unrolled. Lightly flour a clean work surface and your rolling pin. Carefully unroll or place your dough, then gently roll it into a rough 12- to 14-inch circle. Don’t worry about achieving a perfect circle; the charm of a galette is its rustic, free-form nature. The goal is to have a relatively thin, even thickness across the dough, which will ensure uniform baking. Carefully transfer the rolled-out dough to your parchment-lined baking sheet. This sets the stage for the easy assembly of your fruit tart recipe, ensuring a smooth transition from countertop to oven. For other main course ideas, Carina Recipes has a wide selection.
Assembling Your Apple Galette (Step 3)
Arranging Apple Mixture
Now comes the exciting part: bringing your galette to life! Carefully spoon the seasoned Honeycrisp apple mixture onto the center of your rolled-out pie crust. Arrange the apple slices in an even layer, leaving a generous 2-inch border of dough around the edges. You can stack the apples slightly in the center to create a mounded effect, which will look beautiful as it bakes and softens. The goal is to distribute the apples evenly so that each slice cooks properly and every bite of the baked galette offers a delightful balance of fruit and crust. Ensure you drain any excess liquid that might have accumulated in the apple mixture bowl before placing the apples on the dough, as too much moisture can lead to a soggy bottom crust. This care in arrangement helps to create an appealing visual and ensures the perfect baking of your sweet apple treat.
Forming the Crust Border
With the apples perfectly arranged, it’s time to shape the characteristic free-form border of your galette. Gently fold the exposed 2-inch border of the pie crust up and over the outer edges of the apple filling. As you fold, pleat the dough every few inches, allowing it to naturally crease and overlap. This creates the signature rustic, crinkled edge that makes a galette so charming. Don’t press too hard, just enough to secure the folds. The folded crust not only holds the filling in place but also bakes up into a beautiful, golden frame around the tender, caramelized apples. Ensure there are no gaps where the filling might escape, but remember that perfection isn’t the goal here; the homemade, organic look is part of its appeal. This step is where the galette truly takes its unique form, setting it apart from traditional pies.
Finishing Before Baking (Step 4)
Folding Galette Edges
Once the apples are nestled in the center of the crust, and you’ve begun folding the outer edges inward, continue to work your way around the entire circumference of the galette. The beauty of a galette lies in its rustic nature, so don’t fret over perfect symmetry. Simply fold the dough up and over the fruit, creating natural pleats and creases as you go. These folds not only keep the filling contained but also create a lovely textured edge that bakes into a delightful golden-brown. Gently press down on the folds to ensure they hold their shape during baking. This creates a charming visual boundary between the crisp, flaky crust and the juicy, spiced Honeycrisp apple filling, promising a delicious fruit dessert that’s both appealing to the eye and the palate. The simple act of folding truly transforms a flat piece of dough into an inviting baking apple creation.
Adding Diced Butter
The final touch before your Honeycrisp apple galette goes into the oven involves adding a bit of richness and moisture to the filling. Take your cold, diced unsalted butter and dot the top of the apple mixture. These small pats of butter, typically about 1-2 tablespoons total, will slowly melt during baking, creating pockets of luscious, buttery goodness. As the butter melts, it mingles with the apple juices and sugar, forming a syrupy, caramelized sauce that coats the apples and adds depth to their flavor. This step is crucial for achieving that irresistible moist and tender apple filling that contrasts beautifully with the crisp crust. It also contributes to the golden sheen of the fruit as it bakes, making the entire galette even more appealing. This small addition makes a big difference in the overall texture and taste profile of your homemade galette.
Baking the Honeycrisp Apple Galette (Step 5)
Oven Temperature and Time
With your beautiful Honeycrisp apple galette assembled and adorned, it’s time for it to meet the heat of the oven. Your oven should already be preheated to 400°F (200°C), which is the ideal temperature to kickstart the baking process. Place the parchment-lined baking sheet with the galette onto the center rack. Initially, the high temperature helps to quickly set the crust and begin the browning process. After about 15-20 minutes, reduce the oven temperature to 375°F (190°C). This adjustment allows the apples to cook through thoroughly without the crust browning too quickly. The total baking time will typically range from 35 to 50 minutes, depending on your oven and the thickness of your apples. Keep a close eye on it, especially during the latter half of baking.
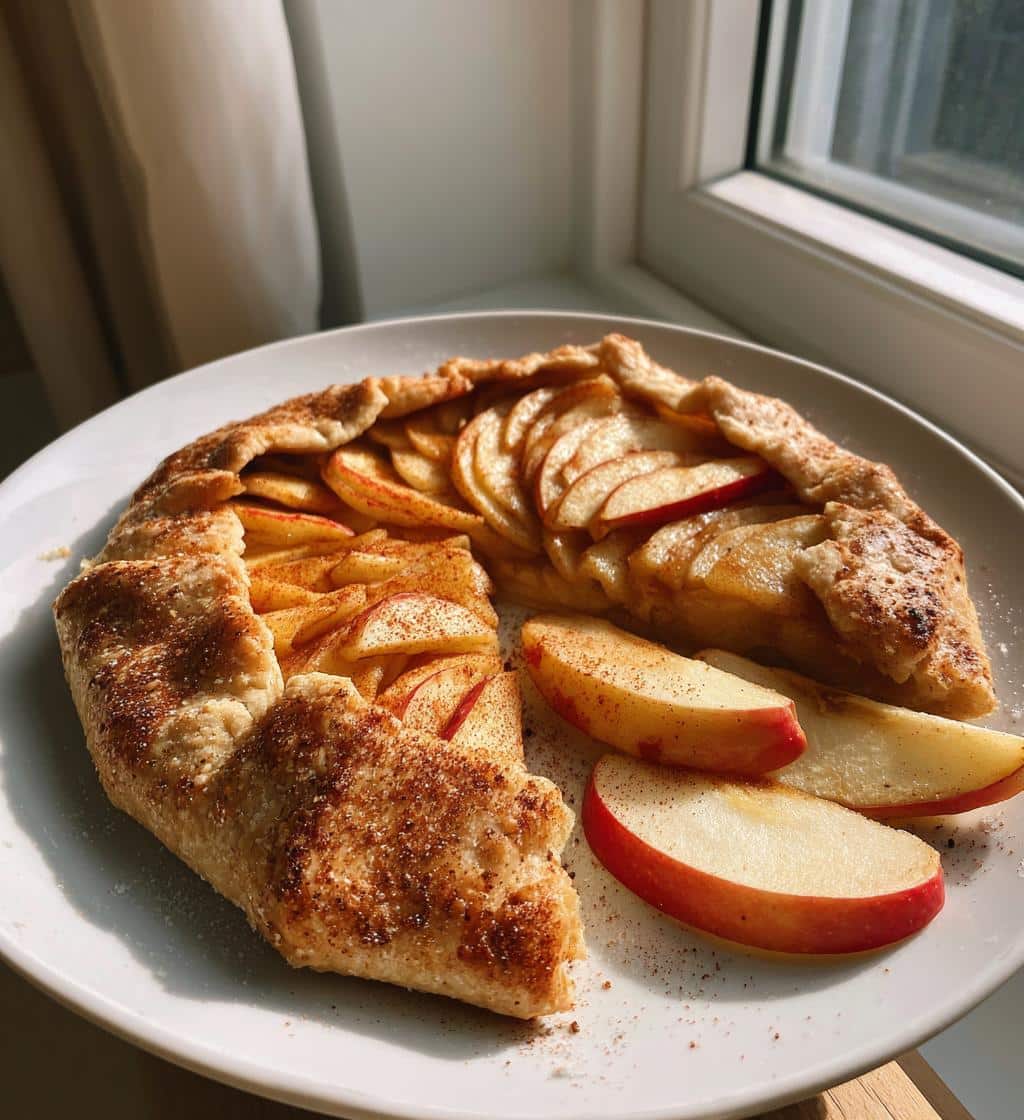
Achieving Golden Brown Crust
The hallmark of a perfectly baked galette is a crust that boasts a rich, golden-brown hue and a satisfying crispness. As your galette bakes, the edges of the crust will gradually darken. If you notice the edges are browning too quickly, you can loosely tent the galette with aluminum foil to protect them. The center of the crust, beneath the apples, should also be cooked through and lightly golden, preventing a soggy bottom. The apples themselves should be tender when pierced with a knife, and the juices around them should be bubbling and slightly thickened, indicating that the sugar has caramelized. An optional step to enhance the crust’s appearance and texture is to brush the exposed crust with an egg wash (one egg beaten with a tablespoon of water) before baking and sprinkle with a bit of turbinado sugar. This creates a beautiful sheen and a delightful sugary crunch, making your desserts even more enticing. For more cooking inspiration, check out our Pinterest page.
Serving Your Warm Galette
Best with Vanilla Ice Cream
After all the anticipation, the moment to enjoy your Honeycrisp apple galette has arrived! While delicious on its own, a warm galette truly reaches its peak when paired with a scoop of creamy vanilla ice cream. The cold, melting ice cream provides a delightful contrast to the warm, spiced apples and flaky crust. The simplicity of vanilla allows the vibrant flavors of the Honeycrisp apples and the subtle warmth of cinnamon and nutmeg to shine through without competition. As the ice cream slowly melts over the hot fruit, it creates a luscious sauce that intertwines with the caramelized apple juices. Beyond ice cream, other delicious accompaniments include a dollop of fresh whipped cream, a drizzle of warm caramel sauce, or even a sprinkle of toasted nuts for added crunch. Allow the galette to cool for about 10-15 minutes after removing it from the oven before slicing and serving. This allows the fruit filling to set slightly, making for cleaner slices and preventing it from being too runny. Serving it warm ensures the crust remains crisp and the apples are at their most tender and fragrant. This sweet apple treat is perfect for any occasion.
Storing Your Apple Galette
Keeping Leftovers Fresh
While a Honeycrisp apple galette is undoubtedly best enjoyed fresh and warm from the oven, you might find yourself with delightful leftovers. Proper storage is key to preserving its flavors and texture. Once the galette has completely cooled to room temperature, loosely cover it with plastic wrap or aluminum foil. If your kitchen is cool, it can be left on the counter for up to 24 hours. For longer storage, transfer the cooled galette to an airtight container and refrigerate it. Stored in the refrigerator, it will remain fresh for 2-3 days. The crust may lose some of its crispness when refrigerated, but the flavors of the apples will still be wonderful. To reheat, you can place individual slices in a microwave for a quick warm-up, but for best results, especially to revive the crust, reheat in an oven or toaster oven at 300°F (150°C) for about 10-15 minutes, or until warmed through and the crust is slightly crisp again. This method helps maintain the integrity of the pastry, making your homemade galette just as enjoyable the next day. Follow Carina Recipes on Instagram for more cooking inspiration.
Adjusting Galette Sweetness
Taste and Apple Variation
One of the beauties of making a Honeycrisp apple galette is the flexibility it offers in customizing the sweetness to your personal preference. The natural sweetness of apples can vary significantly depending on the variety, ripeness, and even the time of year. Honeycrisp apples are known for their sweet-tart balance, often requiring less added sugar than other varieties. Before adding the sugar to your sliced apples, it’s always a good idea to taste a slice or two of your specific batch of apples. If they are exceptionally sweet, you might reduce the granulated sugar by a tablespoon or two. Conversely, if your Honeycrisps are leaning more towards the tart side, or if you simply prefer a sweeter dessert, you can increase the sugar slightly. Beyond granulated sugar, you could also experiment with brown sugar for a deeper, molasses-like flavor, or even a touch of maple syrup for a nuanced sweetness. Remember, the goal is to enhance, not overpower, the natural deliciousness of the baking apples. Adjusting the sweetness ensures your galette is perfectly tailored to your palate, providing a truly personalized and delightful culinary experience.
Honeycrisp Apple Galette Nutrition
Calorie and Sugar Details
Understanding the nutritional aspects of your Honeycrisp apple galette can be helpful for those monitoring their intake. Since galettes are free-form and ingredients can vary, exact calorie and sugar details are estimated. Generally, a single slice of homemade apple galette, made with a standard pie crust, Honeycrisp apples, sugar, and butter, can range from approximately 250 to 400 calories. This variation depends heavily on the size of the slice, the amount of added sugar, and the richness of the pastry crust. The sugar content primarily comes from the natural sugars in the Honeycrisp apples themselves, combined with any added granulated sugar. A typical slice might contain 25-40 grams of sugar, with a significant portion being natural fruit sugars. It’s worth noting that the nutritional value is largely influenced by the ingredients chosen. For example, using a whole-wheat pie crust or reducing added sugar can slightly alter the calorie and sugar count. This rustic dessert offers fiber from the apples and some fat from the butter and crust. Like most desserts, it’s intended as an occasional sweet treat.
Understanding Serving Sizes
Determining an appropriate serving size for a Honeycrisp apple galette is also important for managing nutritional intake. Typically, a 12- to 14-inch galette is cut into 6-8 generous slices. A standard serving often refers to one of these slices. However, individual preferences and the context of the meal can influence what one considers a single serving. If the galette is being served as part of a larger meal, a smaller slice might be sufficient. If it’s a standalone dessert, a larger portion might be desired. It’s useful to remember that estimated values often assume a standard serving. The beauty of baking at home means you have control over the ingredients and can adjust them to fit dietary preferences, such as opting for a reduced-sugar version or a lighter crust. Always consider the overall dietary context when enjoying this delicious homemade pastry. For more information on various dishes, explore our recipe categories like easy honey garlic chicken for dinner inspiration.
Important Galette Notes
Estimated Values May Vary
When following any recipe, especially for baked goods like a Honeycrisp apple galette, it’s crucial to remember that certain values and outcomes can be approximate. Estimated values, such as calorie counts, sugar content, and even baking times, are provided as a general guideline. The exact nutritional information can fluctuate based on numerous factors, including the specific brands of ingredients used (e.g., different types of pie crusts, butter fat content), the ripeness and size of the Honeycrisp apples, and precise measurements. For instance, a “medium” apple can vary in weight and sugar content. Similarly, oven calibration can differ from one appliance to another, meaning your galette might require a few minutes more or less than the suggested baking time to achieve that perfect golden-brown crust and tender apple filling. Always use these estimates as a starting point and trust your judgment and observations in the kitchen. Learning to recognize visual cues, like the browning of the crust or the bubbling of the filling, will help you adapt the recipe to your specific conditions and ensure a consistently delicious homemade galette.
