
Your Favorite Toffee Recipe is simpler to create than you might imagine, offering a delightful homemade treat. This classic sweet is known for its buttery crunch and rich flavor. We provide clear steps, ensuring success from your very first attempt, making it an easy dessert for anyone to master at home.
Key Takeaways
- Making homemade toffee requires precise temperature control for perfect texture.
- High-quality butter and sugar are fundamental to achieving rich, buttery flavor.
- Constant stirring and a candy thermometer are crucial for preventing sugar crystallization.
- Personalize your crunchy toffee with various chocolate toppings and flavorful additions.
- Proper storage ensures your delicious sweet treat remains fresh and enjoyable for longer.
Making toffee is a rewarding kitchen skill. Simple ingredients combine wonderfully. Patience ensures perfect amber results. Enjoy customizing flavors and textures. Share this sweet happiness with others.
Your Favorite Toffee Recipe Journey
Embarking on the creation of your favorite toffee recipe is a delightful culinary adventure that yields a truly satisfying homemade toffee. This journey not only results in a delicious sweet treat but also provides a rewarding experience in your kitchen. Many assume making candy is difficult, but with clear instructions and a little patience, even novice bakers can achieve perfect results. This article breaks down the process into manageable steps, focusing on precision and technique to ensure your success. We’ll cover everything from selecting the right ingredients to the delicate art of cooking sugar, ultimately guiding you to a batch of golden, crunchy butter toffee that will impress everyone.
The appeal of making toffee yourself lies in the control you have over its quality and flavor. Unlike store-bought versions, your homemade toffee will contain only the freshest ingredients, free from unwanted additives. It’s an ideal project for those who love to bake and appreciate the charm of handcrafted confections. Get ready to transform basic pantry staples into a gourmet delight, proving that the best desserts are often those made with care right in your own kitchen.
What You Will Need
To begin your toffee recipe, gather a few essential tools and ingredients. You’ll need a heavy-bottomed saucepan, crucial for even heat distribution and preventing scorching. A reliable candy thermometer is indispensable for accurate temperature readings, ensuring your toffee reaches the perfect stage of doneness. Other necessities include a silicone spatula or wooden spoon for stirring, and a baking sheet lined with parchment paper or a silicone mat for cooling. Having these items ready before you start will make the process smooth and enjoyable, setting you up for success in creating your first batch of this delightful easy dessert.
Quick Preparation Times
While the overall process of making your favorite toffee recipe includes cooling time, the active preparation and cooking phases are surprisingly quick. Once your ingredients are measured and your equipment is set up, the actual time spent stirring over the heat is typically under 20 minutes. This makes toffee an excellent choice for a relatively fast sweet treat when you’re looking to whip up something special without spending hours in the kitchen. The efficiency of the cooking process means you’ll be enjoying your fresh, crunchy toffee in no time, making it a rewarding and time-friendly baking endeavor.
Gathering Toffee Ingredients (Essential)
The foundation of an exceptional batch of homemade toffee rests entirely on the quality and simplicity of its ingredients. You don’t need a lengthy list of specialty items; rather, the magic happens when everyday pantry staples are combined with precision and care. This section highlights the core components that make your butter toffee irresistibly rich and delicious. Opting for high-quality versions of these basic ingredients can significantly impact the final flavor and texture, transforming a simple candy into a gourmet sweet treat.
Understanding the role of each ingredient is key to mastering this toffee recipe. Fresh, unsalted butter, for instance, contributes to the deep, creamy flavor and helps prevent the mixture from separating. Granulated sugar provides the necessary sweetness and structure, forming the brittle base that defines traditional toffee. A touch of salt balances the sweetness, enhancing the overall taste profile. By focusing on these fundamental elements, you lay the groundwork for a truly outstanding dessert.
Pantry Staples for Toffee
For your favorite toffee recipe, you’ll need just a few primary ingredients. These are typically:
- Granulated Sugar: The main component for sweetness and structure.
- Unsalted Butter: Crucial for the rich, buttery flavor and smooth texture. Using unsalted butter allows you to control the salt level precisely.
- Water: Helps dissolve the sugar initially and prevents premature crystallization.
- Vanilla Extract: Added at the end for aromatic depth and warmth.
- Salt: A pinch of salt perfectly balances the sweetness, bringing out the complex flavors of the butter and sugar.
Ensuring these are fresh and good quality will make a noticeable difference in your crunchy toffee. These simple items, when combined correctly, create a classic flavor that is universally loved.
Optional Add-Ins for Toffee
Once you’ve mastered the basic butter toffee, you can begin experimenting with exciting variations. These optional add-ins allow you to customize your chocolate toffee and add layers of texture and flavor. Common additions include:
- Chocolate Chips: A layer of melted chocolate, either milk, semi-sweet, or dark, is a traditional topping. This creates a wonderful contrast with the crunchy toffee.
- Chopped Nuts: Almonds, pecans, or walnuts can be sprinkled over the melted chocolate or even incorporated into the toffee mixture itself during the final minutes of cooking. They add a delightful crunch and nutty flavor.
- Sea Salt Flakes: A sprinkle of flaky sea salt over the chocolate layer enhances the sweetness and adds a sophisticated touch.
- Spices: A dash of cinnamon or cardamom can introduce an unexpected warmth.
These additions transform your simple toffee recipe into a gourmet confection, allowing for endless creativity and personal preference. Don’t be afraid to try new combinations to find your ultimate sweet treat.
Toffee Recipe: Combining Basics
The initial phase of your favorite toffee recipe is where the simple ingredients begin their transformation into a rich, complex confection. This stage, though seemingly straightforward, is critical for laying the groundwork for perfect crunchy toffee. Combining the butter, sugar, and water correctly at the outset helps in preventing issues like sugar crystallization and ensures an even cooking process. Precision here sets the tone for the entire batch, moving you closer to that golden, irresistible result. Pay close attention to these steps to ensure a smooth journey to your delightful homemade toffee.
It’s important to select a heavy-bottomed pot to distribute heat evenly and prevent burning. This small detail can make a big difference in the success of your butter toffee. Remember, consistency from the start leads to excellent results, proving that even an easy dessert can benefit from careful technique. Taking your time during this initial combining phase will pay off as the mixture cooks, producing a superior texture and flavor.
Starting the Mixture
To begin your toffee recipe, combine the measured granulated sugar and water in your heavy-bottomed saucepan. Stir them gently over medium heat until the sugar completely dissolves. This initial step is vital because undissolved sugar crystals can lead to a grainy texture in your finished sweet treat. Once the sugar is dissolved, add the cold, cubed unsalted butter to the mixture. The colder butter helps to slow down the heating process slightly, allowing for more controlled melting and integration. Continue stirring gently until the butter is fully melted and incorporated, forming a smooth, uniform base for your future crunchy toffee.
Why Constant Stirring Helps
Constant, gentle stirring during the initial cooking phase of your toffee recipe is paramount for several reasons. Firstly, it ensures that the heat is evenly distributed throughout the mixture, preventing hot spots that can cause burning. Secondly, it helps to keep the sugar dissolved and prevents the formation of unwanted sugar crystals on the sides of the pan. These crystals can fall back into the mixture, causing the entire batch to become grainy instead of smooth and brittle. Thirdly, continuous stirring promotes uniform cooking, ensuring that your homemade toffee develops its characteristic golden color and rich flavor evenly. This dedication to stirring is a small effort that yields significant rewards in the quality of your finished butter toffee.
Cooking for Deep Amber Toffee
The cooking stage is arguably the most crucial part of perfecting your favorite toffee recipe. This is where the simple sugar and butter mixture undergoes a magical transformation, developing its signature deep amber color and rich, complex flavor. Achieving the right temperature and color is key to ensuring your crunchy toffee has that desired brittle texture rather than being too soft or burnt. This process requires attentiveness and precision, but the reward of perfectly cooked homemade toffee is well worth the effort. Mastering this step is a hallmark of truly great desserts.
The Maillard reaction and caramelization occur during this phase, creating hundreds of new flavor compounds that elevate the simple butter and sugar into something extraordinary. This is where your patience and careful observation will truly shine, leading to a perfectly balanced sweet treat. Don’t rush this stage; let the heat and time work their magic, and you’ll be on your way to a truly remarkable batch of butter toffee.
Watching for Perfect Color
As your toffee recipe cooks, keep a keen eye on the color change. Initially, the mixture will be pale yellow, but as it heats, it will gradually darken. You are aiming for a rich, deep amber color, similar to a penny or dark caramel. This color indicates that the sugars have caramelized sufficiently, developing a complex flavor. A pale color suggests undercooking, resulting in a softer, chewier toffee. Conversely, if it becomes too dark, it will taste burnt and bitter. The transition from golden to deep amber happens quickly in the final stages, so continuous visual monitoring is vital for achieving that perfect, flavorful crunchy toffee.
Using a Candy Thermometer
For consistent and perfect homemade toffee, a candy thermometer is your best friend. It provides the exact temperature readings needed to achieve the right texture. For classic brittle toffee, you’re typically aiming for a temperature between 300°F (149°C) and 310°F (154°C), which corresponds to the “hard crack” stage. Attach the thermometer to the side of your pot, ensuring the bulb is submerged in the mixture but not touching the bottom of the pan. Relying solely on color can be deceptive, especially in different lighting conditions. A thermometer removes the guesswork, guaranteeing that your toffee recipe reaches its ideal point for a crisp, firm set every single time, making it an indispensable tool for baking tips.
Adding Vanilla for Sweetness
The addition of vanilla extract is a pivotal moment in refining your favorite toffee recipe. While the butter and caramelized sugar provide the core flavors, a good quality vanilla extract introduces a layer of warmth, depth, and fragrant sweetness that elevates the entire confection. It harmonizes with the rich butteriness and caramel notes, enhancing the overall profile of this beloved sweet treat. However, timing is everything when it comes to vanilla in candy making.
Because vanilla extract is alcohol-based, adding it too early in the cooking process would cause the alcohol to evaporate, taking much of the delicate flavor with it. Therefore, it is traditionally stirred in right at the very end, once the toffee has reached its target temperature and has been removed from the heat. This allows the vanilla’s aromatic compounds to infuse into the hot mixture without dissipating. A good rule of thumb is to add it carefully, as the mixture will bubble vigorously. This final touch ensures your homemade toffee possesses that comforting, familiar flavor that makes it truly irresistible, creating a memorable easy dessert for anyone.
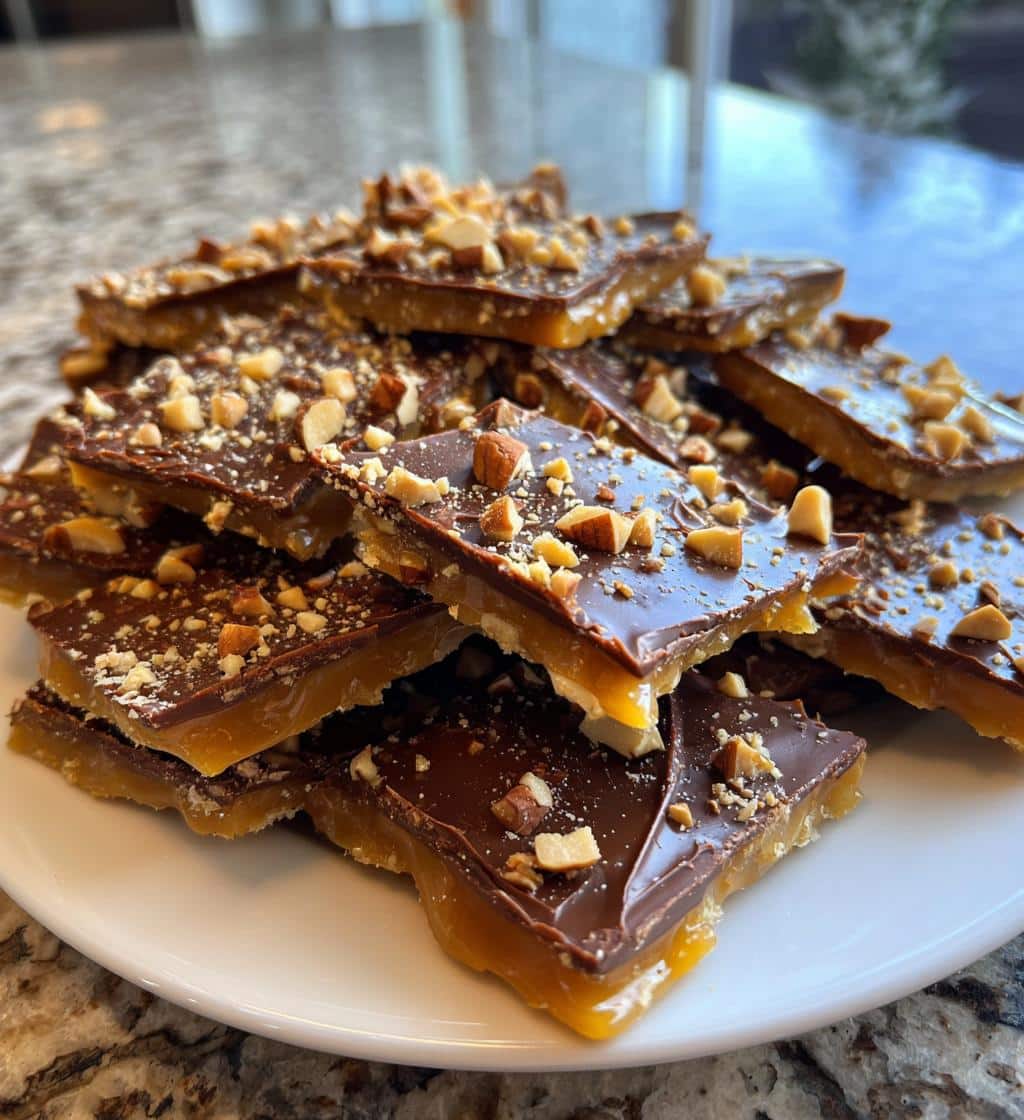
Finishing with Chocolate and Nuts
Once your golden butter toffee has reached its perfect amber hue and been infused with vanilla, the next exciting step in your toffee recipe is to finish it with complementary toppings. The combination of rich chocolate and crunchy nuts not only adds layers of flavor and texture but also transforms your simple brittle into a truly decadent chocolate toffee masterpiece. This stage allows for creative expression, letting you customize your sweet treat to suit personal preferences or seasonal themes. It’s the perfect opportunity to make your homemade toffee truly unique and visually appealing.
The contrast between the crisp, buttery toffee and the smooth, melting chocolate, topped with savory nuts, is what makes this dessert so universally appealing. It adds a luxurious finish that makes your toffee feel gourmet and special, perfect for sharing or gifting. Make sure you have your toppings ready and waiting, as this step moves quite quickly once the hot toffee is spread.
Melting Chocolate Chips Smoothly
After pouring the hot toffee onto your prepared baking sheet, immediately sprinkle an even layer of chocolate chips over the hot surface. The residual heat from the toffee will begin to melt the chips. Let them sit for 5-7 minutes without touching them. This allows the chocolate to soften uniformly. Then, using an offset spatula or the back of a spoon, gently spread the melted chocolate across the entire surface of the toffee in a smooth, even layer. For the best chocolate toffee, ensure full coverage, reaching close to the edges. You can use milk, dark, or white chocolate, depending on your preference for this delightful dessert variation.
Spreading and Adding Toppings
Once the chocolate is smoothly spread, this is your cue to add any additional toppings. While the chocolate is still warm and tacky, sprinkle your chosen nuts—like finely chopped almonds, pecans, or walnuts—evenly over the surface. If you’re adding sea salt flakes, scatter them at this point as well. Press the toppings down gently to ensure they adhere to the melting chocolate. The quicker you work, the better the toppings will stick as the chocolate begins to set. This rapid process ensures all elements integrate beautifully into your delicious crunchy toffee, creating a delightful texture and flavor contrast in your easy dessert.
Cooling and Breaking Toffee
After the exciting final touches of chocolate and nuts, the next critical step for your favorite toffee recipe is allowing it to cool completely. This cooling period is not just about bringing the temperature down; it’s essential for the toffee to set properly and develop its characteristic brittle, “hard crack” texture. Rushing this stage can lead to a chewy or crumbly result, rather than the satisfying snap of true crunchy toffee. Patience here is truly a virtue, ensuring all your hard work translates into the perfect final product.
Once fully cooled, the fun part begins: breaking your beautiful sheet of homemade toffee into irregular, delicious pieces. This natural breaking creates unique shapes, making each bite an individual pleasure. The sound of the crisp snap as you break it signifies a job well done, confirming that you’ve achieved the ideal consistency for your delectable sweet treat. This method is often the simplest and most satisfying way to portion your confection.
Allow the toffee to cool undisturbed on the baking sheet at room temperature. Depending on your kitchen’s ambient temperature, this can take anywhere from one to two hours. For faster cooling, you can carefully place the baking sheet in the refrigerator for about 30-45 minutes, but avoid leaving it in for too long, as this can sometimes cause the chocolate to bloom (a white film to appear) or the toffee to sweat when it returns to room temperature. The toffee is ready to break when it is completely hard and rigid, making a sharp sound when tapped. Once firm, simply lift the parchment paper or silicone mat from the baking sheet. You can then either use your hands to break the large sheet into smaller, irregular pieces, or for more uniform shapes, use a sharp, heavy knife to score and then break the toffee. Be careful, as the edges can be sharp. Each piece of your butter toffee will be a testament to your careful craftsmanship.
Storing Your Delicious Toffee
Proper storage is just as important as the preparation for maintaining the quality and freshness of your homemade toffee. Incorrect storage can lead to sticky, soft, or even stale toffee, diminishing all the effort you put into creating this delightful sweet treat. To ensure your crunchy toffee retains its crisp texture and rich flavor for as long as possible, it’s crucial to understand the best methods for protection against moisture and air. Following these guidelines will allow you to enjoy your carefully crafted easy dessert over several days or even weeks.
The main enemies of toffee are humidity and warmth. Both can cause the sugar to absorb moisture, leading to a sticky texture. By adopting the right storage techniques, you can extend the shelf life of your delicious confection, making sure every piece is as good as the first. This is a vital part of your toffee recipe journey, completing the cycle from creation to enjoyment.
Airtight Container Tips
Toffee is highly susceptible to moisture, which can quickly turn its desirable crunch into an unwelcome chewiness. Therefore, storing your homemade toffee in an airtight container is paramount. Choose a container with a tight-fitting lid to create a barrier against humidity. For extra protection, you can layer the toffee pieces with parchment paper to prevent them from sticking together. A desiccant packet (like those found in shoe boxes) can also be added to absorb any lingering moisture, though this is often unnecessary if the container is truly airtight. This method ensures your butter toffee remains wonderfully crisp, preserving its texture and flavor for enjoyment over time.
Room Temperature vs. Refrigeration
For optimal texture, most toffee recipe variations, especially those without chocolate, are best stored at cool room temperature (around 65-70°F or 18-21°C) in an airtight container. If your toffee is coated with chocolate, refrigeration can help prevent the chocolate from melting, but it might make the toffee slightly harder and prone to “sweating” (developing condensation) when brought back to room temperature. If you must refrigerate, place the toffee in an airtight container and allow it to come to room temperature slowly before serving to minimize condensation. Freezing is also an option for extended storage; wrap portions tightly in plastic wrap, then place them in an airtight freezer bag. Thaw at room temperature for a delicious sweet treat that lasts.
Toffee Recipe Variations to Try
Once you’ve mastered the classic favorite toffee recipe, a world of exciting variations opens up, allowing you to continually refresh and personalize this delightful sweet treat. Experimenting with different flavors and textures is one of the most rewarding aspects of homemade baking, transforming a simple foundation into a diverse array of confections. These toffee variations allow for endless creativity, making your homemade toffee adaptable for any occasion or preference. You might even find yourself creating a new family favorite!
From subtle changes in chocolate type to bold additions of spices or extracts, each modification offers a unique sensory experience. Exploring these options not only expands your culinary repertoire but also deepens your understanding of how different ingredients interact. For more inspiration on toffee making and similar confections, consider delving into other creative dessert recipes that challenge and delight.
Different Chocolate Types
The type of chocolate you choose for your toffee recipe can dramatically alter its flavor profile.
- Milk Chocolate: Offers a creamy, sweeter finish, ideal for those who prefer a classic, milder taste.
- Dark Chocolate: Provides a rich, slightly bitter contrast to the sweet toffee, appealing to sophisticated palates. Look for varieties with 60% cacao or higher.
- White Chocolate: A sweeter, buttery option that can be infused with flavors like peppermint or orange zest for unique twists.
- Semisweet Chocolate: A versatile choice that offers a good balance between sweetness and cocoa intensity.
Feel free to combine different chocolates or swirl them together for a marbled effect, creating visually stunning and uniquely flavored chocolate toffee that perfectly complements the crunchy toffee base. Consider also trying out different cookie recipes for another sweet adventure.
Fun Flavor Additions
Beyond chocolate, there are numerous ways to introduce new dimensions to your homemade toffee.
- Spices: A pinch of cinnamon, nutmeg, or even a dash of cayenne pepper (for a sweet-and-spicy kick) can be added to the toffee mixture during the last minute of cooking.
- Extracts: Replace or complement vanilla with almond, peppermint, or orange extract, added at the very end.
- Citrus Zest: Finely grated orange or lemon zest can be sprinkled over the melted chocolate or added with the vanilla for a bright, refreshing note.
- Dried Fruits: Dried cranberries or cherries, finely chopped, can be scattered over the chocolate layer with nuts.
- Crushed Candies: Bits of crushed peppermint candy, pretzels, or even chili flakes can add an interesting texture and flavor to your easy dessert, making each piece a delightful surprise.
These additions transform the basic butter toffee into an exciting and personalized confection, perfect for any occasion. These toffee variations make your baking experience even more creative and fun.
Toffee Nutrition Facts Per Piece
Understanding the nutrition facts for your homemade toffee can help in enjoying this delightful sweet treat responsibly. While toffee is undeniably indulgent, being aware of its caloric and macronutrient content allows for informed consumption decisions. Keep in mind that homemade versions can vary significantly depending on ingredient ratios and any added toppings like chocolate or nuts. This information is typically an estimate, providing a general idea rather than precise figures, but offers valuable insights for those mindful of their dietary intake, especially when enjoying an easy dessert like toffee.
Homemade toffee primarily consists of sugar and butter, making it a calorie-dense food. It generally contains carbohydrates from sugar, fats from butter and chocolate (if added), and minimal protein. While it doesn’t offer significant micronutrients, its value lies in being a satisfying treat. Moderation is key to enjoying your crunchy toffee without overindulging, making it a perfect occasional pleasure rather than a daily staple.
Understanding Serving Size
When looking at toffee nutrition facts, the concept of “per piece” can be misleading if not clearly defined, as homemade pieces vary greatly in size. A typical serving size for a rich sweet treat like toffee might be considered a small, approximately 1-inch by 1-inch piece. For instance, a small piece of plain butter toffee (without chocolate or nuts) could range from 80-120 calories, with varying amounts of fat and carbohydrates. Adding chocolate and nuts will increase both calorie and fat content. It’s important to portion your homemade toffee into consistent sizes to accurately track your intake. By being mindful of serving size, you can savor your favorite toffee recipe while maintaining a balanced diet, making it a treat you can enjoy guilt-free.
Expert Tips for Best Toffee
Achieving consistently perfect homemade toffee requires more than just following a recipe; it often comes down to mastering a few expert baking tips and techniques. These insights can help prevent common pitfalls and ensure your butter toffee turns out with the ideal brittle texture and rich flavor every time. From managing sugar crystallization to fine-tuning the crunchiness, these advanced pointers will elevate your toffee-making skills and result in a truly exceptional sweet treat. Pay close attention to these details, and you’ll soon be creating toffee that rivals any confectionery.
Many subtle factors can influence the final outcome, so understanding these nuances is key to becoming a true toffee artisan. These tips are invaluable for anyone looking to refine their technique and consistently produce high-quality confections. For more engaging baking ideas and visual inspiration, make sure to check out our Pinterest page, where we share many helpful guides and recipes.
Preventing Sugar Crystals
One of the most common challenges in making toffee recipe is preventing sugar crystallization, which can make your toffee grainy instead of smooth and brittle. Here are some effective baking tips:
- Dissolve Sugar Completely: Before the mixture boils, ensure all sugar crystals are dissolved by stirring gently over low heat.
- Wash Down Sides of Pan: Use a pastry brush dipped in water to brush down any sugar crystals clinging to the sides of the pan. These crystals can act as “seeds” for crystallization.
- Avoid Over-Stirring: Once the mixture begins to boil, stirring too vigorously can agitate the sugar crystals and encourage them to reform. Stir gently and only when necessary.
- Add Acid: A tiny pinch of cream of tartar or a few drops of lemon juice (about 1/4 teaspoon per cup of sugar) can inhibit crystal formation.
Following these steps will help you achieve a beautifully smooth and crunchy homemade toffee.
Adjusting Crunchiness Level
The desired crunchiness of your crunchy toffee is directly related to the final temperature it reaches during cooking.
- For a Chewier Toffee: Cook toffee to a lower temperature, around 290-295°F (143-146°C), which is the soft crack stage. This will result in a slightly chewier, but still firm, consistency.
- For Classic Hard Crack Toffee: Aim for 300-310°F (149-154°C). This is the hard crack stage, producing the signature brittle snap.
- For Extra-Hard Brittle: Cooking toffee closer to 310°F (154°C) will yield an even harder, more brittle texture.
Always use a reliable candy thermometer and remember that the temperature will continue to rise slightly after you remove it from the heat. Monitoring the temperature closely allows you to perfectly customize the texture of your favorite toffee recipe. For more daily cooking inspiration and techniques, follow our Instagram account!
Enjoying Your Sweet Toffee Happiness
There’s nothing quite like the satisfaction of creating and savoring your own homemade toffee. This journey from simple ingredients to a delectable sweet treat culminates in the joyous act of enjoying your hard work. Whether you’re sharing it with loved ones, gifting it for a special occasion, or simply indulging in a quiet moment of personal delight, each piece of your favorite toffee recipe carries the warmth and care you put into its creation. It’s more than just a candy; it’s a small piece of culinary happiness, crafted right in your kitchen.
The rich, buttery flavor and satisfying crunch of your crunchy toffee are sure to bring smiles. Remember the precision, the patience, and the touch of creativity that went into making it. This easy dessert is a testament to the joy of baking and the simple pleasure of a well-made confection. So, go ahead, take another bite, and truly enjoy your moment of sweet toffee happiness.
