
Red Velvet Cake Balls are a delightful confection, perfect for any occasion. These sweet bites combine the rich flavor of red velvet cake with a creamy, tangy frosting, all coated in a shell of chocolate. This easy recipe helps you create homemade treats that impress with minimal effort, making them an instant favorite.
Key Takeaways
- Bake your red velvet cake and allow it to cool completely before crumbling.
- Mix crumbled cake with cream cheese frosting to form uniform, small balls.
- Chill cake balls thoroughly for at least 30 minutes to ensure easier dipping.
- Melt chocolate wafers smoothly and coat each cake ball evenly for a perfect finish.
- Store finished cake balls in an airtight container in the refrigerator for freshness.
- Customize with sprinkles or try different coatings and cake flavors for variety.
These treats are simple to make. They blend cake and frosting perfectly. Dipping adds a lovely chocolate layer. Chilling ensures a firm bite. Enjoy this delightful dessert.
Red Velvet Cake Balls: Sweet Treat
Why make these delightful bites?
Red Velvet Cake Balls are more than just a dessert; they are a celebration in miniature. These delightful bites offer a convenient and mess-free way to enjoy the classic taste of red velvet cake, perfect for parties, potlucks, or a simple indulgence. Their small size makes them easy to serve and enjoy, while their vibrant color and rich flavor make them an instant crowd-pleaser. Forget the fuss of slicing a whole cake; these cake balls provide individual portions of pure bliss. They are also incredibly versatile, allowing for various customizations to suit any palate or occasion. Imagine a platter of these beautiful, bite-sized snickerdoodle cobbler or red velvet treats at your next gathering – they disappear fast!
What makes them so heavenly?
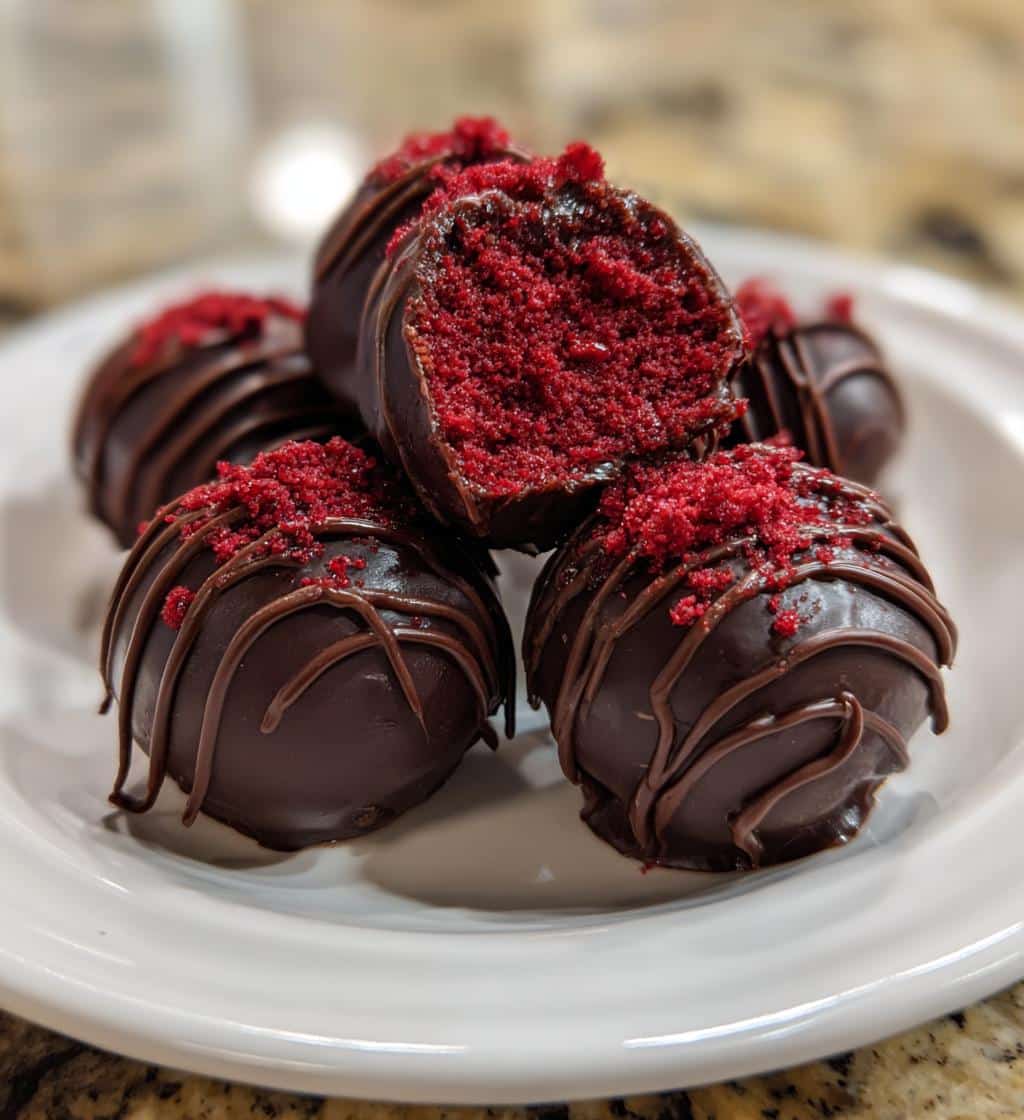
The heavenly appeal of red velvet cake balls lies in their perfect balance of flavors and textures. Each bite features a moist, tender crumb of red velvet cake, infused with a hint of cocoa and that signature tang. This cake base is then combined with a rich, creamy cream cheese frosting, creating an irresistible interior that’s both sweet and slightly tart. Finally, a smooth, crisp chocolate coating encases the entire treat, adding another layer of texture and sweetness. The contrast between the soft interior and the firm exterior is what truly makes these red velvet cake balls a heavenly experience. They embody comfort and sophistication, all rolled into one perfect little sphere. The simple yet profound combination of these elements elevates a traditional cake into an extraordinary sweet treat.
Gather Your Cake Ball Ingredients
List of essential items
Before you begin your red velvet cake ball adventure, it’s crucial to have all your ingredients ready. This ensures a smooth and enjoyable baking process. You will need a box of red velvet cake mix (or ingredients for a homemade cake), cream cheese, butter, powdered sugar, vanilla extract, and chocolate melting wafers. You might also want sprinkles or other decorations for customizing your finished treats. Having everything measured and prepped beforehand, often called “mise en place,” can significantly reduce stress and help you maintain focus as you create these delightful peanut butter brownie swirl cookies or cake balls. Consider quality for your ingredients; fresh cream cheese and good quality chocolate wafers will make a noticeable difference in the final taste and texture of your cake balls. Don’t forget basic baking tools like mixing bowls, spatulas, and a baking sheet.
Cake mix and frosting needs
For the cake component, a standard box of red velvet cake mix works wonderfully and simplifies the process significantly. Follow the package directions for the cake mix, usually requiring eggs, oil, and water. For the frosting, which is crucial for binding the cake crumbs and adding that signature flavor, you’ll need softened cream cheese, unsalted butter (also softened), powdered sugar, and a touch of vanilla extract. This homemade cream cheese frosting is far superior to store-bought varieties for this application, offering a richer flavor and better binding consistency. Ensure your cream cheese and butter are at room temperature to achieve a lump-free, creamy frosting. The quantity of frosting is important; too little, and the balls won’t hold together; too much, and they might become overly soft. Aim for a frosting that is thick enough to hold its shape but still spreadable, ensuring your red velvet cake balls are perfectly moist and flavorful.
Baking The Red Velvet Cake Base
Preheat oven and prepare mix
The foundation of your red velvet cake balls starts with a perfectly baked cake. Begin by preheating your oven to the temperature specified on your red velvet cake mix box, typically around 350°F (175°C). While the oven preheats, prepare your cake batter according to the package instructions, usually combining the mix with water, oil, and eggs. Beat until smooth, then pour evenly into a greased 9×13 inch baking pan. This straightforward step is crucial for achieving a consistently textured cake, which will later form the moist and flavorful core of your cake balls. For more delicious desserts, visit our category page.
Bake until cake is ready
Place the pan in the preheated oven and bake for the recommended time, usually 28-32 minutes. Test for doneness by inserting a wooden skewer or toothpick into the center; it should come out clean. Avoid overbaking, as this can lead to a dry cake, affecting the moisture and texture of your cake balls. A perfectly baked red velvet cake will be tender and moist.
Allow cake to cool completely
This step is vital. Once out of the oven, let the cake cool in the pan for 10-15 minutes, then invert onto a wire rack to cool completely to room temperature. Attempting to crumble or mix a warm cake will result in a greasy, mushy mixture that won’t form proper balls. Patience here ensures the ideal crumbly texture needed for mixing with the frosting.
Creating Cake Ball Mixture Magic
Crumble cooled cake easily
Once your red velvet cake is thoroughly cooled, it’s time to transform it into the base for your cake balls. The easiest way to do this is to simply crumble the entire cake into a large mixing bowl using your hands. Break it down into fine, even crumbs. Ensure there are no large chunks remaining, as these will disrupt the smooth texture of your cake balls. This step is quite satisfying and requires no special tools; your hands are the best instruments here. Make sure your cake is truly cool, as warmth can make the crumbling process messy and the resulting mixture greasy, rather than a light, airy crumb.
Mix with cream cheese frosting
Now for the magic! Add your prepared cream cheese frosting to the crumbled cake. Start with about two-thirds of the frosting, and then add more gradually until you achieve the desired consistency. You want a mixture that is moist enough to hold its shape when pressed together but not so wet that it’s sticky or greasy. Use your hands to thoroughly combine the cake crumbs and frosting, ensuring an even distribution. This mixture forms the delectable core of your red velvet cake balls, providing both structure and flavor. The tangy cream cheese complements the red velvet perfectly, creating a truly irresistible blend.
Form small, uniform balls
With your cake and frosting mixture ready, it’s time to roll! Take small portions of the mixture, about one tablespoon each, and roll them gently between your palms to form smooth, uniform balls. Aim for consistency in size so that all your cake balls bake and set evenly, and look professional. A small cookie scoop can help you measure out consistent portions before rolling. Place the formed balls onto a baking sheet lined with parchment paper. This parchment paper prevents sticking and makes the next step, chilling, much easier. Rolling uniform balls ensures a pleasant eating experience and an attractive presentation for your finished red velvet cake balls.
Chilling For Perfect Cake Balls
Refrigerate for at least 30 minutes
After forming your red velvet cake balls, the next crucial step is chilling. Arrange your formed cake balls on a parchment-lined baking sheet and place them in the refrigerator for at least 30 minutes. Ideally, an hour or even longer is better, especially if you have the time. This chilling period allows the cake and frosting mixture to firm up considerably. The butter and cream cheese in the frosting will solidify, making the balls much more stable and less prone to falling apart during the dipping process. Rushing this step can lead to frustration, as warm, soft balls are difficult to coat neatly. This cooling also helps merge the flavors, enhancing the overall taste of your delightful treats.
Ensures easier dipping
The primary reason for thoroughly chilling your cake balls is to ensure easier and more successful dipping. When the balls are firm and cold, they are much easier to handle. They won’t lose their shape or crumble when you insert a skewer or toothpick, or when you gently drop them into melted chocolate. The cold surface also helps the melted chocolate set faster, creating a smoother and more even coating without excess dripping. This cold contrast is key to achieving that professional, glossy finish on your red velvet cake balls. Without proper chilling, you might find the chocolate coating becoming too thick or uneven, and the balls themselves might soften and become unwieldy, making the final presentation less appealing. Proper chilling makes all the difference for a beautiful, smooth chocolate exterior.
Dipping Red Velvet Cake Balls
Melt chocolate wafers smoothly
Dipping brings your red velvet cake balls to life. Use quality chocolate melting wafers for a smooth, crisp shell. Melt them gently in a double boiler or microwave in 30-second intervals, stirring until fluid and glossy. Avoid overheating to prevent seizing. A well-melted chocolate flows easily, simplifying the dipping process. You can even try white chocolate coating for a stunning visual contrast.
Coat each cake ball evenly
With melted chocolate and chilled cake balls, carefully pick up each ball with a skewer or dipping tool. Submerge it fully, ensuring even coating. Gently tap off excess chocolate for a thin, consistent layer. Place the coated ball back on parchment paper. Add sprinkles immediately if desired, while the chocolate is still wet. Work efficiently for a clean, attractive finish on every single red velvet cake ball.
Let chocolate set firm
Allow the chocolate coating to set completely. This can be done at room temperature in a cool environment or by refrigerating for 15-20 minutes. The chocolate should become firm and dry to the touch, forming a protective and appealing outer layer. This firm shell enhances presentation and helps keep your homemade treats fresh. Patience in this final step ensures the best possible result.
Tips For Best Red Velvet Cake Balls
Ensure cake is fully cool
This cannot be stressed enough: your red velvet cake must be completely cool before crumbling and mixing. A warm cake will release steam and moisture, resulting in a greasy, mushy mixture that won’t form into neat balls. It also makes the final product less appealing in texture. Plan ahead and allow at least an hour or two for cooling, or even bake the cake the day before. This simple tip prevents many common cake ball issues and ensures a perfectly textured base for your delightful treats.
Add enough cream cheese
The cream cheese frosting is not just for flavor; it’s also the binder that holds your cake balls together. Don’t be shy with it, but also don’t drown the cake crumbs. Start by adding about two-thirds of your prepared frosting to the crumbled cake, then gradually add more until the mixture is moist enough to easily form a ball without crumbling apart or feeling too wet. The exact amount can vary slightly depending on the moisture content of your cake. The goal is a pliable, moldable consistency. This balance is key to achieving the desired texture and structural integrity of your red velvet cake balls.
Roll balls same size
For a professional look and consistent cooking/setting, aim to roll all your cake balls to roughly the same size. Using a small cookie scoop or a measuring spoon (like a tablespoon) to portion out the mixture before rolling can be incredibly helpful. Uniformly sized balls also ensure they fit nicely into small cupcake liners for serving and make for an aesthetically pleasing presentation. Consistency in size also means a more even coating during the dipping process. This small detail significantly elevates the overall appearance of your homemade red velvet cake balls.
Customize Your Cake Balls
Add fun sprinkles on top
Personalize your red velvet cake balls with fun sprinkles. Immediately after dipping in chocolate, add your chosen decorations for holidays, special events, or just a cheerful look. Sprinkles enhance visual appeal and add a subtle crunch, making each bite more exciting. Get creative with various shapes and colors to make your cake balls truly stand out.
Try white chocolate coating
For a stunning visual contrast and different flavor, use white chocolate coating. Its creamy sweetness beautifully complements the tangy red velvet. White chocolate offers a blank canvas for colorful sprinkles or dark chocolate drizzles. Melt it carefully, as it can seize easily. White-coated cake balls are particularly striking for elegant occasions.
Explore different cake flavors
Beyond red velvet, the cake ball concept is highly versatile. Experiment with various cake flavors like chocolate fudge, zesty lemon, or playful funfetti. Pair different cake bases with complementary frostings and coatings. This creative freedom allows you to tailor your cake balls to themes or preferences. The possibilities for delicious dessert adventures are endless.
Storing Your Heavenly Bites
Use an airtight container
Proper storage is key to keeping your red velvet cake balls fresh and delicious. Always store them in an airtight container. This prevents them from drying out, absorbing odors from other foods in the refrigerator, and helps maintain their moist texture. A good quality airtight container will seal in the freshness, ensuring that each bite is as delightful as the first. Layer them carefully, using parchment paper between layers if necessary, to prevent them from sticking together or damaging their delicate chocolate coating. This also makes it easy to grab just a few whenever a sweet craving strikes.
Keep in the refrigerator
Due to the cream cheese frosting, red velvet cake balls must be stored in the refrigerator. They will remain fresh for up to one week when properly refrigerated. Keeping them chilled also ensures the chocolate coating stays firm and prevents the cake balls from becoming too soft. If you plan to serve them, you can take them out of the refrigerator about 15-20 minutes beforehand to allow them to come to a slightly softer, more enjoyable temperature, though many people enjoy them straight from the fridge. Always store any leftover cake balls back in the refrigerator promptly to maintain their quality and safety.
Freezing Cake Balls For Later
How to freeze properly
If you’ve made a large batch or want to enjoy red velvet cake balls over an extended period, freezing is an excellent option. To freeze them properly, first ensure the chocolate coating is completely set. Then, arrange the cake balls in a single layer on a baking sheet and flash freeze them for about 30 minutes to an hour. This prevents them from sticking together. Once individually frozen, transfer them to a freezer-safe, airtight container or a heavy-duty freezer bag. They can be stored in the freezer for up to 1-2 months. Label the container with the date for easy tracking. Freezing allows you to have these delightful treats on hand for unexpected guests or sudden dessert cravings.
Thawing instructions
When you’re ready to enjoy your frozen red velvet cake balls, simply transfer them from the freezer to the refrigerator. Allow them to thaw slowly in the refrigerator for several hours, or overnight, still in their airtight container. This slow thawing process helps maintain their texture and prevents condensation from forming excessively on the chocolate coating. Avoid thawing them at room temperature for extended periods, especially if they have cream cheese frosting. Once thawed, they can be enjoyed chilled or allowed to sit at room temperature for a few minutes before serving, just like freshly made ones. Enjoy your convenient, pre-made dessert bliss!
Nutrition Of Red Velvet Cake Balls
Calories per serving
Red Velvet Cake Balls, while undeniably delicious, are rich and indulgent. The calorie count per serving can vary significantly based on the size of the cake balls, the specific ingredients used (e.g., full-fat vs. reduced-fat cream cheese, type of chocolate), and whether you use a boxed cake mix or a homemade recipe. Generally, one medium-sized red velvet cake ball might range from 150 to 250 calories. This estimate includes the cake base, cream cheese frosting, and chocolate coating. It’s important to consider these as occasional treats rather than a daily snack. If you are tracking your caloric intake, using smaller portions or adjusting ingredients can help manage the overall calorie count of these sweet delights.
Sugar and fat content
Given their sweet and creamy nature, red velvet cake balls typically have a moderate to high sugar and fat content. The sugar comes from the cake mix, powdered sugar in the frosting, and the chocolate coating. The fat content is primarily from the butter and cream cheese in the frosting, as well as the oil in the cake mix and the fats in the chocolate. While these components contribute to the heavenly taste and texture, moderation is key. For those mindful of their sugar and fat intake, options like using less frosting, opting for darker chocolate (which usually has less sugar), or reducing portion sizes can be considered. Enjoy these treats as part of a balanced diet, appreciating their special place as a delightful dessert.
Enjoying Your Red Velvet Bliss
Perfect for sharing
Red Velvet Cake Balls are inherently designed for sharing. Their bite-sized nature makes them ideal for dessert platters at parties, family gatherings, or holiday celebrations. They are easy to pick up, require no cutlery, and offer a satisfying pop of flavor in every mouth-watering bite. Arrange them artfully on a serving dish, perhaps in small cupcake liners, to showcase their vibrant color and inviting appeal. These delightful treats are a fantastic way to spread joy and sweetness, becoming a conversation starter and a memorable highlight of any event. Sharing these homemade red velvet cake balls creates moments of pure bliss among friends and loved ones. For more recipe inspiration and delicious ideas, follow us on Pinterest and Instagram!
Simple dessert delight
Despite their sophisticated appearance, red velvet cake balls are a surprisingly simple dessert delight to make. They don’t require advanced baking skills, making them accessible to home bakers of all levels. The process, from baking the cake to crumbling, mixing, rolling, and dipping, is straightforward and enjoyable. The reward is a batch of beautiful, decadent treats that taste incredibly complex but were simple to create. They offer a perfect balance of convenience and gourmet appeal, proving that sometimes the best desserts are those that allow for creativity without overwhelming effort. Enjoy the bliss of creating and savoring these wonderful sweet treats.
