
Red Velvet Cake Balls are a delightful treat, perfect for any occasion. These sweet, bite-sized desserts combine the rich flavor of red velvet cake with tangy cream cheese frosting, all enrobed in a crisp chocolate shell. Learn to make these beautiful and delicious cake balls with our simple steps.
Key Takeaways
- Simple ingredients make delicious Red Velvet Cake Balls.
- Proper chilling is crucial for firm, easy-to-handle cake balls.
- Achieving a smooth chocolate coating enhances their visual appeal.
- Effective storage methods ensure your treats remain fresh.
- Customizing flavors and coatings allows for creative variations.
Making cake balls is simple. You bake cake, mix it with frosting. Then you roll them and chill them well. Finally, dip them in chocolate. Enjoy these lovely sweets!
Making Delicious Red Velvet Cake Balls
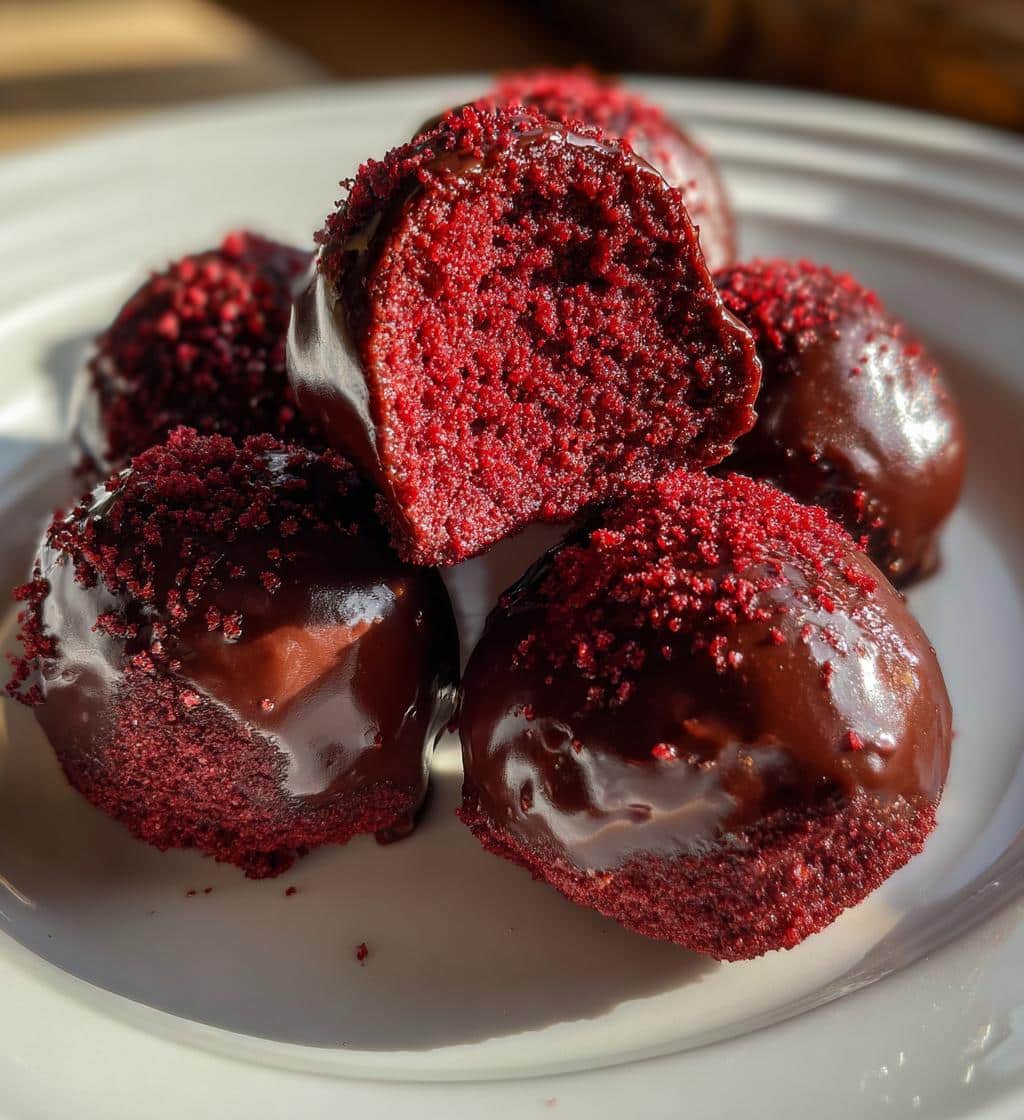
Red Velvet Cake Balls offer a charming and convenient way to enjoy the classic flavors of red velvet cake in a fun, portable format. These delectable treats are perfect for celebrations, potlucks, or simply as a delightful indulgence any day of the week. Unlike a traditional slice of cake, cake balls provide a concentrated burst of flavor and a pleasing texture, combining the moistness of cake with the creaminess of frosting, all encased in a snappy chocolate shell. Their popularity stems from their appealing bite-sized nature, making them easy to serve and enjoy without needing plates or forks. The striking red color of the cake, often contrasted with a white chocolate coating or sprinkles, also makes them visually captivating. Learning to prepare these treats from scratch is a rewarding experience, allowing you to control the quality of ingredients and customize them to your liking. The process, while involving a few distinct stages, is straightforward and accessible for bakers of all skill levels. By following careful instructions, you can produce professional-looking and tasting cake balls that will impress everyone.
Ingredients for Red Velvet Cake Balls
Gathering the right ingredients is the first step to creating these delicious Red Velvet Cake Balls. The beauty of this recipe lies in its simplicity, often utilizing readily available items that contribute to its rich flavor and texture. Starting with quality components ensures a better final product, from the vibrant cake base to the luscious coating. Understanding each ingredient’s role will also help you make informed substitutions if necessary, although for a classic taste, sticking to the standard list is recommended.
Cake Mix and Basic Needs
For the red velvet cake base, you’ll typically need one box of red velvet cake mix. While you can certainly make a red velvet cake from scratch, using a good quality cake mix significantly streamlines the process without compromising much on flavor for this application. Along with the cake mix, you’ll need the ingredients specified on the back of the box, which commonly include eggs, vegetable oil, and water or milk. These wet ingredients are crucial for giving the cake its characteristic moist and tender crumb. Ensure all ingredients are at room temperature before mixing, as this helps them combine more smoothly and creates a uniform batter. Opt for a reputable brand of cake mix for consistent results. You might also want to have some non-stick cooking spray or parchment paper ready for baking the cake, preventing it from sticking to the pan.
Frosting and Chocolate Chips
The binding agent for your cake balls is cream cheese frosting. A standard 16-ounce can of cream cheese frosting works perfectly, providing the necessary tang and moisture to hold the cake crumbs together. Alternatively, you can prepare homemade cream cheese frosting for an even richer flavor; for a delicious alternative, consider trying our Quick Italian Cream Cake, which features a superb cream cheese frosting. The frosting’s consistency is key; it needs to be soft enough to mix easily with the crumbled cake but firm enough to create stable balls. For the coating, high-quality chocolate chips are essential. You’ll need about 12-16 ounces of chocolate chips, typically white chocolate for that classic red velvet contrast, but dark, milk, or semi-sweet chocolate chips also work wonderfully. These will be melted down to create a smooth, dippable coating. You might also consider having some shortening or coconut oil on hand to help thin the melted chocolate if it’s too thick for dipping, ensuring a sleek, even finish on your Red Velvet Cake Balls. Explore more dessert recipes for inspiration.
Preparing Your Red Velvet Cake
The foundation of superb Red Velvet Cake Balls is, naturally, a perfectly baked red velvet cake. Even though it will be crumbled later, paying attention to the baking process ensures the cake has the right flavor and moisture content. This stage is straightforward, even for those new to baking, and sets the stage for the rest of your cake ball creation.
Preheat Oven and Mix Cake
Begin by preheating your oven to the temperature specified on your red velvet cake mix box, usually around 350°F (175°C). While the oven heats, prepare your baking pan; a 9×13-inch pan is ideal for the quantity of cake a standard mix yields. Grease the pan thoroughly with cooking spray or butter, and dust lightly with flour, or line it with parchment paper for easy removal. In a large mixing bowl, combine the red velvet cake mix with the wet ingredients as directed on the box – typically eggs, oil, and water. Beat the mixture with an electric mixer on medium speed for about two minutes, or until the batter is smooth and well combined. Ensure there are no dry pockets of cake mix remaining. The batter should have a vibrant red hue, which is a hallmark of red velvet cake.
Bake and Cool Completely
Pour the prepared red velvet cake batter evenly into your greased and floured (or parchment-lined) baking pan. Place the pan in the preheated oven and bake for the duration specified on the cake mix box, usually between 28-35 minutes. To check for doneness, insert a wooden toothpick into the center of the cake; if it comes out clean, the cake is ready. Avoid overbaking, as this can lead to a dry cake, which will affect the final texture of your cake balls. Once baked, remove the cake from the oven and let it cool in the pan on a wire rack for about 10-15 minutes. After this initial cooling, carefully invert the cake onto the wire rack to cool completely. This step is critical. The cake must be completely cool before you proceed to crumble it, as a warm cake will create a sticky, unmanageable mixture when combined with frosting. Allow at least an hour, or even two, for thorough cooling.
Mixing Red Velvet Cake Balls
This is where the magic truly begins – transforming a baked cake into the delightful base for your cake balls. The key here is achieving the right consistency, ensuring the cake and frosting blend perfectly to form a pliable mixture that’s easy to roll and holds its shape.
Crumbling the Cooled Cake
Once your red velvet cake is entirely cooled, it’s time to crumble it. The easiest way to do this is with your hands. Take the cooled cake and break it into small, uniform crumbs in a large mixing bowl. Aim for a fine, even crumb texture, similar to coarse sand, ensuring there are no large chunks remaining. This provides a smooth base for your cake balls. You can also use a fork or a potato masher, but your hands are often the most effective tool for achieving the desired consistency. This process is surprisingly therapeutic and ensures you’re ready for the next step of integrating the frosting. For a similar concept with a different flavor profile, check out our Butterfinger Balls, which also rely on a crumbled base.
Adding Cream Cheese Frosting
Now, add the entire can of cream cheese frosting (or your homemade frosting) to the bowl with the crumbled red velvet cake. Using your hands or a sturdy spoon, begin to mix the frosting into the cake crumbs. Continue mixing until the frosting is evenly distributed and the mixture comes together to form a moist, cohesive dough. The consistency should be firm enough to hold its shape when pressed, yet soft and pliable. It shouldn’t be overly sticky or overly dry. If the mixture feels too dry, you can add a tablespoon or two more frosting until it reaches the desired consistency. If it’s too wet, a common issue, you might need to add a small amount of crushed vanilla wafers or graham cracker crumbs to absorb excess moisture. This careful blending is crucial for the structural integrity and deliciousness of your final Red Velvet Cake Balls.
Forming Your Cake Balls Perfectly
With your cake and frosting mixture ready, the next exciting step is shaping them into uniform, appealing balls. This stage requires a little patience and a gentle touch, but the result is a tray of perfectly formed cake balls, ready for chilling and dipping. Consistency in size not only looks professional but also ensures even cooling and coating.
Rolling Mixture into Balls
To ensure uniform Red Velvet Cake Balls, it’s highly recommended to use a small cookie scoop or a tablespoon measure. Scoop out portions of the cake mixture, then gently roll them between your palms to form smooth, compact balls. Aim for a size that is about 1 to 1.5 inches in diameter, similar to a cake pop without the stick. This size is ideal for a one-bite treat. Avoid rolling them too loosely, as they might fall apart during dipping, and don’t press too hard, which can make them dense. A gentle, even pressure is best. If the mixture starts to stick to your hands, you can lightly dust your palms with a bit of powdered sugar, or rinse your hands with cool water periodically. This step requires a bit of repetition, but the outcome is worth the effort.
Place on Baking Sheet
As you roll each cake ball, place it on a baking sheet lined with parchment paper or a silicone baking mat. The parchment paper prevents sticking and makes it easy to transfer the cake balls later. Arrange the balls in a single layer, leaving a small space between each one to ensure even chilling. Continue rolling until all the cake mixture has been used. You should typically yield between 40-50 cake balls from a standard cake mix and can of frosting. Once all the balls are neatly arranged on the baking sheet, they will be ready for their crucial chilling period. This setup is key for the next step of firming them up.
Chilling Red Velvet Cake Balls
Chilling is not just an optional step; it’s absolutely fundamental to the success of your Red Velvet Cake Balls. This stage ensures that the balls are firm enough to handle and, most importantly, will not disintegrate when dipped into the warm chocolate coating. Skipping or rushing this step often leads to a messy and frustrating dipping experience.
Refrigerate for Firmness
Once all your Red Velvet Cake Balls are rolled and neatly arranged on the parchment-lined baking sheet, place the entire sheet into the refrigerator. They need to chill for a minimum of 30 minutes to an hour. The goal is for the balls to become firm to the touch, which allows them to hold their shape against the warmth of the melted chocolate. A well-chilled cake ball will maintain its structure, making dipping significantly easier and yielding a smoother, more professional-looking finish. If your kitchen is particularly warm, or if you prefer extra firmness, you can extend the chilling time slightly, or even place them in the freezer for about 15-20 minutes. Just be careful not to freeze them solid, as this can cause condensation when they are brought out, making the chocolate seize or not adhere properly. Proper chilling is the silent hero of perfect cake balls.
Dipping Red Velvet Cake Balls
Dipping is arguably the most visually rewarding part of making Red Velvet Cake Balls. This is where the magic happens, transforming simple cake balls into glossy, elegant treats. A smooth, even chocolate coating is key to their appeal, and with a few simple techniques, you can achieve a professional finish.
Melting Chocolate Chips
Before you begin dipping, you’ll need to melt your chocolate chips. The best method for melting chocolate is using a double boiler or a microwave. For the microwave, place the chocolate chips in a microwave-safe bowl and heat them in 30-second intervals, stirring well after each interval, until the chocolate is smooth and fully melted. Be careful not to overheat the chocolate, as it can burn or seize. If using a double boiler, place the chocolate in a heatproof bowl set over a saucepan of simmering water, ensuring the bottom of the bowl does not touch the water. Stir constantly until melted and smooth. If the melted chocolate appears too thick for dipping, you can stir in 1-2 teaspoons of shortening or coconut oil until it reaches a desired, fluid consistency. This helps create a thinner, more manageable coating. For other sweet treat ideas, consider our Snickerdoodle Cobbler, another delightful dessert that highlights melting ingredients to perfection.
Coating Each Cake Ball
Once your chocolate is perfectly melted and the cake balls are thoroughly chilled, you’re ready to dip. Remove a few cake balls from the refrigerator at a time to keep the rest cold. Using a dipping tool, a fork, or a toothpick, carefully submerge each cake ball into the melted chocolate. Ensure it’s fully coated. Lift the cake ball out, gently tapping the dipping tool or fork against the side of the bowl to allow excess chocolate to drip off. This step is crucial for achieving a thin, even coating and avoiding pools of chocolate around the base. Place the coated cake ball back onto the parchment-lined baking sheet. While the chocolate is still wet, you can add sprinkles, chopped nuts, or a contrasting chocolate drizzle for decoration. Repeat this process with the remaining cake balls. If your chocolate starts to thicken, reheat it gently until it’s fluid again. Let the dipped cake balls set at room temperature or in the refrigerator until the chocolate coating is completely firm.
Storing Red Velvet Cake Balls Safely
Once your Red Velvet Cake Balls are beautifully dipped and set, proper storage is essential to maintain their freshness, flavor, and texture. Whether you plan to enjoy them over a few days or prepare them well in advance, knowing the best storage methods ensures they remain delicious until consumed.
Refrigeration and Freezing
Due to the cream cheese frosting content, Red Velvet Cake Balls must be stored in the refrigerator. Place the set cake balls in an airtight container. Layer them carefully with parchment paper between layers to prevent sticking and maintain their delicate coating. When refrigerated, these cake balls will stay fresh and delicious for up to one week. For longer storage, Red Velvet Cake Balls freeze exceptionally well. Arrange the unfrosted or already dipped and set cake balls in a single layer on a baking sheet and flash freeze them for about an hour, until firm. Then, transfer them to a freezer-safe airtight container or a heavy-duty freezer bag, again using parchment paper between layers. They can be stored in the freezer for up to one month. Thaw frozen cake balls in the refrigerator overnight before serving to ensure they regain their moist texture.
Make Ahead Options
Red Velvet Cake Balls are an excellent make-ahead dessert, perfect for busy hosts or those who like to plan. You can prepare the cake and frosting mixture and roll the balls up to two days in advance. Store the un-dipped cake balls, covered, in the refrigerator. When you’re ready to serve, simply melt your chocolate and dip them fresh. This allows for flexibility and reduces stress on the day of your event. Alternatively, as mentioned, you can completely finish and freeze the cake balls, making them a fantastic option for holiday baking or unexpected gatherings. Having a batch of these sweet treats ready to go can be a lifesaver, allowing you to enjoy your guests or a quiet moment without last-minute baking. This strategy is also useful for preparing a variety of desserts for larger events.
Tips for Perfect Cake Balls
Achieving consistently perfect Red Velvet Cake Balls involves more than just following the steps; it also relies on understanding some key techniques. Paying attention to consistency and dipping methods can make all the difference in the final product’s appearance and taste, elevating them from homemade to gourmet.
Mixing Consistency Guide
The ideal consistency of your cake and frosting mixture is paramount. It should be firm enough to roll into a ball without crumbling, yet moist enough not to be dry. A good way to test it is to take a small portion and roll it between your palms. If it forms a smooth ball easily and holds its shape, you’ve hit the sweet spot. If it’s too crumbly, add a tiny bit more frosting, one teaspoon at a time, mixing thoroughly after each addition until the desired consistency is reached. If the mixture is too wet or sticky, it will be hard to roll and might melt into the warm chocolate. To fix this, you can add a tablespoon or two of powdered sugar, graham cracker crumbs, or even finely crushed vanilla wafers to absorb excess moisture. Always mix thoroughly after each adjustment to ensure even distribution. This careful attention to consistency prevents many common issues and makes the rolling process much smoother.
Smooth Dipping Techniques
Dipping can be the trickiest part, but with the right technique, you can achieve a flawless coating. First, ensure your melted chocolate is at the right temperature—warm enough to be liquid, but not so hot it melts the cake balls. If it’s too hot, let it cool for a few minutes. Use a dipping fork, a specialized tool, or a regular dinner fork with the middle tines bent or removed to create a two-pronged tool. This allows excess chocolate to drip off easily. Hold the cake ball over the bowl of chocolate, completely submerge it, then lift it out. Gently tap the fork against the edge of the bowl to shake off excess chocolate. A thin, even coating is what you’re aiming for. Too much chocolate can create a thick, clumpy layer. For an extra smooth finish, quickly rotate the ball as you lift it to help the chocolate set evenly. Place the coated ball back on parchment paper. Work quickly, especially if your kitchen is warm, and if your chocolate starts to harden, re-melt it gently. For more visual inspiration and recipe ideas, be sure to follow Carina Recipes on Pinterest.
Troubleshooting Common Cake Ball Issues
Even with careful preparation, sometimes things don’t go exactly as planned. Knowing how to troubleshoot common issues with Red Velvet Cake Balls can save your batch and ensure a delicious outcome. The most frequent problem relates to the consistency of the cake mixture, which directly impacts rolling and dipping.
Fixing Dry or Crumbly Mix
A dry or crumbly cake mixture is a common hurdle, usually indicating insufficient moisture. If your mixture isn’t coming together or crumbles when you try to roll it, the solution is to add more binder. Start by adding one tablespoon of cream cheese frosting (or even a neutral binding agent like a spoonful of softened butter or a splash of milk) to the mixture. Mix it thoroughly with your hands, squeezing and kneading until it feels more cohesive. Repeat this process, adding small amounts of frosting at a time, until the mixture is pliable and easily forms a smooth ball that holds its shape. Be careful not to add too much at once, as you can quickly go from too dry to too sticky. A little goes a long way. The goal is a play-dough-like consistency that’s easy to work with and ensures your Red Velvet Cake Balls are moist and delicious. This careful adjustment is essential for successful rolling and prevents issues during the chilling and dipping phases. Keep an eye on your texture; it’s the foundation of a great cake ball!
Creative Variations for Cake Balls
While the classic Red Velvet Cake Ball is a star in its own right, there’s immense potential for creativity and customization. Experimenting with different cake flavors, coatings, and add-ins allows you to tailor these treats to various preferences, seasons, or special occasions. This versatility is one of the many reasons cake balls remain a beloved dessert.
Different Cake and Coating
The world of cake balls extends far beyond red velvet. You can substitute the red velvet cake mix with virtually any other flavor. Imagine chocolate cake balls with peanut butter frosting, lemon cake balls with a lemon glaze, or even spiced pumpkin cake balls for autumn. Carrot cake, funfetti, strawberry, or even a simple vanilla cake can all be transformed into delicious cake balls. Similarly, the coating offers endless possibilities. Beyond white, milk, or dark chocolate, consider using candy melts in various colors to match a party theme. You can also experiment with different types of glazes, such as a simple powdered sugar and milk glaze, or a rich caramel coating. Drizzling contrasting colors of chocolate or adding sprinkles, edible glitter, or even crushed candies (like those in Blueberry Muffin Cookies with Streusel, but repurposed) can add both visual appeal and textural interest.
Fun Flavor Add-ins
To further personalize your cake balls, consider incorporating various flavor add-ins into the cake mixture itself or as decorative toppings. A common favorite is a teaspoon of vanilla extract or almond extract mixed into the cake batter for an extra layer of flavor. For textural contrast, you could fold in mini chocolate chips, chopped nuts (like pecans or walnuts, which pair wonderfully with red velvet), or shredded coconut before rolling the balls. After dipping, the possibilities for toppings are vast: crushed peppermints for a festive touch, toasted coconut flakes, mini M&M’s, finely chopped candied ginger, or even a dash of sea salt sprinkled on top of a dark chocolate coating to balance the sweetness. These small additions can dramatically change the flavor profile and make each batch uniquely yours. Don’t be afraid to experiment with combinations that excite your palate and reflect your personal taste.
Nutrition Facts for Cake Balls
While Red Velvet Cake Balls are undeniably a delightful indulgence, it’s helpful to have a general understanding of their nutritional profile, especially when planning for dietary considerations or managing portion sizes. It’s important to remember that these are sweet treats, typically higher in calories, sugars, and fats, reflecting their rich ingredients like cake, frosting, and chocolate coating. Exact nutrition facts can vary significantly based on the specific brands of cake mix and frosting used, whether you add extra butter or oil, the type of chocolate coating, and the size of your individual cake balls. Homemade versions might differ slightly from commercially prepared ones, often allowing for some control over ingredients. For instance, using a sugar-free cake mix or a reduced-sugar frosting could alter the carbohydrate and sugar content, while opting for darker chocolate might introduce more antioxidants. Generally, a single Red Velvet Cake Ball might contain anywhere from 80-150 calories, with varying amounts of fat, carbohydrates, and sugars. They are best enjoyed as an occasional treat rather than a dietary staple. As with any dessert, moderation is key to enjoying these delicious confections without overindulging. Always refer to the specific nutritional information on your chosen product labels for the most accurate data relevant to your ingredients.
