
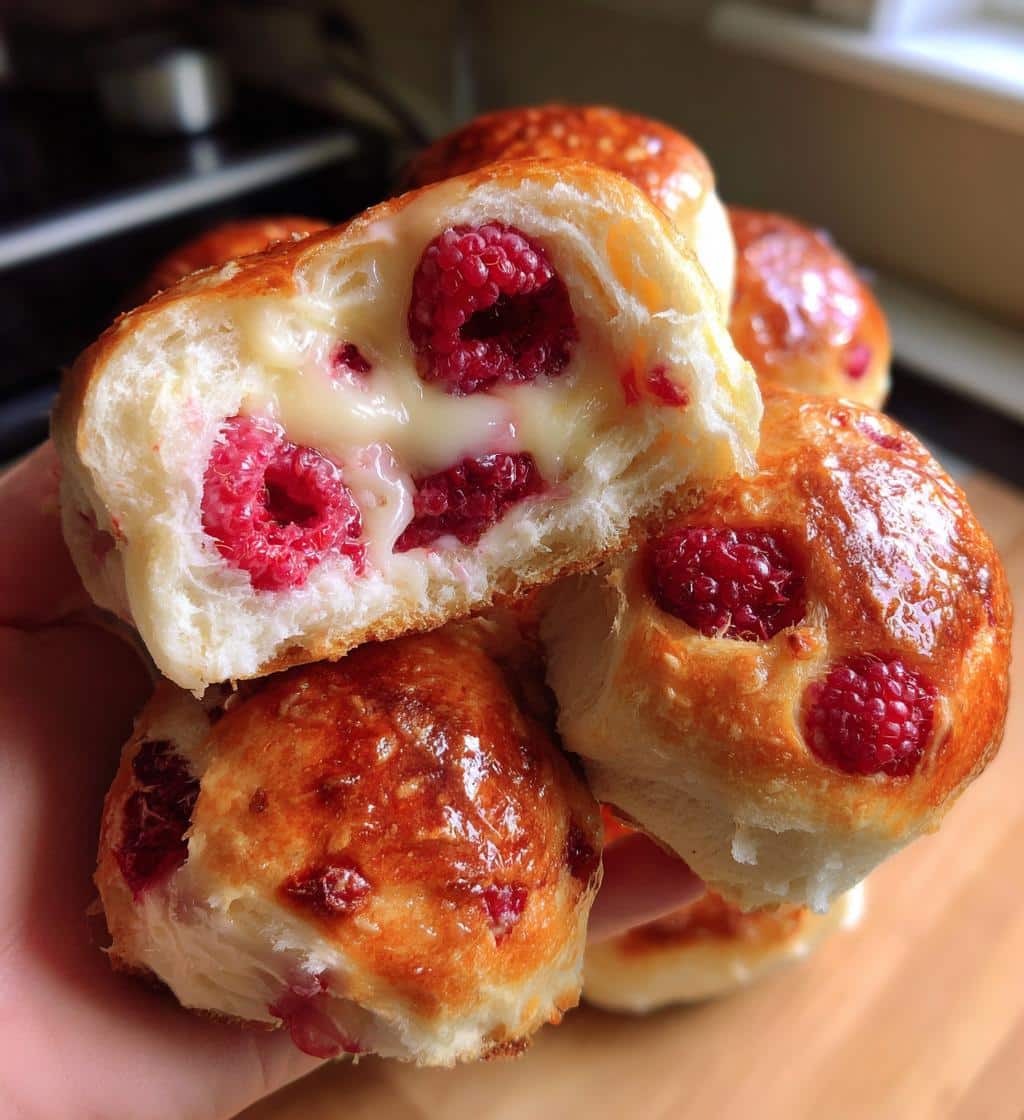
Raspberry Custard Buns are a truly delightful treat, combining fluffy bread with a rich, creamy filling and tart raspberries. This recipe will walk you through each step, ensuring you create delicious homemade buns that impress everyone. Prepare for a rewarding baking adventure to achieve golden brown perfection.
Key Takeaways
- Accurate ingredient measurement is crucial for soft dough.
- Proper kneading and rising times ensure perfect texture.
- Use fresh raspberries for the best flavor in your sweet custard filling.
- Achieve golden brown perfection through careful baking.
- Understand proper cooling and storing methods for longevity.
Baking homemade buns is deeply satisfying. The aroma fills your kitchen. Each bite brings pure joy. Patience makes perfect dough. Share these delicious treats.
Prepare for Your Delicious Buns
Creating raspberry custard buns from scratch is a rewarding experience that begins long before you even touch the dough. Proper preparation ensures a smooth baking process and guarantees the best possible results. When preparing for homemade buns, think of this stage as laying the foundation for an exquisite treat. Taking the time to get everything in order will significantly reduce stress and improve the overall enjoyment of your baking journey. This initial phase sets the stage for achieving soft dough and that irresistible sweet custard, leading to golden brown perfection in every bite. It’s about creating an efficient and enjoyable cooking environment.
Gathering All Ingredients Ready
Before you begin any mixing, ensure all your ingredients are measured and ready. This practice, known as mise en place, is a cornerstone of efficient baking. For these delightful raspberry custard buns, you’ll need flour, yeast, sugar, salt, butter, eggs, and milk for the soft dough. For the sweet custard filling, gather milk, egg yolks, sugar, cornstarch, vanilla extract, and of course, plenty of fresh raspberries. Having everything at room temperature, especially dairy and eggs, often aids in better emulsification and dough development. Double-check your pantry to avoid any last-minute surprises. This step is vital for consistency and success in your baking endeavors, contributing directly to the perfect texture of your finished product.
Setting Up Your Workspace
A clean, organized workspace is just as important as the ingredients themselves. Clear your counter space, making sure you have ample room for kneading dough and shaping your buns. Have your measuring cups, spoons, mixing bowls, whisk, and spatulas within easy reach. A pastry brush, parchment paper, and baking sheets should also be readily available. If you plan to use a stand mixer, ensure it’s set up and ready with the appropriate attachments. Consider the ambient temperature of your kitchen; a slightly warm environment can be beneficial for dough rising. Being prepared means you can focus on the delicate steps of baking without interruption, which is key to making delicious buns.
Creating the Soft Dough Base
The heart of any delicious bun is its dough, and for raspberry custard buns, achieving a soft dough base is paramount. This foundational step dictates the texture and overall success of your finished product. A well-made dough will be pliable, easy to work with, and will bake up into a light, airy bun that perfectly complements the sweet custard filling. Understanding the nuances of combining dry and wet ingredients correctly is crucial here, as it lays the groundwork for perfect texture. The initial mix ensures all elements are evenly distributed, leading to consistent results across all your homemade buns. Pay close attention to hydration levels for optimal softness.
Mixing Dry Ingredients First
Begin by combining all your dry ingredients in a large mixing bowl. This typically includes flour, sugar, yeast, and salt. Whisking these together thoroughly ensures that the yeast and salt are evenly distributed throughout the flour. This is especially important for the yeast, as it needs to be uniformly active to make the dough rise properly. The sugar not only adds sweetness but also provides food for the yeast, aiding in fermentation. Salt, on the other hand, controls the yeast’s activity and enhances the flavor of the dough. Skipping this step can lead to uneven rising or inconsistent taste in your homemade buns. For insights into the role of yeast in baking, you might find this Wikipedia article on yeast informative.
Combining Wet Ingredients Smoothly
In a separate bowl or measuring jug, gently warm your milk until it’s lukewarm (around 105-115°F or 40-46°C). This temperature is ideal for activating the yeast without killing it. Melt your butter and allow it to cool slightly before adding it to the milk, along with beaten eggs. Whisk these wet ingredients together until they are smoothly combined. The butter adds richness and tenderness, while the eggs contribute to structure, flavor, and a beautiful golden color. Gradually add the wet mixture to the dry ingredients, mixing with a wooden spoon or a stand mixer with a dough hook until a shaggy dough forms. Be careful not to overheat the milk, as this can hinder yeast activity and compromise the soft dough texture of your raspberry custard buns. Achieving the right consistency here is key to easy kneading later.
Kneading Dough for Perfect Texture
Kneading is perhaps the most critical step in developing the perfect texture for your soft dough. It’s where the gluten in the flour is developed, creating elasticity and strength that will allow your raspberry custard buns to rise beautifully and maintain a light, airy crumb. Proper kneading ensures your homemade buns are not dense or crumbly but wonderfully tender and chewy. This process requires a bit of patience and technique, but the rewards are well worth the effort. Think of kneading as a workout for your dough, making it stronger and more flexible. This stage is vital for achieving the desired perfect texture.
Work Dough Until It’s Smooth
Turn the shaggy dough out onto a lightly floured surface. Begin to knead by pushing the dough away from you with the heels of your hands, then folding it back towards you. Rotate the dough slightly with each push and fold. Continue this process for 8-10 minutes if kneading by hand, or 5-7 minutes if using a stand mixer with a dough hook on medium-low speed. The dough will initially be sticky, but as you knead, it will become smoother, more elastic, and less sticky. You’ll know it’s ready when it passes the “windowpane test”: you should be able to stretch a small piece of dough thin enough to see light through it without tearing. This indicates strong gluten development, which is crucial for achieving that signature soft dough and golden brown perfection.
Letting Dough Rise Until Doubled
Once the dough is smooth and elastic, form it into a ball and place it in a lightly oiled bowl, turning it once to coat. Cover the bowl with plastic wrap or a clean kitchen towel and place it in a warm, draft-free spot. The ideal temperature for rising is typically between 75-80°F (24-27°C). Allow the dough to rise until it has doubled in size, which usually takes 1 to 1.5 hours, depending on the warmth of your environment and the activity of your yeast. This first rise, also known as bulk fermentation, is essential for developing flavor and creating an open crumb structure in your homemade buns. Don’t rush this step; patience here contributes significantly to the delicious buns you’ll be creating. For more baking inspiration, check out our collection of desserts.
Filling for Raspberry Custard Buns
The filling is what truly sets raspberry custard buns apart, making them an irresistible treat. A luscious, creamy sweet custard combined with the vibrant, slightly tart burst of fresh raspberries creates a harmonious balance of flavors and textures. This combination is the star of these delicious buns, elevating them beyond a simple pastry. Paying attention to the quality of your ingredients, especially the fruit, will significantly impact the final taste. The richness of the custard complements the light, soft dough perfectly, ensuring every bite is a delightful experience. Crafting this filling is a key step towards achieving golden brown perfection.
Fresh Raspberries are Best
While frozen raspberries can be used in a pinch, fresh raspberries truly shine in these buns. Their natural sweetness and subtle tartness provide a beautiful contrast to the rich sweet custard. When choosing raspberries, look for plump, firm berries with a bright, consistent color. Gently wash them and pat them dry before using. The delicate nature of fresh raspberries means they will soften beautifully during baking, releasing their juices and infusing the custard with their distinct flavor. Using fresh produce ensures the most authentic and vibrant taste, contributing to the overall appeal of your homemade buns. For another fantastic dessert, try our peanut butter brownie swirl cookies.
Spooning the Sweet Custard
The sweet custard forms the creamy base of your filling. Prepare your custard according to your favorite recipe, ensuring it’s thick enough to hold its shape once cooled. A classic pastry cream (crème pâtissière) works wonderfully, made with milk, egg yolks, sugar, and cornstarch or flour, flavored with vanilla. It’s crucial to let the custard cool completely before using it; a warm custard can make your dough soggy and difficult to work with. Once cooled, the custard should be smooth and velvety. You can add a tablespoon or two of a good quality raspberry jam to the custard for an extra layer of fruit flavor, though it’s perfectly delicious on its own. For more on the history and variations of this delightful dessert component, consult the Wikipedia page on custard. This sweet custard is what makes these raspberry custard buns so special.
Shaping Your Custard Buns
Shaping is where your soft dough truly begins its transformation into beautiful raspberry custard buns. This stage requires a gentle touch and some precision to ensure each bun is uniformly sized, holds its filling well, and bakes evenly to a golden brown perfection. Proper shaping is not just about aesthetics; it also affects the bun’s texture and how the sweet custard and fresh raspberries are distributed within. Taking your time here will result in professional-looking and consistently delicious buns, making the effort worthwhile for homemade buns.
Dividing Dough into Equal Parts
After the first rise, gently punch down the dough to release the air. Turn it out onto a lightly floured surface. Using a kitchen scale, divide the dough into equal portions. For standard-sized buns, aim for pieces weighing around 60-80 grams each. This ensures uniform baking and presentation. Roll each piece into a smooth ball. This equal division is crucial for consistency, preventing some buns from being undercooked or overcooked while others are just right. Evenly sized portions help maintain the perfect texture across the entire batch of delicious buns. Consistency is key for achieving golden brown perfection.
Sealing Filling Inside Each Bun
Take one dough ball and flatten it into a disc, about 4-5 inches in diameter, ensuring the edges are slightly thinner than the center. Place a generous spoonful of your cooled sweet custard in the center of the dough disc, leaving a border around the edges. Arrange a few fresh raspberries on top of the custard. To seal, bring the edges of the dough up and over the filling, pinching them firmly together at the top to create a tight seam. Ensure there are no gaps, as any openings could lead to the custard leaking out during baking. Gently cup the bun in your hands and roll it against the counter to create a smooth, round shape. Place the shaped buns seam-side down on a parchment-lined baking sheet, leaving ample space between them for the second rise. For another wonderful treat, consider making a quick Italian cream cake.
The Important Second Dough Rise
The second dough rise, often called proofing, is just as crucial as the first for achieving light, fluffy raspberry custard buns with an enviable perfect texture. This stage allows the gluten to relax further and the yeast to produce more carbon dioxide, resulting in a significantly lighter and more tender crumb. Rushing this process can lead to dense, heavy buns, while proper proofing ensures your homemade buns are airy and delightful. Patience during this phase is truly a virtue, as it directly impacts the golden brown perfection of your final product. This final rise is essential for delicious buns.
Allow Buns to Rise Gently
Once your raspberry custard buns are shaped and placed on the baking sheets, cover them loosely with plastic wrap or a clean kitchen towel. Return them to a warm, draft-free spot for their second rise. This usually takes about 30-45 minutes, but keep an eye on them rather than the clock. The buns should look noticeably puffier and feel light when gently touched. They won’t double in size quite as dramatically as the first rise, but they should be visibly expanded. To test if they’re ready, gently poke one with a floured finger; if the indentation slowly springs back, they are perfectly proofed. If it springs back immediately, they need a bit more time. If it stays indented, they might be over-proofed, but don’t worry, they will still be delicious. This gentle rise contributes to the desired soft dough and overall airy quality.
Baking Golden Raspberry Custard Buns
Baking is the moment your carefully prepared soft dough and sweet custard filling come together to create the irresistible raspberry custard buns. This final transformation is where the magic happens, developing complex flavors and giving the buns their characteristic golden brown perfection. Accurate oven temperature and timing are paramount to ensure the buns cook through evenly, achieving a beautifully colored crust and a tender, moist interior. A perfectly baked bun is a testament to all the careful steps taken before, from gathering ingredients to the second dough rise. This is where your homemade buns truly shine.
Preheat Oven to Optimal Temperature
Before placing your proofed buns into the oven, it’s absolutely critical to preheat your oven to the optimal temperature, typically around 375°F (190°C), for at least 15-20 minutes. This allows the oven to not only reach the set temperature but also to stabilize, ensuring consistent heat throughout the baking process. An accurately preheated oven helps the buns rise quickly and evenly, creating that desired perfect texture. If your oven isn’t hot enough, the buns may spread too much before setting, resulting in a flatter, denser product. Consider using an oven thermometer to verify your oven’s accuracy. This precise preheating contributes significantly to achieving golden brown perfection.
Achieve Golden Brown Perfection
Once the oven is properly preheated, gently transfer the baking sheets with your proofed raspberry custard buns into the oven. Bake for approximately 15-20 minutes, or until the buns are beautifully puffed, golden brown, and cooked through. Halfway through baking, you might rotate the baking sheets to ensure even browning. The golden hue indicates not just a beautiful appearance but also a thoroughly cooked crust and interior. If the buns start browning too quickly, you can loosely tent them with aluminum foil. A skewer inserted into the dough (avoiding the custard) should come out clean. The delightful aroma filling your kitchen will be your first clue that these delicious buns are nearly ready. For other delightful treats, explore our blueberry muffin cookies with streusel.
Cooling for Best Flavor and Set
After achieving golden brown perfection in the oven, the next crucial step for your raspberry custard buns is proper cooling. While it’s tempting to dive into these delicious buns immediately, allowing them to cool completely is vital for several reasons. Cooling allows the sweet custard filling to set properly, preventing it from being runny. It also allows the flavors to meld and intensify, and the soft dough to develop its final, perfect texture. Patience here will significantly enhance your eating experience. Rushing this stage can lead to a less enjoyable bun.
Let Buns Cool Completely
As soon as your raspberry custard buns come out of the oven, transfer them to a wire rack to cool. Cooling on a wire rack ensures air circulation all around the buns, preventing the bottoms from becoming soggy due to trapped steam. Resist the urge to cut into them while they are still warm, especially with a custard filling. The custard needs time to firm up; cutting too early will result in a messy, liquid center. The cooling process also allows the structure of the buns to stabilize, meaning they will be less likely to collapse. Typically, this takes at least 30-60 minutes, or even longer, depending on the size of the buns and the ambient temperature. For the truly best flavor and texture, aim for them to be completely cooled. This also ensures the soft dough is at its peak tenderness.
Storing Your Raspberry Custard Buns
Proper storage is key to extending the freshness and enjoyment of your homemade buns, especially when they feature a delicate sweet custard and fresh raspberries. These delicious buns are best enjoyed fresh, but knowing how to store them correctly ensures you can savor their perfect texture and golden brown perfection for a few days or even longer. Improper storage can lead to stale buns or, worse, spoilage of the custard. Follow these guidelines to keep your raspberry custard buns at their best.
Keep Leftovers in Container
Once completely cooled, any leftover raspberry custard buns should be stored in an airtight container. Because of the fresh raspberries and sweet custard filling, it’s best to store them in the refrigerator. This will help maintain their freshness and prevent the custard from spoiling. While they might lose a little of their initial softness when chilled, they will still retain their delicious flavor. They are typically good for 2-3 days when stored in the fridge. For optimal enjoyment, consider briefly warming them before serving to revive some of their soft dough texture.
Freezing Buns for Longer
If you’ve made a large batch of homemade buns or wish to enjoy them over a longer period, freezing is an excellent option. Once the buns are completely cooled, place them in a single layer on a baking sheet and freeze until solid, about 1-2 hours. This prevents them from sticking together. Once frozen solid, transfer the buns to a freezer-safe airtight container or a heavy-duty freezer bag, removing as much air as possible. Label with the date. Frozen raspberry custard buns can be kept for up to 2-3 months. This method preserves their perfect texture and allows you to enjoy fresh-tasting buns whenever a craving strikes, making good use of your baking tips.
Reheating Stored Custard Buns
Reheating stored raspberry custard buns properly can revive their wonderful taste and texture, almost as if they were freshly baked. Whether you’re pulling them from the refrigerator or thawing them from the freezer, a thoughtful reheating process is essential to bring back that delightful soft dough and warm sweet custard without drying them out. The goal is to return them to their golden brown perfection and delicious buns status, ensuring that even stored homemade buns remain a true treat.
Thawing Frozen Buns Safely
If you’ve frozen your raspberry custard buns, the first step is to thaw them safely. Transfer the frozen buns from the freezer to the refrigerator the night before you plan to eat them, or place them on the counter at room temperature for a few hours. This slow thawing process helps maintain the perfect texture and prevents the custard from becoming watery. Once thawed, they are ready for warming. Do not attempt to warm them directly from frozen, as this can result in uneven heating, with the outside becoming dry while the inside remains cold.
Warming Buns for Freshness
To restore your thawed or refrigerated buns to their fresh-baked glory, preheat your oven to a moderate temperature, around 300-325°F (150-160°C). Place the buns directly on a baking sheet or wrap them loosely in foil to prevent excessive browning. Heat for about 10-15 minutes, or until they are warmed through and the soft dough feels tender again. The sweet custard should be pleasantly warm. Alternatively, for a quicker reheat for individual buns, you can use a microwave for 15-30 seconds, but be cautious as microwaving can sometimes make baked goods chewy if overdone. A warm bun, with its revived aroma and perfect texture, is a wonderful experience.
Expert Tips for Amazing Buns
Crafting truly amazing raspberry custard buns goes beyond just following a recipe; it involves understanding key baking tips that elevate your homemade buns from good to extraordinary. These expert insights can help you avoid common pitfalls and ensure your soft dough rises perfectly, your sweet custard is creamy, and you achieve golden brown perfection every time. Embrace these techniques to refine your baking skills and produce consistently delicious buns with an impeccable perfect texture.
Measure Flour Accurately Always
One of the most crucial baking tips for any dough-based recipe is to measure flour accurately. Too much flour can lead to a dry, dense dough, while too little can make it too sticky and difficult to handle. The most accurate way to measure flour is by weight using a kitchen scale. If measuring by volume, spoon the flour lightly into your measuring cup and then level it off with a straight edge; never scoop directly from the bag, as this compacts the flour and adds too much. Precision in flour measurement directly impacts the hydration and gluten development of your soft dough, which in turn determines the final texture of your raspberry custard buns. This accuracy is a hallmark of truly delicious buns.
Help Dough Rise Evenly
For uniform and airy homemade buns, ensuring the dough rises evenly is vital. A warm, draft-free environment is ideal for both the first and second rises. If your kitchen is cool, you can create a warm spot by turning your oven on to its lowest setting for a few minutes, then turning it off and placing the dough inside with the door slightly ajar. Alternatively, place the covered bowl of dough in a sunny spot, or in a microwave (turned off) with a cup of hot water. Consistent warmth promotes consistent yeast activity, leading to a beautifully risen dough with an even, perfect texture throughout all your raspberry custard buns. Remember to check out Carina Recipes on Instagram and Pinterest for more inspiration and baking tips.
Raspberry Custard Buns Nutrition
While raspberry custard buns are undoubtedly a delightful treat, it’s also helpful to have a quick look at their nutritional value. As with most baked goods, they are typically calorie-dense, offering a good source of energy. Understanding the nutritional breakdown can help you enjoy these delicious buns as part of a balanced diet. The combination of soft dough, sweet custard, and fresh raspberries contributes to a unique profile, making these homemade buns a rich indulgence. Knowing the nutritional value is a good part of baking tips for an informed approach to consumption.
Quick Look at Nutritional Value
Raspberry custard buns, being made from flour, sugar, butter, eggs, milk, and fruit, contain a mix of macronutrients. They provide carbohydrates from the flour and sugar, which are a primary energy source. The butter and eggs contribute fats and protein, adding to the richness and satiety. Fresh raspberries offer dietary fiber, vitamins (like Vitamin C and K), and antioxidants, which are beneficial for health. While specific calorie counts will vary based on exact ingredients and portion sizes, these buns are generally considered a sweet indulgence. Enjoy them in moderation, savoring each bite of the perfect texture and golden brown perfection. Consulting a nutritionist or using an online recipe calculator can give you a more precise understanding of the nutritional value for your specific recipe version.
