
Oreo Icebox Cake is a delightful no-bake dessert, perfect for any occasion. This simple recipe combines layers of softened Oreo cookies and luscious whipped cream, creating a creamy texture that everyone loves. Its quick preparation and minimal fuss make it an ideal sweet treat for busy days or impromptu gatherings. Enjoy making this family favorite.
Key Takeaways
- Oreo Icebox Cake is a simple, no-bake dessert.
- Requires minimal ingredients and quick assembly.
- Chill time is crucial for optimal texture and flavor melding.
- Careful dipping of Oreos prevents sogginess.
- A versatile sweet treat suitable for various occasions.
This no-bake cake is pure joy. It features simple layers. The cookies soften beautifully. Creamy goodness in every bite. A perfect, easy dessert.
What is Oreo Icebox Cake?
Simple, No-Bake Dessert Explained
An Oreo Icebox Cake is a classic, effortless dessert that requires no baking whatsoever. It’s a fantastic solution for those craving a sweet treat without turning on the oven, making it especially popular during warmer months. The fundamental concept involves layering crunchy cookies with a creamy filling, allowing them to soften and meld together during a period of refrigeration. This process transforms ordinary ingredients into a cohesive, cake-like structure. The term “icebox cake” originated from the days when refrigerators were called iceboxes, highlighting the chilling method as the primary “cooking” technique. This simple dessert has been a beloved family favorite for generations due to its minimal effort and maximum flavor payoff.
Creamy Layers That Delight
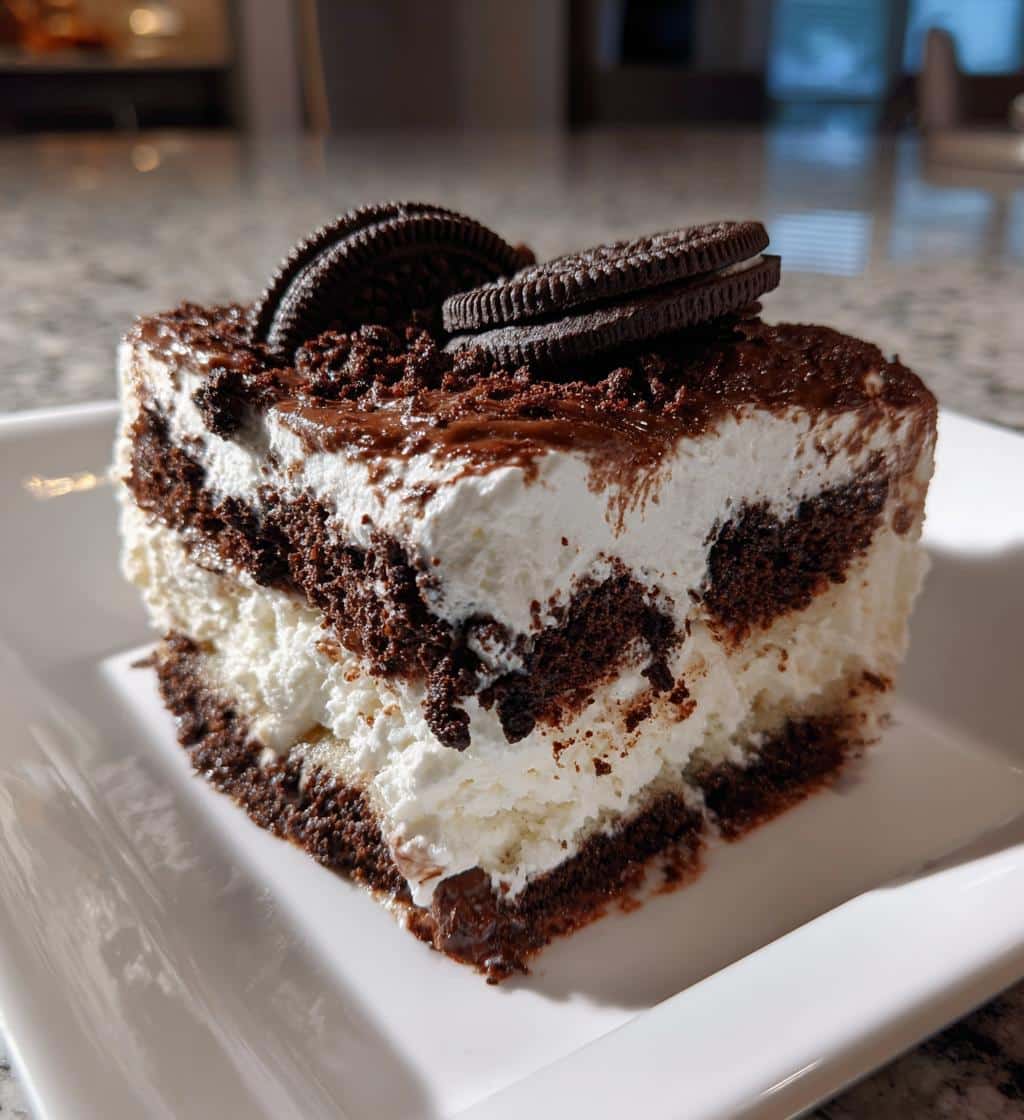
The magic of this particular icebox cake lies in its decadent layers. Each slice presents a beautiful mosaic of dark chocolatey Oreo cookies intertwined with light, airy whipped cream. As the cake chills, the cookies absorb moisture from the cream and milk, softening to a tender, cake-like consistency while still retaining their distinctive flavor. This melding creates a rich, creamy dessert that truly delights the senses. The contrast between the softened chocolate wafers and the sweet, smooth cream is what makes an Oreo Icebox Cake so irresistible. It’s a wonderfully creamy dessert that promises satisfaction with every bite, reminiscent of a classic chocolate dessert but with an easy, no-fuss approach.
Why Make This Oreo Icebox Cake?
Quick Preparation, Delicious Results
The primary appeal of an Oreo Icebox Cake is its incredibly quick preparation time. Unlike traditional baked cakes that demand precise measurements, multiple mixing stages, and oven vigilance, this no-bake dessert comes together in mere minutes. You only need a few readily available ingredients and basic kitchen tools, streamlining the entire process. The assembly is straightforward enough for even novice bakers, making it an ideal entry point into homemade desserts. Despite its simplicity, the results are consistently delicious—a rich, creamy, and satisfying sweet treat that often earns rave reviews. It’s proof that you don’t need to spend hours in the kitchen to create something truly special and memorable for your loved ones.
Perfect for Any Occasion
Whether you’re hosting a casual barbecue, celebrating a birthday, or simply craving a comforting dessert, the Oreo Icebox Cake fits every scenario. Its crowd-pleasing flavor profile, combining the familiar taste of Oreo cookies with sweet cream, appeals to nearly everyone, regardless of age. This makes it a perfect dessert for family gatherings, potlucks, or even a simple weeknight treat. Furthermore, its no-bake nature means you won’t heat up your kitchen, which is particularly beneficial during hot summer months. It’s also an excellent option for children to help prepare, fostering a love for cooking and creating delicious memories together. Just like a batch of homemade cookies, it brings smiles all around.
Gathering Your Oreo Icebox Cake Ingredients
Essential Items for Success
Creating a fantastic Oreo Icebox Cake starts with gathering the right ingredients. Fortunately, the list is short and sweet, emphasizing simplicity and accessibility. You will primarily need:
- Oreo Cookies: One to two standard-sized packages, depending on how many layers you desire. Original Oreos are classic, but feel free to experiment with different flavors.
- Heavy Whipping Cream: This forms the bulk of your creamy layers. Ensure it’s cold for optimal whipping.
- Powdered Sugar: To sweeten the whipped cream without adding granular texture.
- Vanilla Extract: A touch of vanilla enhances the flavor of the cream.
- Milk (optional): A splash of milk is useful for quickly dipping the Oreos, helping them soften faster and more evenly. Whole milk works best.
These core components work in harmony to create the signature taste and texture of this beloved dessert. Keeping these readily available ensures your icebox cake comes together smoothly and without any last-minute grocery runs.
Choosing Best Whipped Cream
The quality of your whipped cream significantly impacts the final texture and taste of your Oreo Icebox Cake. For the best results, always opt for heavy whipping cream, which has a milk fat content of 36% or higher. This higher fat content ensures a stable, rich, and airy whipped cream that holds its shape beautifully and doesn’t deflate easily. Avoid using “light” or “whipping cream” with lower fat percentages, as they may not whip up as thick or hold up as well during the chilling process. For an even more decadent layer, some recipes suggest adding a block of cream cheese softened with a little powdered sugar to your whipped cream mixture. This creates a denser, cheesecake-like consistency. However, for a truly classic and lighter creamy dessert, pure, freshly whipped heavy cream is the way to go. Consider chilling your mixing bowl and whisk attachment for 15 minutes before whipping; this helps the cream whip faster and achieve maximum volume, resulting in perfectly light and fluffy layers.
Tools for Making Your Icebox Cake
Standard Baking Dish Needed
While the Oreo Icebox Cake is a no-bake wonder, having the right tools on hand makes the assembly process even smoother. The most crucial item you’ll need is a standard baking dish or casserole dish. A 9×13-inch rectangular dish is typically ideal, as it provides enough surface area for arranging multiple layers of Oreo cookies and cream. This size also yields a generous number of servings, making it perfect for feeding a crowd. If you prefer a thicker cake or are making a smaller batch, an 8×8-inch square dish can also work, though you may need to adjust the number of cookie layers. Ensure your dish has sides at least 2-3 inches high to accommodate the multiple layers of cookies and cream without overflowing. Beyond the baking dish, you’ll also want a large mixing bowl for whipping the cream, an electric mixer (stand or hand-held) for efficient whipping, and a spatula or offset spatula for spreading the cream evenly. A shallow dish for dipping the Oreos in milk is also handy. Having these simple tools ready ensures a seamless creation of this creamy dessert. The ease of tools echoes the simplicity of many home cooking projects.
Step-by-Step Oreo Icebox Cake Assembly
Quick Oreo Milk Dip
The assembly of your Oreo Icebox Cake begins with preparing the star ingredient: the Oreo cookies. While some recipes suggest using dry cookies, a quick dip in milk is a game-changer for achieving that perfect cake-like texture much faster. Pour about half a cup to a cup of milk into a shallow dish. Briefly dip each Oreo cookie into the milk for just 1-2 seconds per side. The goal is to moisten the cookie without making it soggy or causing it to fall apart. This light dip accelerates the softening process during chilling, ensuring your cookies transform into tender, delicious layers. Have your baking dish ready as you dip, placing each cookie directly into the dish to form your first layer. This methodical approach ensures consistent moisture across all your cookie layers.
Layering Cookies and Cream
Once your dipped Oreos are ready, it’s time to build the glorious layers. Start by arranging a single layer of milk-dipped Oreo cookies at the bottom of your prepared 9×13-inch baking dish. You might need to break some cookies to fill any gaps and create an even base. Next, spread a generous amount of your freshly whipped cream over the cookie layer, ensuring it covers all the cookies evenly from edge to edge. Aim for a layer of cream that’s roughly the same thickness as your cookie layer. The precise technique for layering isn’t overly complicated; the main thing is to ensure consistent coverage for a balanced taste in every bite. This layering technique is crucial for achieving the characteristic creamy dessert texture.
Repeating For Five Layers
To achieve a substantial and satisfying Oreo Icebox Cake, aim for at least four to five alternating layers of cookies and cream. After spreading your first cream layer, repeat the process: add another layer of milk-dipped Oreos, followed by another layer of whipped cream. Continue this pattern until you run out of ingredients or reach your desired height, typically ending with a final, thick layer of whipped cream on top. A five-layer cake usually provides an excellent balance of cookie and cream, creating a tall, impressive dessert. Remember to smooth the top layer of cream for a neat finish before chilling. This structured layering is key to creating a decadent cake that holds its shape beautifully when sliced, making it a truly appealing sweet treat.
Crucial Chill Time for Icebox Cake
Refrigerate for Best Texture
The chilling phase is arguably the most critical step for any icebox cake, especially an Oreo Icebox Cake. This isn’t just about cooling; it’s about allowing the magic to happen. During refrigeration, the moist whipped cream gradually softens the crisp Oreo cookies, transforming their texture from crunchy to wonderfully tender and cake-like. This process creates a harmonious consistency where the cookies are no longer distinct but rather integrated into the creamy layers. A minimum chill time of 4-6 hours is required for the cake to set properly and for the flavors to meld effectively. Rushing this step will result in cookies that are still too firm and a cake that doesn’t hold its shape, compromising the overall experience of this delicious no-bake dessert. Properly chilled, the cake will slice cleanly and offer the desired soft, creamy bite. This patience pays off for a perfect chill.
Overnight for Perfect Melding
While 4-6 hours will get you a decent cake, allowing your Oreo Icebox Cake to chill overnight, or for a full 12-24 hours, yields the absolute best results. This extended refrigeration period provides ample time for the cookies to absorb maximum moisture, achieving an incredibly tender, almost brownie-like texture. Furthermore, an overnight chill allows the flavors of the Oreo cookies, vanilla, and whipped cream to fully integrate and deepen, resulting in a richer and more cohesive taste. The cake will be more stable, making it easier to slice and serve, and the layers will be perfectly set. If planning this dessert for a special event, preparing it the day before is highly recommended. Simply cover the dish tightly with plastic wrap to prevent any absorption of refrigerator odors and keep the cream fresh. This commitment to refrigeration ensures a truly decadent experience, mirroring the careful cooling needed for other creamy treats like Italian Cream Cake.
Expert Tips for a Perfect Cake
Don’t Over-Dip Oreos
One of the most common pitfalls when making an Oreo Icebox Cake is over-dipping the cookies. While a quick dip in milk is beneficial for softening, leaving the Oreos in the milk for too long will turn them mushy and difficult to handle. A soggy cookie base won’t provide the structural integrity needed for a layered cake and will result in a less appealing texture. Aim for a quick, 1-2 second dip per side. Just enough to moisten the surface, allowing the remaining softening to occur naturally during the extended chill time in the refrigerator. This precise approach ensures your layers are tender yet firm enough to hold their shape, contributing to a delightful eating experience with every creamy dessert bite. The goal is a tender cookie, not a disintegrating one.
Full-Fat Whipped Cream Advice
As mentioned previously, the choice of whipping cream is paramount. Always use heavy whipping cream for your Oreo Icebox Cake. Its higher fat content (typically 36% or more) is essential for creating a stable, airy, and rich whipped cream that holds its peaks and provides the luxurious mouthfeel central to this dessert. Lower-fat alternatives might whip up initially, but they are prone to deflating and releasing liquid, which can lead to a watery or less structured cake. For an extra touch of richness and flavor, ensure your vanilla extract is good quality. Some bakers also like to add a spoonful of cream cheese or mascarpone to their whipped cream mixture for added tang and stability, creating an even more decadent texture, although this is optional for a simple, classic cake. Proper whipping also helps: chill your bowl and whisk for 15 minutes before starting. This small step can make a big difference in achieving truly light and stable whipped cream layers for your family favorite treat. For more kitchen wisdom, check out Carina Recipes on Instagram.
Storing Your Delicious Oreo Treat
Keeping It Fresh and Tasty
Once your Oreo Icebox Cake has achieved its perfect chill and you’ve enjoyed a few slices, proper storage is key to keeping it fresh and tasty for as long as possible. Always store leftover cake in the refrigerator. The best method is to cover the baking dish tightly with plastic wrap or aluminum foil. This barrier prevents the cream from absorbing any unwanted odors from other foods in your fridge and helps maintain its moisture content, stopping the cookies from drying out (if they haven’t already softened completely) or becoming excessively wet. When properly stored, an Oreo Icebox Cake can remain fresh and delicious for 3-4 days. After this period, the texture might become too soft, or the cream might start to lose its freshness. For best quality, consume it within the recommended timeframe. If you anticipate having a lot of leftovers or want to prepare portions ahead of time, individual slices can also be stored in airtight containers, making them convenient for a quick sweet treat whenever the craving strikes. This attention to storage ensures every bite is as delightful as the first.
Elevating Your Creamy Icebox Cake
Adding Chocolate Shavings
While an Oreo Icebox Cake is undeniably delicious in its simplest form, there are numerous ways to elevate this creamy dessert and add an extra touch of elegance or flavor. One of the easiest and most visually appealing enhancements is adding chocolate shavings. After the final layer of whipped cream is spread and before the cake goes into its crucial chill, sprinkle a generous amount of chocolate shavings over the top. You can create these shavings yourself using a chocolate bar and a vegetable peeler or grater, or purchase pre-made chocolate curls. The type of chocolate is up to your preference – dark chocolate provides a rich contrast, milk chocolate adds extra sweetness, and white chocolate offers a beautiful visual appeal. The shavings not only add a luxurious textural element but also contribute to a more sophisticated presentation, making your simple dessert feel gourmet. Other options for topping include a drizzle of chocolate fudge, a scattering of mini chocolate chips, or even a sprinkle of crushed Oreos for added crunch. For those who enjoy extra chocolate, consider incorporating a chocolate ganache layer or a chocolate pudding layer within the cake for a truly decadent experience. These small additions can transform a simple icebox cake into a stunning centerpiece.
Understanding Your Icebox Cake Nutrition
Calories and Serving Size
Like many indulgent desserts, an Oreo Icebox Cake is a rich treat that should be enjoyed in moderation. The precise calorie count and nutritional information will vary significantly based on the specific ingredients used and the serving size. For instance, the type of Oreos (original, double-stuffed, thin), the amount of sugar added to the whipped cream, and the density of the cream itself will all play a role. A typical 9×13-inch cake, when cut into 12-16 servings, might yield a calorie count of approximately 300-450 calories per slice. It’s important to remember that these are estimates, and if you are closely monitoring your caloric intake, using a recipe calculator with your exact ingredients is advisable. A smaller serving size can, of course, help manage the caloric impact, allowing you to enjoy this creamy dessert without overindulging. Just as with making a balanced main course, understanding portion control is key for desserts too.
Key Nutritional Facts
Beyond calories, an Oreo Icebox Cake typically contains significant amounts of fats and sugars, primarily from the Oreo cookies and the heavy whipping cream. It will be relatively high in saturated fat due to the dairy components. Carbohydrates will largely come from the sugar in the cookies and added powdered sugar. Protein content will be minimal. Due to the processed nature of the cookies and dairy, it generally does not offer substantial amounts of vitamins or minerals, other than some calcium from the dairy. If you are aiming to adjust the nutritional profile, you could consider using reduced-fat Oreos (though this might affect texture) or sugar substitutes in the whipped cream. However, for a truly satisfying and classic sweet treat, the traditional recipe is usually preferred. It’s best viewed as an occasional treat rather than a staple, savored for its delightful taste and ease of creation.
Common Questions About Icebox Cake
How Long Does It Last?
A properly stored Oreo Icebox Cake will typically last for 3-4 days when kept refrigerated in an airtight container or tightly covered dish. The key to its longevity is preventing air exposure, which can dry out the cream or allow it to absorb other fridge odors. While it may technically be safe to eat for a bit longer, the texture and freshness will begin to decline after the fourth day, with the cookies potentially becoming too mushy and the cream less vibrant. For the best taste and texture, consuming it within 2-3 days of preparation is recommended. This timeline ensures you enjoy the icebox cake at its peak creamy dessert goodness. Always rely on visual cues and smell; if anything seems off, it’s best to discard it.
Can I Make It Ahead?
Absolutely, making an Oreo Icebox Cake ahead of time is not only possible but actually recommended for optimal results! As discussed, the extended chill time is crucial for the cookies to soften and for all the flavors to meld beautifully. Preparing it the day before your event or gathering (giving it a full 12-24 hours to chill) ensures the cake will be perfectly set, easy to slice, and at its most flavorful. This makes it an ideal dessert for entertaining, as it frees up your time on the day of the event. Simply assemble the cake, cover it tightly, and let your refrigerator do all the hard work. You can even add any desired toppings, like chocolate shavings, just before serving to maintain their freshness and aesthetic appeal. The convenience of this no-bake, make-ahead aspect further solidifies its status as a simple, sweet treat and a kitchen hero.
Enjoying Your No-Bake Oreo Dessert
Best Ways to Serve
Serving your perfectly chilled Oreo Icebox Cake is almost as enjoyable as making it. For neat slices, use a sharp knife that has been run under hot water and wiped clean between each cut. This helps prevent the cream from sticking and creates clean edges. The cake is typically served chilled, directly from the refrigerator. While delicious on its own, you can enhance the experience with simple garnishes. A dusting of cocoa powder, a few extra crushed Oreos, a dollop of fresh whipped cream, or a sprig of mint can add visual appeal and a touch of freshness. For those who love a textural contrast, a handful of fresh berries like raspberries or strawberries also pairs wonderfully with the rich chocolate and cream flavors. Serve it as a refreshing end to a summer meal, a comforting treat after a hearty dinner, or a festive addition to any celebration. Its versatility truly shines.
The Joy of Simple Desserts
The Oreo Icebox Cake stands as a testament to the joy and satisfaction that simple desserts can bring. In a world often filled with complex recipes and intricate techniques, this no-bake wonder reminds us that deliciousness doesn’t always require elaborate effort. It champions readily available ingredients, straightforward assembly, and the magic of patient chilling. This simplicity makes it accessible to everyone, from children learning to bake to busy adults seeking a quick yet impressive treat. It’s a reminder that sometimes the best things in life are the easiest to create, offering pure, unadulterated comfort and happiness in every creamy, cookie-filled bite. The success of this cake encourages us to explore more simple yet delicious main courses, embracing effortless cooking. For more inspiration, visit our desserts category.
