
The Irresistible Pistachio Tart is a delightful dessert that combines nutty flavors with a creamy texture. This recipe provides simple steps to create a show-stopping treat perfect for any occasion. Prepare to impress your guests with this vibrant, sweet, and utterly delicious tart.
Key Takeaways
- Follow simple steps for a homemade pistachio tart, ideal for dessert lovers.
- Achieve a perfect, crisp crust and a smooth, creamy pistachio filling.
- Utilize specific kitchen tools like a food processor for best results and fine texture.
- Discover tips for optimal serving, chilling, and enhancing the tart’s flavor profile.
This vibrant dessert offers a unique taste. Its nutty notes truly satisfy. The creamy texture is simply delightful. It’s surprisingly easy to make. A perfect treat for any table.
Why You’ll Love This Tart
The Irresistible Pistachio Tart is more than just a dessert; it’s an experience. Its unique blend of flavors and textures sets it apart from typical sweet treats. You’ll be captivated by the delicate crunch of the crust paired with the rich, creamy filling, all highlighted by the distinct, slightly sweet, and earthy taste of pistachios. This tart offers a sophisticated yet comforting appeal, making it a fantastic choice for family gatherings, holiday celebrations, or simply as a special indulgence on a quiet evening. It’s also visually stunning, with its vibrant green hue, making it a beautiful centerpiece on any dessert table. The aroma alone, as it bakes, will draw everyone to the kitchen, promising a memorable culinary delight. For those who appreciate desserts that are both elegant and simple to prepare, this pistachio tart recipe is truly a gem.
A Delicious Dessert Choice
Choosing this pistachio tart means opting for a dessert that balances richness with a refreshing quality. Unlike heavier, overly sweet pastries, this tart provides a harmonious blend of flavors that satisfies without overwhelming the palate. The natural sweetness of the pistachios, enhanced by a touch of sugar and vanilla, creates a filling that is both indulgent and incredibly smooth. It’s a wonderful alternative to common dessert recipes like peanut butter brownie swirl cookies, offering a more refined profile. Moreover, it’s a versatile dessert; while perfect on its own, it pairs beautifully with a dollop of whipped cream or a fresh berry compote. The subtle nutty notes contribute to a complex flavor profile that will leave your guests asking for the recipe. This tart truly makes for an unforgettable sweet pistachio dessert, offering a delightful twist on traditional baking.
Ingredients for Your Pistachio Tart
Crafting a truly Irresistible Pistachio Tart begins with selecting the right ingredients. Quality makes all the difference, especially when a key component like pistachios is involved. Ensure all your ingredients are fresh and at their best to achieve the perfect balance of flavor and texture. This recipe calls for simple, accessible items that, when combined correctly, create a spectacular dessert. Having everything measured and ready before you start will streamline the baking process, ensuring a smooth and enjoyable experience from start to finish. Think of it as assembling a culinary masterpiece, where each part plays a crucial role in the final delicious outcome. This careful preparation is part of what makes our easy-to-follow recipe so rewarding.
Quality Pistachios for Best Flavor
The star of this tart is, undoubtedly, the pistachio. For the most vibrant flavor and color, opt for high-quality, shelled, unsalted pistachios. While pre-shelled pistachios save time, shelling them yourself ensures maximum freshness. Look for nuts that have a bright green hue, indicating they are fresh and have not been exposed to light or air for too long. Avoid those that appear yellow or brownish, as this can be a sign of staleness. A good source for learning more about this wonderful nut is the Pistachio Wikipedia page. Using premium pistachios will impart a deep, authentic nutty flavor to your tart, elevating it from good to extraordinary. They contribute significantly to the overall texture and the beautiful emerald color of the filling.
Essential Tart Ingredients List
Beyond the pistachios, you’ll need a few other key items to bring your tart to life. Here’s what to gather:
- For the Crust: A pre-made sweet tart shell (or ingredients for a homemade one: flour, butter, sugar, egg yolk).
- For the Pistachio Base: Shelled, unsalted pistachios, granulated sugar, melted unsalted butter.
- For the Creamy Filling: Heavy cream, vanilla extract, more shelled, unsalted pistachios, powdered sugar.
- Optional for Garnish: Whipped cream, extra chopped pistachios, fresh berries.
Having this list ready ensures you won’t miss any critical components for your delicious pistachio flavor creation. Each ingredient plays a specific role, contributing to the perfect balance of sweetness, creaminess, and that distinct nutty essence that makes this tart truly irresistible. Make sure your butter is unsalted to control the overall sodium content.
Kitchen Tools for Tart Success
Having the right tools in your kitchen can make all the difference, especially when you’re aiming for tart perfection. While this recipe is straightforward, a few key pieces of equipment will simplify the process and help you achieve professional-looking results. You don’t need a professional chef’s arsenal, but having these specific items ready will ensure a smooth and efficient baking experience. Good preparation goes a long way in baking, and having your tools organized is just as important as having your ingredients measured. This section outlines the minimal yet effective tools you’ll need to confidently approach this wonderful recipe, ensuring that every step, from grinding nuts to chilling the final product, is handled with ease.
What Kitchen Tools You’ll Need
To successfully assemble your Irresistible Pistachio Tart, gather the following:
- 9-inch Tart Pan: Preferably with a removable bottom for easy serving.
- Food Processor: Absolutely crucial for grinding pistachios to a fine consistency.
- Mixing Bowls: Several sizes for combining ingredients.
- Whisk: For blending liquids and ensuring smoothness.
- Saucepan: For warming the cream for the filling.
- Rubber Spatula: For scraping bowls and folding ingredients.
- Measuring Cups and Spoons: For accurate ingredient quantities.
- Spatula or Offset Spatula: For spreading the crust and filling evenly.
These tools are common in most kitchens and will make the baking instructions much simpler to follow. A successful tart relies not just on good ingredients, but also on the correct application of appropriate kitchen aids. For more insights on various baking methods, including the importance of specific tools, you might visit our baking category.
Food Processor for Pistachios
The food processor is your best friend when it comes to preparing the pistachios for both the crust and the creamy filling. Its power and sharp blades allow you to quickly and efficiently grind the nuts to the desired consistency. For the crust, you’ll need finely ground pistachios, almost like a meal, to ensure a cohesive and sturdy base. For the filling, a slightly coarser grind can add a pleasant textural element, though a very fine paste is also achievable for a silkier finish. Using a food processor ensures consistency, which is difficult to achieve with hand chopping or other methods. This critical step sets the foundation for both the flavor and texture of your tart, truly highlighting the delicious pistachio flavor throughout.
Preparing the Easy Tart Shell
An Irresistible Pistachio Tart needs a foundation that’s just as delightful as its filling. While making a tart shell from scratch can be a rewarding culinary endeavor, this recipe emphasizes convenience without compromising on quality or flavor. Utilizing a pre-made tart shell significantly cuts down on preparation time, making this delicious dessert recipe accessible even for busy schedules. This approach allows you to focus more on the vibrant pistachio flavors of the filling, ensuring that the tart comes together quickly and easily. A good tart shell provides a buttery, slightly crisp contrast to the creamy filling, creating a perfect balance of textures in every bite. This streamlines the process for a quick and simple dessert.
Using a Pre-made Tart Shell
To make this pistachio tart truly effortless, we recommend starting with a high-quality pre-made sweet tart shell. These are readily available in most grocery stores, often in the freezer section or with other baking components. Look for an all-butter crust for the best flavor. Using a pre-made shell saves you the time and effort of mixing, chilling, rolling, and blind-baking your own dough. Simply unwrap the shell and place it into your 9-inch tart pan. This shortcut allows you to jump straight into preparing the rich pistachio base and creamy filling, getting you closer to enjoying your sweet pistachio dessert sooner. Make sure to choose a brand known for good quality to ensure the crust holds up well and provides the right texture. This is a key step towards achieving a perfect tart crust with minimal fuss.
Making the Ground Pistachio Base
The base of our Irresistible Pistachio Tart isn’t just a crust; it’s a flavorful layer infused with the rich essence of pistachios. This ground pistachio base provides a unique texture and complements the creamy filling beautifully. This step is crucial for developing the deep nutty flavor that defines this tart. Taking the time to properly grind the pistachios and combine the ingredients ensures a sturdy yet tender foundation. This base contributes to the overall delicious pistachio flavor and unique character of the dessert, setting it apart from more traditional tart recipes. Getting this layer just right is key to the tart’s success, making every bite a delightful combination of textures and tastes, a true satisfying sweet treat.
How to Grind Pistachios Finely
The secret to a perfect pistachio base lies in the consistency of your ground pistachios. Start with your shelled, unsalted pistachios. Place them in a food processor and pulse in short bursts. Avoid continuous blending, as this can release too much oil and turn the nuts into a paste rather than a meal. You want a fine, sandy texture, similar to breadcrumbs. This ensures the base will hold together well and have a uniform consistency. A fine grind also helps to release the nutty flavor more effectively, distributing it evenly throughout the crust. If you don’t have a food processor, a strong blender might work, but be cautious to avoid over-processing. This step is fundamental to achieving the desired texture for your perfect tart crust.
Combine Crust Ingredients Smoothly
Once your pistachios are finely ground, transfer them to a medium mixing bowl. Add the granulated sugar and melted unsalted butter. Use a rubber spatula or your hands to mix these ingredients thoroughly until they are well combined. The mixture should resemble wet sand and hold together when pressed. The melted butter acts as a binding agent, ensuring the crust will set firmly. Make sure there are no dry pockets of pistachio meal remaining, as this can lead to a crumbly base. A smooth, well-integrated mixture is essential for a cohesive and flavorful crust. This easy-to-follow recipe makes combining these ingredients a breeze.
Press Mixture into Tart Shell
Now, take your perfectly combined pistachio mixture and evenly press it into the bottom of your pre-made tart shell. Use the back of a spoon, a flat-bottomed glass, or your fingers to compact the mixture firmly and create an even layer. Ensure the base is level and extends uniformly across the bottom of the shell. This firm pressing is vital for preventing the crust from crumbling after baking and when slicing. Pay attention to the edges as well, making sure they are neat. This creates a solid foundation for the creamy pistachio filling to come. For another delicious dessert idea, consider our quick Italian cream cake.
Baking the Pistachio Crust Layer
Once your ground pistachio base is firmly pressed into the tart shell, the next crucial step is to bake it. This initial bake, often called blind baking for traditional crusts, helps to set the pistachio layer, preventing it from becoming soggy once the creamy filling is added. It also enhances the nutty flavor, creating a more pronounced and delicious foundation for your Irresistible Pistachio Tart. The aroma that will fill your kitchen during this stage is simply wonderful, a preview of the delightful treat to come. Proper baking instructions are key here to ensure the crust is golden and lightly crisp, providing the ideal contrast to the smooth filling. This step ensures a truly perfect tart crust.
Set Oven to 350 Degrees
Before placing your tart into the oven, ensure it is preheated to the correct temperature. Set your oven to 350°F (175°C). Allowing your oven to fully preheat is important for consistent baking results. A properly preheated oven ensures that the tart crust begins to bake immediately and evenly, preventing uneven cooking or a pale, undercooked base. Using an oven thermometer can help verify the actual temperature inside your oven, as some can run hotter or cooler than their dial indicates. This simple but important step ensures your baking instructions are followed precisely for optimal outcomes.
Bake for 10 Minutes, then Cool
Carefully place the tart shell with the pistachio base into the preheated oven. Bake for exactly 10 minutes. This short baking time is sufficient to lightly toast the pistachios, firm up the butter, and set the crust without overcooking it. Keep an eye on it to ensure it doesn’t brown too much. The edges should appear lightly golden, and the center should feel firm to the touch. Once baked, carefully remove the tart shell from the oven and place it on a wire rack to cool completely. It’s crucial that the crust is entirely cool before you add the creamy pistachio filling. Adding warm filling to a warm crust can lead to a less stable tart and affect the final texture. This cooling period ensures a solid structure for your exquisite sweet pistachio dessert.
Creating Creamy Pistachio Paste Filling
The heart of the Irresistible Pistachio Tart lies in its velvety, rich, and flavorful filling. This creamy pistachio paste is what elevates the dessert from good to truly extraordinary. Achieving the perfect consistency and flavor profile for this filling is key, and it involves a few simple yet important steps. The combination of warm cream, fragrant vanilla, and finely ground pistachios creates a harmonious blend that is both indulgent and incredibly satisfying. This section will guide you through the process, ensuring your filling is smooth, luscious, and bursting with delicious pistachio flavor. Get ready to create a filling that will make your tart unforgettable.
Warm Cream and Vanilla Slowly
In a small saucepan, combine the heavy cream and vanilla extract. Place the saucepan over low to medium heat, stirring occasionally. Your goal is to warm the cream gently until it’s just simmering, but not boiling. Boiling can cause the cream to separate or scorch. Warming the cream helps to infuse it with the vanilla flavor and ensures that it will blend smoothly with the other ingredients, creating a homogeneous and creamy mixture. The warmth also helps to release the aromatic compounds of the vanilla, contributing to the overall delightful fragrance and taste of the filling. This initial step is vital for a truly creamy pistachio filling.
Mix in Remaining Pistachios
Once the cream is warm, remove the saucepan from the heat. Carefully stir in the remaining finely ground pistachios and the powdered sugar. The warmth of the cream will help the powdered sugar dissolve smoothly and prevent a gritty texture. Continue stirring until all ingredients are well incorporated and you have a thick, fragrant paste. The amount of pistachios here contributes significantly to the richness and depth of flavor in the filling. If you want an even silkier texture, you can briefly blend this mixture in a food processor again, but typically, hand-stirring is sufficient for a wonderful creamy consistency. This is where the magic of the delicious pistachio flavor truly comes alive.
Stir Until Smooth and Creamy
After adding the pistachios and powdered sugar, continue to stir the mixture until it is completely smooth and creamy. Use a whisk to break up any lumps and ensure a uniform consistency. The filling should be thick enough to hold its shape but still pourable. Taste a small amount and adjust the sweetness if necessary; some prefer it a little sweeter, while others enjoy a more pronounced nutty taste. This careful stirring ensures a luscious texture that melts in your mouth, making every bite of your Irresistible Pistachio Tart a moment to savor. This creamy pistachio filling is a highlight for holiday dessert tables or any special occasion. For another elegant dessert, try our vanilla bean creme brulee cheesecake cupcakes.
Filling Your Pistachio Tart Shell
With both your perfectly baked crust and your rich, creamy filling ready, the moment arrives to bring these two delightful components together. This step is straightforward but requires a gentle hand to ensure an even distribution of the filling within the tart shell. The contrast between the firm, nutty crust and the smooth, vibrant green filling is not just a treat for the palate but also a feast for the eyes. This part of the process is quick and brings you one step closer to enjoying your truly irresistible pistachio tart. Ensure your workspace is clean and organized, and you’ll complete this step with ease, moving closer to a beautiful and satisfying sweet treat.
Pour Filling into Cooled Shell
Ensure that your pistachio crust layer has cooled completely to room temperature before proceeding. This is critical to prevent the warm filling from softening the crust, which could lead to a less stable and potentially soggy tart. Carefully pour the creamy pistachio paste filling into the cooled tart shell. Use a rubber spatula to scrape all the filling from the bowl, ensuring none of that delicious pistachio flavor goes to waste. Gently spread the filling evenly across the crust using the back of a spoon or an offset spatula, creating a smooth, level surface. Take your time to make sure the filling is distributed uniformly, reaching all edges of the crust. This meticulous step contributes to the aesthetic appeal and overall texture of your elegant dessert, making it perfect for entertaining guests.
Chilling for Irresistible Pistachio Tart
Once the creamy filling has been poured into the crust, the next essential step is chilling. This is not just a suggestion but a critical part of the recipe that allows the tart to set properly, firm up, and develop its full flavor. Rushing this stage can result in a gooey, unstable tart that is difficult to slice and less enjoyable to eat. Patience here truly pays off, transforming the components into a cohesive, sliceable, and utterly delicious sweet pistachio dessert. The chilling process allows the fats in the filling to solidify and the flavors to meld, creating a more pronounced and satisfying taste. This is a crucial step in achieving the desired consistency for your irresistible pistachio tart.
Refrigerate for At Least Two Hours
Cover the filled tart loosely with plastic wrap to prevent any odors from the refrigerator from affecting its delicate flavor. Carefully transfer the tart to the refrigerator and chill for a minimum of two hours. For the best results and a truly firm, sliceable tart, it’s highly recommended to chill it for four hours or even overnight. This extended chilling time allows the creamy pistachio filling to completely set, resulting in a firm yet smooth texture that holds its shape beautifully when sliced. When you’re looking for a holiday dessert or something special for entertaining guests, this make-ahead dessert aspect is incredibly convenient, allowing you to prepare it in advance and simply serve when needed. This ensures your tart is perfectly firm and ready for enjoyment.
Serving Your Delightful Pistachio Tart
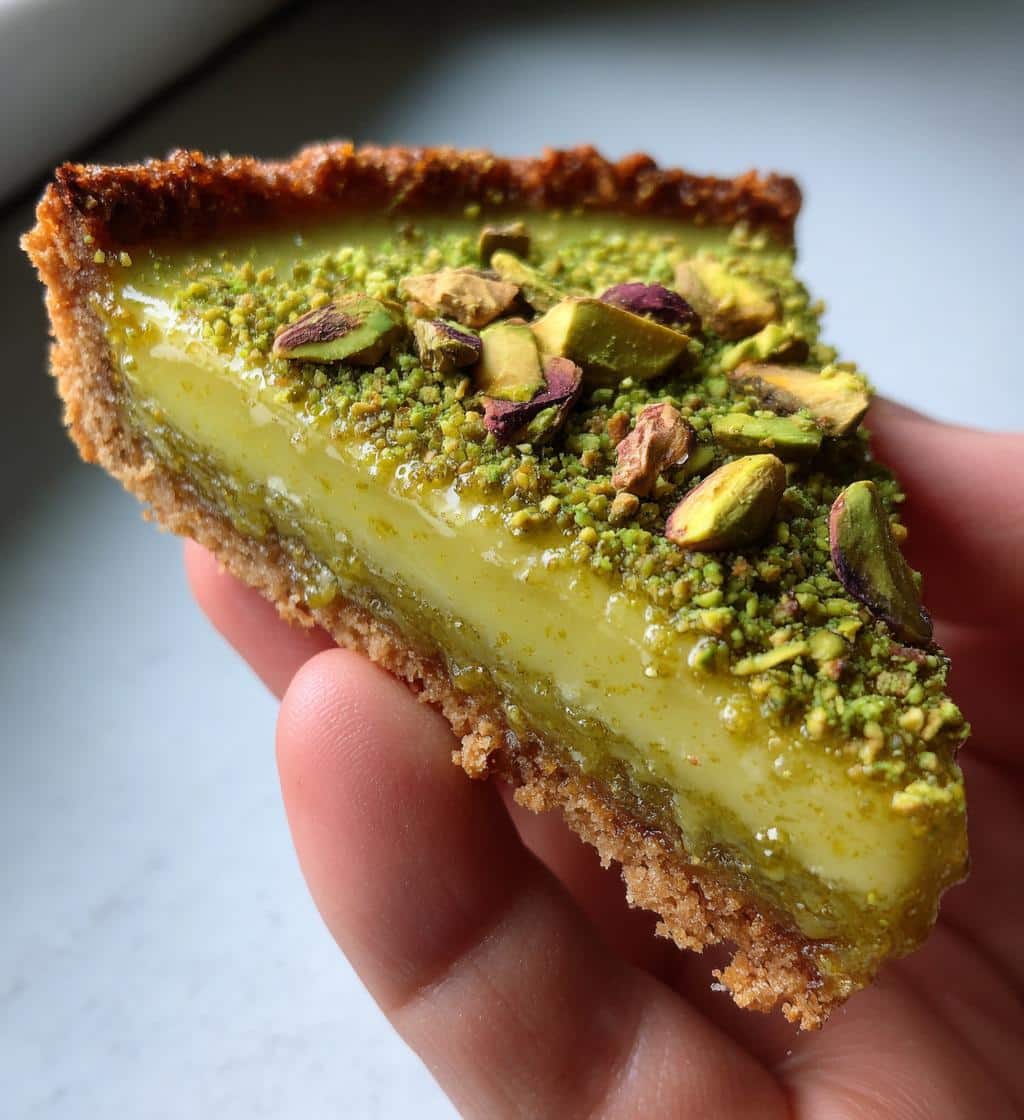
After the crucial chilling period, your Irresistible Pistachio Tart is finally ready to be enjoyed. Serving this delightful dessert is the culmination of your efforts, and a few simple tips can enhance the presentation and make the experience even more special. The vibrant green of the pistachio filling, contrasted with the golden-brown crust, makes for a visually appealing treat that’s sure to impress. Whether you’re serving it to family or entertaining guests, thoughtful presentation adds to the enjoyment. This section will guide you on how to best slice your tart and suggest a classic topping that complements its rich flavors beautifully, making it a perfect tart for any occasion.
How to Slice Your Tart
To achieve clean, neat slices, remove the tart from the refrigerator about 15-20 minutes before serving. This allows the filling to soften just slightly, making it easier to cut without cracking the crust or squishing the filling. Use a sharp, thin-bladed knife, and wipe the blade clean between each cut to ensure crisp edges. Gently press down and then slice through, rather than sawing. For a standard 9-inch tart, you can typically get 8 to 12 slices, depending on the desired portion size. If your tart pan has a removable bottom, carefully push up from the base to release the tart before slicing. This technique will ensure each piece of your sweet pistachio dessert looks as good as it tastes.
Add Whipped Cream Topping
While the pistachio tart is delicious on its own, a dollop of freshly whipped cream can elevate it to new heights. The light, airy sweetness of the cream provides a perfect counterpoint to the rich, nutty filling. You can also sprinkle a few extra chopped pistachios on top for added texture and visual appeal, or garnish with a fresh raspberry or a mint sprig for a pop of color. This simple addition enhances the overall delicious pistachio flavor profile, making it an even more satisfying sweet treat. For more dessert inspiration and vibrant presentations, follow us on Pinterest and Instagram.
Pistachio Tart Nutrition: What to Know
Understanding the nutritional aspects of your Irresistible Pistachio Tart can be helpful, especially if you’re mindful of your dietary intake. While this dessert is undoubtedly a delicious indulgence, it’s good to have a quick overview of its calorie content and key nutritional values. Like most desserts, it’s meant to be enjoyed in moderation, offering a satisfying sweet treat. This section provides a brief look at what you can expect from a typical serving, helping you make informed choices without detracting from the joy of a homemade tart. Remember, homemade treats allow you to control ingredients, offering a healthier option compared to many store-bought alternatives.
Quick Look at Calories
A single slice of this pistachio tart, depending on portion size and specific ingredient brands, can range from approximately 300 to 450 calories. This figure accounts for the butter-rich crust, the sugar content, and the energy density of the pistachios and cream. While it’s a higher calorie count, it’s on par with many other rich desserts like a slice of cake or pie. For a more precise calculation, consider using an online nutrition calculator with your exact ingredients and measurements. This quick look helps you enjoy your sweet pistachio dessert as part of a balanced diet.
Key Nutritional Values
Beyond calories, the Irresistible Pistachio Tart offers several key nutritional values from its primary ingredients. Pistachios are known for being a good source of healthy fats (monounsaturated and polyunsaturated), protein, fiber, and essential minerals like potassium and magnesium. They also provide antioxidants. The dairy in the cream contributes calcium. While sugar and saturated fats are present, the presence of beneficial nutrients from the pistachios offers some redeeming qualities. Enjoying this tart is about savoring its delicious pistachio flavor and unique texture while being aware of its contribution to your daily intake. For further reading on the nutritional benefits of nuts, the Wikipedia page on nuts is a great resource.
Extra Tips for Tart Perfection
Crafting an Irresistible Pistachio Tart is a rewarding experience, and with a few extra tips, you can ensure your creation reaches true perfection. These insights go beyond the basic baking instructions, offering ways to customize your tart and guarantee the best possible flavor. From fine-tuning the sweetness to selecting the finest ingredients, these suggestions are designed to empower you to make this dessert uniquely yours and undeniably delicious. Whether you’re a seasoned baker or just starting, these tips will help you achieve a show-stopping result that will impress everyone at the table. These simple baking tips can really make a difference.
Adjust Sugar to Your Taste
The beauty of homemade desserts is the ability to customize them to your preference. The recipe provides a standard amount of sugar for both the crust and the filling, but feel free to adjust it. If you prefer a less sweet dessert, reduce the amount of granulated sugar in the crust and powdered sugar in the filling by 1-2 tablespoons. If you have a sweeter tooth, you can add a bit more. When making the filling, taste a small amount before pouring it into the shell. This allows you to fine-tune the sweetness to your liking, ensuring the delicious pistachio flavor is perfectly balanced with the right amount of sugary goodness. This adaptability makes it truly an easy-to-follow recipe.
Use Fresh Pistachios for Flavor
As mentioned earlier, the quality of your pistachios directly impacts the final flavor of your tart. Always opt for fresh, shelled, unsalted pistachios. Stale pistachios can impart an off-flavor and a dull appearance. If you buy pistachios in bulk, store them in an airtight container in the refrigerator or freezer to extend their freshness. Buying them from a reputable source that has a high turnover will also help ensure you’re getting the freshest nuts available. The vibrant green color and rich, nutty flavor of fresh pistachios are non-negotiable for creating an Irresistible Pistachio Tart that truly shines. This focus on ingredients creates a fantastic holiday dessert.
