
Peanut butter cheesecake recipe is a delightful dessert that combines rich flavors with a smooth texture. This simple dessert is perfect for any occasion, offering a homemade cheesecake experience without excessive fuss. Learn how to create this sweet treat with our detailed steps for a truly rewarding result.
Key Takeaways
- Achieve a perfect cookie crust easily without complex techniques.
- Master the creamy peanut butter filling with simple mixing steps.
- Bake your cheesecake to perfection, avoiding common pitfalls like cracks.
- Understand the importance of chilling for the best flavor and texture.
- Explore creative topping ideas to customize your delicious treat.
- Learn practical tips for making ahead and freezing slices.
Cheesecake often seems complex. But this recipe simplifies the process. Enjoy a creamy texture. Achieve perfect results with ease. A delightful dessert awaits.
Gathering Ingredients for Peanut Butter Cheesecake
Creating a truly magnificent peanut butter cheesecake recipe begins with selecting the right ingredients. The quality of your components directly influences the final taste and texture of this creamy peanut butter dessert. We break down what you’ll need for each layer, ensuring you have everything on hand before you start baking. Having all your ingredients prepped and measured makes the entire process smoother and more enjoyable, leading to a truly rewarding homemade cheesecake experience.
What You Need for the Crust
The foundation of this rich dessert is a simple yet flavorful cookie crust. For this, you will need about 24 chocolate sandwich cookies (like Oreos), which equates to roughly 2 cups of crushed crumbs. Ensure you use the entire cookie, including the cream filling, as this adds to the richness and helps bind the crust together. Additionally, you’ll need 6 tablespoons of melted unsalted butter. The butter binds the cookie crumbs, creating a sturdy and delicious base that complements the creamy filling beautifully. This cookie crust is incredibly easy to prepare and sets the stage for a wonderful dessert. Consider checking out our other desserts for more sweet inspiration!
Key Filling Items
The heart of your peanut butter cheesecake recipe lies in its luxurious, smooth, and creamy filling. You’ll need two 8-ounce blocks of full-fat cream cheese, softened to room temperature, which is crucial for achieving a lump-free mixture. Granulated sugar and light brown sugar provide the perfect balance of sweetness, enhancing the peanut butter flavor without overpowering it. Of course, the star ingredient is 1 cup of creamy peanut butter; we’ll discuss types later, but a good quality, creamy variety works best here. A teaspoon of vanilla extract adds warmth and depth to the flavor profile. Three large eggs are necessary for structure, ensuring the cheesecake sets properly without becoming too dense. A pinch of salt balances the sweetness and brings out the nutty notes of the peanut butter. These ingredients combine to form an irresistible peanut butter cheesecake filling.
Fun Topping Options
While the peanut butter cheesecake is delicious on its own, adding toppings can elevate it to an even more spectacular sweet treat. Think about a decadent chocolate ganache drizzle, a dollop of fluffy whipped cream, or even some extra chopped peanuts for texture. Other popular options include a warm peanut butter drizzle, chocolate shavings, or mini chocolate chips. These choices offer a fantastic opportunity to customize your dessert and cater to different preferences. We’ll cover some specific ideas later, but feel free to get creative with your favorite flavor combinations.
Making the Cookie Crust Simple
A great cheesecake starts with a fantastic crust, and this peanut butter cheesecake recipe is no exception. Our cookie crust is both simple to make and incredibly flavorful, providing the perfect counterpoint to the rich, creamy filling. Forget complicated techniques; we’re focusing on ease and deliciousness. This section guides you through preparing and baking the crust to perfection, ensuring a sturdy and tasty base for your homemade cheesecake. It’s truly an easy baking step!
How to Crush Cookies
Crushing cookies for your crust is straightforward. The easiest method is to use a food processor. Simply add your chocolate sandwich cookies (cream and all) to the food processor and pulse until fine crumbs form. Be careful not to overprocess, as you want crumbs, not a paste. If you don’t have a food processor, a zip-top bag and a rolling pin work just as well. Place the cookies in a sturdy bag, seal it, and roll over them repeatedly with the rolling pin until they are finely crushed. This method is surprisingly therapeutic! Once crushed, transfer the crumbs to a medium bowl.
After crushing, combine the cookie crumbs with 6 tablespoons of melted unsalted butter. Stir thoroughly until all the crumbs are moistened. The mixture should resemble wet sand. This butter is crucial; it acts as the binding agent, ensuring your cookie crust holds its shape. Press the mixture firmly into the bottom of a 9-inch springform pan. Use the bottom of a flat-bottomed glass or your hands to create an even, compact layer. The firmer you press, the less likely your crust is to crumble when sliced. This simple dessert base is ready for its quick bake.
Baking the Crust Perfectly
Baking the crust helps it set and become even more stable. Preheat your oven to 350°F (175°C). Place the springform pan with the pressed crust into the preheated oven and bake for 8-10 minutes. This short baking time helps the butter solidify within the crumbs, creating a crispier texture and preventing a soggy crust once the filling is added. Keep an eye on it to ensure it doesn’t burn. You’re looking for a lightly fragrant, golden-brown crust.
Once baked, remove the crust from the oven and let it cool completely on a wire rack while you prepare the filling. Cooling is an important step to prevent the warm crust from melting the cream cheese in the filling, which could affect the final texture. A well-prepared and cooled crust is the secret to a professional-looking and tasting cheesecake. This simple cookie crust is a key component to our easy cheesecake recipe, setting it apart as a favorite among sweet treats.
Mixing the Peanut Butter Filling Smooth
The creamy peanut butter filling is the star of this easy cheesecake recipe. Achieving a smooth, lump-free consistency is vital for that melt-in-your-mouth experience. This section guides you through each step of mixing, emphasizing techniques that prevent overmixing and ensure a wonderfully creamy texture. Follow these instructions carefully to create a filling that’s truly irresistible for your homemade cheesecake.
Cream Cheese Prep
The most important step for a smooth filling is starting with softened cream cheese. Take your two 8-ounce blocks of full-fat cream cheese out of the refrigerator at least an hour before you plan to bake, or even two hours if your kitchen is cool. Room temperature cream cheese mixes easily, creating a silky batter without lumps. Cold cream cheese will resist blending, leading to a lumpy texture and requiring more mixing, which can incorporate too much air. Once softened, place the cream cheese in a large mixing bowl. Using an electric mixer on medium speed, beat the cream cheese until it’s completely smooth and creamy, usually for about 2-3 minutes. Scrape down the sides of the bowl frequently to ensure even mixing.
Blending Sugars and Peanut Butter
Next, gradually add the granulated sugar and light brown sugar to the cream cheese, beating on medium-low speed until just combined. The brown sugar adds a subtle caramel note that pairs wonderfully with the peanut butter. Continue mixing until the sugars are fully incorporated and the mixture is light and fluffy. Then, add the 1 cup of creamy peanut butter and 1 teaspoon of vanilla extract. Beat on low speed until the peanut butter is fully integrated into the cream cheese mixture, ensuring no streaks remain. Again, scrape the bowl often. The goal is a uniform, creamy consistency. For another peanut-flavored sweet treat, you might enjoy these Peanut Butter Brownie Swirl Cookies.
Adding Eggs Without Overmixing
This is a critical step for preventing cracks in your finished cheesecake. Add the three large eggs one at a time, beating on the lowest speed after each addition. Mix just until the yolk disappears into the batter. Overmixing the eggs incorporates too much air into the batter, which causes the cheesecake to puff up significantly during baking and then collapse and crack as it cools. Gentle mixing ensures a dense, creamy texture. After adding the last egg, give the bowl a final scrape and a quick mix on low to ensure everything is just combined. Your smooth, rich, and creamy peanut butter dessert filling is now ready for the pan.
Baking Your Perfect Peanut Butter Cheesecake
Baking a cheesecake can seem intimidating, but with the right techniques, you can achieve a perfectly set, crack-free, and delightfully creamy peanut butter cheesecake. This section will guide you through filling the pan, understanding oven time and doneness, and the crucial cooling process. Our goal is to demystify cheesecake baking, making this easy cheesecake a rewarding experience. You’ll soon have a stunning homemade cheesecake that’s a true sweet treat.
Filling the Pan
Once your creamy peanut butter filling is prepared, carefully pour it over the cooled cookie crust in your springform pan. Use a spatula to gently spread the filling evenly across the crust, ensuring it reaches the edges. Lightly tap the pan on your counter a few times to release any large air bubbles that might be trapped in the batter. This step helps prevent air pockets in the finished cheesecake. Make sure the springform pan is placed on a baking sheet; this offers stability and catches any potential drips, keeping your oven clean. This preparation ensures a smooth, even surface for your delicious peanut butter dessert.
Oven Time and Doneness
Preheat your oven to 325°F (160°C). Unlike some cheesecakes, this peanut butter cheesecake recipe does not require a water bath, simplifying the process significantly. Bake for 50-60 minutes. The key to knowing when your cheesecake is ready is the “jiggle test.” Gently nudge the pan; the edges of the cheesecake should appear set, while the very center (about a 2-inch diameter) should still have a slight wobble or jiggle. It shouldn’t be liquidy, but a subtle movement indicates it’s cooked just enough. Overbaking can lead to a dry texture and cracks. If you’re looking for other impressive baked goods, consider our Vanilla Bean Creme Brulee Cheesecake Cupcakes.
Cooling Gently to Avoid Cracks
Once the cheesecake passes the jiggle test, turn off the oven but leave the cheesecake inside with the oven door propped open slightly (a wooden spoon works well for this) for about an hour. This gradual cooling process is crucial for preventing cracks. A sudden change in temperature can cause the cheesecake to contract too quickly, leading to those unwelcome fissures on the surface. After an hour in the cooling oven, remove the cheesecake and place it on a wire rack to cool completely to room temperature. This can take another 1-2 hours. Do not rush this step. Once cooled, cover the cheesecake loosely with plastic wrap and transfer it to the refrigerator for its crucial chilling time.
Chilling and Topping Your Dessert
The journey to a perfect peanut butter cheesecake doesn’t end when it comes out of the oven. Chilling is a critical step, allowing the flavors to meld and the texture to firm up beautifully. Only after proper chilling should you consider adding creative toppings to your creamy peanut butter dessert. This section details the importance of fridge time and offers exciting ideas to transform your easy cheesecake into an even more spectacular sweet treat.
Fridge Time for Best Taste
After cooling to room temperature, your peanut butter cheesecake needs a minimum of 6 hours in the refrigerator, but preferably overnight. This extended chilling time is non-negotiable for achieving the ideal creamy and dense texture that makes cheesecake so enjoyable. During chilling, the fats in the cream cheese and peanut butter solidify, and the flavors deepen and harmonize. Trying to slice and serve the cheesecake before it’s fully chilled will result in a messy, unset dessert. Patience here will be greatly rewarded with a firm, perfectly sliceable, and intensely flavored homemade cheesecake that is sure to impress.
Adding Creative Toppings
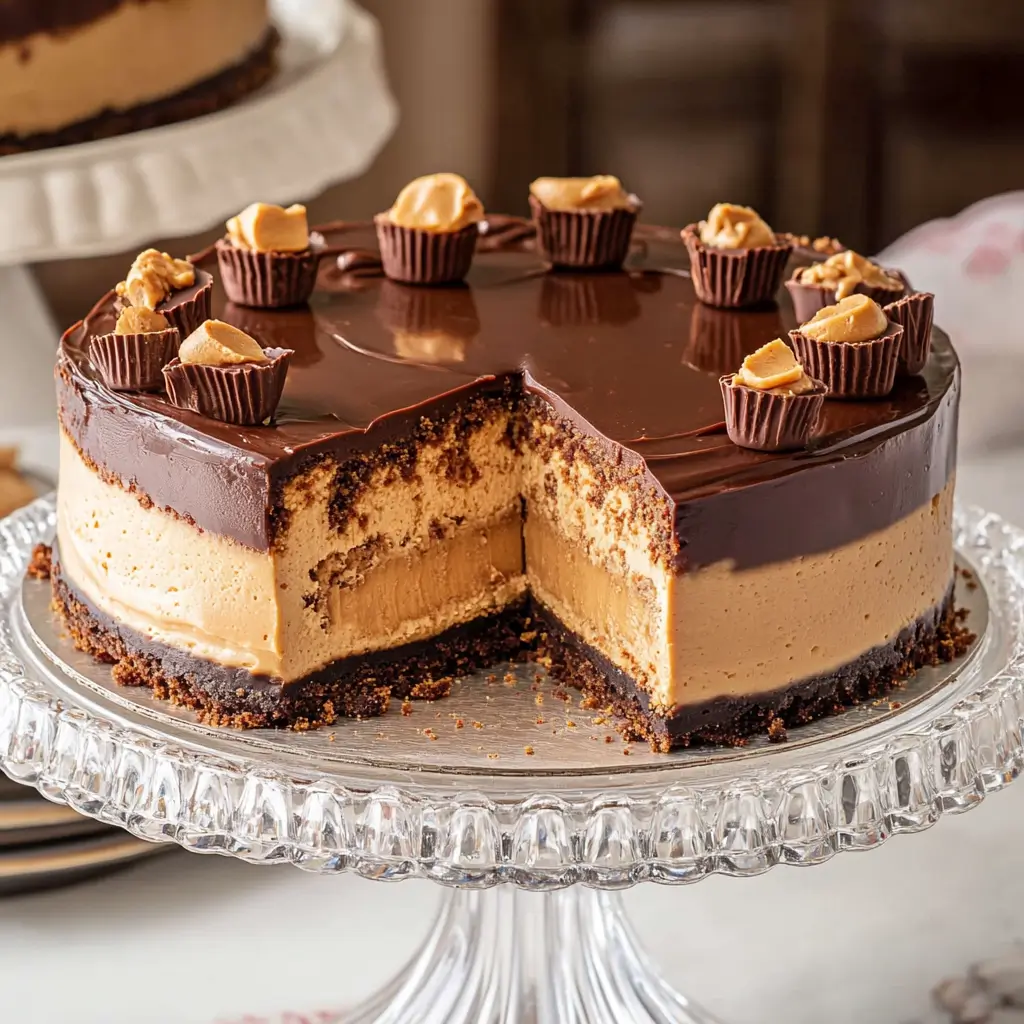
Once your cheesecake is thoroughly chilled, it’s time for the fun part: adding toppings! This is where you can truly personalize your peanut butter cheesecake. A simple dusting of cocoa powder or a drizzle of melted chocolate is always a good start. For something more decadent, consider a luscious chocolate ganache or a generous swirl of whipped cream. You can also sprinkle on chopped roasted peanuts for added crunch and flavor, or even mini peanut butter cups. For those who love a double dose of peanut goodness, a warm peanut butter drizzle creates an incredible effect. Get creative and make this already rich dessert even more special. You can find more dessert ideas on our Pinterest!
Important Notes for Cheesecake Success
Making a successful peanut butter cheesecake, especially for an easy cheesecake recipe, often involves understanding a few key principles. These tips are designed to simplify the process and ensure you achieve fantastic results every time. From baking methods to preparation timelines, these insights will help you create a creamy peanut butter dessert that tastes expertly made, even if it’s your first time baking a homemade cheesecake.
No Water Bath Needed
Many traditional cheesecake recipes call for a water bath, a technique used to provide a moist baking environment and prevent cracks. However, for this specific peanut butter cheesecake recipe, a water bath is not necessary! This simplifies the baking process significantly, making it less intimidating for home bakers. The combination of ingredients and precise baking instructions ensures a smooth, crack-free surface without the added hassle. Just remember to follow the cooling instructions carefully, as they are key to achieving that perfect finish without a water bath. This makes it a truly simple dessert.
Making Ahead Tips
Cheesecake is an excellent dessert to make ahead of time, which is perfect for entertaining or busy schedules. You can prepare and bake the entire peanut butter cheesecake up to 2-3 days in advance. Once it has completely cooled and chilled, cover it tightly with plastic wrap and store it in the refrigerator. The flavors often deepen and improve after a day or two, making it an even richer dessert. When you’re ready to serve, simply remove it from the fridge, let it sit at room temperature for about 15-20 minutes for optimal texture, and then add your desired toppings. This foresight allows for stress-free serving and enjoyment, making your sweet treat experience even better.
Freezing Peanut Butter Cheesecake Slices
One of the best qualities of this easy cheesecake recipe is its freezer-friendly nature. If you find yourself with leftovers (a rare occurrence for this creamy peanut butter dessert!) or want to prepare portions for later, freezing is an excellent option. Properly frozen slices maintain their delicious flavor and smooth texture, ensuring you can enjoy this sweet treat whenever a craving strikes. This section details the best methods for freezing and thawing your homemade cheesecake.
How to Freeze and Thaw
To freeze individual slices, first ensure the cheesecake is fully chilled. Slice the cheesecake into desired portions. Place the slices on a baking sheet lined with parchment paper and freeze for about 1-2 hours, or until firm. This initial freeze prevents them from sticking together. Once firm, wrap each slice tightly in plastic wrap, then an additional layer of aluminum foil. Place the double-wrapped slices in a freezer-safe bag or airtight container. Frozen cheesecake slices can be stored for up to 1-2 months. For comparison, a traditional cheesecake can also be frozen in similar ways.
To thaw, remove a wrapped slice from the freezer and place it in the refrigerator overnight, or for at least 4-6 hours. For a quicker thaw, you can leave a wrapped slice at room temperature for about 1-2 hours, though the texture might be slightly softer. Avoid using a microwave, as this can alter the texture of the cream cheese. Once thawed, you can enjoy your perfectly preserved peanut butter cheesecake, as delicious as the day it was made. This method is fantastic for portion control and ensuring you always have a delightful rich dessert on hand.
Choosing the Right Peanut Butter Type
The type of peanut butter you choose can significantly impact the final texture and flavor of your creamy peanut butter dessert. For this peanut butter cheesecake recipe, the consistency and sweetness of your chosen spread are important considerations. Understanding the differences between common varieties will help you achieve the best possible homemade cheesecake results. Let’s look at your options to perfect this sweet treat.
Smooth vs. Natural Peanut Butter
For this easy cheesecake recipe, creamy, processed peanut butter (like Jif or Skippy) is generally recommended. These types contain added sugars and oils that give them a consistent, smooth texture and a predictable sweetness. This consistency is ideal for creating a perfectly smooth cheesecake batter that sets up well. The added emulsifiers also prevent oil separation, which can be an issue with natural varieties.
Natural peanut butter (which often contains only peanuts and salt, or just peanuts) can be used, but with a few caveats. Natural peanut butter tends to be thicker and can sometimes separate into oil and solids. If using natural peanut butter, stir it very thoroughly to recombine the oil before measuring. You might also find the resulting cheesecake has a slightly denser texture and a less sweet, more intense peanut flavor. If you prefer a more pronounced, less sweet peanut taste, natural can work, but for the classic, rich, and creamy peanut butter cheesecake, stick with the regular, smooth variety. Read more about peanut butter on Wikipedia.
Peanut-Free Cheesecake Allergy Swaps
Not everyone can enjoy the classic peanut butter cheesecake due to allergies. However, that doesn’t mean you have to miss out on a delicious, creamy dessert with a similar profile. This section offers a fantastic allergy-friendly alternative, ensuring everyone can enjoy a version of this easy cheesecake. Making these simple swaps allows for a safe yet equally delightful homemade cheesecake, offering a delicious sweet treat for all.
Using Sunflower Seed Butter
For a delicious peanut-free alternative, sunflower seed butter (often sold as SunButter) is an excellent choice. It offers a similar creamy texture and nutty flavor profile to peanut butter, making it a perfect substitute in this recipe. When swapping, use sunflower seed butter in the same quantity as peanut butter (1 cup). The consistency is very similar, so no other adjustments to the recipe are usually needed. Be aware that sunflower seed butter can sometimes react with baking soda or powder, turning baked goods a greenish color; however, since this recipe doesn’t contain those leavening agents in the filling, you shouldn’t encounter this issue. The rich flavor of sunflower seed butter creates a wonderfully creamy dessert that closely mimics the original peanut butter experience, allowing those with peanut allergies to safely enjoy this rich dessert.
Knowing When Your Cheesecake is Ready
Determining the perfect moment to remove your peanut butter cheesecake from the oven is crucial for achieving that ideal creamy texture and preventing cracks. Overbaking can lead to a dry, dense cheesecake, while underbaking results in a runny, unset center. This section focuses on the key indicator for doneness, ensuring your easy cheesecake comes out perfectly every time, contributing to a truly impressive homemade cheesecake.
The Jiggle Test
The “jiggle test” is the most reliable method for determining if your peanut butter cheesecake is ready. After the recommended baking time (around 50-60 minutes at 325°F or 160°C), gently open the oven door and carefully give the pan a light nudge. You’re looking for a specific kind of movement. The outer 2-3 inches of the cheesecake should appear set and firm, while the very center (a circle about 2-3 inches in diameter) should still have a slight, soft jiggle. It should look like firm gelatin, not liquidy batter. If the entire cheesecake still wobbles significantly, it needs more time. If no part of it jiggles, it’s likely overbaked. This subtle jiggle indicates that the residual heat will continue to cook the center as it cools, leading to a perfectly creamy, set texture. Trust the jiggle; it’s the secret to a flawless rich dessert.
Delicious Topping Ideas for Your Treat
While the peanut butter cheesecake recipe is a flavorful triumph on its own, adding the right toppings can elevate it from a delicious sweet treat to an unforgettable dessert. Toppings provide an extra layer of flavor, texture, and visual appeal, allowing you to customize your easy cheesecake for any occasion. This section explores some classic and irresistible options to finish your creamy peanut butter dessert with a flourish, making your homemade cheesecake even more special.
Chocolate Ganache and Whipped Cream
A classic pairing for peanut butter is chocolate, and a rich chocolate ganache is a perfect complement to this cheesecake. To make a simple ganache, heat 1/2 cup of heavy cream until just simmering, then pour it over 4 ounces of finely chopped semi-sweet or dark chocolate. Let it sit for 5 minutes, then whisk until smooth and glossy. Drizzle this decadent ganache generously over your chilled cheesecake. For added elegance and a delightful contrast in texture, serve slices with a dollop of freshly whipped cream. The coolness and lightness of the whipped cream beautifully balance the richness of the peanut butter and chocolate, creating a truly luxurious experience. You can find more inspiration on our Instagram!
Warm Peanut Butter Drizzle
For the ultimate peanut butter lover, a warm peanut butter drizzle adds another layer of nutty goodness. Simply combine 1/2 cup creamy peanut butter with 2-3 tablespoons of milk (or cream) and 1 tablespoon of powdered sugar in a small saucepan over low heat. Whisk until smooth and warm, adding more milk if needed to reach a drizzly consistency. This warm, slightly sweet sauce is incredible drizzled over individual slices just before serving. It enhances the peanut flavor and adds a lovely touch of warmth. Alternatively, crushed peanuts, mini chocolate chips, or even a sprinkle of sea salt can add a fantastic textural contrast and intensify the flavors of this already phenomenal rich dessert. Don’t forget to check out our Quick Italian Cream Cake for another wonderful dessert idea.
Enjoying Easy Peanut Butter Cheesecake
After all your efforts, the best part of any peanut butter cheesecake recipe is undoubtedly enjoying the fruits of your labor. This easy cheesecake is designed for delightful consumption, whether for a special occasion or a simple weeknight treat. To ensure you can savor every last bite, knowing how to properly store leftovers is key. This section provides practical advice for maximizing the enjoyment and longevity of your creamy peanut butter dessert.
Storing Leftovers
Proper storage is essential to keep your homemade cheesecake fresh and delicious. Any leftover peanut butter cheesecake should be stored in an airtight container in the refrigerator. If you have a springform pan with a lid, that works perfectly. Otherwise, transfer slices to a container or cover the remaining cheesecake tightly with plastic wrap directly on the plate or pan. Stored correctly, the cheesecake will remain fresh and tasty for up to 5-7 days in the refrigerator. This allows you to enjoy a slice of this rich dessert over several days, making it an ideal sweet treat to have on hand. Always bring individual slices to room temperature for about 15-20 minutes before serving for the best texture and flavor, ensuring the creaminess is perfectly restored.
