
Decadent Chocolate Danish brings bakery-quality taste directly to your kitchen. This straightforward recipe helps you craft delicious, flaky pastries filled with creamy chocolate goodness. Ideal for breakfast, brunch, or a sweet treat anytime. Get ready to impress with your homemade danish, perfect for any occasion.
Key Takeaways
- Effortlessly bake rich chocolate cream cheese danishes at home.
- Utilize store-bought puff pastry for quick and easy preparation.
- Achieve golden perfection with a simple egg wash and precise baking.
- Perfect for breakfast, brunch, or a delightful dessert.
Sweet cravings? Make a chocolate danish. It’s surprisingly simple to prepare. Fresh ingredients yield best results. Enjoy this pastry warm. A perfect treat awaits you.
Bake Your Decadent Chocolate Danish
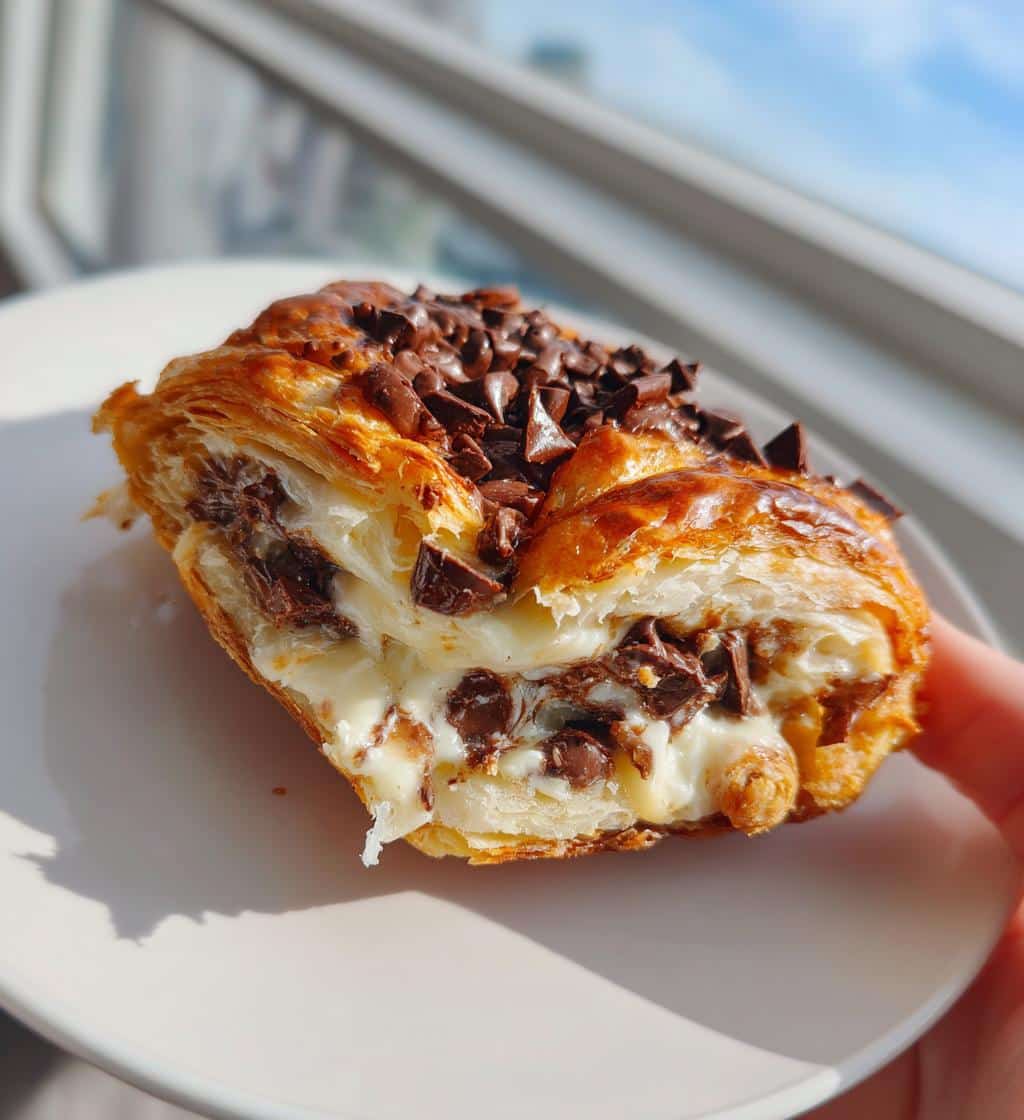
Imagine warm, flaky pastry, a luscious cream cheese and chocolate filling, all baked to golden perfection right in your own kitchen. This decadent chocolate danish recipe is designed to make that dream a reality, proving that bakery-quality treats are entirely achievable for the home baker. Forget complicated techniques; we’re focusing on simple steps that yield incredible results. From preheating your oven to the final sprinkle of chocolate chips, every stage is crafted for ease and deliciousness. This sweet breakfast pastry is an ideal way to brighten any morning or conclude a special meal.
Preheat Oven to 400°F
The first crucial step in creating your delicious chocolate cream cheese danish is to preheat your oven. A consistent temperature is vital for the puff pastry to rise properly and achieve that desirable flaky texture. Set your oven to 400°F (200°C) and allow it ample time to reach and maintain this heat. This ensures that when your danishes go in, they start baking immediately and evenly. Precision here sets the stage for golden-brown edges and a perfectly cooked interior. While your oven heats, you can begin preparing your ingredients, making the process seamless and efficient, much like preparing a quick Italian cream cake for another delightful dessert.
Get Your Ingredients Ready
Preparation is key to a smooth baking experience. Before you even touch the puff pastry, gather all your ingredients. This mise en place approach saves time and prevents last-minute scrambling. Ensure your cream cheese is softened to room temperature, your chocolate chips are measured, and any other components are readily accessible. This step not only makes the process more enjoyable but also helps ensure you don’t miss anything, contributing to the flawless execution of your homemade danish. Having everything organized will make the assembly phase feel almost effortless.
Gather Ingredients for Your Danish
Creating a truly decadent chocolate danish starts with selecting the right components. For this recipe, we prioritize both quality and convenience. You won’t need an extensive shopping list, which makes this quick dessert even more appealing. The beauty of these homemade danishes lies in how a few simple items combine to produce something extraordinary. Think of these as the building blocks for your sweet breakfast pastry masterpiece.
Puff Pastry Package
The star of the show, besides the filling, is undoubtedly the puff pastry. Opt for a good quality, store-bought frozen puff pastry package. This is where the “easy baking” aspect truly shines. Thaw it according to package directions, usually in the refrigerator overnight or at room temperature for about 30-40 minutes. Look for brands known for their buttery flavor and flakiness. A well-chosen puff pastry will give your danishes that signature crisp, airy texture that is so desirable. It’s the foundation upon which your chocolate cream cheese danish will be built, ensuring a light and delicious base for your gourmet breakfast.
Cream Cheese and Chocolate
The heart of your danish will be the rich and creamy filling. You’ll need softened cream cheese, preferably full-fat for the best texture and flavor. Alongside this, a generous amount of chocolate chips – semi-sweet or dark, depending on your preference – will provide that irresistible chocolate lover’s treat element. The combination of tangy cream cheese and sweet chocolate creates a balanced and incredibly satisfying flavor profile. Don’t forget a touch of vanilla extract and sugar to sweeten the cream cheese, making it truly divine. This simple danish filling makes these pastries a standout for any weekend brunch ideas.
Prepare Puff Pastry for Danish
With your ingredients ready, it’s time to transform the simple puff pastry into the foundation of your decadent chocolate danish. Handling puff pastry correctly is crucial for achieving that characteristic flaky texture. Work relatively quickly to keep the pastry cool, as warmth can make it sticky and harder to manage. A lightly floured surface is your best friend during this stage.
Roll Out Pastry
Once thawed, gently unroll your puff pastry sheet onto a lightly floured surface. You might need to give it a light roll with a rolling pin to even it out slightly or to achieve a specific thickness. Aim for a uniform thickness across the entire sheet, typically around 1/8 to 1/4 inch. This ensures even baking and consistent flakiness throughout your finished pastries. Don’t overwork the pastry; a light touch is key to maintaining its delicate layers. Proper rolling technique contributes significantly to the overall aesthetic and taste of your homemade danish, just as careful preparation is essential for a good Southern-style collard green and potato stew.
Cut Into Squares
After rolling, use a sharp knife or a pizza cutter to divide the pastry sheet into squares. A common size is about 4×4 inches, which yields a good portion size for a single danish. The number of squares you get will depend on the size of your original pastry sheet. Try to make the cuts clean and straight for neat, uniformly sized pastries. These squares will be the base for your chocolate cream cheese danish, ready to be filled and folded into their classic shape. This systematic approach makes the assembly process straightforward and ensures each sweet breakfast pastry looks as appealing as it tastes.
Making Cream Cheese Filling
The heart of these delicious danishes lies in their rich, sweet, and slightly tangy cream cheese filling. This component truly elevates the homemade danish from a simple baked good to a gourmet breakfast item. The process is straightforward, requiring just a few simple steps and ingredients to create a luscious mixture that perfectly complements the flaky pastry.
Mix Cream Cheese
Start by placing your softened cream cheese in a mixing bowl. It’s crucial that the cream cheese is at room temperature; this prevents lumps and ensures a smooth, creamy consistency. Use an electric mixer on medium speed, or a sturdy spatula, to beat the cream cheese until it’s light and fluffy. This aeration process makes the filling incredibly smooth and spreadable, a perfect counterpoint to the puff pastry dessert. Don’t rush this step, as a well-mixed base is essential for the overall quality of your chocolate cream cheese danish.
Add Vanilla and Sugar
Once the cream cheese is smooth, it’s time to add the sweeteners and flavorings. Incorporate granulated sugar (or powdered sugar for an even smoother texture) and a generous splash of pure vanilla extract. These ingredients not only sweeten the filling but also add depth and warmth to its flavor profile. Continue mixing until everything is well combined and the sugar has dissolved. Taste and adjust sweetness if desired, keeping in mind the additional sweetness from the chocolate chips to come. This sweet cream cheese mixture forms the foundation for a truly irresistible treat.
Fold in Half Chips
Finally, gently fold in about half of your chocolate chips. The key here is “fold” – you don’t want to beat them in, which could crush them or melt them prematurely if the mixture is too warm. A spatula is ideal for this. Distributing the chips evenly ensures that every bite of your chocolate danish recipe offers a delightful burst of chocolate. The remaining half of the chocolate chips will be reserved for sprinkling on top before baking. This delightful filling isn’t just for pastries; it’s a versatile flavor profile that could even enhance other desserts found in our desserts category.
Assemble Decadent Chocolate Cream Cheese Danish
Now comes the satisfying part: bringing all the elements together to form your beautiful, homemade chocolate cream cheese danishes. This assembly stage is where your puff pastry squares meet their delicious destiny with the creamy chocolate filling. Precision and a gentle touch will ensure your danishes look as good as they taste, ready to become the star of any sweet breakfast pastry spread or weekend brunch ideas.
Spoon Filling on Pastry
Take each prepared puff pastry square and place a generous spoonful of the cream cheese and chocolate filling in the center. Don’t overfill, as you’ll need room to fold the pastry corners. Aim for about 1.5 to 2 tablespoons per square, leaving a clear border around the edges. The visual appeal of these baked goods starts here; a well-placed dollop of filling makes all the difference. This step is what truly defines your chocolate danish recipe, setting the stage for the flavorful burst in every bite.
Fold Pastry Corners
To achieve the classic danish shape, take two opposite corners of each pastry square and gently fold them towards the center, overlapping them slightly over the filling. Press down lightly to secure them. Some recipes also suggest folding all four corners to the center, creating a more enclosed parcel, but the two-corner fold is simpler and very effective for this design. The aim is to create a cradle for the filling while still allowing some of it to be visible. This technique not only looks traditional but also helps prevent the filling from oozing out during baking, ensuring your sweet breakfast pastry holds its shape. For more visual inspiration on these and other delicious pastries, consider visiting our Pinterest page.
Bake Until Golden Perfection
The moment of truth arrives when your assembled danishes enter the oven. Baking is where the magic truly happens, transforming raw ingredients into a golden, flaky, and aromatic chocolate lover’s treat. Achieving that coveted “golden perfection” requires a few key steps that will ensure your homemade danishes are not just delicious, but also visually stunning, making them perfect for any gourmet breakfast or special occasion.
Brush With Beaten Egg
Before baking, an egg wash is a simple yet powerful secret weapon for creating that beautiful, glossy, golden-brown finish. Whisk one egg with a tablespoon of water or milk until well combined. Lightly brush this mixture over the exposed puff pastry on each danish. This not only enhances the color but also contributes to the pastry’s crispness. Be careful not to let the egg wash drip onto your baking sheet, as it can cause the pastry to stick. This little step makes a huge difference in the final presentation of your sweet breakfast pastry.
Sprinkle Remaining Chips
Once brushed with the egg wash, it’s time for the final touch: sprinkling the remaining chocolate chips over the exposed cream cheese filling and even a bit onto the pastry. This adds an extra burst of chocolate flavor and creates an appealing, rustic look. As the danishes bake, these chips will soften and slightly melt, becoming wonderfully gooey. This extra sprinkle ensures every bite delivers maximum chocolate impact, solidifying its status as a true chocolate lover’s treat. It’s a simple addition that adds significant visual and textural appeal.
Bake for 15-20 Minutes
Carefully transfer your baking sheet of danishes to the preheated 400°F (200°C) oven. Bake for approximately 15 to 20 minutes. Keep a close eye on them, as oven temperatures can vary. The danishes are ready when the puff pastry is puffed up, deeply golden brown, and the filling is set and slightly bubbly. The aroma filling your kitchen will be your best indicator! Once baked, remove them from the oven and let them cool on the baking sheet for a few minutes before transferring them to a wire rack. This period is crucial, allowing them to firm up slightly. If you’re a fan of quick and easy baking, you might also appreciate how efficiently you can prepare snickerdoodle cobbler, another delightful dessert.
Helpful Tips for Perfect Danish
While this chocolate danish recipe is designed for simplicity and success, a few insider tips can elevate your homemade danish from good to truly exceptional. These small adjustments can make a significant difference in texture, flavor, and overall enjoyment, ensuring your sweet breakfast pastry stands out every time.
Use Fresh Puff Pastry
The quality of your puff pastry is paramount. While store-bought is perfectly acceptable and encouraged for ease, ensure it’s fresh and hasn’t been sitting in your freezer for too long. Check the expiration date. Older pastry might not puff up as dramatically or have the same buttery flavor. Properly thawing it is also key; rapid thawing can make it sticky and difficult to work with. Using a high-quality, fresh puff pastry is arguably the most important factor for achieving that enviable flaky crust in your chocolate cream cheese danish. It makes all the difference for a gourmet breakfast experience.
Add Nuts for Crunch
For those who love a little extra texture, consider incorporating chopped nuts into your danish. Toasted pecans, walnuts, or almonds can add a delightful crunch and a subtle nutty flavor that complements the chocolate and cream cheese beautifully. You can either mix them directly into the cream cheese filling before folding in the chocolate chips, or sprinkle them on top of the danishes along with the reserved chocolate chips before baking. This simple addition can transform your quick dessert into an even more complex and satisfying chocolate lover’s treat, making it a fantastic option for weekend brunch ideas.
Serving Your Delicious Danish
After all your effort in baking, the final step is to enjoy your homemade chocolate cream cheese danishes. How you serve them can truly enhance the experience, making them an even more irresistible sweet breakfast pastry or a delightful dessert. The waiting is almost as crucial as the baking itself.
Let Them Cool Down
It’s tempting to devour these warm, straight from the oven, but for optimal enjoyment, it’s important to let your danishes cool down for at least 10-15 minutes on a wire rack. This cooling period allows the filling to set properly and prevents any burning sensations from molten chocolate or cream cheese. The pastry also benefits from this time, firming up to its ideal flaky texture. Patience here is rewarded with a more structurally sound and enjoyable gourmet breakfast. Resist the urge, and you’ll be glad you did.
Best When Served Warm
While cooling is important, these decadent chocolate danishes are undeniably at their peak when served warm. After they’ve cooled sufficiently to handle, a quick 10-15 second reheat in the microwave can bring back that comforting warmth and slightly gooey chocolate. They pair wonderfully with a cup of coffee for a morning pastry, or a glass of milk as a quick dessert. They are also fantastic with a dusting of powdered sugar for an extra touch of elegance. This simple danish makes for perfect weekend brunch ideas or a special treat anytime, embodying the essence of easy baking and pure bliss. For more delicious recipes and kitchen inspiration, be sure to follow us on Instagram!
Decadent Chocolate Danish Nutrition
Understanding the nutritional profile of your homemade chocolate cream cheese danish can be helpful, especially if you’re mindful of your dietary intake. While these are certainly a treat and a chocolate lover’s delight, knowing what goes into each sweet breakfast pastry allows for informed enjoyment. This section provides a general overview, as exact figures can vary based on specific ingredients and portion sizes.
Calories Per Danish
The caloric content of each decadent chocolate danish will largely depend on the size of your pastry squares, the amount of cream cheese and chocolate filling, and the type of puff pastry used. On average, a homemade danish of this size and richness can range anywhere from 250 to 400 calories. This makes them a substantial morning pastry or a fulfilling quick dessert. If you’re looking to manage calorie intake, consider making slightly smaller squares or using a lighter cream cheese option, though this may alter the texture slightly. These are perfect for special occasions, so enjoy them as an indulgence.
Fat and Sugar Info
Given the primary ingredients – puff pastry (butter-rich), full-fat cream cheese, and chocolate chips – these danishes will naturally be high in fat and sugar. Each danish can contain a significant amount of saturated fat and sugars. The sugar content comes from both the added sugar in the filling and the natural sugars in the chocolate. While delicious, they are best enjoyed as an occasional treat rather than a daily staple, fitting perfectly into the category of “treat yourself.” For a deeper scientific explanation of how different fats and sugars interact in baking, you might find resources on Wikipedia’s page on Sugar helpful.
Quick Prep, 10 Easy Danish Steps
One of the most appealing aspects of this chocolate danish recipe is its remarkable efficiency. Despite yielding a gourmet breakfast item, the actual time spent on preparation and baking is surprisingly minimal. This makes it an ideal choice for those busy mornings when you crave something special but don’t have hours to spare, or for a last-minute quick dessert that impresses.
Only 20 Minutes Prep
From thawing the puff pastry (assuming you did it overnight) to mixing the filling and assembling the danishes, the active preparation time is genuinely short. With everything laid out, you can realistically have your danishes ready for the oven in about 20 minutes. This “easy baking” factor is a huge draw for this homemade danish, making it accessible even for novice bakers. It truly embodies the idea of a simple danish that delivers complex flavors without complex steps. This efficiency means you can enjoy these baked goods more often, fitting them into your routine for a delightful morning pastry or a chocolate lover’s treat.
20 Minutes Cooking
Once assembled, the danishes bake quickly, typically in another 15-20 minutes. This means that from start to finish (excluding thawing time), you could be enjoying warm, flaky, chocolate cream cheese danishes in under an hour. The quick cooking time ensures the puff pastry becomes perfectly golden and crisp, and the filling warms through without overcooking. This rapid turnaround time means less waiting and more savoring, perfectly aligning with the desire for a quick dessert. It’s truly a testament to how simple ingredients and smart techniques can create a gourmet breakfast experience with minimal fuss. Enjoy the sweet rewards of your efficient efforts.
Why This Decadent Danish is Pure Bliss
Beyond its simple preparation and delicious taste, there’s a certain joy that comes from biting into a freshly baked homemade chocolate cream cheese danish. It’s more than just a sweet breakfast pastry; it’s an experience that brings comfort, indulgence, and a touch of everyday luxury. This recipe captures the essence of a bakery-quality treat, made with love in your own kitchen.
Enjoy Sweetness Easily
The ability to create such a rich and satisfying sweet breakfast pastry with minimal effort is a primary reason this chocolate danish recipe brings pure bliss. There’s no need for elaborate techniques or exotic ingredients. The combination of flaky puff pastry and a creamy, chocolate-infused filling is a classic for a reason – it simply works. It’s an easy baking project that yields impressive results, making it suitable for any skill level. The immediate gratification of enjoying warm, freshly baked goods is a happiness that’s hard to beat, making it a perfect example of how to “treat yourself” with a simple danish. It’s truly a chocolate lover’s treat that’s easily within reach, bringing a delightful start to your weekend brunch ideas.
Enjoy Your Homemade Chocolate Cream Cheese Danish
You’ve successfully baked a batch of exquisite chocolate cream cheese danishes! This journey from simple ingredients to a gourmet breakfast delight is a testament to the joy of easy baking. Whether you’re sharing them with loved ones or savoring one all by yourself, each flaky, chocolate-filled bite is a reward for your efforts. This homemade danish truly embodies comfort and indulgence, making it more than just a quick dessert.
Perfect for Any Occasion
The beauty of these decadent chocolate danishes lies in their versatility. They are perfect for a special Sunday morning breakfast, a delightful addition to a weekend brunch spread, or a comforting sweet treat enjoyed with an afternoon coffee. They make wonderful contributions to potlucks, bake sales, or simply as an everyday luxury when you want to “treat yourself.” The elegant appearance combined with the irresistible flavor ensures they are always a hit. This chocolate danish recipe is a valuable addition to any home baker’s repertoire, promising pure bliss and countless delicious moments for any chocolate lover’s treat.
