
Creamy Chocolate Fudge is a classic sweet treat that brings joy to any occasion. Learning to make this rich confection at home is simpler than you might imagine. Follow our easy recipe steps to create smooth, delicious fudge perfect for sharing with loved ones or savoring yourself. Get ready for a delightful baking experience.
Key Takeaways
- Making homemade fudge is straightforward with basic ingredients.
- Precise cooking steps lead to consistently smooth, creamy results.
- Proper cooling and thoughtful storage maintain optimal freshness and texture.
- Customize flavors and textures to add a personal touch to your sweet creations.
Homemade fudge offers pure delight. It is a wonderfully rewarding activity. The process creates lasting memories. Enjoy rich, comforting flavors. Share this sweet happiness with others.
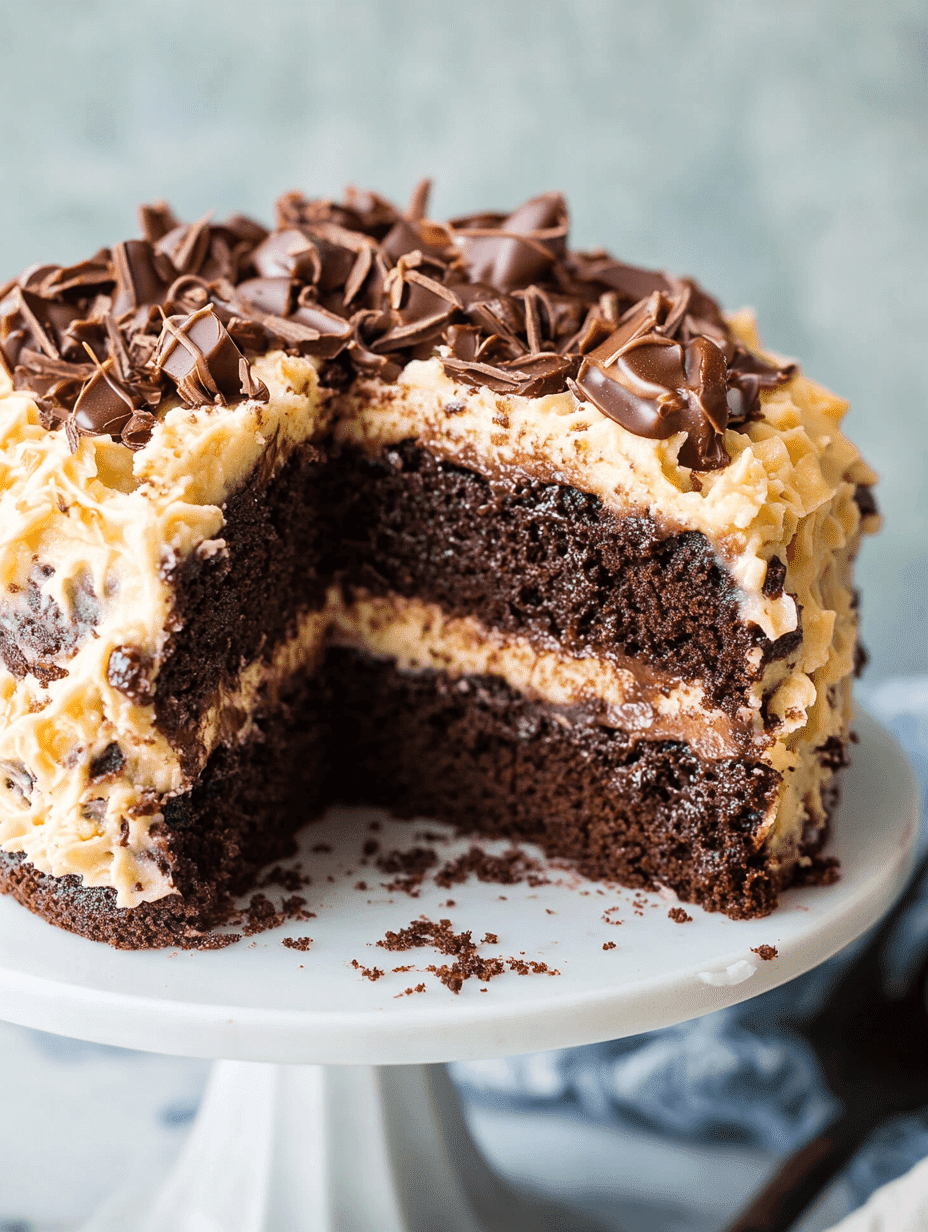
Make Creamy Chocolate Fudge Today
There’s something truly special about the aroma of homemade fudge wafting through your kitchen. It promises a delightful indulgence that few can resist. Crafting creamy chocolate fudge from scratch is not only a rewarding culinary experience but also surprisingly achievable, even for those new to candy making. Forget about store-bought versions; our simple recipe guides you through each step, ensuring you achieve that perfect melt-in-your-mouth texture and rich chocolatey flavor every single time. Imagine presenting a platter of these velvety squares, knowing you’ve created them with care. This delightful sweet treat is ideal for family gatherings, quiet evenings, or as a thoughtful gift. It’s a process that builds confidence in the kitchen and yields a delicious reward. So, if you’re ready to transform simple ingredients into an irresistible dessert, let’s get started. Dive into the world of homemade candy and see how easy it is to create a truly memorable confection.
If you enjoy creating wonderful desserts, consider trying our Quick Italian Cream Cake for another satisfying baking adventure.
Essential Ingredients for Fudge
Gather all items beforehand
Before you even think about turning on the stove, it’s crucial to have all your ingredients measured and ready. This practice, known as mise en place, streamlines the cooking process and prevents frantic searching midway through. For creamy chocolate fudge, precision matters, especially when dealing with sugar and liquids. Having everything at your fingertips ensures a smooth, uninterrupted flow, allowing you to focus on the cooking itself rather than scrambling for a missing item. Take a moment to read through the entire recipe first, then gather your sugar, evaporated milk, butter, chocolate chips, vanilla extract, and a pinch of salt. This simple preparatory step significantly reduces stress and increases your chances of achieving perfect fudge.
Simple pantry staples needed
One of the best aspects of making homemade fudge is that it relies on common ingredients you likely already have in your pantry. You won’t need to hunt for obscure items; just a few basic staples come together to create something truly magical. The core components include granulated sugar, which provides the essential sweetness and structure, and evaporated milk, lending that signature creamy richness. Butter adds a silky texture and decadent flavor, while a good quality chocolate is, of course, non-negotiable for an authentic chocolate fudge experience. Vanilla extract brightens the overall flavor profile, and a tiny pinch of salt balances the sweetness, enhancing all the other notes. These humble ingredients, when combined correctly, undergo a delightful transformation into a luscious, sweet treat that tastes far more complex than its simple origins suggest. Opt for good quality ingredients, especially your chocolate, as this will noticeably impact the final flavor.
Cooking Your Chocolate Fudge Mix
Combine sugar, cream, butter
The journey to perfect creamy chocolate fudge begins with careful heating. In a heavy-bottomed saucepan, combine your granulated sugar, evaporated milk, and butter. A heavy-bottomed pan is absolutely key here, as it distributes heat more evenly, reducing the risk of scorching, which can ruin your fudge. Stir these ingredients together over medium heat, allowing the butter to melt and everything to integrate thoroughly. The goal at this stage is to create a homogenous mixture before it comes to a boil. Patience and consistent stirring are your friends, ensuring no sugar crystals cling to the bottom or sides of the pan. This foundational step sets the stage for the smooth texture we’re aiming for.
Stir until sugar dissolves
Continue stirring the mixture gently but consistently until all the sugar crystals have completely dissolved. You can test this by rubbing a small amount of the liquid between your fingers; if it feels gritty, keep stirring. If it’s smooth, you’re on the right track. This is a critical step because any undissolved sugar crystals can lead to grainy fudge, which is exactly what we want to avoid for that coveted creamy texture. Once the sugar has dissolved, bring the mixture to a rolling boil. At this point, avoid stirring excessively, as introducing too much agitation can also encourage sugar crystallization. Let the mixture boil undisturbed, allowing it to reach the correct temperature for candy making.
Simmer gently for 5 minutes
Once your mixture reaches a rolling boil, reduce the heat slightly to maintain a gentle simmer. Let it continue to cook for exactly 5 minutes, without stirring. During this time, the mixture will thicken and concentrate, developing the proper consistency for fudge. It’s important to monitor it closely to prevent it from boiling over or burning. If you have a candy thermometer, aim for a temperature of 234-236°F (112-113°C), which is the soft-ball stage. However, for this simple recipe, timing for 5 minutes after reaching a boil works wonderfully. Remove the pan from the heat immediately after the 5 minutes are up to prevent overcooking, which can result in hard, crumbly fudge. This precise cooking time is vital for ensuring your fudge achieves its signature smooth, soft texture.
For more delightful dessert ideas, check out our Desserts category, where you’ll find plenty of inspiration for your next sweet creation.
Achieving Smooth, Creamy Fudge
Add chocolate chips off heat
The moment the saucepan is removed from the heat, it’s time to incorporate the star ingredient: chocolate chips. Immediately add your chocolate chips to the hot mixture. The residual heat from the cooked sugar, cream, and butter will be sufficient to melt the chocolate chips slowly and evenly. Resist the urge to stir just yet; allow the chocolate to sit for a few minutes, giving it time to soften and melt naturally into the warm base. This gentle melting process helps prevent the chocolate from seizing or becoming gritty, contributing to the exceptionally smooth texture of your final fudge. Using high-quality chocolate chips can make a significant difference here, providing a richer and more satisfying flavor.
Stir in vanilla and salt
After letting the chocolate chips sit and soften for a couple of minutes, begin to stir the mixture gently. Use a sturdy spoon or spatula to fold the melted chocolate into the sugar base until the mixture is completely smooth, glossy, and uniformly combined. There should be no streaks of unmixed chocolate or lumps. Once smooth, stir in the vanilla extract and a pinch of salt. The vanilla enhances the chocolate flavor, adding a warm, aromatic depth, while the salt brilliantly cuts through the sweetness, balancing the overall taste profile. These final additions are crucial for developing the rich, complex flavors that make homemade chocolate fudge so irresistible. Continue stirring until the mixture is thick and just begins to lose its shine, indicating it’s ready for setting. Proper stirring at this stage ensures a truly creamy, non-grainy fudge.
Setting Your Perfect Fudge
Prepare dish with parchment
Proper preparation of your baking dish is paramount for easy removal and perfect presentation of your creamy chocolate fudge. Line an 8×8-inch or 9×9-inch baking dish with parchment paper, allowing an overhang on two sides. This parchment paper acts as a sling, making it incredibly simple to lift the set fudge out of the pan without any sticking or damage. You can also lightly grease the dish before adding the parchment paper for extra insurance, although the overhang is usually sufficient. A well-prepared dish means less fuss later and ensures your beautiful fudge squares maintain their pristine shape. This small step saves a lot of potential headaches and cleanup.
Pour warm mixture evenly
Once your dish is ready, immediately pour the warm, glossy fudge mixture into the prepared pan. Work quickly but carefully, as the fudge will begin to set as it cools. Use a spatula to spread the mixture evenly into the corners, creating a flat, uniform surface. The goal is to achieve an even thickness throughout the pan, which will result in consistently sized and textured fudge squares when cut. You can gently tap the pan on your counter a couple of times to release any air bubbles and help settle the mixture. Avoid over-handling or smoothing too much, as this can affect the texture. A smooth, even surface now translates to beautiful, professional-looking fudge later.
Cool completely before cutting
The waiting game is often the hardest part when making fudge, but patience is key for a truly perfect result. Allow the fudge to cool completely at room temperature for at least 2-4 hours, or even longer. For best results, some prefer to let it set overnight. While it might be tempting to speed up the process by placing it in the refrigerator, rapid cooling can sometimes lead to a less creamy texture. The slow cooling process allows the sugar crystals to properly stabilize, creating that desired smooth, rich consistency. The fudge should be firm to the touch and hold its shape perfectly before you attempt to cut it. A fully cooled fudge will slice cleanly, giving you those ideal, delicious squares.
Slicing Your Creamy Fudge Squares
Lift fudge using paper
Once your creamy chocolate fudge has cooled and set completely, the parchment paper sling becomes your best friend. Gently lift the entire block of fudge out of the baking dish by holding onto the overhangs of the parchment paper. Place the fudge block on a clean cutting board. This method ensures that your fudge remains intact and pristine, preventing any damage that might occur from trying to pry it directly from the pan. It’s a simple trick that makes the final step of preparation much easier and mess-free, allowing you to focus on getting those perfect cuts.
Cut into desired shapes
With the fudge on your cutting board, it’s time to transform the block into individual, bite-sized pieces. Use a large, sharp knife to cut the fudge. For cleaner cuts, you can warm the knife slightly under hot water and wipe it dry between each cut. This helps prevent the fudge from sticking to the blade and creates smoother edges. Decide on your preferred size; traditional fudge is often cut into 1-inch or 1.5-inch squares. You can also get creative and use small cookie cutters for festive shapes, especially during holidays. After slicing, arrange your beautiful creamy chocolate fudge squares on a serving platter or prepare them for storage. Each piece is a testament to your careful craftsmanship, ready to be enjoyed.
Storing Delicious Fudge Properly
Room temperature up to two weeks
Proper storage is key to maintaining the delightful texture and fresh taste of your homemade creamy chocolate fudge. For immediate consumption or short-term storage, keeping fudge at room temperature is ideal. Place the fudge in an airtight container to protect it from drying out and absorbing other odors. If you stack the pieces, you might want to place small squares of parchment paper between layers to prevent them from sticking together. Stored this way, your delicious fudge will remain fresh, soft, and utterly irresistible for up to two weeks. Ensure it’s kept in a cool, dry place away from direct sunlight or heat, which can cause it to melt or become oily.
Refrigerate or freeze longer
If you’ve made a large batch or want to extend the shelf life of your creamy chocolate fudge, refrigeration or freezing are excellent options. To refrigerate, store the fudge in an airtight container in the fridge for up to 3-4 weeks. Be aware that refrigeration can sometimes alter the texture slightly, making it firmer. For longer storage, freezing is your best bet. Wrap individual pieces or small blocks of fudge tightly in plastic wrap, then place them in an airtight freezer-safe container or bag. Frozen fudge can last for up to 3-4 months. When you’re ready to enjoy it, simply thaw it at room temperature, and it will return to its wonderfully creamy state. This makes homemade fudge an excellent make-ahead treat for special occasions or unexpected cravings.
Tips for Best Chocolate Fudge
Use heavy-bottomed saucepan
The choice of saucepan might seem minor, but it plays a significant role in the success of your creamy chocolate fudge. A heavy-bottomed saucepan is highly recommended because it distributes heat much more evenly than thinner pans. This even heat distribution prevents hot spots that can cause the sugar mixture to burn or crystallize on the bottom, leading to grainy or scorched fudge. It also maintains a more consistent temperature, which is vital for achieving the correct candy stage. Investing in a good quality heavy-bottomed pan will not only benefit your fudge-making but also improve many other aspects of your cooking.
Don’t overcook the mixture
Overcooking is one of the most common pitfalls in fudge making. If the sugar mixture boils for too long or reaches too high a temperature, the resulting fudge will be hard, crumbly, and dry, losing that desired creamy texture. Conversely, undercooking will prevent the fudge from setting properly, leaving it gooey or sticky. Precision is key during the boiling stage. Stick to the recommended cooking time of 5 minutes after a rolling boil, or use a candy thermometer to ensure it reaches the soft-ball stage (234-236°F / 112-113°C) accurately. Remove the pan from heat promptly when the target is reached to halt the cooking process.
High-quality chocolate makes difference
While all ingredients contribute to the final product, the quality of your chocolate has a profound impact on the flavor and texture of your creamy chocolate fudge. Opt for good quality chocolate chips or finely chopped baking chocolate that you enjoy eating on its own. Better chocolate will melt more smoothly, integrate more beautifully, and impart a richer, more complex chocolate flavor to your fudge. Avoid using cheap chocolate substitutes, as they can sometimes contain ingredients that prevent smooth melting or impart an artificial taste. A higher cocoa content generally means a deeper flavor. For instance, using semi-sweet chocolate will give a balanced richness, while darker chocolate will yield a more intense, less sweet fudge. Making Snickerdoodle Cobbler also highlights how ingredient quality matters.
Flavor Twists for Your Fudge
Add nuts or dried fruits
While classic creamy chocolate fudge is undeniably delicious, it also serves as a fantastic canvas for creative flavor additions. One of the simplest ways to add texture and taste is by folding in nuts or dried fruits. Stir in a cup of chopped walnuts, pecans, almonds, or peanuts just before pouring the fudge into the prepared pan. The crunch of nuts provides a delightful contrast to the smooth fudge. For a touch of fruity chewiness, dried cranberries, cherries, or even finely chopped apricots can be a wonderful addition, offering a tangy counterpoint to the sweetness of the chocolate. These inclusions not only enhance the flavor but also make your fudge visually appealing and more complex.
Try peanut butter or coffee
Expand your fudge repertoire by experimenting with bold flavor pairings. For a truly decadent treat, swirl in a few tablespoons of creamy peanut butter just before setting the fudge. The combination of chocolate and peanut butter is a timeless classic, offering a rich, savory, and sweet experience. Alternatively, for a sophisticated twist, you can dissolve a teaspoon of instant espresso powder or a tablespoon of strong brewed coffee into the hot sugar mixture before boiling. Coffee naturally enhances chocolate flavors, making the fudge taste even more intensely chocolatey without a strong coffee taste dominating. These additions can turn a simple fudge recipe into something truly gourmet.
Use different chocolate types
Don’t limit yourself to just semi-sweet chocolate chips. The world of chocolate offers a spectrum of possibilities for your fudge. Try making a batch with milk chocolate for a sweeter, creamier, and milder flavor profile that’s often a hit with children. For those who prefer a more intense, less sweet dessert, use dark chocolate (60-70% cocoa solids) to create a deeply rich and sophisticated fudge. You could even experiment with white chocolate, adding food coloring or flavorings like peppermint extract to create vibrant, uniquely flavored fudges. Combining different types of chocolate, such as dark and milk, can also yield interesting complexities, allowing you to tailor the sweetness and bitterness to your exact preference. For another chocolatey treat, our Peanut Butter Brownie Swirl Cookies are a fantastic option.
Serving Melt-in-Your-Mouth Fudge
Garnish with sea salt
Serving your homemade creamy chocolate fudge can be an art form in itself. One of the simplest yet most effective garnishes is a sprinkle of flaky sea salt. Just before the fudge fully sets, or right before serving, lightly dust the top with a good quality sea salt. The salt crystals provide a delightful textural contrast and, more importantly, a beautiful counterpoint to the sweetness of the chocolate. This sweet-and-salty combination is incredibly popular for a reason—it amplifies the chocolate’s depth and makes each bite more complex and satisfying. It elevates the fudge from a simple sweet treat to a gourmet dessert, impressing both the eye and the palate with minimal effort.
Pair with ice cream
While creamy chocolate fudge is perfectly delicious on its own, pairing it with other treats can create an even more decadent dessert experience. One classic combination is serving warm or room-temperature fudge alongside a scoop of vanilla bean ice cream. The cold, creamy ice cream contrasts beautifully with the rich, soft fudge, creating a harmonious blend of temperatures and textures. You can also crumble small pieces of fudge over a bowl of ice cream, or even slightly warm a piece of fudge in the microwave and drizzle it over the top like a sauce. This pairing is especially delightful for a special occasion or as a comforting dessert after a meal, offering a luxurious finish.
Gifting Homemade Fudge Ideas
Package into small portions
Homemade creamy chocolate fudge makes an exceptionally thoughtful and cherished gift. To prepare it for gifting, cut the fudge into uniform, attractive squares. Consider smaller portions, perhaps 1×1-inch pieces, allowing recipients to savor each bite. Package these delectable squares creatively. Small, clear cellophane bags tied with a festive ribbon are always a hit. You can also use decorative tins or small boxes, lining them with parchment paper for a professional touch. Layering different flavors or types of fudge in one box adds variety and visual appeal. Thoughtful packaging not only protects the fudge but also enhances its appeal as a homemade present, making it feel extra special.
Homemade gifts are thoughtful
There’s an undeniable charm and warmth that comes with receiving a homemade gift. It signifies time, effort, and care—qualities often more valued than monetary worth. Gifting your homemade creamy chocolate fudge communicates a personal touch that store-bought items simply cannot replicate. It’s a gesture that says, “I made this just for you” or “I spent my time creating something delicious for your enjoyment.” Whether it’s for holidays, birthdays, or just a token of appreciation, a box of your velvety fudge is sure to bring smiles. It’s a delicious way to spread joy and share a piece of your culinary passion with friends, family, and neighbors. For more visual inspiration on presenting your culinary creations, you can check out Carina Recipes on Pinterest or explore our latest posts on Instagram.
Why Make Your Own Fudge?
Control ingredients and flavor
Making your own creamy chocolate fudge offers a multitude of benefits, with ingredient control being a primary advantage. When you prepare fudge at home, you have complete oversight of what goes into your sweet treat. This means you can choose high-quality butter, premium chocolate, and natural vanilla extract, avoiding artificial flavors or preservatives often found in commercial varieties. You can also adjust the sugar content to suit your preference, making it slightly less sweet if desired. Furthermore, the ability to experiment with different flavorings, mix-ins like nuts or dried fruits, and various types of chocolate means your fudge can be precisely tailored to your taste, creating a truly personalized indulgence. This control ensures a fresher, more natural, and utterly delicious product that reflects your culinary vision.
It’s easier than you think
Many people are intimidated by candy making, assuming it requires complex techniques or specialized equipment. However, making creamy chocolate fudge is surprisingly straightforward and accessible, even for novice bakers. Our recipe breaks down the process into simple, manageable steps that don’t require a candy thermometer (though it’s helpful). The key lies in following the instructions carefully, particularly regarding heating and cooling. With a basic saucepan, a few common pantry staples, and a little patience, you can achieve professional-quality fudge in your own kitchen. It’s a rewarding activity that yields impressive results, proving that delicious homemade treats are well within reach. Don’t let apprehension stop you from creating this wonderful dessert; you’ll be amazed at how easily you can master this classic confection. It is certainly an easier dessert to tackle than some of the more complex ones like a Blueberry Muffin Cookies with Streusel or similar.
