
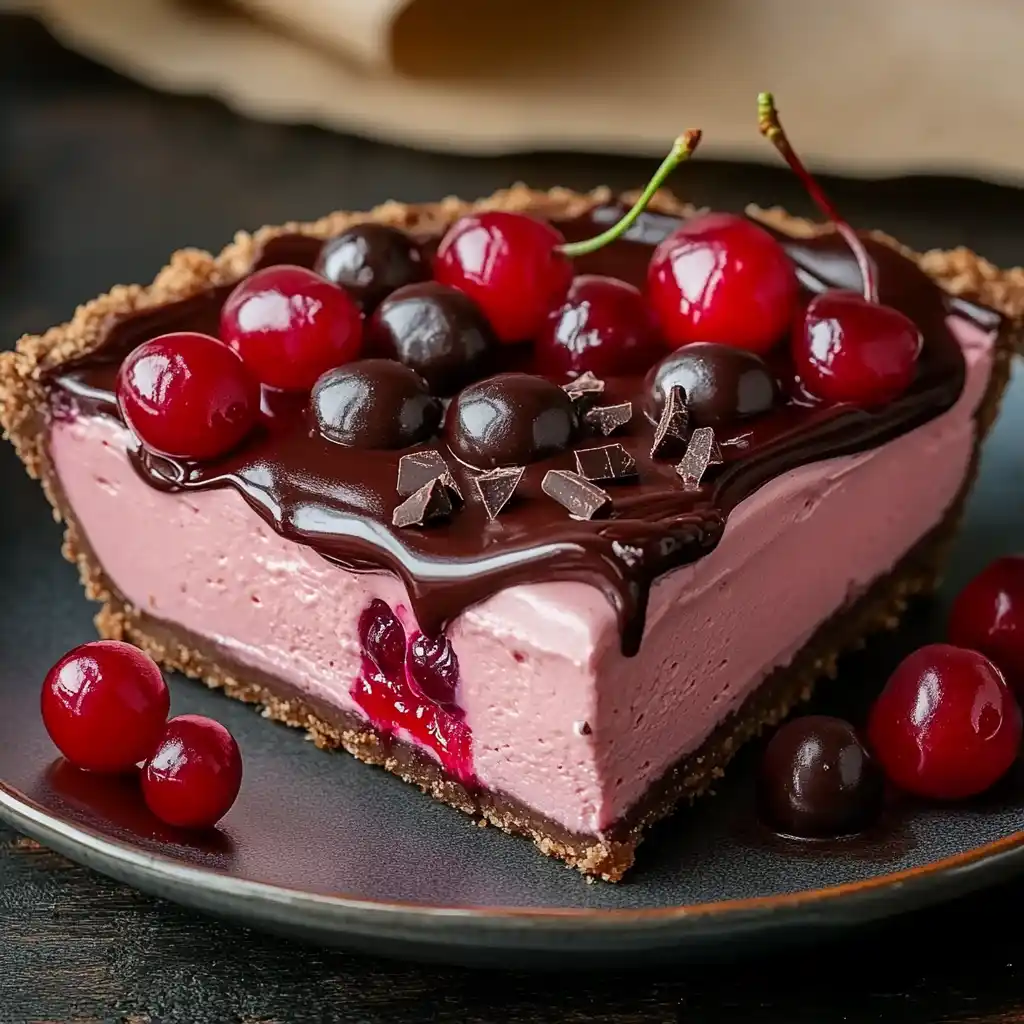
Chocolate Cherry Pie with Creamy Cheesecake Filling combines rich flavors beautifully. This delightful dessert offers sweet cherries, smooth chocolate, and a decadent cheesecake layer. Our homemade pie recipe provides all the steps for baking perfection. Enjoy this sweet treat that truly impresses any guest.
Key Takeaways
- Master the art of combining tart cherries, rich chocolate, and creamy cheesecake in one dessert.
- Follow a simple, step-by-step process from preparing the crust to crafting the ganache.
- Learn essential baking tips for a perfect pie, including storage and flavor variations.
Imagine dessert. Sweet cherries burst with flavor. Creamy cheesecake adds richness. A hint of chocolate finishes it. This pie delivers pure delight.
Get Ready for Cherry Pie Bliss
Prepare to delight your senses with a truly extraordinary dessert: the Chocolate Cherry Pie with Creamy Cheesecake Filling. This homemade pie recipe goes beyond the ordinary, combining the sweet-tart goodness of fresh cherries with the indulgent richness of chocolate and a velvety cheesecake layer. It’s a decadent sweet treat that promises to be the star of any gathering, from casual family dinners to festive holiday celebrations. Imagine biting into a slice where the crisp, buttery crust gives way to a vibrant cherry filling, followed by a smooth, tangy cheesecake, all crowned with a luscious chocolate ganache. This dessert is not just a pie; it’s an experience. Creating this chocolate cherry pie might seem like a grand endeavor, but our detailed steps make it accessible and enjoyable for home bakers of all skill levels. We’ll walk you through everything, from selecting the best ingredients to achieving that perfect golden-brown crust and crafting an easy ganache that will impress. Get ready to bake a memorable creamy dessert that looks as impressive as it tastes, earning you rave reviews and requests for seconds. We understand the joy of baking, and this recipe is designed to bring that joy straight into your kitchen.
Gather Your Pie Ingredients
Pie Crust and Cherries
Starting with the foundation, you’ll need a high-quality pie crust. While a store-bought crust can certainly save time, a homemade crust truly elevates this cherry pie. For the star fruit, opt for fresh, ripe sweet or tart cherries, depending on your preference. Sweet cherries, like Bing or Rainier, offer a naturally sweeter filling, while tart cherries, such as Montmorency, provide a delightful tang that contrasts beautifully with the creamy cheesecake. If fresh cherries are out of season, quality frozen cherries can be a fantastic alternative, but remember to adjust the preparation as advised in our tips section. Aim for about two pounds of cherries to ensure a generous, fruit-filled pie.
Sweeteners and Thickeners
To balance the tartness of the cherries and sweeten the cheesecake, granulated sugar and powdered sugar will be your primary sweeteners. Cornstarch or tapioca starch are crucial for achieving the perfect consistency in your cherry filling, preventing it from becoming too watery. A touch of vanilla extract will enhance the overall flavor profile of both the cherry and cheesecake layers. Don’t forget a pinch of salt to round out the sweetness and bring out the best in every ingredient. These seemingly small additions play a big role in the final taste and texture of your creamy dessert.
Chocolate and Cream Needs
For the luscious cheesecake filling, you’ll require softened full-fat cream cheese for a rich and smooth texture, along with heavy cream for whipping into a light, airy mixture. Good quality chocolate, whether semi-sweet or dark chocolate chips or a chopped bar, is essential for the chocolate ganache topping. The better the chocolate, the more decadent your cheesecake and ganache will taste. Ensure you have unsalted butter on hand for the pie crust, if making it from scratch, and potentially for the cheesecake layer to add richness. Having all your ingredients prepped and ready will make the baking process smooth and enjoyable.
Making the Sweet Cherry Filling
Pitting Fresh Cherries
The first step to a magnificent sweet cherry filling is preparing your fruit. If using fresh cherries, pitting them is a necessary, albeit slightly time-consuming, task. A cherry pitter makes this process much quicker and cleaner. If you don’t have one, a sturdy straw or a small paring knife can be used carefully to remove the pits. Simply push the straw through the stem end of the cherry until the pit pops out, or cut around the pit with a knife. Be mindful that this can be a messy job, so wearing an apron and protecting your work surface is recommended. Aim to keep the cherries as whole as possible to retain their juicy texture in the pie. This homemade pie recipe truly shines with fresh, properly prepared fruit.
Mixing Fruit and Sugar
Once your cherries are pitted, place them in a large bowl. Add the granulated sugar, typically about half a cup, though you can adjust this based on the sweetness of your cherries and your personal preference. A squeeze of fresh lemon juice can brighten the flavors and balance the sweetness, especially if using sweet cherries. Gently toss the cherries with the sugar, ensuring they are evenly coated. Let the mixture sit for about 15-20 minutes. This resting period allows the sugar to draw out some of the cherries’ natural juices, creating a rich, flavorful syrup that will form the base of your filling. This step is crucial for the depth of flavor in your chocolate cherry pie.
Adding Thickening Agents
After the cherries have released their juices, it’s time to add the thickening agent. Cornstarch or tapioca starch are excellent choices, typically requiring 2-3 tablespoons, depending on how thick you prefer your filling. Whisk the chosen thickener into the cherry and sugar mixture until no lumps remain. This ensures an evenly thickened filling that won’t be runny once baked. You might also add a pinch of salt and a dash of almond extract at this stage for an extra layer of flavor that complements the cherries beautifully. Integrating these thickening agents correctly is key to achieving that perfect, gooey cherry consistency in your chocolate cherry pie.
Preparing the Creamy Cheesecake Layer
Softening Cream Cheese
For a truly smooth and lump-free creamy cheesecake filling, starting with softened cream cheese is absolutely critical. Take your full-fat cream cheese out of the refrigerator at least an hour or two before you plan to start mixing. If you’re short on time, you can carefully soften it in the microwave for 10-15 seconds at a time, being careful not to melt it. The ideal consistency is soft enough to indent easily with a finger but still cool to the touch. This ensures it will blend seamlessly with the other ingredients, creating a velvety texture that is the hallmark of a delicious cheesecake. Using cold cream cheese will result in a lumpy filling, which is not what we want for this decadent dessert.
Whipping Creamy Mixture
Once your cream cheese is perfectly softened, place it in a large mixing bowl. Add powdered sugar (also known as confectioners’ sugar) and a touch of vanilla extract. Using an electric mixer, beat these ingredients on medium speed until the mixture is light, fluffy, and completely smooth. Scrape down the sides of the bowl often to ensure everything is incorporated. Next, gradually add the heavy cream. Continue beating on medium-high speed until the mixture is thick and holds soft peaks. Be careful not to overmix, as this can cause the cream to separate. The goal is a light, airy, and stable creamy dessert layer that will hold its shape beautifully in your chocolate cherry pie.
Flavoring Your Cheesecake
While vanilla is a classic and wonderful addition, you can customize the flavor profile of your cheesecake filling to perfectly complement the chocolate and cherries. A hint of almond extract can enhance the cherry flavor, while a tiny dash of orange zest can add brightness. If you’re a fan of a richer chocolate note, a tablespoon of unsweetened cocoa powder could be incorporated into the cream cheese mixture, or even a few finely chopped dark chocolate pieces. Taste and adjust as you go, remembering that this layer will balance the tartness of the cherries and the sweetness of the ganache. For other delightful creamy desserts, check out our recipe for Vanilla Bean Creme Brulee Cheesecake Cupcakes, offering another take on creamy indulgence.
Assembling Your Decadent Chocolate Cherry Pie
Placing Crust in Dish
Begin by carefully unrolling or pressing your prepared pie crust into a standard 9-inch pie dish. Ensure the crust fits snugly into the bottom and up the sides without stretching it, which can cause it to shrink during baking. Trim any excess dough, leaving about a half-inch overhang. You can then crimp the edges decoratively using your fingers or a fork, creating a beautiful border for your desserts masterpiece. For a blind bake, pierce the bottom of the crust several times with a fork and line it with parchment paper, filling it with pie weights or dried beans. Bake for 10-15 minutes at 375°F (190°C) until lightly golden, then remove the weights and parchment, and let it cool completely. This crucial step helps prevent a soggy bottom, especially with a juicy cherry filling.
Layering Cherry Mixture
Once your pie crust is ready and cooled, it’s time to add the vibrant cherry filling. Pour the entire sweet cherry mixture, including any juices, into the bottom of the prepared pie crust. Spread it evenly with a spatula, making sure the cherries are distributed from edge to edge. This creates the first foundational layer of flavor and texture for your chocolate cherry pie. The natural juices, now thickened with starch, will bubble delightfully during baking, creating that classic fruit pie experience. Ensure the cherry layer is relatively flat to provide a good base for the creamy cheesecake layer that follows, allowing for clean slices later on.
Spreading Cheesecake Filling
Now, gently spoon the creamy cheesecake layer over the cherry filling. Using an offset spatula or the back of a spoon, carefully spread the cheesecake mixture to cover the cherries completely. Take care not to disturb the cherry layer underneath, aiming for an even, smooth surface. The contrast between the bright red cherries and the pale, creamy cheesecake will be visually stunning, creating an inviting appearance before it even goes into the oven. This thoughtful layering is what makes this quick Italian cream cake-like dessert so unique and appealing, marrying rich flavors into a harmonious whole.
Baking Your Perfect Chocolate Cherry Pie
Preheat Oven Correctly
Achieving a perfectly baked chocolate cherry pie begins with proper oven preheating. It’s not enough to simply turn on the oven and wait for the light to indicate it’s ready. Ovens often fluctuate in temperature, so preheating for at least 20-30 minutes ensures that your oven reaches and stabilizes at the desired temperature. For this pie, typically 375°F (190°C) is ideal. A fully preheated oven ensures even baking from the start, contributing to a beautifully golden crust and a properly set filling. If your oven tends to run hot or cold, consider using an oven thermometer for accuracy; this can make a significant difference in your baking success.
How Long to Bake
Once assembled, place your pie on a baking sheet to catch any potential drips and facilitate easier handling. Bake the chocolate cherry pie in your preheated oven for approximately 45-60 minutes. The baking time can vary depending on your oven and the pie dish material. During the last 15-20 minutes of baking, keep an eye on the crust edges. If they start to brown too quickly, loosely cover the edges with aluminum foil or a pie crust shield to prevent overbrowning. The goal is a golden-brown crust and a filling that is bubbly around the edges, indicating the cherries are cooked and the thickener is activated. This careful monitoring helps prevent a soggy bottom and ensures a perfectly cooked pie.
Checking for Doneness
To confirm your chocolate cherry pie is perfectly baked, look for a few key indicators. The crust should be a rich golden brown, and the cherry filling should be visibly bubbling around the edges and even in the center. If you gently jiggle the pie, the cheesecake layer should appear mostly set with only a slight wobble in the very center. For an extra measure, you can carefully insert a thin knife or skewer into the cherry layer through the cheesecake—it should come out mostly clean. If the filling seems too liquid, continue baking for another 5-10 minutes. Trust your senses: a delicious aroma will fill your kitchen when this homemade pie recipe is nearing completion. Don’t rush this final stage; patience is key to a truly decadent chocolate cherry pie.
Crafting the Easy Chocolate Ganache
Heating Heavy Cream
An easy chocolate ganache is the crowning glory of this chocolate cherry pie, adding a luxurious finish. To begin, pour heavy cream into a small saucepan. Heat the cream over medium heat, stirring occasionally, until it just begins to simmer around the edges. You’ll see small bubbles forming. It’s important not to bring the cream to a rolling boil, as this can affect the ganache’s texture and flavor. The goal is to get the cream hot enough to melt the chocolate chips completely and create a smooth, emulsified mixture. This simple step sets the stage for a rich and glossy topping that enhances the entire homemade pie recipe. Ensure your cream is fresh for the best results in this creamy dessert.
Melting Chocolate Chips
Once the heavy cream is hot, immediately remove it from the heat. Place your chosen chocolate chips (semi-sweet or dark chocolate work wonderfully) in a heatproof bowl. Pour the hot cream directly over the chocolate chips. Let the mixture sit undisturbed for about 5 minutes. This allows the residual heat from the cream to gently melt the chocolate, ensuring a smooth and glossy ganache without scorching. After 5 minutes, begin stirring gently from the center outwards with a whisk or a rubber spatula. Continue stirring until the mixture is completely smooth, shiny, and free of any lumps. The chocolate should be fully incorporated into the cream, creating a luscious, pourable consistency perfect for your dessert creations.
Adding Vanilla Flavor
To deepen the flavor of your easy chocolate ganache and complement the cherries and cheesecake, stir in a teaspoon of vanilla extract. A high-quality vanilla extract can make a noticeable difference, adding warmth and complexity. You can also experiment with other flavorings; a hint of espresso powder can intensify the chocolate flavor, or a dash of almond extract could tie in with the cherry notes beautifully. Taste the ganache and adjust any flavorings as desired. The ganache should be smooth and pourable at this stage. If it seems too thick, you can gently rewarm it over a very low heat or a double boiler, stirring until it reaches the desired consistency. This simple, rich ganache is a perfect complement to the creamy cheesecake filling and vibrant fruit.
Cooling and Finishing Your Pie
Resting Baked Pie
Patience is a virtue, especially when it comes to pie. After removing your chocolate cherry pie from the oven, it’s absolutely crucial to let it cool completely on a wire rack for at least 3-4 hours, or even longer, until it reaches room temperature. During this resting period, the cherry filling continues to set, and the cheesecake layer firms up properly. Cutting into a warm pie will result in a messy, runny slice, as the fillings haven’t had a chance to fully stabilize. Resist the temptation to slice it early! This cooling time is essential for the structural integrity and the optimal texture of both the fruit and creamy cheesecake layers in your homemade pie recipe. This allows the thickeners to do their final work.
Pouring Ganache Evenly
Once the pie has cooled completely to room temperature, it’s time for the grand finale: pouring the easy chocolate ganache. Ensure your ganache is still warm and pourable, but not hot. If it has thickened too much, gently warm it again until it reaches a smooth, flowing consistency. Slowly pour the ganache over the cooled pie, starting from the center and spiraling outwards. Use an offset spatula or the back of a spoon to gently spread the ganache evenly over the entire surface of the cheesecake layer, ensuring it reaches the crimped edges of the crust. This creates a beautiful, glossy, and indulgent topping that makes the chocolate cherry pie truly irresistible and ready for your Instagram food shots.
Allowing Pie to Set
After the ganache has been poured, the pie needs one more period of rest and chilling. Place the pie in the refrigerator for at least 2-4 hours, or preferably overnight. This chilling time allows the ganache to firm up to a sliceable consistency and ensures the entire chocolate cherry pie is thoroughly set. A well-chilled pie will slice beautifully, showcasing distinct layers of crust, cherry, cheesecake, and ganache. This step is non-negotiable for achieving perfect, clean slices of your creamy dessert. While waiting can be hard, the payoff is a perfectly structured, refreshingly cool, and utterly delicious sweet treat that’s worth every moment of anticipation.
Serving Your Chocolate Cherry Pie Slices
Slicing Pie Cleanly
After all your efforts, you want to ensure your chocolate cherry pie slices look as magnificent as they taste. For the cleanest slices, make sure your pie is thoroughly chilled. Use a sharp, thin-bladed knife that has been run under hot water and wiped dry before each cut. This technique helps the knife glide through the ganache and cheesecake layers without dragging or sticking, creating distinct, clean lines. Make your first cut straight down the middle, then rotate the pie and cut again to create quarters. Continue halving each section until you have the desired number of slices, usually 8-12. Wipe your knife clean between each slice for the best presentation. A perfectly cut slice of this homemade pie recipe is a visual treat.
Best Toppings for Pie
While the chocolate cherry pie with creamy cheesecake filling is absolutely divine on its own, a few simple toppings can elevate the serving experience even further. A dollop of freshly whipped cream adds a light, airy contrast to the rich pie, enhancing the creamy dessert theme. For an extra touch of decadence, a sprinkle of chocolate shavings or curls on top of the whipped cream can highlight the ganache layer. Fresh cherries, either whole or halved, make a beautiful and thematic garnish, reinforcing the fruit element. A light dusting of cocoa powder or powdered sugar can also add a sophisticated finish. Serve each slice chilled for the best texture and flavor, allowing guests to fully appreciate the harmonious combination of chocolate, cherry, and cheesecake in every bite. Consider pairing it with a scoop of vanilla bean ice cream for an extra cool treat.
Top Tips for Best Pie
Using Frozen Cherries
Don’t let cherry season dictate your craving for this chocolate cherry pie! Frozen cherries are an excellent alternative and can be used directly from the freezer without thawing for the filling. The key is to account for the extra moisture they will release. When using frozen cherries, you might need to add an extra tablespoon of your chosen thickener (cornstarch or tapioca starch) to the cherry mixture to ensure the filling sets properly. You can also gently cook the frozen cherries with the sugar and thickener on the stovetop for about 5-7 minutes until the mixture thickens slightly before pouring it into the crust. This pre-cooking step helps evaporate some of the excess liquid, resulting in a perfectly set cherry layer, even with frozen fruit. This baking tip ensures your homemade pie recipe is a success any time of year.
Preventing a Soggy Bottom
A soggy bottom is every pie baker’s nemesis, especially with juicy fruit fillings. To prevent this, several strategies can be employed. First, blind bake your pie crust as described in the assembly section. This pre-baking step creates a barrier against the moisture from the filling. Second, ensure you use enough thickening agent in your cherry mixture. Cornstarch or tapioca starch absorb excess liquid, creating a firmer filling. Third, bake the pie on a lower rack of your oven to ensure the bottom crust gets adequate heat. Finally, allowing the pie to cool completely before slicing is crucial, as the filling continues to set as it cools, preventing any liquid from seeping into the crust. For another delicious baked treat that benefits from careful cooling, explore our recipe for Peanut Butter Brownie Swirl Cookies.
Crust Browning Tips
Achieving a beautifully golden-brown crust without burning the edges can be tricky. If your crust starts to brown too quickly during baking, simply create a loose foil tent over the pie or use a silicone pie crust shield to protect the edges. This allows the center of the pie to continue baking while shielding the more exposed edges from direct heat. For a richer, deeper golden hue, you can brush the top crust (if you were adding one, though not in this specific recipe, it’s a general crust tip) with an egg wash (one egg yolk whisked with a tablespoon of milk or water) before baking. This not only promotes browning but also adds a subtle sheen. Proper oven temperature calibration and consistent monitoring are your best allies in achieving a perfect crust for your chocolate cherry pie. This homemade pie recipe deserves a beautiful presentation.
How to Store Leftover Pie
Refrigerator Storage
Due to its creamy cheesecake filling and ganache, the Chocolate Cherry Pie must be stored in the refrigerator. After the pie has completely cooled and set, cover it loosely with plastic wrap or aluminum foil. If you have a pie keeper or an airtight container large enough, that’s even better, as it helps prevent the pie from absorbing refrigerator odors. Stored correctly, your leftover chocolate cherry pie will remain fresh and delicious for 3-4 days in the refrigerator. It’s best enjoyed chilled, directly from the fridge, to maintain the firmness of the cheesecake and ganache layers. This ensures every slice of this sweet treat maintains its optimal texture and flavor, ready for another indulgent moment. Keep it covered to prevent drying out and preserve its creamy dessert quality.
Freezing Pie Options
If you’ve made a large pie or want to enjoy this decadent dessert at a later date, freezing is an excellent option. For best results, it’s recommended to freeze the pie before adding the ganache topping. Bake the pie, cool it completely, and then wrap it tightly in several layers of plastic wrap, followed by a layer of aluminum foil. Label with the date. It can be frozen for up to 2-3 months. When you’re ready to serve, thaw the pie overnight in the refrigerator. Once thawed, prepare and add the fresh chocolate ganache before serving. You can also freeze individual slices, wrapped similarly, for convenient single-serving treats. This method helps maintain the integrity of the ganache and prevents it from becoming watery upon thawing, ensuring your homemade pie recipe remains delicious.
Optional Pie Flavor Variations
Dark Chocolate Choice
For those who love a more intense chocolate experience, opting for dark chocolate in your easy chocolate ganache can significantly alter the flavor profile of your chocolate cherry pie. Instead of semi-sweet, use chocolate with 60-70% cacao content. This will introduce a richer, slightly more bitter note that beautifully contrasts with the sweetness of the cherries and the creaminess of the cheesecake. The deeper chocolate flavor provides an extra layer of sophistication, making it a truly grown-up sweet treat. You can also mix finely chopped dark chocolate into the cheesecake layer for an added textural and flavor dimension. This choice elevates the overall complexity of this already indulgent creamy dessert. Consider using a high-quality baking bar for the best results.
Adding Almond Extract
Almond and cherry are a classic flavor pairing, and adding a touch of almond extract can truly enhance the natural sweetness and tartness of the cherries in your pie. A quarter to half a teaspoon added to the cherry filling, or even a tiny drop in the cheesecake layer, can bring a delightful nutty depth. Be cautious not to overdo it, as almond extract is quite potent; a little goes a long way. This subtle addition can transform the cherry flavor, making it more robust and aromatic, reminiscent of a classic cherry cordial. It’s a simple yet effective way to add another layer of complexity to your homemade pie recipe, making it uniquely yours. This small addition can make your chocolate cherry pie even more memorable.
Decorative Crust Ideas
Beyond the delicious fillings and toppings, the presentation of your chocolate cherry pie can be elevated with decorative crust ideas. Instead of a simple crimped edge, consider cutting out small shapes like leaves, hearts, or stars from extra pie dough using cookie cutters. These can be artfully placed around the edge of the pie before baking, or even on top of the ganache (if baked separately). Another idea is to create a lattice top with thin strips of pie dough woven over the cherry layer, forgoing the cheesecake layer entirely for a more traditional dessert with a twist, then adding the cheesecake dollops after baking, or incorporating smaller cheesecake swirls within the lattice. Brushing decorative elements with an egg wash before baking gives them a beautiful golden sheen. These creative touches make your sweet treat visually stunning and demonstrate your baking prowess.
