
The Burnt Basque Cheesecake Loaf offers a unique twist on a classic dessert. Its signature dark, caramelized top and wonderfully creamy interior make it an irresistible sweet indulgence. This simple recipe is perfect for home bakers seeking a stunning yet easy treat that promises a rich, unforgettable flavor profile.
Key Takeaways
- Achieve a perfect dark top and creamy texture for your cheesecake loaf.
- Follow simple steps for mixing ingredients to ensure a smooth batter.
- Proper cooling is essential for the best structural integrity and flavor development.
- Enjoy this delightful dessert chilled for an optimal taste experience.
This cheesecake loaf is truly special. Its distinct flavor profile stands out. The simplicity is deceptive. Rich, creamy, deeply satisfying. A homemade treat everyone will love.
Get Started: Preheat Oven
Beginning any baking adventure with proper preparation sets the stage for success. For your homemade burnt basque cheesecake loaf, the initial steps are crucial to ensure an even bake and the characteristic “burnt” exterior that makes this dessert so appealing. A perfectly preheated oven and a meticulously prepared pan are non-negotiable foundations for this creamy texture masterpiece. Taking the time here will prevent common baking mishaps and contribute significantly to the loaf’s overall quality. Think of it as the quiet promise of a sweet indulgence to come, where every detail matters in achieving that perfect dark top.
Set oven to 400°F
Before you even think about mixing ingredients, preheat your oven to 400°F (approximately 200°C). This high temperature is fundamental for achieving the signature deeply caramelized, almost burnt exterior of a Basque cheesecake, while allowing the interior to remain wonderfully creamy. A properly preheated oven ensures that the cheesecake starts baking immediately at the target temperature, encouraging rapid browning on the surface. If the oven isn’t hot enough, the crust won’t develop correctly, and you might end up with a less dramatic, paler finish. Always give your oven ample time to reach and stabilize at the specified temperature—at least 15-20 minutes after it signals it’s ready—to avoid uneven baking and ensure consistent results for your cheesecake creations.
Prepare your loaf pan
Preparing your loaf pan correctly is just as important as preheating the oven. For a burnt basque cheesecake loaf, you’ll want to line your standard loaf pan (typically 9×5 inches) with parchment paper. Start by wetting the parchment paper slightly, crumpling it, and then smoothing it out. This makes it more pliable and easier to fit into the corners of the pan. Overhang the parchment paper on all sides by a few inches; this will create “handles” that make it incredibly easy to lift the finished cheesecake out of the pan once it’s cooled. You can also lightly grease the pan before adding the parchment paper to help it adhere better. This simple step ensures that your decadent Basque cheesecake doesn’t stick and can be removed cleanly, preserving its shape and presentation for serving.
Creamy Base for Basque Cheesecake
The heart of any exceptional cheesecake lies in its base, and for a burnt basque cheesecake, that means a wonderfully smooth and homogenous mixture. This particular dessert celebrates the richness of cream cheese, so achieving a lump-free foundation is paramount for the luxurious, creamy texture that defines it. The quality of your ingredients, especially the cream cheese, will significantly influence the final outcome. Ensure your cream cheese is at room temperature before you begin; this is a non-negotiable step that allows it to soften and blend seamlessly with the sugar, preventing any stubborn lumps from forming in your batter. This stage is where the magic begins, transforming simple ingredients into a sophisticated batter.
Beat cream cheese, sugar
Once your cream cheese has come to room temperature, place it in a large mixing bowl. Add the granulated sugar, or a combination of granulated and powdered sugar for an even finer texture, to the bowl. Using an electric mixer (either a stand mixer with the paddle attachment or a hand mixer), begin beating the cream cheese and sugar together on low speed. Gradually increase the speed to medium. The goal here is to thoroughly combine these two ingredients, ensuring that the sugar dissolves into the cream cheese. Continue beating until the mixture is light, fluffy, and noticeably paler in color. This process not only incorporates air but also starts to break down the cream cheese, paving the way for a perfectly smooth batter. Don’t rush this step; patience now pays off in a superior cream cheese base.
Make it super smooth
Achieving a “super smooth” base is crucial for the signature melt-in-your-mouth quality of a burnt basque cheesecake loaf. After beating the cream cheese and sugar, pause to scrape down the sides and bottom of the bowl frequently with a rubber spatula. This ensures that no pockets of unmixed cream cheese or sugar remain. Continue beating until the mixture has a uniform consistency, free from any visible lumps. If your cream cheese wasn’t perfectly softened, you might find tiny specks; a quick beat on medium-high speed for another minute or two, followed by more scraping, usually resolves this. The smoother your base, the more elegant and refined your final dessert will be, promising an exquisite creamy texture with every slice. This careful attention to detail is what separates a good cheesecake from an truly outstanding one.
Adding Eggs to Batter Smoothly
Incorporating eggs into your cheesecake batter might seem straightforward, but it’s a step that requires careful attention to maintain the velvety smooth consistency you’ve worked so hard to achieve. Eggs serve as a vital binder and contribute significantly to the structure and richness of the cheesecake. However, adding them too quickly or beating them excessively can introduce too much air, which might lead to cracks on the surface during baking or a cakey, rather than creamy, texture. The key is gentle, controlled mixing that fully integrates each egg without overworking the batter, preserving that desired dense yet yielding quality. This method ensures your burnt basque cheesecake loaf bakes perfectly, holding its creamy integrity.
Mix one egg at time
The golden rule for adding eggs to cheesecake batter is to mix them in one at a time. After you’ve created your smooth cream cheese and sugar base, crack an egg into a separate small bowl to ensure no shells fall into your mixture. Add the first egg to the cream cheese mixture. Using your electric mixer on low speed, beat just until the egg is fully incorporated into the batter. This should only take about 15-20 seconds. Do not overmix. Once that egg disappears into the batter, scrape down the sides of the bowl with your spatula to ensure everything is evenly combined. Then, repeat this process with the next egg, and so on, until all the eggs are incorporated. This gradual addition ensures that each egg emulsifies properly with the fats in the cream cheese, contributing to a stable and consistent batter that will bake up beautifully. It’s a simple technique that makes a significant difference in the final creamy texture of your sweet treat.
Flavor Secrets: Cream and Vanilla
Beyond the primary ingredients, the nuanced flavors of a burnt basque cheesecake loaf are largely shaped by the quality of your cream and vanilla. These components aren’t just fillers; they are essential for deepening the richness and aromatic profile of the dessert. High-quality heavy cream provides an unparalleled silky mouthfeel, while pure vanilla extract infuses the entire loaf with warmth and a delicate sweetness. Skimping on these ingredients can noticeably diminish the overall gourmet experience. Investing in the best cream and vanilla you can find will truly elevate your simple recipe into a sweet indulgence that lingers on the palate, making every slice unforgettable. This careful selection is part of what makes the burnt basque cheesecake so irresistibly delicious.
Use good heavy cream
For a truly indulgent burnt basque cheesecake, the choice of cream is critical. Opt for a full-fat, good quality heavy cream (also known as whipping cream), ideally with a fat content of 36% or higher. This high fat content is what contributes to the cheesecake’s signature velvety smooth and rich texture. Avoid using half-and-half or lighter creams, as they contain too much water and will result in a less dense, less luxurious cheesecake. The heavy cream acts as a diluent to the dense cream cheese, creating a pourable batter while adding a luscious quality that sets this dessert apart. It also helps achieve that desirable deep, dark caramelization on top without drying out the interior. Pour the heavy cream into your batter gradually while mixing on low speed until just combined. Overmixing the cream can sometimes incorporate too much air, which we want to avoid for the dense, custardy interior. This step is about enhancing the creamy texture to perfection.
Add pure vanilla extract
Vanilla is often underestimated, but in a recipe as pure as Basque cheesecake, its role is profound. Always use pure vanilla extract, not imitation vanilla. Pure vanilla extract, made from real vanilla beans, offers a complex, aromatic flavor that complements and enhances the dairy notes of the cream cheese and heavy cream. Imitation vanilla, while cheaper, often tastes artificial and can detract from the overall quality of your burnt basque cheesecake loaf. A good quality vanilla extract provides subtle floral and woody undertones that round out the sweetness and richness, adding depth to the flavor profile without overpowering the main ingredients. Add it in the final stages of mixing, after the eggs and cream have been incorporated, and mix just enough to distribute it evenly. This small addition makes a big impact on the final taste, contributing to a truly sweet indulgence that delights the senses.
Mixing Flour for Loaf Pan
While many traditional Basque cheesecakes are flourless, a small amount of flour (or cornstarch for a gluten-free option) can sometimes be added, especially when adapting the recipe to a loaf pan. This addition can provide a slight structural integrity that helps the cheesecake hold its shape better, particularly when sliced. However, the cardinal rule when introducing flour to any cheesecake batter is to do so with the utmost gentleness. The goal is to bind the ingredients subtly without developing gluten, which would lead to a tough or rubbery texture, completely undermining the desired creamy texture of a burnt basque cheesecake loaf. This step, if included, must be handled with care to maintain the dessert’s delicate balance.
Gently combine all ingredients
After incorporating your eggs and heavy cream, if your recipe calls for flour, sift a small amount (usually 1-2 tablespoons) directly over the batter. Sifting prevents lumps and helps distribute it evenly. Then, using a rubber spatula or a whisk on the lowest possible speed, gently fold or mix the flour into the batter. The key here is to mix just until the flour streaks disappear. Overmixing at this stage will activate the gluten in the flour, resulting in a dense, chewy cheesecake, which is the opposite of the light, custardy interior we’re aiming for. The less you mix, the better. This gentle approach ensures that the flour integrates seamlessly into the batter, providing minimal structural support while preserving the smooth and creamy consistency that makes this homemade treat so special. Always remember, for a perfect dark top and creamy texture, gentle mixing is paramount.
Pouring Burnt Basque Cheesecake Batter
With your beautifully smooth and fragrant batter ready, the next step is to carefully transfer it into your meticulously prepared loaf pan. This might seem like a minor detail, but how you pour the batter can impact the final bake, influencing everything from the distribution of heat to the evenness of the finished loaf. The goal is to ensure the batter fills the pan uniformly, without trapping large air bubbles, which could create imperfections in the cheesecake’s creamy texture. Taking a moment to pour with precision contributes to the overall aesthetic and structural integrity of your exquisite burnt basque cheesecake loaf. This straightforward action is a crucial bridge between preparation and baking, leading to your perfect dark top.
Into your prepared loaf pan
Carefully lift your bowl of batter and slowly pour the mixture directly into the parchment-lined loaf pan. Aim for a steady stream, allowing the batter to spread naturally into the corners and edges of the pan. Once all the batter is in the pan, gently tap the loaf pan a few times on your counter. This action helps to release any trapped air bubbles that might be lurking within the batter, which could otherwise create unsightly holes or a crumbly texture in the finished cheesecake. You’ll notice small bubbles rising to the surface and popping. This simple step ensures a denser, more uniform and creamy texture throughout the baked loaf. With the batter now settled, your burnt basque cheesecake loaf is officially ready for its transformational journey into the hot oven, where it will develop its renowned perfect dark top and creamy interior.
Baking Your Burnt Basque Cheesecake Loaf
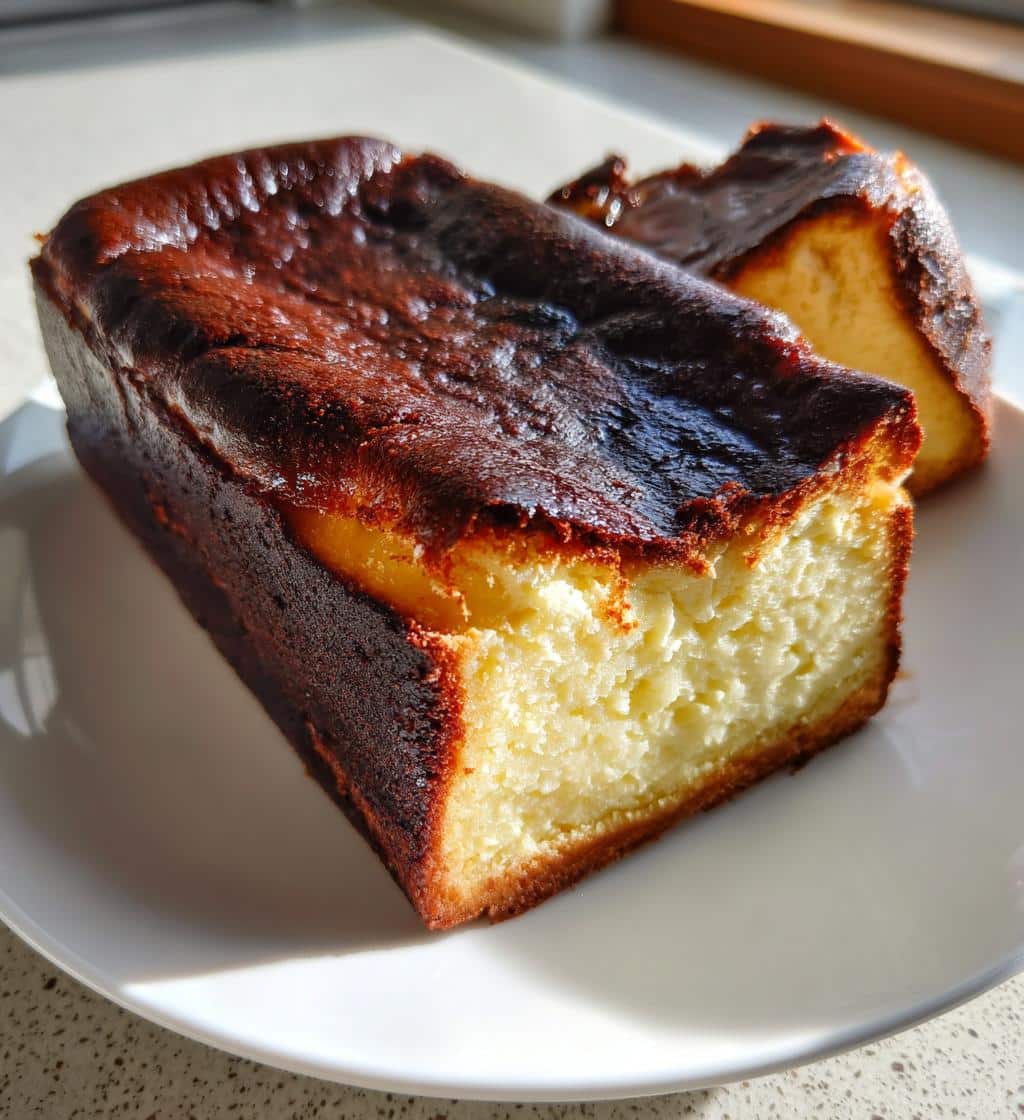
This is where the magic truly happens for your burnt basque cheesecake loaf. The baking process is what transforms the creamy batter into a dessert with contrasting textures – a deeply caramelized, almost charred exterior and a gloriously soft, custardy interior. Unlike traditional cheesecakes that aim for a pristine, crack-free surface, the Basque version embraces an intentionally “burnt” appearance. This high-heat baking is key to developing those complex, bittersweet notes that set it apart. Don’t be afraid of the dark; that distinct top is not a mistake but a desired characteristic that promises a truly unique and delicious experience, a perfect dark top that signifies a sweet indulgence.
Achieve that dark top
Place your prepared loaf pan directly into the preheated 400°F (200°C) oven. The initial high heat is what quickly caramelizes the sugars on the surface, creating that signature dark, almost blackened crust. Bake for approximately 50-60 minutes, or until the top is deeply browned, almost mahogany in color, and even charred in spots. The edges of the cheesecake should appear set, while the center will still have a significant jiggle, much like a thick custard or panna cotta. This jiggle is crucial; it indicates that the interior will be wonderfully creamy and soft once cooled. If the top isn’t dark enough, you can increase the oven temperature slightly for the last 5-10 minutes, but watch it closely to prevent actual burning. Every oven is different, so keep an eye on your loaf. This aggressive baking method might seem counter-intuitive, but it’s the secret to the unique flavor profile and creamy texture of a burnt basque cheesecake.
Cooling the Cheesecake Loaf Properly
While the visual drama of the burnt top is captivating, the cooling process is equally critical for the structural integrity and ideal creamy texture of your burnt basque cheesecake loaf. It’s during this phase that the cheesecake transitions from a wobbly, hot custard to a firm yet yielding dessert. Rushing the cooling can lead to cracks, a dense center, or an unappealing texture. Patience here is a virtue, allowing the internal structure to set fully and the flavors to meld beautifully. This step ensures that your loaf retains its shape and achieves its optimal richness, making it truly a sweet indulgence. The cooling journey is as important as the baking itself for a perfect dark top.
Let it rest completely
Once your burnt basque cheesecake loaf emerges from the oven with its glorious dark top, resist the urge to immediately remove it from the pan. First, let the cheesecake cool on a wire rack at room temperature for at least 2-3 hours, or until it reaches room temperature. During this time, the residual heat will continue to cook the cheesecake gently, and the center will gradually set. It will also deflate slightly, which is completely normal for this type of cheesecake. After it has cooled to room temperature, transfer the loaf, still in its parchment-lined pan, to the refrigerator. Chill it for a minimum of 6 hours, but preferably overnight. This extended refrigeration period is essential for the cheesecake to firm up completely, develop its dense yet creamy texture, and allow its flavors to fully deepen. Only after it’s thoroughly chilled should you use the parchment overhangs to carefully lift the loaf out of the pan, then peel away the parchment paper. This careful baking method ensures the perfect slice.
Serving Burnt Basque Cheesecake Loaf
After all your careful preparation and patient waiting, the moment arrives to present and enjoy your magnificent burnt basque cheesecake loaf. Serving it correctly can truly enhance the experience, allowing its unique combination of textures and flavors to shine. This dessert, with its contrasting dark exterior and creamy interior, is a sensory delight that deserves a thoughtful presentation. Whether for a special occasion or a simple weeknight treat, understanding the optimal serving conditions will ensure that every single slice delivers the full sweet indulgence and satisfaction of this simple recipe. Get ready to delight in the rich, complex flavors you’ve created, savoring every moment.
Best when served chilled
The burnt basque cheesecake loaf is unequivocally best when served chilled. The cold temperature helps to firm up the creamy interior even further, providing a delightful contrast to the slight chewiness of the caramelized crust. Remove the cheesecake from the refrigerator about 15-20 minutes before serving to allow it to temper slightly; this can enhance the creaminess without making it too warm. Use a sharp knife, wiped clean between each cut, to achieve neat, precise slices. This simple step elevates the presentation and ensures each portion looks as enticing as it tastes. A chilled slice highlights the dessert’s dense yet smooth consistency, making it an incredibly refreshing and satisfying end to any meal or a wonderful treat on its own. This perfect dark top dessert is a delightful way to satisfy any craving for a homemade treat.
Enjoy every delicious slice
Once sliced, take a moment to appreciate the beautiful cross-section of your burnt basque cheesecake loaf – the dark, dramatic crust yielding to the pale, custardy interior. Each bite should offer a harmony of flavors: the slightly bitter notes from the caramelized top, the rich tang of cream cheese, and the subtle sweetness of vanilla. This dessert is designed to be savored. It’s a versatile simple recipe, delicious on its own, but also open to creative pairings, such as fresh berries or a light dusting of powdered sugar. Encourage your guests, or yourself, to truly enjoy every delicious slice, taking in the creamy texture and unique flavor profile that makes this cheesecake loaf a true sweet indulgence. It’s not just a dessert; it’s an experience crafted with care, from the initial preheat to the final, satisfying bite.
Storing Your Cheesecake Loaf Fresh
After enjoying some slices of your delicious burnt basque cheesecake loaf, proper storage is essential to maintain its creamy texture, freshness, and food safety. Cheesecakes, being dairy-rich desserts, are perishable and require careful handling to ensure they remain as delightful as when they were first baked. Following correct storage guidelines will allow you to savor your homemade treat for several days, ensuring that every subsequent slice is just as enjoyable as the first. This simple recipe yields a generous loaf, so knowing how to keep it fresh means you can enjoy this sweet indulgence over time, preserving its perfect dark top and rich interior.
Keep leftovers refrigerated
To keep your burnt basque cheesecake loaf fresh, any leftovers must be promptly refrigerated. Once the cheesecake has been served, transfer any remaining portions back into the loaf pan, or carefully wrap individual slices. Cover the entire loaf pan tightly with plastic wrap, ensuring it’s sealed to prevent any absorption of refrigerator odors and to maintain moisture. Alternatively, you can transfer slices to an airtight container. Refrigerate the cheesecake at 40°F (4°C) or below. Stored properly, the burnt basque cheesecake loaf will remain fresh and delicious for 3 to 5 days. While it can technically be frozen for longer storage, freezing might slightly alter the delicate creamy texture upon thawing. For the best quality and enjoyment of your simple recipe, aim to consume it within the recommended refrigeration period. This ensures you always experience its optimal creamy texture and sweet indulgence.
Burnt Basque Cheesecake Nutrition Facts
Understanding the nutritional aspects of your burnt basque cheesecake loaf can be helpful, especially if you’re mindful of dietary intake. While specific nutrition facts can vary significantly based on the exact ingredients, brand of cream cheese, amount of sugar, and portion size, it’s generally understood that this is a rich and indulgent dessert. The primary components—cream cheese, heavy cream, sugar, and eggs—all contribute to its caloric density. It’s a sweet indulgence designed for enjoyment, and acknowledging its richness allows for mindful consumption. The focus is on the luxurious taste and creamy texture, making it a celebratory treat rather than an everyday staple, a perfect dark top for special moments.
Calories per serving
Given the variability in recipes, providing exact calories per serving for a homemade burnt basque cheesecake loaf without a specific ingredient list is difficult. However, we can offer a general estimate. A typical slice of a rich cheesecake, depending on its size and the recipe’s fat and sugar content, can range anywhere from 300 to 500 calories or more. The high fat content from cream cheese and heavy cream contributes significantly to the caloric value, as does the sugar. This delicious simple recipe is also typically low in fiber and can be high in saturated fat and cholesterol. For precise nutritional information tailored to your specific loaf, you would need to calculate it based on the exact quantities and types of ingredients used in your particular preparation. As with any rich dessert, enjoying your cheesecake loaf in moderation is key to a balanced diet, allowing you to savor this wonderful sweet indulgence without overdoing it.
Top Your Cheesecake Loaf Creatively
While the burnt basque cheesecake loaf is undeniably exquisite on its own, its relatively simple flavor profile makes it a fantastic canvas for creative toppings. Adding a complementary topping can introduce new textures, enhance existing flavors, or provide a pop of color that elevates the entire presentation. This is where you can truly personalize your homemade treat, transforming a classic simple recipe into something uniquely yours. From fresh and zesty to rich and decadent, the possibilities are vast, allowing you to match the cheesecake’s creamy texture and perfect dark top with an equally appealing flourish. Explore various options to make this sweet indulgence even more special.
Fruit or chocolate sauce
One of the most popular and appealing ways to top your burnt basque cheesecake loaf is with fresh fruit or a luscious chocolate sauce. For fruit, think about options that provide a contrasting tartness, such as fresh raspberries, blueberries, or sliced strawberries. A light berry compote, slightly sweetened and warmed, can also be a delightful addition, adding both flavor and a beautiful sheen. If you prefer a richer experience, a drizzle of high-quality chocolate ganache or a simple chocolate syrup works wonderfully. The bitterness of dark chocolate can beautifully complement the caramelized notes of the cheesecake’s perfect dark top. Beyond these classics, consider a delicate caramel sauce, a sprinkle of toasted nuts for crunch, or even a dollop of whipped cream with a dusting of cocoa powder. For more main course meal ideas, explore our recipes, but for desserts, let your imagination guide you with these toppings. Each option offers a unique way to enjoy this delicious simple recipe and sweet indulgence.
