
Making Boston cream fudge recipe easy is simpler than you think. This delicious sweet treat delivers a rich, creamy chocolate flavor perfect for any occasion. With just a few simple ingredients and clear steps, you’ll be enjoying homemade Boston cream fudge in no time, satisfying those dessert cravings effortlessly.
Key Takeaways
- Boston cream fudge is simple to make with minimal prep time.
- Utilize common pantry items for this delightful sweet treat.
- Achieve perfect, smooth consistency by following precise cooking methods.
- Customization with various mix-ins enhances the flavor profile.
- Proper cooling and storage ensure lasting freshness and enjoyment.
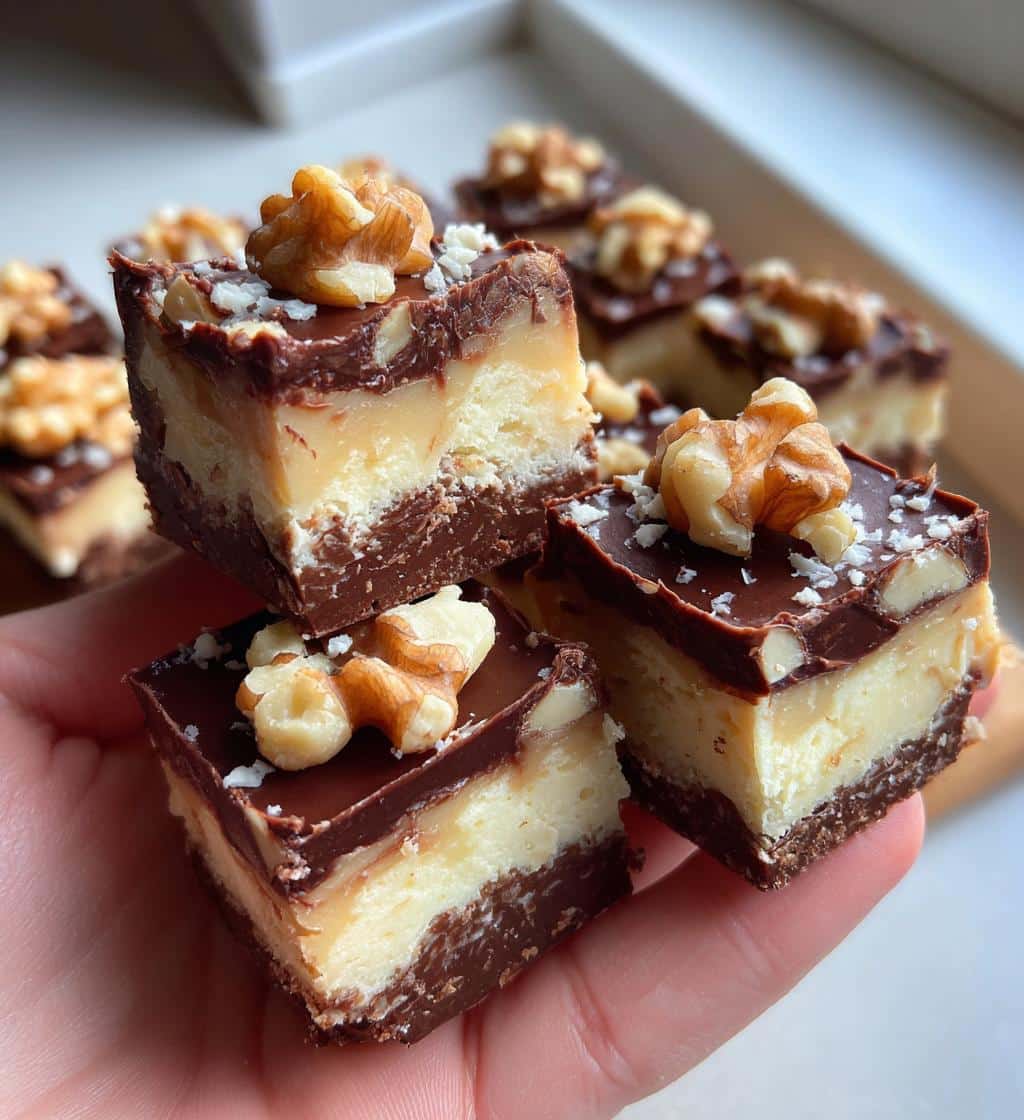
Homemade fudge is a true delight. Its creamy texture brings joy. Simple steps yield sweet rewards. A perfect dessert always. Share this treat with loved ones.
Making Boston Cream Fudge Recipe Easy
Crafting a batch of homemade Boston cream fudge doesn’t have to be an intimidating kitchen project. In fact, with the right approach and a clear understanding of the steps involved, this rich and creamy dessert becomes a highly achievable sweet treat for any home cook. This recipe simplifies the traditional fudge-making process, focusing on efficiency without compromising on the decadent flavor profile that makes Boston cream fudge so beloved. Forget complicated candy thermometers and endless stirring; our streamlined method aims to make your fudge-making experience enjoyable and rewarding, leaving you with delicious results every single time.
Quick prep for delicious fudge
One of the most appealing aspects of this Boston cream fudge recipe is its emphasis on quick preparation. The active time required to get your ingredients ready and the initial mixture cooking is surprisingly minimal. We focus on clear, concise instructions that move you swiftly from gathering components to the actual cooking phase. This means less time spent chopping or measuring intricate amounts and more time enjoying the process. A quick prep ensures that even on busy days, you can easily whip up this homemade dessert without feeling overwhelmed. Think of it as an accessible path to a decadent confection, perfect for satisfying sudden cravings or preparing a last-minute gift.
Gather simple ingredients first
The foundation of any easy recipe lies in its ingredients, and our Boston cream fudge is no exception. Before you even think about turning on the stove, ensure all your simple ingredients are measured out and ready to go. This practice, known as mise en place, dramatically reduces stress and errors during the cooking process. You’ll find that many of the items needed are likely already staples in your pantry: sugar, cocoa powder, cream, butter, and vanilla. By having everything at your fingertips, you can seamlessly transition through each step, making the entire cooking experience smooth and efficient. It’s about setting yourself up for success from the very beginning, paving the way for a delightful batch of creamy Boston cream fudge.
Essential Boston Cream Fudge Ingredients
To create the perfect Boston cream fudge, understanding the role of each essential ingredient is paramount. The beauty of this recipe lies in its reliance on common, readily available items that, when combined correctly, yield an extraordinary flavor and texture. Each component contributes to the distinctive taste and mouthfeel of this popular confectionery. Paying attention to the quality of these core ingredients will significantly impact the final outcome, ensuring your homemade dessert is truly exceptional. We aim for a rich, deep chocolate flavor complemented by a smooth, melt-in-your-mouth creaminess, and that starts with selecting the right items.
Sweeteners and cocoa powder
The primary sweetener for our Boston cream fudge is granulated sugar, providing the necessary bulk and sweetness. While brown sugar can add a deeper molasses note, granulated sugar typically creates the classic smooth texture. For the distinctive chocolate flavor, high-quality cocoa powder is non-negotiable. Dutch-processed cocoa powder often yields a darker color and a less acidic, smoother chocolate taste, making it ideal for this recipe. However, natural unsweetened cocoa powder also works wonderfully, offering a robust chocolate punch. The combination of these two elements forms the backbone of the fudge’s signature taste, giving it that decadent chocolate core reminiscent of a classic Boston cream pie. Experimenting with the cocoa powder can slightly alter the depth of flavor, so choose one you enjoy.
Cream, butter, vanilla basics
The creamy texture that defines great fudge comes from a careful balance of dairy. Heavy cream (or whipping cream) is preferred over milk or half-and-half due to its higher fat content, which contributes significantly to the fudge’s richness and smooth consistency. This fat is crucial for a luxurious mouthfeel. Unsalted butter adds another layer of richness and helps prevent crystallization, ensuring your fudge remains creamy rather than grainy. Always use good quality butter for the best flavor. Finally, pure vanilla extract is the aromatic secret weapon. A small amount of vanilla enhances the chocolate notes and rounds out the overall flavor profile, adding warmth and depth. Avoid imitation vanilla if possible, as pure extract offers a superior taste experience. These dairy and flavoring basics are what make your Boston cream fudge truly exceptional.
Chocolate chips, walnuts optional
While the core recipe for Boston cream fudge is undeniably delicious on its own, adding mix-ins like chocolate chips or walnuts can elevate the experience and introduce new textures. Semi-sweet chocolate chips are a popular choice, melting into pockets of extra chocolatey goodness throughout the fudge. If you prefer a bolder chocolate presence, dark chocolate chips can add a hint of bitterness that balances the overall sweetness. Walnuts, on the other hand, provide a delightful crunch and nutty flavor, offering a textural contrast to the smooth fudge. Feel free to use pecans, almonds, or even mini marshmallows if you have other preferences. These additions are entirely optional, allowing you to customize your dessert to your liking. Whether you keep it plain or load it with extras, this Boston cream fudge recipe remains a winner.
Mixing and Cooking Your Fudge
The transformation of simple ingredients into luscious Boston cream fudge happens during the mixing and cooking stages. This is where precision and attention to detail truly pay off, ensuring you achieve the desired creamy texture and rich flavor. The process involves dissolving sugars, combining liquids, and then carefully boiling the mixture to a specific point. This active cooking phase is perhaps the most critical for fudge success, as it dictates the final consistency. Don’t worry, with a few straightforward tips, you’ll navigate this stage like a seasoned confectioner. Remember, patience and constant observation are your best allies here.
Combine sugar, cocoa, cream
Begin by combining your granulated sugar, cocoa powder, and heavy cream in a large, heavy-bottomed saucepan. A heavy-bottomed pan is crucial because it distributes heat more evenly, preventing scorching, which can be a common pitfall when making fudge. Whisk these ingredients together thoroughly before applying heat to ensure the cocoa powder is fully incorporated and there are no dry lumps. This initial mixing creates a homogeneous base that will cook more uniformly. The sugar will begin to dissolve in the cream, and the cocoa will impart its rich color and flavor to the liquid. This careful start sets the stage for a smooth cooking process and ultimately, a perfectly creamy Boston cream fudge.
Boil mixture until smooth
Once combined, place the saucepan over medium heat and bring the mixture to a rolling boil. During this phase, it’s important to stir constantly, especially at the bottom of the pan, to prevent the ingredients from sticking and burning. Stirring also helps the sugar fully dissolve and prevents crystallization. The goal is to cook the mixture until it reaches a specific temperature—typically 235-240°F (113-116°C), which is known as the soft-ball stage. If you don’t have a candy thermometer, you can test it by dropping a small amount into cold water; it should form a soft, pliable ball. This careful boiling process is what concentrates the sugars and sets the structure for your fudge, making it firm yet still creamy when cooled. For a more traditional experience with a slightly different flavor profile, consider our Snickerdoodle Cobbler, which also requires careful heating to achieve its comforting texture.
Perfecting Your Fudge Consistency
Achieving the ideal consistency for your Boston cream fudge is what truly sets a good batch apart from a great one. After the initial boiling, the cooling and subsequent stirring are crucial steps that determine whether your fudge will be perfectly smooth and creamy or grainy and crumbly. This stage requires a bit of patience and a watchful eye, but the payoff is a decadent sweet treat that melts in your mouth. Getting the consistency right is about controlling crystal formation, which prevents the fudge from becoming too hard or too soft. It’s a delicate balance that, once mastered, will make you a fudge-making expert, ready to impress with your homemade dessert.
Stir in butter and vanilla
Once your fudge mixture has reached the soft-ball stage and has been removed from the heat, it’s time to incorporate the butter and vanilla extract. Do not stir immediately. Instead, place the butter directly on top of the hot mixture and pour the vanilla over it. Resist the urge to stir these in right away. Allowing the mixture to cool slightly without disturbance is key to preventing premature sugar crystallization. The butter will slowly melt into the surface, and the vanilla will begin to infuse its aroma. This waiting period is critical for setting the stage for a smooth, non-grainy fudge texture. This step might seem counterintuitive, but it’s a fundamental principle in fudge making that ensures the desired creamy outcome.
Ensure mixture is smooth
After the butter has melted and the mixture has cooled to about 110-120°F (43-49°C) – warm enough to touch comfortably but no longer boiling hot – it’s time for vigorous stirring. Using a wooden spoon or an electric mixer on low speed, beat the fudge continuously. This stirring process is what breaks down any large sugar crystals that may have formed and incorporates air, resulting in a smooth, creamy texture. You’ll notice the mixture start to thicken and lose its glossy sheen, becoming duller and more opaque. Continue to beat until it becomes very thick and difficult to stir, and you can see a slight resistance against the spoon. This indicates it’s ready to be poured. This transformation from a liquid to a semi-solid, smooth fudge is the magic of this stage, delivering that perfect, melt-in-your-mouth fudge consistency you’re aiming for.
Adding Flavor to Your Fudge
After achieving the perfect base consistency, the next exciting step is adding your chosen flavor enhancements to the Boston cream fudge. This is where you can truly personalize your homemade dessert, introducing textural contrasts and additional layers of taste. The timing and method of incorporating these extra ingredients are important to ensure they are evenly distributed and retain their integrity within the creamy fudge. Whether you opt for a classic addition like chocolate chips or decide to venture into more adventurous mix-ins, this stage is about putting your unique stamp on this delightful sweet treat. Make sure your fudge is at the right temperature before mixing to prevent any unwelcome melting or sinking.
Fold in chips and walnuts
Once your fudge has reached the thick, dull stage after cooling and stirring, it’s the ideal moment to gently fold in any optional ingredients like chocolate chips, chopped walnuts, or other desired mix-ins. At this point, the fudge is still warm enough to allow for easy incorporation but cool enough to prevent chocolate chips from melting completely and disappearing into the mixture. Use a sturdy spatula or spoon to fold the additions into the fudge until they are evenly distributed throughout. Avoid overmixing, as this can introduce too much air and affect the final texture. The goal is to integrate them just enough so that every square of Boston cream fudge offers a delightful surprise. For another fantastic treat that incorporates delicious mix-ins, try our Peanut Butter Brownie Swirl Cookies.
Remove from heat immediately
This instruction, while seemingly simple, is crucial for two main reasons: preventing overcooking and preserving the delicate flavors of your added ingredients. Once the fudge mixture has reached its target temperature (soft-ball stage), it must be removed from the heat source immediately. Continued exposure to residual heat can cause the mixture to cook further, leading to a brittle or grainy texture rather than the desired creamy consistency. Furthermore, for ingredients like chocolate chips or vanilla extract, excessive heat can compromise their flavor and texture. Removing the fudge from heat quickly ensures that the cooking process stops precisely when it should, allowing you to control the final outcome and maintain the quality of your homemade dessert. Proper timing here is key to a successful batch of Boston cream fudge.
Setting and Serving Fudge Squares
After all the careful cooking and mixing, the final steps of setting and serving your Boston cream fudge squares are where your patience is truly rewarded. This stage is critical for achieving perfectly firm, sliceable fudge that holds its shape beautifully. Rushing the cooling process can lead to a sticky, unmanageable mess, while proper setting ensures a clean cut and an appealing presentation. Whether you’re making this easy recipe for a party, a gift, or simply to enjoy at home, following these guidelines will guarantee that your homemade dessert is a triumph, ready to be enjoyed by everyone who appreciates a good sweet treat.
Pour into greased pan
Once your Boston cream fudge mixture is thick and ready, quickly pour it into a prepared pan. A 9×9 inch square pan is typically ideal for a standard batch, yielding fudge squares of a good thickness. It’s crucial to prepare the pan beforehand by lightly greasing it with butter or cooking spray, then lining it with parchment paper, leaving an overhang on two sides. This parchment “sling” makes it incredibly easy to lift the entire slab of fudge out of the pan once it’s set, simplifying the cutting process. Smooth the top of the fudge gently with a spatula to create an even surface. Working quickly during this step is important because the fudge will continue to thicken as it cools, making it harder to spread evenly if you delay.
Let fudge cool completely
This is arguably the most challenging part for many eager bakers: waiting. To achieve the perfect firm, non-sticky texture, your Boston cream fudge must cool completely at room temperature. This process can take several hours, usually 2 to 4 hours, or even overnight. Do not place the fudge in the refrigerator to speed up cooling, as rapid temperature changes can sometimes cause it to become brittle or grainy. Allowing it to cool slowly and naturally encourages the formation of small, even sugar crystals, which results in that desirable smooth, creamy consistency. Once fully cooled and firm to the touch, use the parchment paper overhangs to lift the fudge slab onto a cutting board. Then, using a sharp, warm knife (wiping it clean after each cut helps), slice your homemade dessert into neat squares. Now your delicious sweet treat is ready to serve!
Quick Fudge Prep and Cook Times
Understanding the time commitment involved in making Boston cream fudge can help you plan your kitchen activities effectively. While the total time includes active cooking and inactive cooling, breaking down the specific phases makes this easy recipe even more manageable. This section demystifies the duration for both preparation and cooking, ensuring you can fit this homemade dessert into your schedule without any surprises. Knowing what to expect allows for a stress-free experience, proving that even a decadent sweet treat like fudge can be a quick and rewarding project for busy individuals.
What about preparation time?
The beauty of making Boston cream fudge lies in its relatively short preparation time. Gathering and measuring your simple ingredients typically takes no more than 10-15 minutes. This involves getting your sugar, cocoa powder, cream, butter, and vanilla extract ready, along with any optional mix-ins you plan to use. If you practice mise en place, as suggested earlier, this phase will be even quicker and more streamlined. The goal here is efficiency—to have everything within arm’s reach so that once you start cooking, you can move seamlessly from one step to the next. This quick prep ensures that the initial hurdle of starting a baking project feels minimal, making it an approachable sweet treat for any occasion.
Understanding the cooking duration
The active cooking time for Boston cream fudge usually spans about 15-20 minutes, from the moment you place the pot on the stove until it reaches the soft-ball stage. This period involves bringing the mixture to a boil and then maintaining that boil while constantly stirring until the correct temperature or consistency is achieved. Following this, there’s a crucial cooling period off the heat, where the butter and vanilla are added, and the mixture is left to cool without stirring for about 30-45 minutes. Finally, the vigorous stirring phase to achieve smoothness takes another 5-10 minutes. So, while the active cooking is relatively brief, the total active kitchen time, including prep and stirring, is roughly 45-60 minutes. The longest duration is the inactive cooling and setting time, which can take 2-4 hours or longer, allowing the fudge to firm up perfectly before slicing into delicious Boston cream fudge squares.
Boston Cream Fudge Recipe Notes
To ensure your Boston cream fudge turns out perfectly every time, a few key recipe notes can make a significant difference. These tips address common challenges and best practices in fudge making, guiding you toward a consistently creamy, smooth, and delicious outcome. Understanding the nuances of equipment and technique can elevate your homemade dessert from good to absolutely outstanding. Pay close attention to these details, as they are often the secrets to professional-quality fudge, even for an easy recipe. Embrace these insights to master the art of this beloved sweet treat.
Heavy-bottomed pan advice
The type of pan you use for making fudge is far more critical than you might initially realize. A heavy-bottomed pan, such as a sturdy stainless steel or cast iron pot, is strongly advised. The reason is simple: these pans distribute heat much more evenly across the base, which is crucial when boiling sugary mixtures. Thin-bottomed pans, on the other hand, can create hot spots where the sugar mixture might scorch and burn, leading to a gritty texture and an unpleasant burnt taste. Using a heavy-bottomed pan minimizes the risk of burning and helps the fudge cook more uniformly, resulting in a smoother, more consistent texture. Investing in one is a small step that yields significant benefits for any sweet treat you create.
Constant stirring benefits
During the initial boiling phase of your Boston cream fudge, constant stirring is not just a suggestion—it’s a necessity. This continuous agitation serves multiple important purposes. Firstly, it prevents the sugar and cocoa mixture from sticking to the bottom of the pan and burning, which is a common cause of ruined fudge. Secondly, stirring helps to dissolve the sugar crystals evenly into the liquid, preventing them from recrystallizing prematurely, which could lead to a grainy texture in your finished fudge. Thirdly, it ensures the entire mixture heats uniformly, contributing to the desired soft-ball stage consistency. While it might seem like a chore, the few minutes of constant stirring during cooking are vital for achieving that luscious, smooth, and creamy homemade dessert. If you enjoy making creamy desserts, you might also like our Crispy Parmesan Chicken with a Rich Garlic Sauce, a delightful main course that offers a different kind of rich texture experience.
Troubleshooting Common Fudge Issues
Even with an easy recipe, sometimes issues arise when making Boston cream fudge. Knowing how to troubleshoot common problems can save your batch and turn a potential kitchen mishap into a successful homemade dessert. From fudge that won’t set to a grainy texture, these tips will help you understand the causes and provide solutions, ensuring your sweet treat consistently meets expectations. Don’t be discouraged by minor setbacks; they are opportunities to refine your technique and become an even better fudge maker. Mastering these fixes will give you confidence in tackling any fudge challenge.
What if fudge is too runny?
If your Boston cream fudge turns out too runny, it almost always points to one primary issue: the mixture wasn’t cooked to a high enough temperature. The sugar concentration needs to reach the soft-ball stage (235-240°F or 113-116°C) for the fudge to properly set. If you removed it from the heat too soon, the sugar molecules couldn’t form the necessary structure. Unfortunately, once poured and cooled, it’s very difficult to salvage runny fudge into solid squares. In some cases, you might be able to re-melt it over low heat, add a tablespoon or two more of sugar (if you suspect incorrect initial measurement), and then re-boil it to the correct temperature, carefully monitoring with a candy thermometer. However, the texture might not be as smooth as the first attempt. To prevent this, always ensure you use an accurate candy thermometer or perform the cold-water test meticulously.
How to check for readiness
Checking for the readiness of your Boston cream fudge mixture is critical to its success. The most reliable method is using a candy thermometer. Insert it into the boiling mixture, ensuring it doesn’t touch the bottom of the pan. Cook until it consistently reads between 235°F and 240°F (113°C-116°C) for the soft-ball stage. If you don’t have a thermometer, you can perform the cold-water test. Drop a small spoonful of the boiling mixture into a cup of very cold water. Let it cool for a few seconds, then pick up the candy with your fingers. If it forms a soft, pliable ball that can be flattened easily but still holds its shape, it’s ready. If it dissolves or is too sticky, it needs to cook longer. If it’s hard and brittle, you’ve likely overcooked it. Practice with this test, and you’ll quickly become adept at recognizing the perfect consistency for your creamy Boston cream fudge.
Storing Your Homemade Fudge Safely
Once you’ve successfully crafted your delicious Boston cream fudge, knowing how to store it properly is essential to maintain its freshness, flavor, and creamy texture. Incorrect storage can lead to dry, hard, or even spoiled fudge, which would be a waste of your effort in making this wonderful homemade dessert. Whether you plan to enjoy it over a few days or save some for a later treat, these storage tips ensure your sweet treat remains as delightful as the day it was made. Proper storage also helps prevent any unwanted crystallization, keeping that smooth texture intact.
Room temperature storage
For optimal enjoyment and to preserve its creamy texture, Boston cream fudge is best stored at room temperature. Place the fudge in an airtight container once it has completely cooled and been cut into squares. Layering squares between sheets of parchment paper can prevent them from sticking together. Stored this way, fudge can typically last for 1 to 2 weeks. Keep the container in a cool, dry place, away from direct sunlight or heat sources, which could cause the fudge to melt or dry out. Room temperature storage allows the fudge to maintain its rich flavor and signature smooth, melt-in-your-mouth quality, making it readily accessible for whenever a craving for this sweet treat strikes. Share your storage tips and other culinary ideas by following Carina Recipes on Instagram!
Refrigerate or freeze options
While room temperature is ideal for short-term storage, refrigeration or freezing are excellent options for extending the shelf life of your Boston cream fudge. If you need to store it for longer than two weeks, or if you live in a very warm climate, refrigeration is a good choice. Wrap individual fudge pieces tightly in plastic wrap, then place them in an airtight container before refrigerating. This can extend its freshness for up to 3-4 weeks. When ready to eat, allow refrigerated fudge to come to room temperature for about 15-30 minutes to restore its optimal texture. For even longer storage, fudge freezes exceptionally well. Wrap individual pieces or blocks tightly in plastic wrap, then in aluminum foil, and store in an airtight freezer-safe container for up to 3 months. Thaw frozen fudge in the refrigerator overnight, then let it come to room temperature before serving to enjoy your perfectly preserved homemade dessert.
Customizing Your Fudge Flavor Ideas
One of the joys of making your own Boston cream fudge is the endless potential for customization. While the base recipe for this easy recipe is a delicious sweet treat on its own, adding different flavors and mix-ins can transform it into a unique homemade dessert tailored to your preferences. Don’t be afraid to experiment beyond the traditional chocolate chips and walnuts; the world of flavor combinations is vast and inviting. This section provides inspiration to help you personalize your fudge, making each batch a distinctive culinary adventure that reflects your taste and creativity.
Dark chocolate for richness
If you’re a fan of a more intense chocolate experience, consider adjusting the cocoa powder or adding dark chocolate elements to your Boston cream fudge. Instead of solely relying on cocoa powder, you could melt in a small amount of high-quality dark chocolate (60-70% cacao) along with the butter and vanilla during the cooling phase. Alternatively, you can use a higher proportion of dark cocoa powder or fold in dark chocolate chips for extra richness. This modification introduces a deeper, slightly more bitter note that beautifully contrasts with the sweetness of the fudge, creating a sophisticated twist on the classic flavor. This darker variation offers a luxurious and complex taste profile that chocolate connoisseurs will appreciate, making your homemade dessert an even more special sweet treat. Find more creative dessert ideas on Carina Recipes Pinterest.
Other delicious mix-ins
Beyond chocolate chips and walnuts, the possibilities for delicious mix-ins in your Boston cream fudge are virtually limitless. Consider adding chopped pecans, almonds, or cashews for different nutty flavors and textures. Dried fruits like cherries, cranberries, or even diced apricots can introduce a chewy texture and a burst of fruity tang. For an extra decadent twist, try mini marshmallows, toffee bits, or crushed cookies (like Oreos or graham crackers). A swirl of peanut butter or caramel can create a beautiful visual and flavor contrast. You can also play with extracts; a hint of peppermint, almond, or orange extract can completely change the character of your fudge. Remember to add these mix-ins after the fudge has cooled slightly but before it sets completely, ensuring they are evenly distributed. This allows you to truly make this easy recipe your own, creating a unique and memorable sweet treat.
Boston Cream Fudge Nutrition Facts
While Boston cream fudge is undeniably a delightful sweet treat and a homemade dessert to savor, it’s also helpful to be aware of its nutritional content, especially if you’re mindful of your dietary intake. Understanding the approximate calories, fat, and carbohydrates per serving can assist with portion control and help you make informed choices. Keep in mind that these figures are estimates and can vary based on the exact ingredients used, portion size, and any additional mix-ins. This information isn’t meant to deter enjoyment but to provide a balanced perspective on this delicious confection, allowing you to enjoy your Boston cream fudge responsibly as part of a varied diet. For broader information on dietary needs, you might consult resources like Wikipedia’s page on Nutrition Facts.
Calories per serving square
A typical serving of Boston cream fudge, often defined as a 1-inch or 1.5-inch square, generally contains a moderate to high number of calories. Due to its dense nature and rich ingredients like sugar, butter, and cream, a single square can range anywhere from 80 to 150 calories, sometimes more depending on the size of the square and the addition of high-calorie mix-ins like nuts or extra chocolate. These calories primarily come from carbohydrates (sugar) and fats. When enjoying this easy recipe, it’s beneficial to be mindful of serving sizes, as the deliciousness of this sweet treat can make it easy to overindulge. Enjoying a smaller portion allows you to savor the rich flavor without consuming an excessive amount of calories, making this homemade dessert a sustainable indulgence.
Fat and carbohydrate details
Boston cream fudge is rich in both fats and carbohydrates. The fats primarily come from the heavy cream and butter, contributing to its creamy texture and satisfying mouthfeel. A single serving square can contain approximately 5-10 grams of fat, with a significant portion being saturated fat. For individuals monitoring fat intake, this is an important consideration. As for carbohydrates, sugar is the predominant source. A typical serving may contain 15-25 grams of carbohydrates, almost entirely from sugars. This contributes to the energy content and, of course, the delightful sweetness of the fudge. While delicious, this homemade dessert is best enjoyed in moderation, especially for those managing blood sugar levels or following specific dietary plans. Understanding these details helps in making this easy recipe a well-balanced addition to your treat repertoire.
