
Easy Bisquick Cinnamon Rolls are a fantastic way to enjoy a warm, sweet treat without the fuss of traditional yeast dough. This simple recipe ensures delicious results every time. Perfect for a quick breakfast or a delightful homemade dessert, these rolls come together with pantry staples, making baking accessible and enjoyable for everyone.
Key Takeaways
- Whip up delicious cinnamon rolls in just 30 minutes.
- Utilize Bisquick for a remarkably easy, no-yeast dough.
- Create a classic, comforting cinnamon and brown sugar filling.
- Finish with a simple, sweet powdered sugar glaze.
- Learn practical tips for perfect texture and convenient storage.
These rolls are surprisingly simple. They offer homemade comfort quickly. Few ingredients yield great taste. Perfect for busy mornings. A sweet start to any day.
Easy Bisquick Cinnamon Rolls: Quick Start
Craving warm, gooey cinnamon rolls but short on time? Our Easy Bisquick Cinnamon Rolls recipe is your answer. This delightful method skips the traditional yeast proofing, relying on the versatility of Bisquick to deliver tender, fluffy rolls in a fraction of the time. It’s perfect for busy mornings, unexpected guests, or simply satisfying that sweet tooth craving without a lengthy process. The magic lies in streamlining the baking process, ensuring that even novice bakers can achieve impressive results. Forget complicated steps and long waits; this recipe focuses on speed and simplicity, letting you enjoy homemade goodness much faster.
Preheat Oven to 375°F
Before you begin mixing, ensure your oven is preheated to 375°F (190°C). Proper preheating is crucial for even baking and helps the rolls achieve that desirable golden-brown exterior and soft interior. A correctly heated oven prevents the rolls from drying out or cooking unevenly. Take a moment to ensure your oven is at the specified temperature before placing your rolls inside, setting the stage for perfectly baked treats.
Total Time: 30 Minutes
One of the most appealing aspects of this Bisquick cinnamon roll recipe is its incredibly quick turnaround. From start to finish, you’ll have warm, freshly baked rolls on your table in approximately 30 minutes. This includes a short prep time for mixing dough and filling, a brief baking period, and a quick glaze application. This efficiency makes them an ideal choice for a last-minute breakfast or a spontaneous treat. Compared to yeast-based recipes that can take hours, this speed is truly revolutionary for homemade baked goods.
Makes 12 Servings
This recipe is designed to yield a generous batch of 12 individual cinnamon rolls, making it perfect for sharing with family and friends. The serving size is ideal for a standard 9×13 inch baking dish, ensuring each roll has enough space to expand and bake beautifully. If you need fewer, the recipe can easily be halved, but these delicious rolls tend to disappear quickly, so a dozen is often just right!
Gathering Your Cinnamon Roll Ingredients
The beauty of these easy Bisquick cinnamon rolls lies in their straightforward ingredient list. You likely have most of these items already in your kitchen, making spontaneous baking a real possibility. Having all your ingredients measured and ready before you start mixing (mise en place) will make the preparation process even smoother and quicker. This recipe champions simplicity without sacrificing flavor, relying on common pantry and dairy items to create a comforting classic.
Pantry Staples List
Your pantry will provide the backbone of this recipe. You’ll need:
- Bisquick Original Baking Mix: The star ingredient, offering convenience and a perfect base for our dough. Bisquick is a pre-mixed baking product that includes flour, leavening, fat, and salt, eliminating the need to measure multiple dry ingredients. You can learn more about Bisquick on Wikipedia.
- Granulated Sugar: A small amount is added to the dough for sweetness and to balance the flavors.
- Brown Sugar: The essential component of our rich, caramelly filling. Light or dark brown sugar works well.
- Ground Cinnamon: The namesake spice that gives these rolls their signature aroma and taste. For extra depth, ensure your cinnamon is fresh.
- Powdered Sugar (Confectioners’ Sugar): Crucial for making that creamy, sweet glaze that perfectly complements the warm rolls.
- Vanilla Extract (Optional but Recommended): A dash in the glaze adds a lovely aromatic complexity.
These staples form the foundation of a fantastic baking experience, proving that impressive results don’t always require obscure or expensive items. This simplicity also makes these rolls a great recipe for beginner bakers.
Fresh Dairy Needs
Beyond your pantry, a few fresh dairy items are necessary to bring the dough and filling together:
- Milk: Used in the dough to create a soft, pliable consistency. Any type of milk (whole, 2%, skim) will work, but whole milk often yields a richer flavor and tenderer crumb.
- Unsalted Butter: Melted butter is key for both the filling and the glaze. It acts as a binder for the cinnamon sugar, helping it adhere to the dough, and contributes to the overall richness. Using unsalted butter gives you control over the final sodium content, though salted butter can be used if that’s what you have on hand – just be mindful of any additional salt in other components.
These fresh ingredients combine with the pantry staples to create a harmonious blend, resulting in a batch of homemade cinnamon rolls that taste absolutely divine.
Mixing Your Easy Bisquick Dough
The dough for these easy Bisquick cinnamon rolls is incredibly forgiving and comes together in just a few minutes. Unlike traditional yeast doughs that require precise measurements, warm liquids, and proofing time, this Bisquick version is designed for speed and simplicity. The goal is a soft, slightly sticky dough that’s easy to handle and roll out, producing tender rolls every time. Pay close attention to the consistency, as this directly impacts the final texture of your baked goods. For a delightful breakfast treat, you might also enjoy making Hawaiian Roll French Toast.
Combine Bisquick, Milk, Sugar
In a large mixing bowl, combine the Bisquick baking mix, granulated sugar, and milk. Start by adding the Bisquick and sugar, then gradually pour in the milk. Use a sturdy spoon or a rubber spatula to mix the ingredients. Stir until just combined. The mixture will initially look crumbly, but as you continue to stir, it will come together to form a soft dough. If the dough seems too dry, add milk one tablespoon at a time until it reaches the desired consistency. Conversely, if it’s too wet, sprinkle in a small amount of extra Bisquick.
The dough should be cohesive enough to form into a ball but still soft and slightly sticky to the touch. This delicate balance ensures the rolls will be tender, not tough. The simplicity of this mixing process is what makes Bisquick such a fantastic shortcut for homemade treats. This method bypasses the complexities of working with yeast, making these rolls accessible to bakers of all skill levels. It’s truly a game-changer for quick baking endeavors.
Avoid Overmixing Dough
This is a critical step for tender cinnamon rolls. Overmixing the dough can develop the gluten in the Bisquick, leading to a tough, chewy texture rather than the desired light and fluffy result. As soon as the ingredients are just combined and a soft dough has formed, stop mixing. There might be a few small lumps, and that’s perfectly fine. Resist the urge to knead the dough extensively as you would with bread. Gentle handling is key here.
Once the dough is together, lightly flour your work surface and your hands before turning the dough out. A gentle gathering and a quick patting into shape are all that’s needed before rolling. This careful approach ensures your easy Bisquick cinnamon rolls will melt in your mouth, retaining their soft, delicate crumb. Prioritizing minimal handling keeps the dough tender and delightful, much like achieving the perfect soft texture in a batch of Snickerdoodle Cobbler.
Assembling Delicious Cinnamon Roll Filling
The heart and soul of any great cinnamon roll lies in its rich, aromatic filling. This recipe’s filling is incredibly simple yet incredibly effective, combining the warmth of cinnamon with the deep sweetness of brown sugar, all bound together by luscious melted butter. Achieving a well-distributed filling is crucial for that classic swirl of flavor in every bite. This mixture transforms a plain dough into a delightful experience, providing the signature taste and aroma that makes cinnamon rolls so irresistible. Preparing this component correctly ensures maximum flavor impact.
Spread Melted Butter
Once your Bisquick dough is rolled out into a neat rectangle (we’ll cover shaping in the next section), it’s time to generously spread melted butter over its entire surface. The butter acts as a delicious adhesive, ensuring the cinnamon-sugar mixture sticks perfectly to the dough. It also contributes significantly to the richness and moistness of the final product. Make sure the butter is fully melted but not scorching hot, as very hot butter could start to cook the dough. A pastry brush is ideal for achieving an even layer from edge to edge, ensuring no part of the roll is left without that buttery goodness. This foundation is key to the roll’s flavor and texture, creating a barrier that keeps the dough moist during baking.
Cinnamon and Brown Sugar Blend
After the melted butter is spread, generously sprinkle the combined cinnamon and brown sugar mixture over the buttery dough. For an even coating, you can mix the brown sugar and cinnamon in a small bowl first before sprinkling. Ensure the entire surface, right up to the edges, is covered. The brown sugar not only adds sweetness but also a wonderful molasses-like depth and helps to create that signature gooey texture when baked. The cinnamon, of course, provides the quintessential spice, filling your kitchen with an inviting aroma as they bake. Don’t be shy with the filling; a generous amount ensures maximum flavor in every bite. This blend is what truly defines a cinnamon roll, providing that comforting, sweet, and spicy core that everyone loves. For other sweet baked goods, check out our collection of dessert recipes.
Shaping Your Easy Cinnamon Rolls
Shaping the rolls is a fun and surprisingly simple part of the process, even for beginners. With Bisquick dough, you don’t have to worry about the dough springing back too much, making it easier to manage. The key is to create a tight, even log that will yield perfectly swirled, uniformly sized rolls. Taking a little care during this stage ensures that each baked roll looks as good as it tastes. This section will guide you through turning your flat dough into a cylindrical masterpiece, ready for slicing and baking. Precision here contributes to a beautiful presentation.
Roll Dough into Rectangle
On a lightly floured surface, turn out your Bisquick dough. Gently pat it into a roughly rectangular shape. Then, using a rolling pin, roll the dough into a rectangle approximately 12×18 inches and about ¼ inch thick. Try to keep the edges as straight as possible; this will make for neater rolls later. If the dough is a little sticky, lightly flour your rolling pin or hands. The beauty of this dough is its forgiving nature, allowing you to re-roll if needed without much fuss. A consistent thickness is important for even baking, so aim for uniformity across the entire rectangle. This forms the canvas for your delicious filling.
Slice Log into Pieces
Once the dough is rolled out and the filling is applied, it’s time to carefully roll the rectangle into a tight log, starting from one of the longer sides. Roll it as tightly as you can without tearing the dough; a tight roll ensures beautiful spirals. Once you have a log, use a sharp knife or even unflavored dental floss to slice the log into 12 even pieces, each about 1 to 1.5 inches thick. A sharp knife prevents squishing the rolls, maintaining their circular shape. If using dental floss, slide it under the log, cross the ends over the top, and pull to slice cleanly. This method is particularly good for very soft doughs. For more baking inspiration, check out our Carina Recipes Pinterest!
Place in Baking Dish
Lightly grease a 9×13 inch baking dish. Arrange the sliced cinnamon rolls cut-side up in the prepared dish, leaving a small space between each roll. They will expand slightly during baking, so a little room is necessary, but don’t space them too far apart; having them nestle together helps keep them moist and soft. Some bakers like to line the bottom of the dish with parchment paper for easier cleanup, though greasing typically suffices. Once all 12 rolls are in the dish, they are ready for the oven. This arrangement ensures even heat distribution and a lovely collective rise.
Baking Golden Brown Cinnamon Rolls
The baking process for these easy Bisquick cinnamon rolls is quick and straightforward, a testament to the efficient design of the recipe. Unlike traditional yeast rolls that can take longer to achieve proper doneness, these rolls will be ready in a short amount of time. The goal is a perfectly golden-brown exterior that hints at the soft, gooey interior awaiting. Keep a watchful eye on your oven, as baking times can vary slightly depending on your specific appliance. Proper baking ensures both taste and texture are at their peak.
Bake for 15-20 Minutes
Place your baking dish with the prepared cinnamon rolls into the preheated 375°F (190°C) oven. Bake for approximately 15 to 20 minutes. The exact timing can depend on your oven’s calibration and the thickness of your rolls. Begin checking them around the 15-minute mark. You’re looking for a specific visual cue to know when they’re perfectly baked, which brings us to the next point. Over-baking can lead to dry rolls, so it’s important to monitor them carefully. This relatively short baking time is a key factor in the recipe’s “easy” and “quick” claims, delivering warm treats without a long wait.
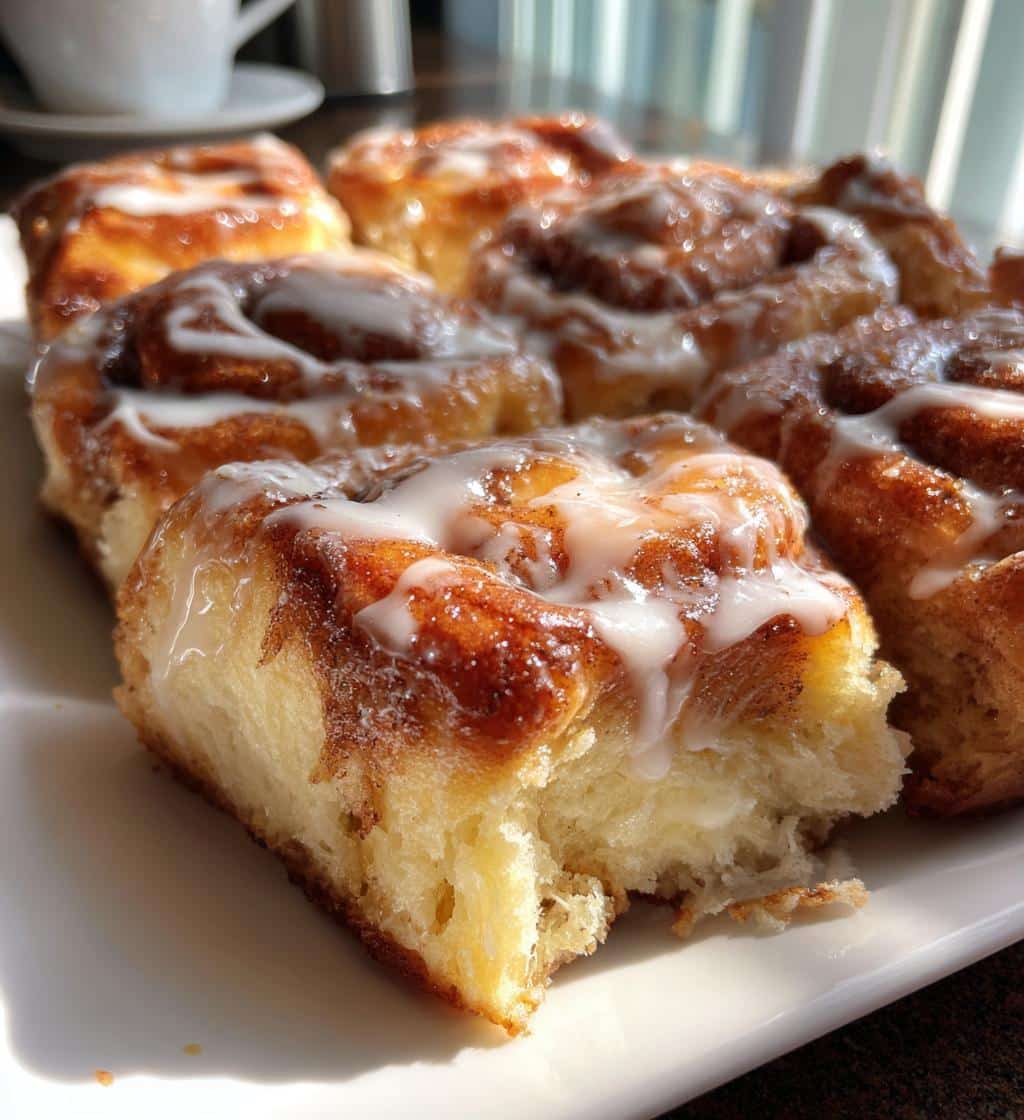
Watch for Golden Color
The most reliable indicator of doneness for these Bisquick cinnamon rolls is their color. They should be beautifully golden brown on top and around the edges. The centers might still appear slightly lighter, but the overall hue should be rich and inviting. If they look pale, give them a few more minutes, checking frequently. The bottoms of the rolls should also be lightly browned. Once they reach this perfect golden hue, remove the dish from the oven. Let them cool in the pan for a few minutes before applying the glaze; this allows them to set slightly and absorb the glaze more effectively. This visual check ensures your cinnamon rolls are cooked through but remain wonderfully soft and moist, much like the ideal texture for a batch of Peanut Butter Brownie Swirl Cookies.
Making the Sweet Glaze
No cinnamon roll is complete without a luscious, sweet glaze to top it all off. This glaze is incredibly simple to prepare, requiring just two core ingredients, and comes together in mere minutes. It adds a final layer of sweetness and moisture, making each bite even more delightful. The consistency of the glaze is key – you want it thick enough to coat but thin enough to drizzle beautifully over the warm rolls. This quick finish elevates the entire cinnamon roll experience, making them truly irresistible. It’s the crowning glory of your baking efforts.
Mix Powdered Sugar and Water
In a small bowl, combine powdered sugar (confectioners’ sugar) with a small amount of milk or water. Start with about 1 cup of powdered sugar and 1-2 tablespoons of liquid. Whisk vigorously until smooth. You’re aiming for a consistency that is thick enough to coat a spoon but still pourable. If it’s too thick, add more liquid (milk or water) a teaspoon at a time until desired consistency is reached. If it’s too thin, whisk in a little more powdered sugar. A dash of vanilla extract is an optional but highly recommended addition, lending a beautiful aroma and enhancing the sweetness. This simple mixture transforms into a creamy, dreamy topping. For more culinary inspiration, visit Carina Recipes on Instagram.
Drizzle Over Warm Rolls
Once your cinnamon rolls have cooled slightly (about 5-10 minutes) after coming out of the oven, they are ready for the glaze. Drizzling the glaze over warm rolls allows it to melt ever so slightly, creating a beautiful sheen and ensuring it seeps into the nooks and crannies of the rolls, enhancing their moisture and flavor. Use a spoon to generously drizzle the glaze over all the rolls in the pan. Don’t be shy! The warmth of the rolls will help the glaze spread and set just enough. This final step adds that iconic sweet finish, making them utterly irresistible and ready to enjoy.
Serving Your Warm Bisquick Rolls
Enjoy Freshly Baked Goodness
There’s truly nothing quite like a warm, freshly baked cinnamon roll. The aroma alone is enough to bring smiles. These easy Bisquick cinnamon rolls are best enjoyed straight from the pan, while they are still warm and the glaze is slightly soft and gooey. Serve them with a hot cup of coffee, a glass of cold milk, or your favorite tea for a perfect breakfast or an indulgent afternoon treat. The simplicity of this recipe means you can enjoy this homemade comfort whenever the craving strikes, without hours of effort. Sharing these warm rolls with loved ones makes the experience even more special, fostering a sense of warmth and togetherness around the table. They are a delightful way to start any day or add a sweet ending to a meal.
Tips for Perfect Easy Bisquick Cinnamon Rolls
While this recipe is incredibly straightforward, a few simple tips can elevate your easy Bisquick cinnamon rolls from good to absolutely fantastic. These small adjustments can make a significant difference in the final texture, appearance, and overall enjoyment of your homemade treats. Paying attention to these details ensures that every batch you make is consistently delicious and visually appealing, confirming that even simple recipes benefit from careful execution. These helpful hints address common baking challenges.
Flour Your Work Surface Well
Bisquick dough can be a bit sticky, so a well-floured work surface is essential for easy handling. Don’t be afraid to use a generous dusting of flour on your counter and your rolling pin. This prevents the dough from sticking, allowing you to roll it out evenly and peel it away easily once you’re ready to roll it into a log. A lightly floured surface also helps when you need to gather and shape the dough without it adhering to your hands. Having enough flour ensures a smooth process from start to finish, reducing frustration and making shaping a breeze. Remember, too much flour can dry out the dough, so find a good balance.
Use Sharp Knife for Cuts
When it comes to slicing your cinnamon roll log into individual pieces, a sharp knife is your best friend. A dull knife will squish the dough, distorting the beautiful spiral shape and potentially pushing the filling out. A sharp, un-serrated knife allows for clean, precise cuts, ensuring each roll maintains its distinct shape and attractive swirl. If you don’t have a very sharp knife, unflavored dental floss is an excellent alternative. Simply slide the floss under the log, cross the ends over the top where you want to cut, and pull. This method creates perfectly round, unsquished rolls every time, showcasing the intricate layers of dough and filling. For more cooking and baking guidance, read about cinnamon rolls on Wikipedia.
Storing Leftover Cinnamon Rolls
While these easy Bisquick cinnamon rolls are undeniably best enjoyed fresh and warm, you might find yourself with a few leftovers. Properly storing them ensures they retain as much of their deliciousness as possible for future enjoyment. The key is to protect them from drying out and to know the best way to revive them for that fresh-baked taste. These tips help extend the life of your homemade treats, making sure not a single delicious roll goes to waste. Thoughtful storage makes subsequent servings just as enjoyable.
Room Temperature or Fridge
For short-term storage (1-2 days), you can store leftover cinnamon rolls at room temperature in an airtight container. This helps keep them soft and prevents them from drying out. If you plan to store them for a longer period (up to 3-4 days), it’s best to refrigerate them in an airtight container. Be aware that the texture of the glaze might change slightly in the fridge, becoming firmer. For extended storage beyond a few days, consider freezing the rolls. Wrap individual rolls tightly in plastic wrap, then place them in a freezer-safe bag or container for up to 2-3 months. Thawing frozen rolls is easy and they reheat beautifully.
Quick Reheating Options
To enjoy your stored cinnamon rolls as if they were freshly baked, reheating is crucial. For rolls stored at room temperature or in the fridge, a quick warm-up in the microwave for 15-30 seconds (depending on your microwave and the number of rolls) will soften them right up. Be careful not to overheat, as this can make them tough. Alternatively, you can reheat them in an oven or toaster oven at 300°F (150°C) for about 5-10 minutes, or until warmed through. This method often helps to crisp up the edges slightly. For frozen rolls, thaw them overnight in the refrigerator, then reheat using one of the methods above. Reheating brings back that delightful warmth and softness, making them almost as good as fresh. For more main courses ideas to follow your sweet treat, explore our main course recipes.
Easy Bisquick Cinnamon Rolls Variations
While the classic easy Bisquick cinnamon roll is a delight on its own, its simplicity makes it an excellent canvas for creative variations. You can easily adapt this recipe to suit your taste preferences or to add an extra layer of flavor and texture. Experimenting with different additions allows you to personalize your batch, making each baking experience unique and exciting. These simple tweaks can transform the basic recipe into something new and exciting without adding much complexity to the process, proving its versatility.
Add Nuts or Dried Fruit
Elevate your cinnamon rolls by incorporating additional ingredients into the filling. After spreading the cinnamon-brown sugar mixture, sprinkle a handful of finely chopped nuts over the dough before rolling. Walnuts and pecans are popular choices, adding a lovely crunch and nutty flavor. Alternatively, dried fruits like raisins, dried cranberries, or finely diced dried apricots can introduce a chewy texture and a burst of fruity sweetness. These additions not only enhance the flavor profile but also provide interesting textural contrasts, making each bite more dynamic. Just ensure they are spread evenly to avoid lumps when rolling.
Try Cocoa Powder Swap
For a delicious twist, consider swapping out some of the cinnamon for cocoa powder in the filling. Mix about 1-2 tablespoons of unsweetened cocoa powder with your brown sugar and cinnamon for a chocolate-cinnamon roll. This creates a rich, decadent flavor profile that’s a delightful change from the traditional. You can even drizzle a chocolate glaze (made with powdered sugar, cocoa powder, and milk/water) instead of the plain vanilla glaze for a truly indulgent treat. This variation is particularly appealing to chocolate lovers and offers a sophisticated twist on the classic comfort food, proving the adaptability of the Bisquick base. A little cocoa can go a long way.
Nutrition for Easy Bisquick Cinnamon Rolls
Understanding the nutritional values of your baked goods can be helpful, especially when incorporating them into a balanced diet. These easy Bisquick cinnamon rolls, while a delightful treat, are generally considered an indulgence rather than a health food. The exact nutritional content can vary based on specific ingredients used (e.g., type of milk, amount of butter, additions like nuts) and serving size. The following values provide a general estimate to give you an idea of what each serving might contain. Always remember that home-cooked values are estimates.
Calories Per Serving
On average, one serving (one cinnamon roll) of this recipe can contain approximately 250-350 calories. This figure accounts for the Bisquick dough, the butter and sugar in the filling, and the powdered sugar glaze. Adding extra ingredients like nuts, dried fruit, or a richer glaze will naturally increase the calorie count. If you’re mindful of calorie intake, you can adjust the portion size or slightly reduce the amount of butter or sugar in the filling, though this may alter the classic taste and texture. Consider these estimates as a general guideline to help you enjoy your treat responsibly.
Key Nutritional Values
Beyond calories, a single Bisquick cinnamon roll typically provides:
- Carbohydrates: Ranging from 40-55 grams, primarily from the Bisquick mix and the sugars in the filling and glaze. This provides quick energy.
- Fats: Around 10-18 grams, mostly from the butter and the fat content in Bisquick. A portion of this will be saturated fat.
- Sugars: Generally between 20-35 grams, originating from the brown sugar in the filling and the powdered sugar in the glaze. This is a significant component of the roll’s sweetness.
- Protein: A smaller amount, usually 3-5 grams, primarily from the Bisquick and milk.
- Sodium: The Bisquick mix contains sodium, contributing to approximately 200-300 mg per roll. Using unsalted butter can help manage this if you’re watching sodium intake.
These values are approximate and can vary. Enjoying these delicious rolls in moderation is key to a balanced approach to sweet treats. While these rolls offer comfort and a quick energy boost, they are best savored as an occasional indulgence.
