
Oven Baked Chicken Wings are a crowd-pleasing dish, perfect for any gathering or a weeknight treat. Achieving that coveted crispy skin and juicy interior is easier than you think with a few simple techniques. This article shares six key secrets to consistently making perfect, restaurant-quality wings right in your own kitchen. Get ready for deliciousness!
Key Takeaways
- Thoroughly drying wings is crucial for crispy skin.
- Coating wings evenly with oil and spices enhances flavor and crispiness.
- Proper spacing on the baking sheet prevents steaming.
- High oven heat and broiling deliver a golden brown, extra crispy finish.
- Resting wings after baking ensures maximum juiciness.
- This recipe provides simple steps for delicious, homemade oven baked chicken wings.
Making crispy wings is not hard. A few smart steps make a big difference. Drying them well is so important. High heat crisps them perfectly. You will love these delicious, juicy results.
Getting Ready for Crispy Perfection
Creating truly crispy oven baked chicken wings begins long before they hit the oven. The initial preparation steps are fundamental to achieving that desirable golden brown, crunchy exterior and tender, juicy interior that makes main course meals special. Taking a few moments to properly prepare your ingredients and gather your tools will significantly impact the final texture and flavor of your homemade wings. This foundation ensures every bite is a delightful experience, whether for game day, a party, or a family dinner.
Ingredients for Perfect Wings
The beauty of oven baked chicken wings lies in their simplicity. You don’t need a long list of exotic ingredients to achieve outstanding results. Start with about two to three pounds of fresh or thawed chicken wings, typically split into drumettes and flats. If you buy whole wings, you can easily separate them at the joint with a sharp knife. For seasoning, a basic mix of salt, black pepper, garlic powder, onion powder, and paprika works wonders, providing a flavorful base. A neutral oil, like olive oil, avocado oil, or vegetable oil, is also crucial for coating the wings and promoting crispiness. Some people prefer a touch of baking powder (not baking soda) mixed with the spices to further enhance skin crisping, but it’s optional. Make sure all your spices are fresh for the best taste.
Essential Tools You Need
Having the right equipment makes the process smooth and efficient. You’ll need a large baking sheet, preferably a rimmed one, to catch any drippings. A wire rack that fits inside the baking sheet is absolutely essential for airflow, allowing heat to circulate all around each wing, which is key to even cooking and maximum crispness. Parchment paper or aluminum foil can be used to line the baking sheet for easier cleanup, but make sure the wings are directly on the wire rack. A large mixing bowl for tossing the wings with oil and spices, and a pair of tongs for flipping, complete your basic toolkit. For precise temperature control, an oven thermometer is highly recommended, as oven temperatures can vary. These simple tools ensure your easy honey garlic chicken wings or any other variety turn out perfectly every time.
Secret 1: Pat Wings Dry Thoroughly
This secret is arguably the most critical step for achieving truly crispy oven baked chicken wings. Any residual moisture on the skin will turn to steam in the hot oven, effectively steaming the wings instead of frying them. Steaming leads to rubbery, soggy skin, which is the exact opposite of what we want. Think of it like trying to fry wet potatoes; they just won’t crisp up properly. This fundamental technique applies to many cooking methods where a crisp exterior is desired.
Why Drying is Key
Drying the chicken wings meticulously removes surface moisture, allowing the skin to render its fat and crisp up beautifully when exposed to high heat. To do this effectively, place the raw wings on a few layers of paper towels and pat them vigorously on all sides. You might be surprised by how much moisture comes off. For even better results, some chefs recommend letting the patted-dry wings air-dry in the refrigerator, uncovered, for an hour or even overnight. This extra step further dehydrates the skin, ensuring an unparalleled crispness. When the skin is dry, the heat can directly work on rendering the fat and browning the skin, leading to that satisfying crunch everyone loves in delicious homemade party food. Don’t skip this step; it truly makes all the difference.
Secret 2: Coat Well with Oil
Once your wings are thoroughly dry, the next secret to achieving golden brown, crispy perfection is to coat them generously and evenly with a thin layer of oil. Oil serves multiple purposes: it acts as a heat conductor, helping the skin to cook and crisp uniformly, and it also aids in adhering your chosen seasonings to the chicken. Without adequate oil, your wings might dry out too much or develop an unevenly crispy texture, lacking that desirable richness.
Mixing Spices for Flavor
Before adding the oil, mix your chosen spices in a separate small bowl. This ensures an even distribution of flavor. A classic seasoning blend includes salt, black pepper, garlic powder, onion powder, and paprika. For a little kick, you can add cayenne pepper or chili powder. If you’re using baking powder (aluminum-free), mix it in with your spices now. Once the spices are combined, add the wings to a large bowl, drizzle with about one tablespoon of oil per pound of wings, and then sprinkle the spice mixture over them. Toss everything vigorously with your hands or tongs until every single wing piece is lightly but completely coated. This step ensures that each bite of your homemade wings is packed with flavor and ready for its oven baked journey. Proper seasoning is just as important as the crispiness itself for truly delicious results.
Secret 3: Space Wings Evenly
Crowding the baking sheet is a common mistake that can sabotage your efforts to achieve crispy wings. When wings are packed too closely together, they release moisture, and that moisture gets trapped between the pieces, creating steam. As we learned earlier, steam is the enemy of crispiness. Instead of browning and crisping up, the wings will end up steaming in their own juices, leading to a soggy, unappetizing texture. Adequate spacing is crucial for proper air circulation around each wing.
Avoiding Crowding on the Pan
To avoid crowding, arrange your seasoned, oiled wings in a single layer on the wire rack set over your baking sheet. Ensure there is at least an inch of space between each wing. This allows hot air to circulate freely around all surfaces, promoting even cooking and optimal browning. If you have a large batch of wings, it’s far better to use two baking sheets or cook them in batches rather than cramming them onto one. Patience here pays off in the form of consistently crispy, golden brown results. This strategy is vital not only for oven baked chicken wings but also for other items you want to crisp up, such as crispy cauliflower. Proper spacing is a simple secret to ensuring every piece of your party food reaches its crispy potential.
Secret 4: Use High Oven Heat
When it comes to oven baked chicken wings, temperature is paramount. You need high heat to achieve that beautiful, crispy exterior. A low or moderate oven temperature will simply dry out the chicken without adequately crisping the skin. The goal is to quickly render the fat in the skin, allowing it to become golden brown and crunchy, while keeping the meat inside juicy and tender. This high-heat method mimics the intense heat of frying but without all the oil.
The Right Temperature Matters
Preheat your oven to a robust 400°F (200°C) or even 425°F (220°C). This high temperature ensures that as soon as the wings enter the oven, the skin begins to crisp up immediately. It’s important to allow your oven to fully preheat, which often means waiting 10-15 minutes after the preheat indicator light comes on, to ensure the oven cavity and any baking sheets inside are truly at the target temperature. For even more consistent results, place your empty baking sheet and wire rack into the oven during preheating. This way, the wings hit a hot surface, accelerating the crisping process from below. Maintaining this high temperature throughout most of the cooking time is crucial for developing that much-desired crispy texture. Knowing your oven’s true temperature with an oven thermometer can prevent common baking woes. High heat helps render the fat and brown the skin, making these wings a truly popular appetizer.
Secret 5: Flip Wings Mid-Bake
While a wire rack allows for good air circulation around the bottom of the wings, flipping them halfway through the baking process is a simple yet effective secret to ensuring both sides achieve maximum crispiness. Leaving them untouched can lead to one side being perfectly golden and crunchy, while the other remains less so, potentially even a little pale or soft. This step guarantees uniform exposure to the oven’s direct heat, promoting even browning and texture throughout.
Ensuring Even Crispy Sides
After about 20-25 minutes of baking at your high temperature, carefully remove the baking sheet from the oven. Using tongs, individually flip each chicken wing. Be gentle to avoid tearing the skin, especially if it’s already starting to crisp up. Return the baking sheet to the oven for another 20-25 minutes. This mid-bake flip ensures that every part of the wing gets its turn to interact directly with the hot air and radiant heat, preventing one-sided crispiness. It’s a minor interruption to the cooking process but yields significantly better results, contributing to those perfect, golden brown, oven baked chicken wings you’re aiming for. This meticulous attention to detail makes all the difference when aiming for that professional-grade crispy texture.
Secret 6: Broil for Extra Crisp
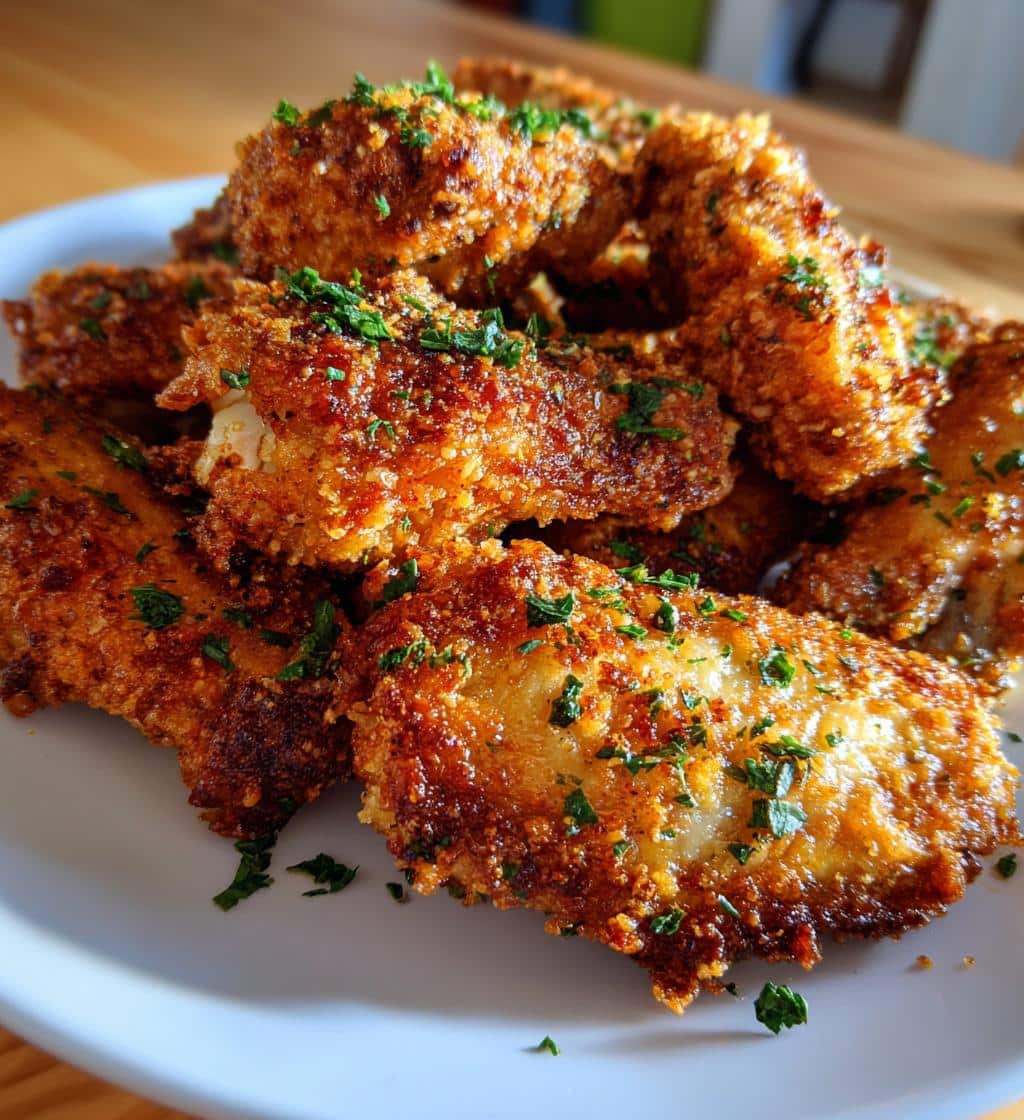
Once your wings have baked through and are mostly crispy, there’s one final secret weapon to push them over the edge into truly extraordinary territory: a quick session under the broiler. This step is optional but highly recommended for achieving that professional-grade, extra crispy, golden brown finish that makes homemade oven baked chicken wings irresistible. The intense, direct heat from the broiler will caramelize the skin and deepen its crunch, giving you that satisfying snap with every bite.
Achieving Golden Brown Finish
After the wings have finished their main baking time (around 40-50 minutes total), switch your oven setting to broil. Keep a close eye on them, as the broiler works very quickly and can burn the wings if left unattended for even a minute too long. Place the baking sheet on the top rack of your oven, ensuring the wings are 6-8 inches from the heat source. Broil for 2-4 minutes per side, or until they reach your desired level of golden brown crispness. You might need to flip them once more under the broiler to ensure even browning. The goal is a deep, rich color and an undeniable crunch. This final touch transforms already good wings into spectacular ones, ensuring a delicious and memorable party food experience. It’s the ultimate secret for those seeking the perfect finish.
Oven Baked Chicken Wings Recipe
With the secrets revealed, let’s put them into practice with a straightforward, easy-to-follow recipe for perfect oven baked chicken wings. This recipe integrates all the previously discussed tips to ensure you achieve maximum crispiness and flavor every time. It’s designed to be simple, using common pantry ingredients, making it accessible for any home cook looking to impress with delicious homemade wings.
Simple Steps to Follow
- Prep the Wings: Pat 2-3 lbs chicken wings thoroughly dry. Air-dry in fridge for best results (optional).
- Season: Toss wings with 1-2 tbsp neutral oil. Mix 1 tsp each salt, pepper, garlic powder, onion powder, and 1/2 tsp paprika. Sprinkle over wings and toss to coat.
- Arrange: Place a wire rack on a rimmed baking sheet. Arrange wings in a single layer, spaced apart.
- Bake: Preheat oven to 400-425°F. Bake 40-50 min, flipping halfway (after 20-25 min) for even crisping.
- Broil (Optional): For extra crispiness, broil 2-4 min per side on the top rack, watching closely.
- Rest & Serve: Remove from oven and let rest 5 minutes before serving.
Quick Prep and Cook Times
This easy recipe is surprisingly quick to put together, especially if you skip the overnight air-drying. Prep time is typically around 10-15 minutes, allowing you to quickly get your wings ready for the oven. The total cook time, including baking and a quick broil, usually falls between 45-55 minutes. This makes oven baked chicken wings a fantastic option for a relatively quick, flavorful meal or appetizer that doesn’t demand hours in the kitchen, perfect for those busy weeknights or unexpected guests.
Why Resting Wings Matters
Just like with larger cuts of meat, allowing your oven baked chicken wings to rest for a few minutes after they come out of the oven is a crucial step often overlooked. While it might be tempting to dive right into those perfectly crispy, golden brown wings, a short resting period ensures that all the delicious juices redistribute throughout the meat, resulting in a much juicier and more flavorful wing. Skipping this step can lead to juices running out onto your plate, leaving the meat drier than it should be.
Serving Juicier Delicious Wings
When chicken cooks, the muscle fibers contract, pushing the internal juices towards the center. If you cut into or bite into the wings immediately after they come out of the intense heat of the oven, those juices will simply escape. By letting the wings rest for about 5 minutes, you allow the muscle fibers to relax and reabsorb those juices, ensuring that every bite is as succulent and tender as possible. This also gives the exterior a brief moment to stabilize its crispiness. You’ll notice a significant difference in the overall juiciness and tenderness of your wings. This simple patience is a game-changer for delivering truly delicious, flavorful chicken dishes.
Serving Your Perfect Chicken Wings
Your perfectly crispy, juicy oven baked chicken wings are now ready to be enjoyed! While they are undoubtedly delicious on their own, serving them with the right accompaniments can elevate the entire experience. Whether for a party, game day, or family meal, the right dipping sauces and complementary sides will make your homemade wings even more memorable. Balance the rich, savory wing flavor with fresh, tangy, or cooling elements for delicious results.
Best Dipping Sauces
No plate of chicken wings is complete without fantastic dipping sauces. Classic choices include creamy ranch and tangy blue cheese dip, offering a cooling contrast to any spicy seasonings. For heat lovers, a classic buffalo sauce or sweet chili sauce adds a wonderful kick. BBQ sauce, honey mustard, or a simple garlic aioli also make excellent choices. Experiment with homemade options like Greek yogurt with fresh herbs and lemon for a lighter, refreshing option. The variety of sauces truly enhances the party food aspect of crispy wings.
Sides to Enjoy With
While wings are hearty enough to be a meal, pairing them with the right side dishes creates a well-rounded spread. Crunchy celery and carrot sticks are traditional, providing a refreshing crunch. Other great options include a fresh green salad, potato wedges, french fries, or a light coleslaw. For a heartier meal, consider serving them alongside creamy baked mac and cheese or a simple rice pilaf. Complement the wings without overpowering their delicious flavor, making for a truly enjoyable family favorite meal.
Nutrition of Crispy Chicken Wings
When prepared at home, oven baked chicken wings can be a much healthier alternative to their deep-fried counterparts, while still delivering all the delicious flavor and satisfying crispiness. Baking significantly reduces the amount of added fat and calories compared to frying in oil. This makes them a more appealing option for those mindful of their dietary intake, without sacrificing the enjoyment of this popular party food. It’s about making smart choices for your family favorite meals.
Quick Calorie Information
The exact nutritional content of crispy chicken wings can vary depending on their size, whether the skin is removed, and the type of seasonings and sauces used. Generally, a plain, un-sauced oven baked chicken wing (drumette or flat) with the skin on contains approximately 100-150 calories, 7-10 grams of fat, and 10-15 grams of protein. This makes them a good source of protein. If you’re looking to further reduce calories and fat, you can remove the skin before baking, though this will sacrifice some of the crispiness. Be mindful of calorie-dense dipping sauces, as these can quickly add to the overall count. Homemade sauces often allow for better control over ingredients and calorie content, providing a healthier alternative without compromising on flavor.
Frequently Asked Wing Questions
Even with a tried-and-true recipe, questions often arise when preparing oven baked chicken wings. Addressing these common queries can help clarify any doubts and empower you to confidently create the best crispy wings every time. Understanding the nuances of preparation can make your cooking process smoother and your results even more consistently delicious, ensuring these become a true family favorite.
Can I Marinate for Flavor?
Absolutely! Marinating chicken wings can infuse them with an incredible depth of flavor. However, it’s crucial to consider the impact on crispiness. Liquid marinades introduce moisture, which, as we’ve discussed, is the enemy of crispy skin. If you choose to marinate, ensure you thoroughly pat the wings dry after removing them from the marinade and before coating them with oil and spices. You might even consider a dry rub as an alternative to a liquid marinade if crispiness is your top priority. A dry rub can deliver intense flavor without adding extra moisture, making it a fantastic choice for oven baked wings. If using a liquid marinade, aim for shorter marinating times (1-2 hours) to avoid excessive moisture absorption, then follow all the drying steps meticulously for the crispiest outcome.
