
Campfire nachos are a fantastic outdoor cooking option, combining delicious flavors with a fun experience. This easy campfire recipe provides a simple preparation method for a quick campfire snack. Gather your ingredients and get ready for a memorable, cheesy meal under the stars.
Key Takeaways
- Campfire nachos are a simple, delicious outdoor meal or snack.
- Quick preparation and cooking make them ideal for camping.
- Customization with various toppings allows for endless flavor combinations.
- Proper heat management is crucial for perfect gooey results.
- They are great for feeding groups and can be prepped in advance.
Easy to make. Great for outdoor fun. Kids love this tasty treat. Simple steps yield delicious results. Enjoy cooking over hot coals.
Campfire Nachos Recipe: Quick Overview
Craving a warm, savory treat while enjoying the great outdoors? Campfire nachos offer a fantastic solution, blending the rustic charm of outdoor cooking with the satisfying crunch and gooey goodness of a classic snack. This recipe is specifically designed to be an easy campfire recipe, focusing on minimal fuss and maximum flavor. It’s truly a family friendly meal that everyone can enjoy, making it a staple for camping trips or backyard fire pit gatherings. Forget complicated setups; with a few simple ingredients and a little heat management, you’ll have delicious nachos ready in no time. The appeal of cooking over coals not only adds a unique smoky flavor but also turns meal preparation into an interactive and memorable part of your adventure. Whether you’re a seasoned camper or just enjoying an evening in your backyard, this recipe promises a delightful experience.
Quick Prep and Cook Times
One of the biggest advantages of making campfire nachos is their incredible speed. Preparation typically takes no more than 10-15 minutes, which involves chopping a few toppings and assembling your layers. Cooking time is equally efficient, usually ranging from 10 to 20 minutes, depending on the heat of your coals and how melty you like your cheese. This quick turnaround means less waiting and more enjoying your time around the fire. It’s an ideal quick campfire snack, perfect for when hunger strikes unexpectedly or you need a speedy appetizer before a main course. The convenience factor makes this an unbeatable option for anyone looking for simple preparation without sacrificing taste or fun.
How Many Servings
The beauty of campfire nachos lies in their flexibility when it comes to serving sizes. This recipe, as typically outlined for a single skillet, generally serves 2-4 people as a hearty snack or appetizer. If you’re planning a main course, it might satisfy 1-2 hungry campers. However, it’s incredibly easy to scale up. Using a larger cast-iron skillet or multiple smaller ones allows you to feed more people effortlessly. For a larger group, consider preparing multiple batches or using a big disposable aluminum pan directly on the coals. This adaptability makes it excellent for parties or larger camping groups, ensuring everyone gets a taste of this amazing cheesy goodness. You can also pair it with other camping favorites like cheesy chicken and rice casserole for a more substantial spread.
Gather Ingredients for Campfire Nachos
The foundation of any great nacho dish starts with quality ingredients. For campfire nachos, simplicity and portability are key. You want items that travel well and don’t require extensive refrigeration or preparation on-site. The beauty of this recipe is that you can adapt it to whatever you have on hand, making it a truly versatile camping trip food. Think about textures and flavors that complement each other, ensuring every bite is a delightful combination of crunch, melt, and tang. This careful selection ensures a perfect nachos experience, even in the wilderness.
Essential Chips and Cheese
The backbone of your delicious nachos will always be the chips and cheese. For chips, opt for sturdy, thick-cut tortilla chips that can hold up to the heat and the weight of your toppings without becoming soggy. Think restaurant-style chips rather than thin, delicate ones. As for cheese, a good melty blend is crucial for achieving that signature gooey cheese effect. Shredded cheddar, Monterey Jack, or a Mexican blend are excellent choices. Pre-shredded cheese is convenient for camping, but block cheese shredded just before packing will melt even more smoothly. Consider bringing a mix of cheeses for a deeper flavor profile. For another comforting cheesy meal idea, check out our creamy baked mac and cheese.
Tasty Topping Ideas
This is where you can truly customize nachos and make them your own! While the classic chips and gooey cheese are amazing, toppings elevate your campfire nachos to the next level. Think about what adds flavor, texture, and freshness. Some popular choices include:
- Salsa: A jar of your favorite salsa adds a tangy, zesty kick.
- Jalapeños: Fresh or pickled, they provide a pleasant heat.
- Black Olives: Sliced olives add a briny, savory note.
- Diced Onions: Red or white onions, finely diced for a sharp crunch.
- Bell Peppers: Colorful and sweet, they add a fresh crispness.
- Beans: Canned black beans or pinto beans (drained and rinsed) offer extra protein.
- Corn: Canned or frozen (thawed) corn kernels for a touch of sweetness.
Pack these toppings in small, sealed containers for easy transport and assembly. Preparing them at home saves time and effort at the campsite.
Simple Steps to Make Campfire Nachos
Making campfire nachos is less about precise cooking and more about mastering the art of cooking over coals. It’s a forgiving process, which makes it an ideal activity for both seasoned outdoor chefs and beginners. The key is to control your heat and be patient, letting the warmth of the fire slowly transform simple ingredients into a piping hot, gooey masterpiece. This method creates a unique flavor that you just can’t get from an oven or microwave, making your nachos truly special.
Setting Up Your Fire
Before you even think about layering chips, you need a good cooking fire. Start by building a fire and allowing it to burn down to a bed of hot, glowing coals. This is crucial because direct flames will burn your chips and toppings before the cheese has a chance to melt properly. You’ll want a medium-hot coal bed, ideally with some areas that are hotter and some that are slightly cooler, giving you more control. A tripod or a grate set over the coals works best, but you can also place a cast-iron skillet directly on the coals if you monitor it closely. For further reading on this ancient cooking method, you can learn more about campfire cooking on Wikipedia.
Layering Nacho Components
Once your cooking surface is ready, it’s time to assemble your delicious nachos. The secret to evenly melted, perfectly topped nachos is thoughtful layering. Begin with a light coat of cooking spray or oil in your cast-iron skillet or aluminum pan to prevent sticking. Then, lay down about a third of your tortilla chips in a single layer. Over these chips, sprinkle a generous portion of cheese, followed by some of your chosen toppings like salsa, jalapeños, or beans. Repeat this process two more times: chips, cheese, toppings. Finish with a final, generous layer of cheese on top. This ensures that every chip gets a share of gooey cheese and savory additions. Don’t overload the pan too much, as it will make even cooking difficult.
Cooking Over Hot Coals
Carefully place your skillet or pan over the hot coals. The goal is indirect heat if possible, or direct heat with constant supervision. If using a tripod or grate, position it a few inches above the coals. If placing directly on coals, lift and move the pan frequently to prevent scorching. Cover the skillet with a lid or aluminum foil to trap the heat, allowing the cheese to melt faster and more evenly. Cook for about 10-20 minutes, periodically checking for melted cheese and crispy chips. You’ll know they’re ready when the cheese is bubbly and gooey, and the edges of the chips start to brown slightly. Remove from heat using sturdy oven mitts or tongs.
Serving Your Delicious Campfire Nachos
The moment your campfire nachos emerge from the heat, bubbling and aromatic, is truly satisfying. The smoky scent mingled with melting cheese creates an irresistible invitation. Serving them hot and fresh is paramount to enjoying their full flavor and texture. This simple preparation makes for a quick and rewarding outdoor meal that truly highlights the joy of shared food. Everyone around the fire will be eager to dive into this comforting and delicious creation.
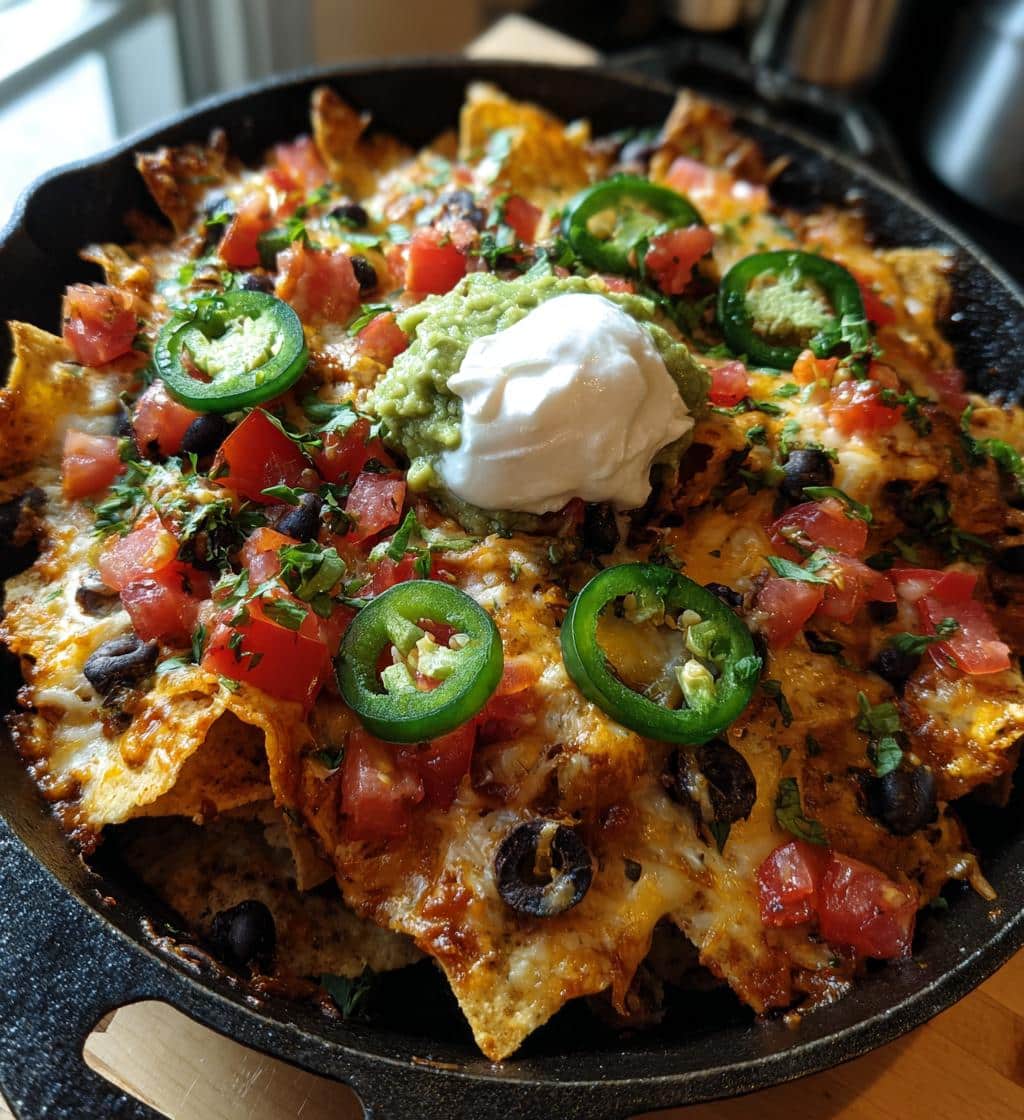
Adding Fresh Toppings
Once your cheesy nachos are off the heat, this is the perfect time to add any fresh, delicate toppings that wouldn’t hold up well to cooking. These additions provide a delightful contrast in temperature and texture. Consider adding:
- Sour Cream or Greek Yogurt: A dollop adds a cool, creamy tang.
- Guacamole or Sliced Avocado: Creamy and rich, perfect for balancing spice.
- Fresh Cilantro: Chopped cilantro brightens the flavors with a herbaceous note.
- Chopped Green Onions: For a mild, fresh onion flavor and a pop of color.
- Lime Wedges: A squeeze of fresh lime juice adds acidity and zest, enhancing all the other flavors.
Arrange these artfully on top of your hot nachos, allowing some of the heat to slightly warm them through. This final flourish makes your campfire nachos not just tasty, but also visually appealing.
Enjoying Right Away
Campfire nachos are best enjoyed immediately, straight from the skillet or pan. The gooey cheese is at its peak, and the chips are perfectly warm and crisp. Gather around the fire, grab a fork (or just use your fingers!), and dig in! Sharing a communal pan of nachos fosters a wonderful sense of camaraderie, making it more than just a meal – it’s an experience. Be sure to warn everyone that the skillet will be hot! This delicious nachos recipe is designed for instant gratification, so don’t delay in savoring every bite. The simplicity and immediate reward are what make this a beloved camping trip food.
Customize Your Campfire Nachos Recipe
One of the greatest aspects of this easy campfire recipe is its incredible versatility. While the basic chips and gooey cheese combination is always a winner, the real fun begins when you start customizing. Think of your skillet as a blank canvas, ready to be adorned with a palette of flavors and textures that reflect your personal preferences. This adaptability ensures that no two batches of campfire nachos have to be exactly alike, making it a perfect meal for repeated enjoyment without becoming monotonous. The freedom to add or subtract ingredients based on what you have or what you crave truly makes this a perfect nachos experience.
More Topping Suggestions
Beyond the classic salsa and jalapeños, a world of possibilities awaits to make your delicious nachos truly unique. Don’t be afraid to experiment with different flavor profiles to match your mood or your pantry. Here are some additional ideas:
- Pickled Red Onions: Offer a sweet and tangy bite.
- Roasted Red Peppers: Add a smoky sweetness and soft texture.
- Artichoke Hearts: Marinated or plain, they contribute a unique savory flavor.
- Olives: Green or black, they bring a briny kick.
- Pico de Gallo: A fresh, chunky salsa for a vibrant taste.
- Queso Fresco or Cotija: Crumbled over the top for a salty, crumbly contrast to the melted cheese.
- Chipotle Crema: A drizzle of spicy, smoky cream sauce.
- Pineapple Salsa: For a sweet and savory tropical twist.
Pre-chop or prepare these toppings at home to simplify your campsite cooking. This helps ensure a truly simple preparation process.
Adding Meats to Nachos
For a heartier, more substantial meal, incorporating cooked meats is a game-changer. Adding meat transforms your quick campfire snack into a filling main course. The key is to use pre-cooked and seasoned meats, as cooking raw meat over a campfire can be challenging and time-consuming. Here are some fantastic options:
- Seasoned Ground Beef or Turkey: Cooked and crumbled at home, then reheated with the nachos. Our ground turkey and peppers recipe offers great seasoning ideas.
- Shredded Chicken: Leftover rotisserie chicken or boiled chicken, seasoned with taco seasoning.
- Pulled Pork: Slow-cooked and shredded pork, especially good with a smoky BBQ sauce.
- Carne Asada: Thinly sliced, grilled steak, chopped into bite-sized pieces.
- Chorizo: Cooked and crumbled, it adds a spicy, flavorful punch.
Layer the cooked meat between the chips and cheese, allowing it to warm through with the nachos. This ensures every bite is packed with flavor and protein, making your campfire nachos a complete and satisfying meal. You can get more dinner inspiration by visiting our dinners category page.
Tips for Perfect Campfire Nachos
Achieving truly perfect nachos over an open flame requires a few insider tips. While the process is generally forgiving, paying attention to certain details can elevate your dish from good to absolutely outstanding. The goal is to achieve that ideal balance: perfectly melted gooey cheese, warm and slightly crispy chips, and heated toppings, all without any burnt spots. Mastering these techniques will make your outdoor cooking experience even more enjoyable and your results consistently delicious.
Choosing the Right Skillet
The choice of cooking vessel is paramount for campfire nachos. A cast-iron skillet is undoubtedly the best option. Its heavy construction allows for excellent heat retention and even heat distribution, which is crucial when cooking over an inconsistent heat source like coals. A 10-12 inch cast-iron skillet is ideal for a standard batch. If you don’t have a cast-iron skillet, a heavy-duty disposable aluminum pan can work in a pinch. However, be aware that aluminum pans heat up much faster and can lead to scorching if not monitored constantly. Ensure your chosen pan has a lid or can be covered tightly with aluminum foil to trap heat and steam, aiding in the melting process of the gooey cheese.
Watching Heat Levels
Controlling the heat is the single most important factor for perfect nachos. Unlike a stovetop or oven, a campfire’s heat can fluctuate wildly. Here are some strategies:
- Use Coals, Not Flames: Always cook over hot coals, not direct flames, which will quickly burn the bottom of your chips.
- Elevate Your Skillet: Use a cooking grate or a tripod to keep your skillet a few inches above the coals. This provides more even, indirect heat.
- Rotate and Shift: If cooking directly on coals, frequently lift and rotate your skillet to prevent hot spots from scorching the nachos.
- Use a Lid: Covering the skillet traps heat, helping the cheese melt from the top down and preventing the chips from drying out.
- Test the Heat: Hold your hand about 6 inches above the coals. If you can only keep it there for 2-3 seconds, it’s very hot; 4-5 seconds is medium-hot, which is ideal.
Patience and constant monitoring are your best tools. Adjust your skillet’s position as needed to maintain a consistent, gentle sizzle. This attention to detail will prevent burned bottoms and ensure perfectly melted, delicious nachos.
Making Ahead for Campfire Nachos
Preparing ingredients in advance is a game-changer for any camping trip food, and campfire nachos are no exception. This simple preparation step significantly reduces your workload at the campsite, allowing you more time to relax and enjoy the outdoors. By doing some of the groundwork at home, you ensure a smooth and efficient cooking process once you’re ready to eat. It transforms what could be a scramble into an organized and enjoyable cooking experience, leading to a much more perfect nachos outcome with less stress.
Here’s how you can get ahead:
- Chop Vegetables: Dice onions, bell peppers, jalapeños, and any other raw veggies at home. Store them in separate, airtight containers or resealable bags.
- Shred Cheese: While pre-shredded cheese is convenient, shredding your own from a block often results in a better melt. Do this at home and store it in a resealable bag.
- Cook Meats: If you plan to add seasoned ground beef, shredded chicken, or pulled pork, cook and season it fully at home. Let it cool completely, then store it in an airtight container in the cooler.
- Prepare Sauces: Mix any special sauces like chipotle crema or a lime dressing beforehand and store them in small, sealed containers.
- Pack Smart: Group all nacho ingredients together in your cooler or a separate bag. This makes assembly quick and easy when you’re ready to cook.
These simple steps will make assembling your quick campfire snack a breeze, letting you focus on the joy of outdoor cooking rather than tedious chopping.
Feeding a Crowd with Campfire Nachos
Campfire nachos are inherently a communal dish, making them perfect for feeding a crowd. Whether you’re hosting a large group on a camping trip or having a backyard gathering, scaling up this easy campfire recipe is straightforward. The key is efficient planning and smart execution to ensure everyone gets to enjoy the gooey cheese goodness. This approach makes it a fantastic family friendly meal option for any larger assembly, guaranteeing satisfied appetites and a shared enjoyable dining experience.
Here are some strategies for scaling up:
- Multiple Skillets: If you have several cast-iron skillets, use them all! You can have multiple batches cooking simultaneously over different parts of the fire or staggered.
- Large Disposable Aluminum Pans: These are excellent for large batches. You can buy extra-large foil pans from most grocery stores. They can be placed directly on hot coals (with careful monitoring) and are easy to clean up afterward.
- Layering in Advance: Pre-layer some of the chips, cheese, and non-perishable toppings in multiple pans at home. Cover them tightly with foil. When at the campsite, just add fresh ingredients and heat.
- Buffet Style Toppings: Set up a topping bar with all your fresh additions in separate bowls. Once the hot, cheesy nachos are ready, guests can customize their portions. This also keeps the chips from getting soggy from wet toppings while cooking.
- Prep Station: Have a dedicated prep station away from the fire for quick assembly and dishing out. This streamlines the process and keeps things organized when serving many people.
By planning ahead and using these methods, you can easily turn this delicious nachos recipe into a crowd-pleasing feast, ensuring no one goes hungry.
Understanding Campfire Nachos Nutrition
While campfire nachos are undeniably a treat, understanding their nutritional profile can help you enjoy them mindfully. The exact nutritional content will vary significantly based on the type and quantity of chips, cheese, and toppings you choose. As with any delicious, cheesy nachos, moderation and ingredient selection play a big role in managing the overall impact on your diet. The good news is that you have a lot of control over making this camping trip food as healthy or as indulgent as you wish, allowing you to customize nachos to fit your dietary needs.
Calories and Macronutrients
A typical serving of campfire nachos (approx. 4-6 oz) can range widely, often starting around 300-500 calories. This mostly comes from the carbohydrates in the chips and the fats in the cheese. Protein content will depend heavily on whether you add meat like seasoned ground beef or beans. Without meat, protein might be around 10-15g per serving, increasing significantly with additions. Fats, particularly saturated fats from cheese, will be present. Choosing leaner meats and loading up on vegetable toppings can help balance the macronutrients, making it a more wholesome quick campfire snack. For more recipe ideas and to connect with other food enthusiasts, visit Carina Recipes on Pinterest.
Sodium and Cholesterol
Both sodium and cholesterol can be notable in campfire nachos, primarily due to the processed nature of some tortilla chips and the high sodium and fat content in many cheeses. A single serving could contain a significant portion of your daily recommended sodium intake. To manage this:
- Choose Low-Sodium Chips: Look for tortilla chips specifically labeled as low-sodium.
- Control Cheese Portions: While gooey cheese is key, using a moderate amount or opting for lower-fat cheese blends can help.
- Fresh Toppings: Load up on fresh vegetables like bell peppers, onions, and cilantro, which add flavor and nutrients without significant sodium or cholesterol.
- Homemade Salsa: If possible, make your own salsa to control sodium levels, as jarred salsas can be high.
By being mindful of your ingredient choices, you can still enjoy this easy campfire recipe without overdoing it on sodium and cholesterol. It’s all about finding that perfect balance for your perfect nachos experience. You can also explore the nutritional facts of Nachos on Wikipedia.
Storing Leftover Campfire Nachos
While campfire nachos are best enjoyed fresh, it’s not uncommon to have a bit left over, especially when feeding a crowd. Proper storage is key to maintaining their quality and ensuring they are safe to eat later. The primary challenge with storing nachos is preventing the chips from becoming soggy. With the right technique, you can preserve some of their deliciousness for another meal. This thoughtful approach helps minimize food waste and extends the enjoyment of your camping trip food.
To store leftover campfire nachos:
- Cool Completely: Allow the nachos to cool down to room temperature as quickly as possible, but no longer than two hours, to prevent bacterial growth.
- Separate Components (Optional but Recommended): For best results, carefully scrape off the cheesiest, most topped chips and store them separately from any less-topped or plain chips. If possible, remove any very wet toppings like salsa before storing.
- Airtight Container: Transfer the cooled nachos to an airtight container. This helps prevent them from drying out and absorbing odors from other foods in your cooler or fridge.
- Refrigerate Promptly: Store the container in a cooler with plenty of ice (if camping) or in a refrigerator (if at home). Consume within 1-2 days.
While they won’t be as crispy as fresh, these steps will help preserve the flavors and make reheating a more pleasant experience.
Reheating Your Campfire Nachos
Reheating campfire nachos can be a bit tricky, as the goal is to get the cheese melty again and the chips warm without turning them into a soggy mess. While they won’t return to their original, fresh-off-the-fire crispness, you can certainly make them enjoyable again. The success of reheating largely depends on the method chosen and managing expectations. It’s about reviving that delicious nachos flavor for a second round.
Best Ways to Reheat
Here are a few effective methods for reheating your easy campfire recipe:
- Oven/Toaster Oven: Spread the nachos in a single layer on a baking sheet. Reheat at 300-350°F (150-175°C) for 5-10 minutes, or until cheese is bubbly and chips are warmed. This is arguably the best method for retaining some crispness.
- Air Fryer: For smaller portions, an air fryer works wonders. Reheat at 300°F (150°C) for 3-5 minutes, checking frequently. It provides a good crisp.
- Skillet on Stovetop: Place nachos in a dry skillet over medium-low heat. Cover with a lid. Heat gently for 5-7 minutes, stirring occasionally, until warmed through. Be careful not to burn the bottom.
- Campfire (again): If you have a fire going, you can reheat them in a cast-iron skillet over gentle coals, similar to the initial cooking process. Keep the lid on and monitor closely to prevent burning.
Avoid the microwave if possible, as it tends to make chips soggy, though it will melt the cheese quickly. For more culinary inspiration, consider following Carina Recipes on Instagram.
What to Expect
When reheating campfire nachos, set realistic expectations. The chips will likely be softer than they were originally, especially those directly in contact with moist toppings or cheese. The gooey cheese will re-melt, but the overall texture might be slightly different. Fresh toppings like sour cream, guacamole, and cilantro should always be added after reheating, not before, to maintain their freshness and texture. Despite a slight change in texture, the delicious flavors will still be there, making for a satisfying leftover meal or quick campfire snack. It’s a convenient way to enjoy the great taste of your camping trip food once more.
Why This Campfire Nachos Recipe is Great
This campfire nachos recipe stands out for numerous reasons, making it an absolute must-try for anyone seeking an easy campfire recipe that delivers on taste and experience. Its inherent simplicity, coupled with the customizable nature, guarantees a crowd-pleasing dish every time. It’s more than just food; it’s about the shared joy of outdoor cooking and creating memorable moments around the fire. This truly is the perfect nachos recipe for any outdoor adventure or even a cozy backyard evening.
Here’s why it’s fantastic:
- Simplicity: With minimal ingredients and straightforward steps, it’s accessible to all skill levels.
- Speed: Quick prep and cook times mean less waiting and more enjoying.
- Customization: Easily adapt toppings and additions to suit any dietary preference or craving, from vegetarian options to hearty meat-filled versions. You can truly customize nachos to your liking.
- Communal Fun: Serving directly from the skillet fosters a shared, interactive dining experience, perfect for family and friends.
- Unique Flavor: Cooking over coals imparts a distinct, delicious smoky flavor that you can’t replicate indoors.
- Versatility: Perfect as a quick campfire snack, a hearty appetizer, or a main meal.
- Camping Friendly: Uses common, portable ingredients and simple equipment ideal for camping trips.
Embrace the joy of outdoor cooking with this delightful and easy-to-make campfire nachos recipe. It promises delicious nachos and unforgettable moments.
