
Strawberry scones are a delightful breakfast or treat, known for their tender crumb and bursts of sweet fruit. This simple recipe ensures flaky results with fresh ingredients. Learn to bake perfect homemade strawberry scones that will impress everyone. They are truly a delicious addition to any meal.
Key Takeaways
- Achieve flaky scones by using cold butter and minimal handling.
- Fresh strawberries provide bursts of natural sweetness.
- The recipe is quick to prep and bake, perfect for any morning.
- Store scones properly to maintain their fresh taste.
Baking scones is truly rewarding. Simple steps yield delicious results. Cold butter is key for flakiness. Fresh berries add a sweet touch. Enjoy warm for best flavor.
Making Irresistible Strawberry Scones
Gather your fresh ingredients
Crafting truly irresistible strawberry scones begins with selecting the finest ingredients. For these delightful pastries, you’ll need all-purpose flour, granulated sugar, baking powder, and a touch of salt to create the foundational dry mix. The magic, however, truly happens with your wet ingredients: heavy cream, a large egg, and a hint of vanilla extract, all working in harmony to deliver a rich, tender crumb. Most importantly, ensure you have plenty of cold, unsalted butter, which is absolutely crucial for achieving that signature flaky texture we all adore in a perfect scone. Don’t forget the star of the show – fresh, ripe strawberries, which will infuse every bite with vibrant flavor. Having everything measured and ready before you start mixing will make the baking process smooth and enjoyable, setting you up for success in making delicious homemade strawberry scones.
Why you’ll love these berries
Strawberries are not just pretty; they bring a wonderful depth of flavor and natural sweetness to your scones that is simply unmatched. When baked, these beautiful red berries soften slightly, releasing their juicy goodness and creating pockets of intense fruity flavor throughout the dough. The contrast between the rich, buttery scone and the bright, slightly tart notes of the fresh fruit is what makes this recipe so incredibly special. Using seasonal, ripe strawberries ensures the best taste, adding a natural sweetness that often means you can even reduce the added sugar in the recipe if you prefer. They are also packed with antioxidants and vitamin C, making these delicious scones a slightly healthier indulgence. For other berry-filled treats, consider exploring a recipe like blueberry muffin cookies with streusel, which similarly highlights the beauty of fresh fruit in baking. Fresh berries are truly a game-changer.
Simple Dry Mix for Scones
Combine flour, sugar, baking powder
The foundation of any great scone recipe is a well-balanced dry mix. In a large mixing bowl, combine your all-purpose flour, granulated sugar, baking powder, and a pinch of salt. The baking powder is your leavening agent, responsible for giving the scones their rise and light texture. Sugar not only adds sweetness but also contributes to the golden-brown crust and keeps the scones moist. Salt, often overlooked, is vital for balancing the flavors and enhancing the overall taste of your baked goods. Whisk these ingredients together thoroughly until they are well combined. This ensures that the leavening is evenly distributed throughout the flour, guaranteeing a consistent rise in every scone. Proper mixing at this stage is crucial for achieving a uniform texture later on. This simple step is quick but incredibly important for the success of your scone. Ensuring all dry ingredients are properly incorporated prevents pockets of unmixed baking powder or salt, which can lead to an unevenly textured final product.
Cold Butter Creates Flaky Scones
Cut cold butter into flour
The secret to wonderfully flaky scones lies in the temperature and preparation of your butter. Always use very cold, unsalted butter, ideally cut into small cubes or grated. The cold butter prevents it from fully incorporating into the flour mixture too quickly. Instead, as the scones bake, these tiny pockets of cold butter melt, releasing steam and creating airy layers within the dough, resulting in that irresistible flakiness. You can cut the butter into the flour mixture using a pastry blender, two knives, or even your fingertips. The goal is to work quickly to prevent the butter from warming up. Continue until the mixture resembles coarse crumbs, with some pea-sized pieces of butter still visible. This method ensures maximum flakiness and a tender crumb, distinguishing homemade strawberry scones from denser versions. The less you handle the butter, the better your scones will be, preserving the coldness and ensuring those perfect flaky layers.
Reasons to Love Strawberry Scones
Fresh berries add sweet bursts
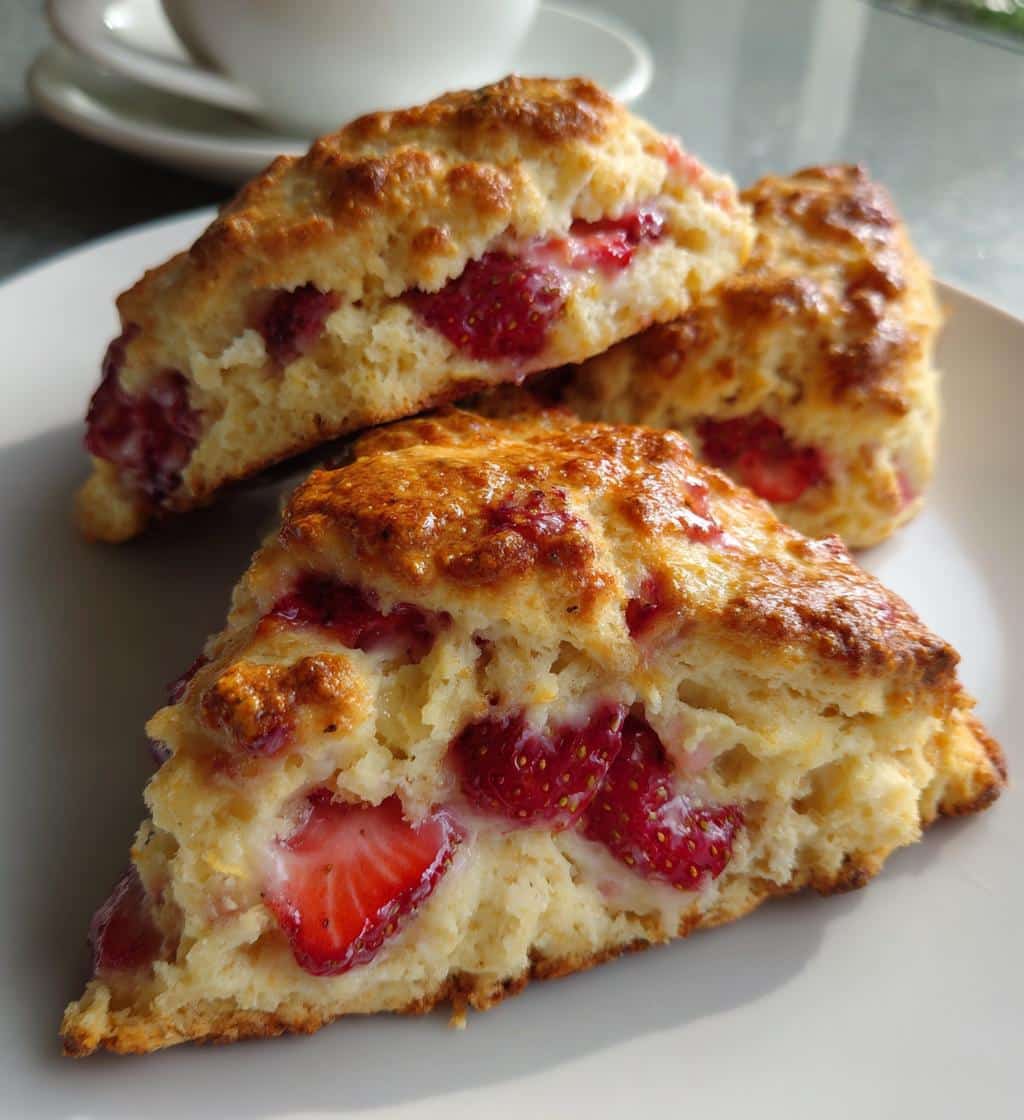
There are countless reasons to adore strawberry scones, and the star ingredient, fresh strawberries, sits right at the top. Each bite offers a delightful surprise: a soft, buttery scone punctuated by juicy, sweet bursts of strawberry. These natural gems not only infuse the scone with their vibrant flavor but also add a pleasant tenderness to the texture. The slight tartness of the strawberries perfectly balances the richness of the butter and cream, creating a harmonious taste profile that is both comforting and refreshing. Opting for ripe, in-season strawberries will truly make a difference, as their peak flavor elevates the entire scone experience, making every mouthful a delicious treat. It’s this simple inclusion of fresh fruit that transforms a basic scone into something truly extraordinary and memorable.
An easy, delightful recipe
Beyond their incredible taste, strawberry scones are a joy to bake because the recipe is surprisingly straightforward and incredibly rewarding. Even novice bakers can achieve impressive results by following a few simple steps. The process involves combining dry ingredients, cutting in cold butter, adding a wet mixture, and gently bringing it all together. There’s no complicated kneading or proofing required, making it a perfect project for a weekend morning or when you need a quick, satisfying baked good. The delight comes not only from the ease of preparation but also from the versatility. While these are strawberry scones, you can easily adapt the recipe with other berries or even chocolate chips, making it a staple in your baking repertoire. This delightful recipe provides a comforting and impressive treat with minimal effort.
Wet Mix for Rich Scone Flavor
Whisk cream, egg, vanilla
To achieve the rich flavor and tender texture that distinguishes exceptional strawberry scones, a thoughtfully prepared wet mix is indispensable. In a separate bowl, whisk together the heavy cream, a large egg, and a touch of vanilla extract. Heavy cream is preferred over milk because its higher fat content contributes significantly to the scone’s richness and moistness, helping to create that luxurious mouthfeel. The egg acts as a binder, adding structure and a beautiful golden hue to the baked scones, while also enriching the flavor. Vanilla extract, a classic baking ingredient, provides a warm, aromatic note that complements the sweet strawberries and buttery dough perfectly. Ensure these ingredients are well combined but don’t over-whisk, as you just need them integrated. This liquid mixture will bring the dry ingredients together, forming a cohesive dough that’s ready for baking. The quality of these components directly impacts the overall taste, ensuring your scones are bursting with delightful flavor. For more fantastic breakfast ideas, check out this Hawaiian Roll French Toast recipe.
Bringing Your Scone Dough Together
Mix wet and dry gently
Once your dry and wet mixes are prepared, it’s time to bring them together to form the scone dough. Pour the wet mixture into the bowl with your flour and butter mixture. Using a spatula or your hands, mix gently until just combined. The key here is not to overmix. Overmixing develops the gluten in the flour, which can lead to tough, dense scones. You want a tender, flaky result, so stop mixing as soon as the ingredients come together and there are no dry streaks of flour remaining. The dough will look a bit shaggy and sticky, which is perfectly normal. Gently fold in your fresh, diced strawberries at this stage. This gentle approach ensures the delicate butter pieces remain intact, ready to create those wonderful layers during baking, preserving the light and airy texture of the strawberry scones.
Lightly knead on flour
After gently combining the wet and dry ingredients, turn the shaggy dough out onto a lightly floured surface. Dust your hands with a little flour and very briefly, lightly knead the dough. This isn’t like bread kneading; it’s more about bringing the dough together into a cohesive mass. Aim for just a few gentle folds—perhaps 4-5 times—to ensure all the loose bits are incorporated without overworking it. This minimal handling is crucial for maintaining the tender crumb of your scones. If the dough is too sticky, add a tiny bit more flour, but be sparing. Over-flouring can make the scones dry. This delicate process ensures your homemade strawberry scones achieve their desired light and tender texture, rather than becoming tough or rubbery. This stage is also important for distributing the strawberries evenly without crushing them too much.
Shape Delicious Strawberry Scones
Form dough into circle
After the briefest kneading, it’s time to shape your delicious strawberry scones. On your lightly floured surface, gently press the dough into a thick, even circle. Aim for a thickness of about 1 to 1.5 inches. You can use your hands to pat it into shape, ensuring the edges are relatively smooth. The round shape is traditional for cutting wedges, but you could also opt for a rectangular shape if you prefer square scones. Consistency in thickness is important for even baking, so take a moment to ensure your circle is uniform throughout. This careful shaping helps your strawberry scones bake beautifully and uniformly, resulting in a perfect golden-brown exterior and a tender interior.
Cut into 8 perfect wedges
With your dough formed into an even circle, the next step is to cut it into individual scones. Using a sharp knife or a bench scraper, cut the circle into 8 equal wedges, just like slicing a pizza. For a neater cut, you can lightly flour your knife blade. If you desire smaller scones, you could cut it into 12 wedges, adjusting baking time slightly. Place these wedges onto a baking sheet lined with parchment paper, leaving a little space between each scone. This allows for even air circulation and helps them bake thoroughly on all sides. The visual appeal of these perfectly shaped wedges adds to the charm of homemade strawberry scones, making them look as good as they taste.
Baking Your Strawberry Scones Today
Preheat oven to 400°F
Proper oven temperature is absolutely vital for baking perfect strawberry scones. Make sure your oven is fully preheated to 400°F (200°C) before placing the scones inside. A hot oven creates an initial burst of steam from the cold butter within the dough, which contributes significantly to the scones’ rise and flakiness. If the oven isn’t hot enough, the butter will melt too slowly, resulting in flatter, denser scones. Giving your oven ample time to reach and maintain this temperature ensures consistent baking results every time. Don’t rush this step; a well-preheated oven sets the stage for beautifully risen and golden-brown scones, ready to be enjoyed.
Golden brown in 15-20 minutes
Once your oven is perfectly preheated, slide the baking sheet with your scone wedges into the hot oven. Bake for approximately 15 to 20 minutes. Keep an eye on them, as oven temperatures can vary. You’ll know they’re done when they’ve risen significantly and achieved a beautiful golden-brown color on top and around the edges. The aroma filling your kitchen will be another strong indicator of their readiness. If they appear to be browning too quickly, you can loosely tent them with aluminum foil for the last few minutes of baking. A perfectly baked scone will have a tender interior and a slightly crisp exterior. These quick baking times mean you can enjoy fresh, warm strawberry scones in no time, making them a fantastic choice for an impromptu breakfast or an afternoon tea. For more delightful baked goods, browse our collection of dessert recipes.
Love Your Warm Strawberry Scones
Let them cool slightly
While it’s incredibly tempting to dive into your fresh-from-the-oven strawberry scones immediately, allowing them to cool slightly is a crucial step. Transfer the baked scones from the hot baking sheet to a wire rack to cool for at least 10-15 minutes. This cooling period allows the internal structure of the scones to set, preventing them from crumbling when sliced. It also helps to develop their full flavor and improves their texture. The residual heat continues to cook them gently, ensuring they are perfectly done throughout. Patience here is rewarded with scones that hold their shape beautifully and offer an even more delightful eating experience. Resist the urge to cut into them too soon!
Best enjoyed fresh and warm
Though a slight cooling period is beneficial, strawberry scones are unequivocally at their absolute best when enjoyed fresh and still warm. The warmth enhances their buttery aroma, softens the tender crumb, and makes the juicy strawberries even more fragrant. Serve them simply with a dollop of clotted cream or a smear of your favorite jam for a truly traditional experience. A dusting of powdered sugar can also add a touch of elegance and extra sweetness. Whether for breakfast, brunch, or an afternoon treat, the simple pleasure of a warm, homemade strawberry scone is hard to beat. They embody comfort and joy in every bite, making them a perennial favorite. Make sure to share your creations on our Pinterest and Instagram!
Quick Prep and Cook Times
Only 15 minutes to prep
One of the most appealing aspects of this strawberry scone recipe is its incredibly efficient preparation time. You’ll be pleased to know that assembling these delicious pastries takes only about 15 minutes from start to finish. This rapid prep time makes them an ideal choice for busy mornings or for when you need a quick baking project without a lot of fuss. The key to this speed is having all your ingredients measured and ready to go before you begin, a practice known as mise en place. With cold butter, pre-measured flour, and the wet ingredients whisked, combining everything goes swiftly, allowing you to get your scones into the oven without delay. Enjoy the simplicity and speed!
Cook time is just 20
Adding to the convenience, these strawberry scones require a mere 15 to 20 minutes of baking time. This means that from the moment you decide to bake, you can have warm, freshly baked scones on your table in under 40 minutes, including both prep and cook time. The quick baking duration is perfect for satisfying sudden cravings or for surprising your family with a fresh breakfast without an early start. Keep an eye on the color to ensure they reach that perfect golden-brown hue without overbaking. The efficient cook time, combined with the minimal prep, solidifies this recipe as a go-to for delightful, homemade baked goods. Who knew such flaky, flavorful scones could be made so quickly?
Nutrition for Each Tasty Scone
Calories, sugar, and fat
Understanding the nutritional profile of your homemade strawberry scones can be helpful, especially if you’re mindful of your dietary intake. Each tasty scone, when prepared according to this recipe and assuming 8 servings, typically contains a moderate amount of calories, primarily from the flour, butter, and sugar. The sugar content comes from both the granulated sugar added to the dough and the natural sugars present in the fresh strawberries. Fat content is largely contributed by the heavy cream and, most significantly, the cold unsalted butter, which is essential for that desired flaky texture. While precise figures can vary based on exact ingredient brands and measurements, these scones offer a delightful indulgence best enjoyed in moderation as part of a balanced diet. Serving sizes can impact these numbers, so consider how you slice your circle. For a lighter treat, consider recipes with less butter or sugar content, although this recipe aims for traditional flavor.
Protein and fiber details
Beyond the primary macronutrients, these strawberry scones also provide some beneficial elements. The all-purpose flour and the egg contribute a modest amount of protein to each scone, which is important for satiety and muscle health. More notably, the fresh strawberries are a good source of dietary fiber. Fiber is crucial for digestive health and can help maintain stable blood sugar levels. While not a high-fiber food, the inclusion of fresh fruit certainly boosts its nutritional value compared to scones without fruit. Enjoying these delicious scones with a side of yogurt or a protein-rich meal can further balance your breakfast or snack. It’s a wonderful way to incorporate fruit into your diet, especially when paired with a satisfying meal like a crispy parmesan chicken for dinner.
Best Tips for Strawberry Scones
Use ripe, fresh strawberries
The quality of your strawberries directly impacts the flavor of your scones. Always opt for ripe, fresh strawberries when they are in season. They will offer the sweetest, most vibrant flavor, requiring less added sugar and delivering that true burst of fruity goodness. If fresh are unavailable, frozen strawberries can be used, but make sure they are completely thawed and thoroughly drained of excess moisture to prevent the dough from becoming soggy. Pat them dry with paper towels before folding them into the dough. This simple tip alone can elevate your strawberry scones from good to absolutely outstanding, ensuring every bite is infused with the best berry taste.
Store in airtight container
To keep your strawberry scones tasting fresh for as long as possible, proper storage is key. Once completely cooled, store them in an airtight container at room temperature. This prevents them from drying out and helps maintain their tender texture. They will remain fresh and delicious for 1-2 days. For longer storage, you can freeze baked and cooled scones in an airtight freezer-safe bag or container for up to 1 month. Thaw at room temperature and warm gently in the oven or microwave before serving. Proper storage ensures you can enjoy your homemade strawberry scones even after the baking day.
Scones taste best fresh
While proper storage can extend their life, it’s undeniable that strawberry scones are at their peak freshness and flavor when enjoyed the day they are baked, ideally still warm from the oven. The buttery aroma, the flaky texture, and the juicy bursts of strawberry are most prominent then. If you’re planning to serve them for a special occasion, baking them shortly before serving will yield the best results. The effort is minimal for the immense satisfaction gained from a truly fresh scone. Consider sharing them with friends or family immediately to enjoy their prime deliciousness!
