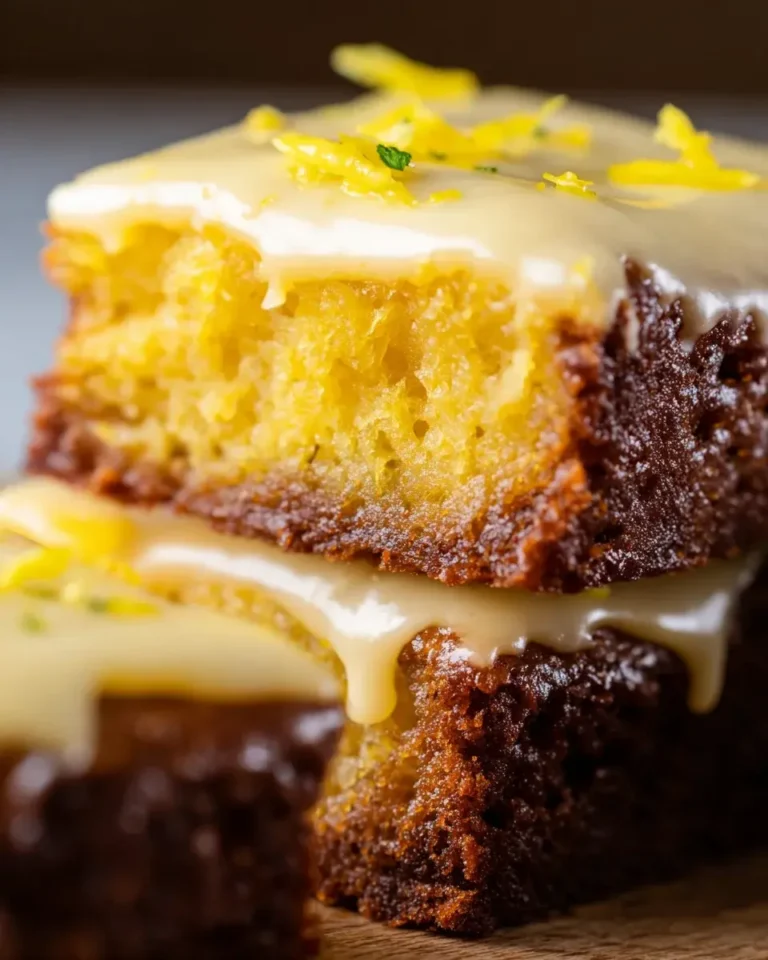
Condensed Milk Coconut Cake
Creamy, tender, and wonderfully simple, Condensed Milk and Coconut Cake brings together sweetened condensed milk, coconut milk, and a soft buttery crumb for a fuss-free dessert that feels special enough for guests and easy enough for everyday baking.
This is the kind of cake that fits beautifully into real life, allowing you to mix everything in one bowl, pour it into the pan, and let the oven handle the work while you attend to other tasks. Its gentle yet memorable flavor profile, featuring the smooth sweetness of condensed milk and the mellow tropical notes from coconut, makes each bite incredibly soft and fragrant, requiring no complicated frosting or decorating skills.
Why You Will Love This Recipe
- Effortless Preparation: This cake is designed for simplicity, allowing for one-bowl mixing and minimal fuss, making it accessible even for novice bakers.
- Delicate Flavor Profile: The harmonious blend of sweetened condensed milk and coconut milk creates a subtly sweet, tropical taste that is both comforting and refreshing.
- Moist and Tender Crumb: Rich ingredients like full-fat coconut milk and butter contribute to a wonderfully soft, melt-in-your-mouth texture that is incredibly satisfying.
- Visually Appealing Finish: A simple dusting of powdered sugar provides an elegant presentation without requiring advanced decorating techniques, making it look professionally done.
- Versatile Occasion Dessert: Its elegant yet approachable nature makes it perfect for casual family gatherings, afternoon tea, or even as a sophisticated dessert for special occasions.
Ingredients You Need
Crafting this delightful cake relies on a selection of key ingredients that come together to create its signature texture and flavor. Using high-quality ingredients, especially fresh eggs and full-fat coconut milk, will significantly enhance the final outcome, ensuring a rich taste and wonderfully moist crumb. The subtle sweetness from the condensed milk is perfectly balanced by the gentle tropical notes, making it a truly special treat.
Condensed Milk and Coconut Cake

A tender, richly flavored cake prepared with sweetened condensed milk and coconut elements for a soft crumb and delicate sweetness. Once cooled, it is finished with a light dusting of powdered sugar for an elegant presentation.
- 4 room-temperature eggs
- 9 ounces sweetened condensed milk
- 2 tablespoons coconut flour
- 2/3 cup full-fat coconut milk
- 1 teaspoon coconut extract
- 1 cup plain all-purpose flour
- 3.5 tablespoons unsalted butter, melted
- 1/2 teaspoon baking powder
- 2 tablespoons white granulated sugar
- Powdered sugar, for finishing
- 1Grease a 22 cm (9-inch) springform pan thoroughly with butter or cooking spray. Lightly flour the interior so the cake releases cleanly after baking.
- 2Place all of the ingredients into the bowl of an electric mixer. Beat on medium speed until the mixture is fully blended, smooth, and free from lumps.
- 3Preheat the oven to 180°C (355°F). Transfer the batter to the prepared springform pan, then bake for 40 minutes, or until a toothpick inserted into the center comes out clean.
- 4Remove the cake from the oven and allow it to cool completely in the pan. Once cooled, carefully release it from the springform pan and finish with a dusting of powdered sugar before serving.
- room-temperature eggs: vital for binding the ingredients and providing structure to the cake, ensuring a cohesive and tender crumb.
- sweetened condensed milk: imparts a rich, silky sweetness and contributes significantly to the cake’s signature moistness and luxurious texture.
- coconut flour: adds a subtle depth of coconut flavor and aids in achieving the desired cake consistency without making it heavy or dense.
- full-fat coconut milk: this is crucial for a tender and incredibly moist interior, lending richness that complements the other flavors beautifully.
- coconut extract: a potent flavor enhancer that ensures the coconut essence shines through clearly even after baking, providing an unmistakable tropical aroma.
- all-purpose flour: forms the structural foundation of the cake, ensuring it bakes up with a stable yet delicate crumb that slices cleanly.
- unsalted butter, melted: contributes a delicate buttery richness and helps to round out the overall flavor profile, adding a subtle warmth.
- baking powder: provides essential lift, ensuring the cake has a light and airy texture rather than a dense, heavy one.
- granulated sugar: offers a touch more sweetness to balance the richness and helps achieve an ideal texture during the baking process.
- powdered sugar: used for a simple, elegant finishing dusting, giving the cake a polished, bakery-quality appearance.
The exact quantities for each ingredient are detailed within the accompanying recipe card, ensuring you have all the precise measurements needed for success.
Variations
For those seeking a vegan twist on this delightful cake, consider replacing the eggs with a flax egg or a commercial egg replacer, and ensure your butter is a high-quality vegan alternative. The condensed milk can be substituted with a thick, sweetened vegan condensed milk made from coconut or soy, while still aiming for that signature creamy sweetness. This adaptation ensures the cake remains wonderfully moist and flavorful, perfect for those with dietary preferences.
To create a lower-carbohydrate version, you might experiment with using almond flour or a blend of coconut and almond flours in place of the all-purpose flour, adjusting the liquid content as needed for the perfect batter consistency. Granulated sugar can be swapped for a sugar-free sweetener like erythritol or stevia, ensuring the sweetness is still well-balanced. This modification allows for indulgence without the typical carbohydrate load, making it suitable for keto or low-carb lifestyles.
Another exciting variation involves infusing the cake with complementary flavors. Consider adding a tablespoon or two of finely chopped candied ginger for a spicy kick, or a teaspoon of finely grated lime zest to introduce a bright, citrusy note that cuts through the sweetness. You could also fold in a cup of fresh or frozen berries, like raspberries or blueberries, for bursts of color and tartness, transforming the classic cake into something uniquely your own.
How to Prepare Condensed Milk and Coconut Cake
Step 1: Preparing the Pan and Preheating the Oven
Begin by preheating your oven to a moderate temperature of 180°C (355°F). This ensures that once the batter is ready, the oven will be at the optimal temperature for even baking, preventing the cake from sinking in the middle or burning on the edges. A consistent oven temperature is foundational to a successful bake, allowing the leavening agents to work effectively and the cake to rise beautifully.
Next, thoroughly grease a 22 cm (9-inch) springform pan. Using butter or a non-stick cooking spray will create a barrier between the cake batter and the metal of the pan, preventing the delicate cake from sticking. Pay close attention to all crevices and the sides of the pan to ensure easy release after baking. This crucial step safeguards the integrity of the cake’s crust and sides.
Follow this by lightly flouring the greased pan. After applying the grease, add a tablespoon or two of all-purpose flour and tilt the pan in all directions to coat the interior evenly. Tap out any excess flour; you want a thin, consistent layer that will provide an extra non-stick surface. This double-layer of preparation – greasing and flouring – is a time-tested method for guaranteeing that your beautiful cake will slide out of the pan with ease, maintaining its perfect shape.
Step 2: Mixing the Cake Batter
In the bowl of your electric mixer, or a large mixing bowl if using a hand mixer, combine all the primary cake batter ingredients. This includes the room-temperature eggs, sweetened condensed milk, coconut flour, full-fat coconut milk, coconut extract, all-purpose flour, melted unsalted butter, baking powder, and granulated sugar. The convenience of having all ingredients in one bowl simplifies the process and minimizes the number of dishes to wash later.
Beat the mixture on medium speed until it is completely smooth and fully blended. The goal is to achieve a uniform batter with no visible lumps of flour or streaks of egg. The eggs, being at room temperature, will incorporate more easily and create a more emulsified batter, contributing to a finer crumb structure. This stage is about bringing everything together harmoniously, not about developing gluten, so avoid overmixing.
Scrape down the sides and bottom of the bowl occasionally with a spatula to ensure all ingredients are incorporated evenly into the batter. This step is vital for consistency, as ingredients that cling to the sides might not be properly mixed, leading to uneven texture or flavor distribution in the final cake. Once you have a smooth, homogeneous batter, it is ready to be transferred to the prepared pan.
Step 3: Pouring and Smoothing the Batter
Once the batter is perfectly smooth and well-combined, carefully pour it into the prepared springform pan. Use a spatula to gently scrape every last bit of batter from the bowl, ensuring you utilize all the delicious mixture you have created. This also helps in getting the most out of your ingredients and guarantees you have enough batter to fill the pan adequately for even baking.
After pouring the batter, take a moment to gently smooth the top surface with your spatula or the back of a spoon. The batter might have an uneven appearance initially, but by gently coaxing it into an even layer, you encourage the cake to bake uniformly. This step is crucial for achieving a level cake, which not only looks more appealing but also bakes more predictably, reducing the risk of domed centers or uneven cooking.
Ensure the batter is spread to the edges of the pan. If you notice any thick spots or thin areas, use your spatula to redistribute the batter gently. A level surface ensures that the heat from the oven will circulate evenly around the entire cake, promoting consistent rise and browning. This attention to detail at this stage sets the foundation for a flawless final product.
Step 4: Baking the Cake
Place the prepared pan with the batter into the preheated oven at 180°C (355°F). Position the oven rack in the center of the oven to ensure the most even heat distribution, avoiding direct contact with heating elements at the top or bottom which could lead to scorching. Allow the cake to bake undisturbed for approximately 40 minutes.
During the baking process, resist the urge to open the oven door frequently, especially within the first 30 minutes. Opening the door can cause a sudden drop in temperature, which may result in the cake deflating or developing an uneven texture. The cake needs a stable environment to rise and set properly. The aroma of coconut and sweet butter should begin to fill your kitchen as it bakes, a delightful indicator of the deliciousness to come.
Towards the end of the baking time, around the 40-minute mark, it is time to check for doneness. Gently insert a toothpick or a thin skewer into the center of the cake. If it comes out clean, or with only a few moist crumbs attached, the cake is perfectly baked and ready to be removed from the oven. If it comes out with wet batter clinging to it, continue baking in 5-minute increments, re-testing each time until the toothpick test is successful.
Step 5: Cooling the Cake
Once the cake is confirmed to be fully baked, carefully remove the pan from the oven. Place the hot pan on a wire cooling rack. This rack allows air to circulate freely around the bottom and sides of the pan, preventing the base of the cake from becoming soggy due to trapped steam.
It is critically important to let the cake cool completely in the springform pan before attempting to release it. While still warm, the cake’s crumb is very tender and delicate and can easily break apart if disturbed. The springform pan provides the necessary support to maintain the cake’s structure as it begins to firm up during the cooling process. Patience at this stage is key to ensuring the cake remains intact.
Once the cake has cooled thoroughly within the pan, typically for at least an hour or longer depending on ambient temperature, you can proceed to release it. Carefully run a thin knife or offset spatula around the inside edge of the springform pan to loosen any parts that might be slightly adhering. Then, unlatch the springform ring and gently lift it away. The cake should then be left on the base of the springform pan, or carefully transferred to a serving plate, to cool completely before decorating or serving.
Step 6: Finishing and Serving
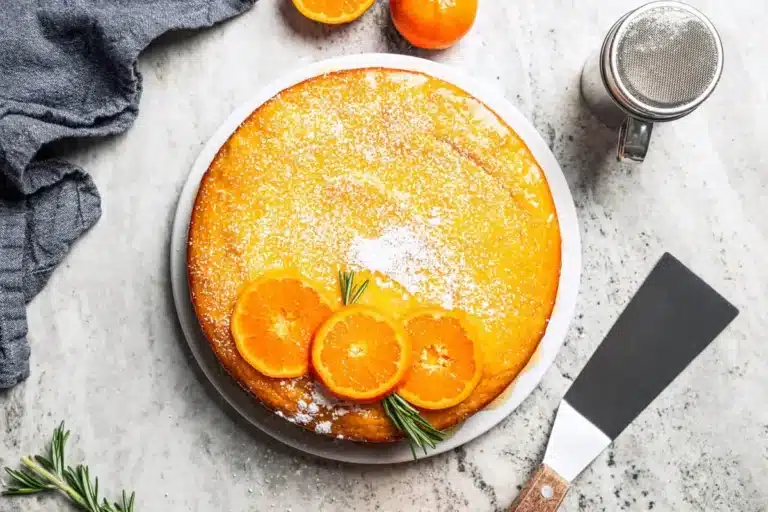
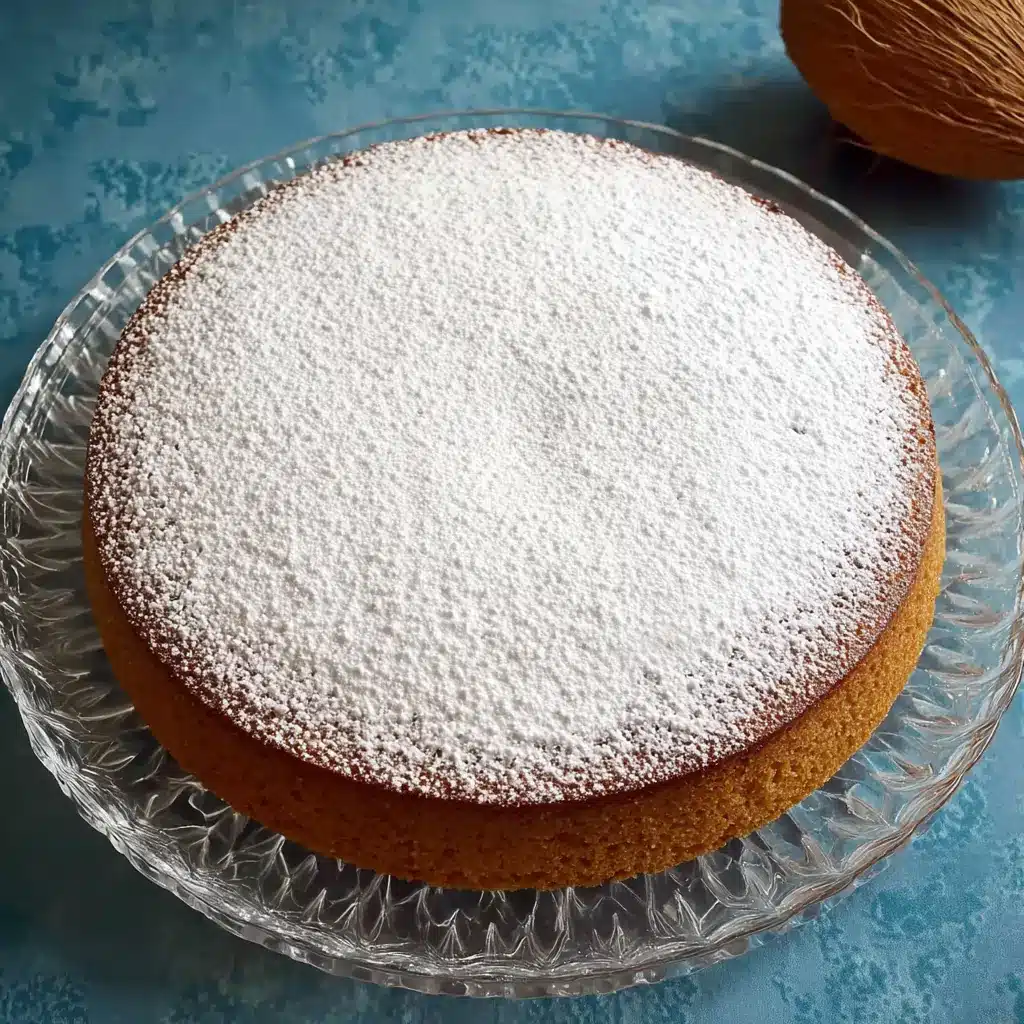
After the cake has reached room temperature and is completely cool, it is time for the final elegant touch. Take a sieve or a fine-mesh strainer and lightly dust the top of the cake with powdered sugar. A gentle, even dusting provides a beautiful, professional finish that enhances the cake’s appearance without adding excessive sweetness or masking its delicate flavors. Avoid applying too much powdered sugar at once; build it up gradually for the best visual effect.
If you wish, you can add further simple decorations. A few fresh berries scattered around the edges, or a sprinkle of toasted shredded coconut, can add color and texture. However, the cake is designed to be enjoyed for its inherent flavors and textures, so an understated finish is often preferred, allowing the subtle coconut and creamy notes to take center stage.
Once finished, the cake is ready to be sliced and served. Use a sharp knife to cut neat portions, ensuring each slice showcases the cake’s tender crumb and moist interior. This Condensed Milk and Coconut Cake is delightful on its own, but can also be paired with simple accompaniments for an elevated dessert experience. Enjoy the fruits of your baking labor with friends and family.
Pro Tips for Condensed Milk and Coconut Cake
- Room Temperature is Key: Always ensure your eggs are at room temperature. This helps them emulsify better with the other ingredients, leading to a smoother batter and a more evenly baked, tender crumb. Cold eggs can cause the batter to break or become dense.
- Measure Flour Accurately: Coconut flour is very absorbent. Measure it carefully using the spoon-and-level method or a kitchen scale to avoid adding too much, which can result in a dry, crumbly cake.
- Gentle Mixing is Best: Avoid overmixing the batter once the flour is added. Overmixing develops gluten, which can make the cake tough. Mix just until the ingredients are combined and the batter is smooth.
- Cooling is Crucial: Allow the cake to cool completely in the pan before releasing the springform ring. The cake is very delicate when warm and needs time to set fully. Rushing this step can lead to breakage.
- Don’t Skip the Sieve: When dusting with powdered sugar, always use a fine-mesh sieve. This ensures a light, even coating without lumps, giving the cake a professional and elegant finish.
Serving Suggestions for Condensed Milk and Coconut Cake
Decoration
For a simple yet elegant decoration, a light dusting of powdered sugar is perfectly sufficient, creating a soft, snow-like effect that enhances the cake’s visual appeal. If you desire a bit more color or texture, consider a scattering of toasted shredded coconut over the powdered sugar; the toasting process brings out a richer, nuttier coconut flavor and adds a pleasant crispness. Another beautiful option is to adorn the cake with a few fresh, vibrant berries, such as raspberries, blueberries, or sliced strawberries, whose bright colors and tartness can offer a delightful contrast to the cake’s sweetness.
Side Dishes
This cake pairs exceptionally well with a dollop of lightly whipped cream, which adds a cloud-like softness and a subtle dairy richness that complements the coconut and condensed milk flavors without overwhelming them. Fresh fruit salads featuring tropical fruits like mango, pineapple, and kiwi are also an excellent choice, as they echo the cake’s tropical theme and provide a refreshing counterpoint. For a warm accompaniment, a simple serving of crème anglaise or a light vanilla custard can add an extra layer of creamy indulgence, making the dessert feel even more luxurious.
Creative Serving Ideas
Consider serving individual slices of this cake warm, perhaps after a brief stint in a low oven, accompanied by a scoop of good quality vanilla bean ice cream or a small quenelle of coconut sorbet for a delightful temperature and textural contrast. Another creative idea is to transform it into a trifle by layering cubed cake with fresh fruit, whipped cream, and perhaps a light coconut custard in individual glasses or a large serving bowl. For a more sophisticated presentation, you could gently warm a slice and serve it with a drizzle of passion fruit coulis or a caramel sauce, offering a complex interplay of sweet and tangy notes.
Preparation & Storage
Storing Leftovers
Once completely cooled, this Condensed Milk and Coconut Cake can be stored at room temperature for up to two days if the climate is cool and dry. However, for optimal freshness and to maintain its tender crumb, it is best to store it in an airtight container or covered tightly with plastic wrap in the refrigerator. This method helps prevent it from drying out and preserves its moist texture for longer.
When storing leftovers in the refrigerator, the cake will typically remain fresh and delicious for about 4 to 5 days. The flavors often meld and deepen over time, making it just as enjoyable, if not more so, on the second or third day. If you’ve dusted it with powdered sugar, it’s advisable to do so just before serving to prevent the sugar from dissolving or becoming gummy due to moisture.
If you plan to store it for a longer period, or if your environment is particularly warm, refrigeration is highly recommended. Ensure the container is truly airtight to prevent any absorption of odors from other foods in the refrigerator. The cake’s rich ingredients, like condensed milk and butter, help it retain moisture well, even when refrigerated.
Freezing
This cake freezes exceptionally well, making it a fantastic option for baking ahead of time or for enjoying at a later date. To freeze, ensure the cake is completely cooled, and ideally, do not apply the final powdered sugar dusting until after thawing. Wrap the cake, either whole or in individual slices, very tightly in several layers of plastic wrap, ensuring no air can reach it, then place it in a heavy-duty freezer bag or an airtight freezer-safe container for added protection.
When properly wrapped and stored, the cake can maintain its quality in the freezer for up to two months. Freezing helps to preserve its soft texture and delightful flavor profile, ensuring that when you are ready to enjoy it, it tastes almost as fresh as the day it was baked. Using a freezer bag or container also helps to prevent freezer burn, which can affect the cake’s texture and taste.
When you are ready to thaw the cake, it is best to do so in the refrigerator overnight. This slow thawing process allows the cake to gradually come back to temperature and moisture levels, minimizing any impact on its delicate crumb. Alternatively, for a quicker thaw, you can leave it at room temperature for a few hours, though this might slightly alter the texture compared to the slow method.
Reheating
While this cake is designed to be enjoyed at room temperature or slightly chilled, a gentle reheating can sometimes enhance its texture and aroma, especially if it has been refrigerated. To reheat, place an individual slice on a microwave-safe plate and heat it on low power for very short intervals, perhaps 10-15 seconds at a time. The goal is to warm it through, not to cook it further or dry it out, so be cautious not to overheat it.
Another method for gentle warming is to place a slice in a preheated oven set to its lowest possible temperature (around 120°C or 250°F) for just a few minutes. This can help to soften the crumb and re-release the wonderful coconut and vanilla aromas. Always check the cake frequently to ensure it does not dry out or begin to brown excessively during this warming process.
It is important to note that reheating might slightly change the texture; the goal is to achieve a slightly softer, more yielding crumb. If you have reheated the cake, it is best to apply the powdered sugar dusting immediately afterwards for the most appealing visual result. This step ensures the cake looks as inviting as it tastes, making it a perfect treat any time.
Frequently Asked Questions
-
Can I make this cake ahead of time, and how should I store it for optimal freshness?
Absolutely, this Condensed Milk and Coconut Cake is an excellent make-ahead dessert, and its texture often improves after a day, allowing the flavors to meld beautifully. For optimal freshness, it’s best to store the completely cooled cake in an airtight container either at room temperature in a cool, dry environment for up to two days, or in the refrigerator for up to 4-5 days. Refrigeration is recommended to maintain its tender crumb and prevent it from drying out, especially in warmer climates. If you plan to freeze it, wrap individual slices or the whole cake tightly in plastic wrap, then in foil or a freezer bag, and it will keep well for up to two months; thaw overnight in the refrigerator for best results.
-
Why is my coconut cake dense or dry, and what steps can I take to ensure a moist, tender crumb?
A dense or dry texture in a coconut cake can often be attributed to a few common baking errors. Overmixing the batter after adding the flour is a primary culprit, as it develops gluten excessively, leading to a tough texture. Additionally, inaccurate flour measurements, particularly with coconut flour which is highly absorbent, can significantly impact moisture levels; always measure coconut flour carefully using the spoon-and-level method or a kitchen scale. Ensuring you use full-fat coconut milk and melted butter contributes essential fats and moisture, so using lighter versions or omitting them can result in dryness. Finally, overbaking the cake will inevitably dry it out, so accurately checking for doneness with a toothpick and removing it promptly once clean is crucial for achieving that desired moist and tender crumb.
-
What are the best ways to serve this cake, and can I substitute any of the ingredients if I have dietary restrictions?
This cake is wonderfully versatile and can be served on its own with a simple dusting of powdered sugar, or dressed up with a dollop of lightly whipped cream, fresh berries, or even a scoop of vanilla ice cream. For ingredient substitutions, if you need a vegan version, replace the eggs with a flax egg or commercial egg replacer and use a vegan butter substitute; sweetened vegan condensed milk can replace dairy condensed milk. For those following a low-carb or gluten-free diet, you can experiment with almond flour or a gluten-free baking blend, adjusting liquid quantities as needed, and using a sugar substitute like erythritol for granulated sugar. Always ensure full-fat coconut milk is used for the best texture, whether dairy or non-dairy.