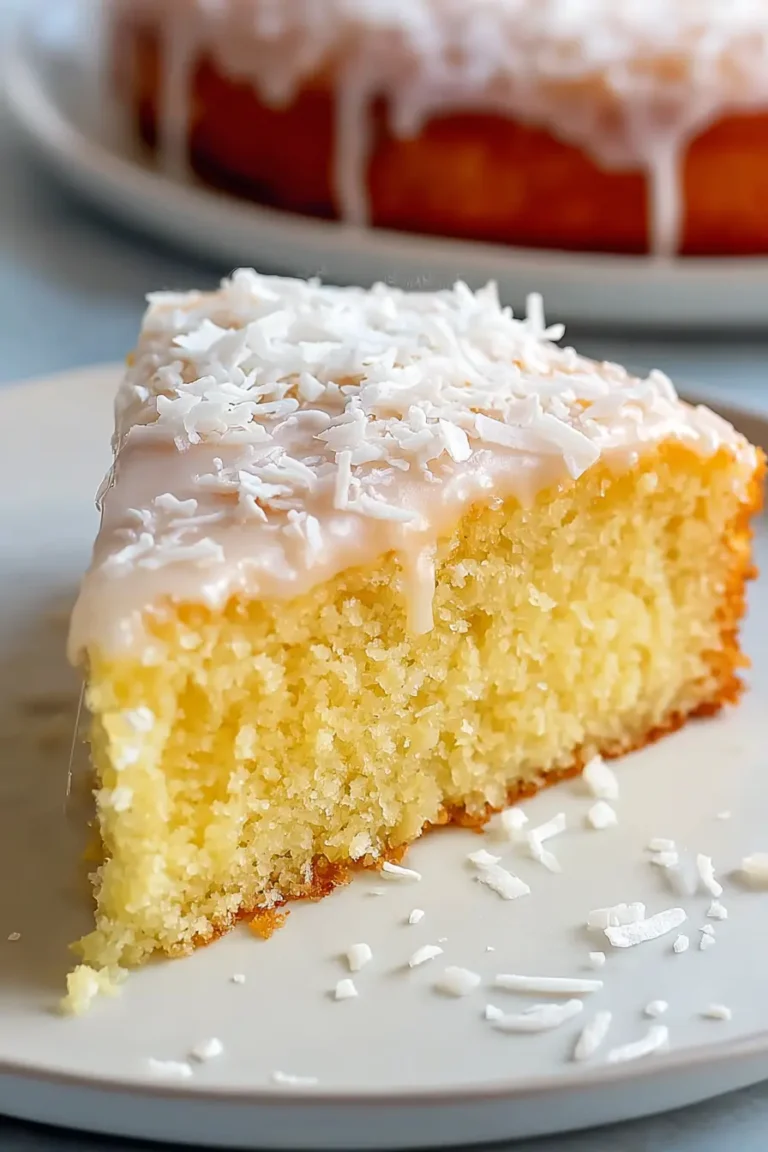
Lemon Coconut Yogurt Cake
Light, moist, and wonderfully beginner-friendly, this Coconut Yogurt Cake is a delightful creation that masterfully blends bright lemon zest with the subtle sweetness of coconut. Its soft crumb is the perfect companion to a cup of coffee or tea, offering an elegant yet fuss-free baking experience.
This is the kind of cake that makes your kitchen feel warm and welcoming, even if you’re a novice baker. It comes together with common kitchen tools, a straightforward mixing process, and a short ingredient list where each component plays a vital role in the final flavor and texture.
Why You Will Love This Recipe
- Light & Moist Texture: The combination of coconut yogurt and a careful balance of ingredients ensures a tender crumb that melts in your mouth.
- Bright Citrus Notes: Fresh lemon juice and zest cut through the richness, providing a refreshing and aromatic lift to every bite.
- Subtle Coconut Flavor: Gentle hints of coconut oil and shredded coconut add depth without overpowering the delicate balance of this cake.
- Effortless Preparation: With simple steps and common ingredients, this cake is perfect for both seasoned bakers and those just starting out.
- Versatile Serving: Delicious on its own or paired with simple accompaniments, it’s ideal for breakfast, dessert, or an afternoon tea.
Ingredients You Need
The secret to a truly exceptional Coconut Yogurt Cake lies in the quality of its components. Opting for fresh, vibrant ingredients like freshly squeezed lemon juice and zesty lemon peel will elevate the aroma and flavor profile significantly. Using a full-fat coconut yogurt is highly recommended, as it contributes to the cake’s unparalleled moistness and silken texture, ensuring a truly luxurious crumb that is both delicate and satisfying.
Coconut Yogurt Cake
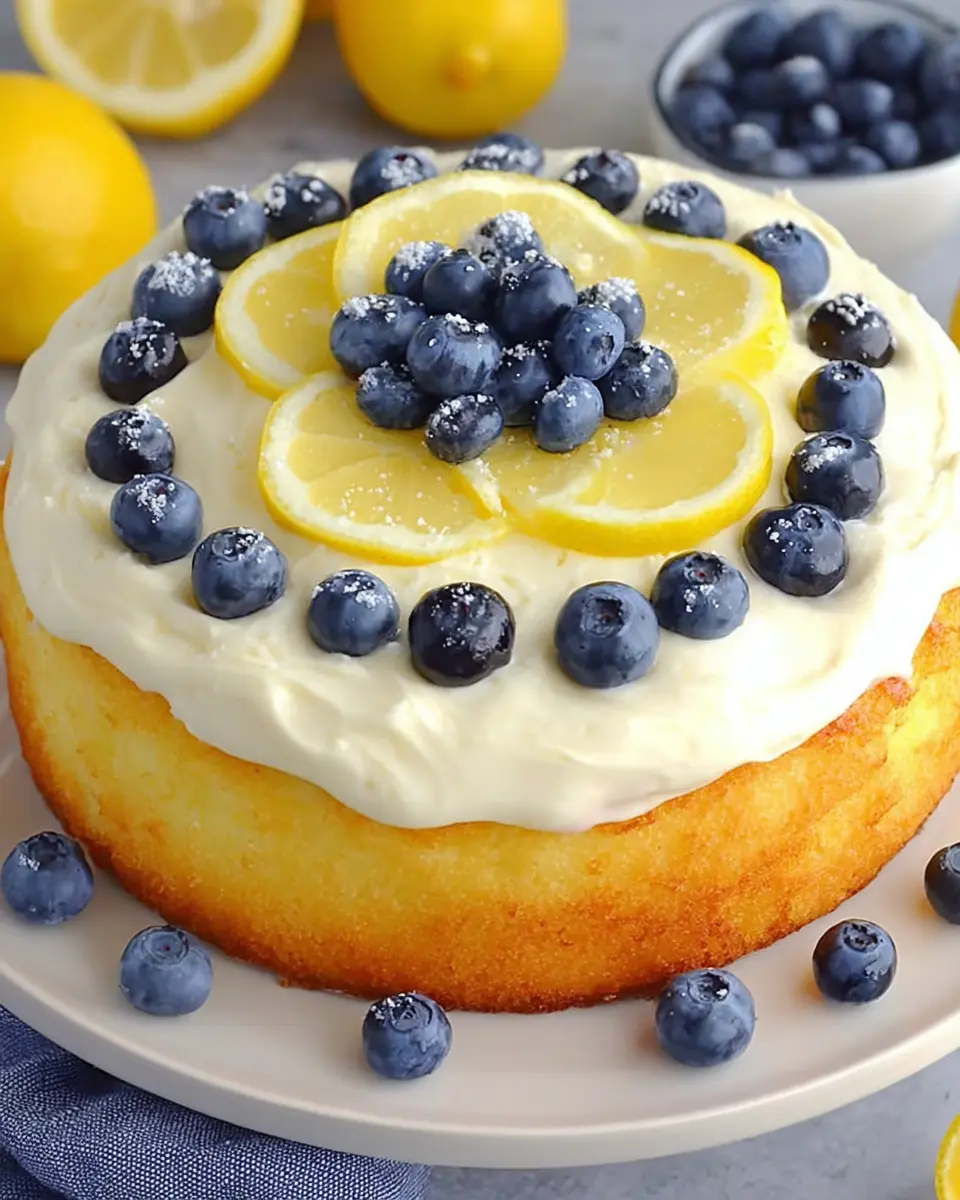
A delicate, moist cake prepared with plain coconut yogurt, fresh lemon juice, and fragrant lemon peel, finished with shredded coconut for gentle texture and flavor. This simple bake offers a bright citrus note and a soft crumb, making it well-suited for serving with tea or coffee.
- 3.5 oz granulated sugar
- 1 oz shredded coconut
- 2 medium eggs
- 4.25 oz plain flour (preferably all-purpose)
- 1.75 oz coconut oil (melted and brought to room temperature)
- 2.5 tsp baking powder
- 3.5 oz plain coconut yogurt (preferably full-fat)
- 1 tsp freshly grated lemon peel
- 1.35 fl oz fresh lemon juice
- 1Preheat the oven to 350°F (175°C). Lightly grease a 7–8 inch (18–20 cm) springform pan with oil or butter, then dust it with a small amount of flour. Tap out the excess flour and set the pan aside.
- 2In a mixing bowl, whisk the eggs together with the sugar until the mixture is pale, foamy, and thoroughly combined. This helps introduce air into the batter.
- 3Add the coconut oil and coconut yogurt, stirring until smooth. Mix in the fresh lemon juice and grated lemon peel.
- 4In a separate bowl, combine the plain flour, baking powder, and shredded coconut. Add the dry mixture gradually to the wet ingredients, stirring only until the batter is evenly incorporated. Do not overmix.
- 5Transfer the batter to the prepared springform pan. Smooth the surface evenly with a spatula.
- 6Bake in the preheated oven for 35 to 40 minutes. Begin checking at the 35-minute mark; the cake is done when a toothpick inserted into the center comes out clean.
- 7Remove the cake from the oven and let it rest in the pan for about 10 minutes. Carefully release it from the springform pan, then place it on a wire rack to cool completely before serving.
- granulated sugar: provides the necessary sweetness without being overpowering, allowing the lemon and coconut flavors to shine.
- shredded coconut: adds a delicate texture and reinforces the subtle coconut notes throughout the cake.
- medium eggs: bind the ingredients together and contribute to the cake’s structure and light, airy rise.
- plain flour: forms the base of the cake, ensuring a tender yet stable crumb.
- coconut oil: adds richness and a delicate coconut essence while keeping the batter smooth and easy to mix.
- baking powder: acts as a leavening agent, ensuring the cake bakes up with a lovely, soft texture.
- plain coconut yogurt: the star ingredient, imparting exceptional moisture and a tender crumb.
- freshly grated lemon peel: delivers a bright, aromatic zest that awakens the senses.
- fresh lemon juice: offers a tangy counterpoint to the sweetness, balancing the overall flavor profile.
Detailed quantities for each ingredient can be found within the accompanying recipe card, ensuring precision for perfect results every time.
Variations
This Coconut Yogurt Cake serves as a beautiful canvas for creative culinary exploration. Its inherent lightness and delicate flavor profile lend themselves wonderfully to various enhancements and dietary adjustments, allowing you to tailor it to your specific preferences or needs.
For those following a vegan lifestyle, the transformation is remarkably simple. You can effortlessly substitute the eggs with a flax egg, created by mixing one tablespoon of ground flaxseed with three tablespoons of water and letting it sit for about five minutes until it becomes gel-like. This binder will provide similar structural support to the cake. Additionally, ensure your chosen yogurt is a plant-based, full-fat coconut variety, and any non-vegan toppings are omitted or replaced with vegan alternatives like a simple dusting of powdered sugar or a fruit compote.
If you’re looking for a lower-carbohydrate option, you can experiment with alternative flours. A blend of almond flour and a touch of coconut flour can work effectively, though you might need to adjust the liquid content slightly to achieve the desired batter consistency. Replacing the granulated sugar with a keto-friendly sweetener, such as erythritol or xylitol (ensure it’s safe for pets if you have them), will further reduce the carbohydrate count. Be mindful that the texture might change slightly, becoming perhaps a little denser or more crumbly, but the delicious lemon-coconut flavor will remain.
Another delightful variation involves infusing the cake with additional spices or extracts. A touch of cardamom or a pinch of ground ginger can add a warm, cozy dimension, particularly appealing during cooler months. Alternatively, a teaspoon of almond extract, used alongside the lemon, can create a delightful citrus-almond fusion. Consider also adding a handful of fresh berries, such as blueberries or raspberries, gently folded into the batter just before baking; they will burst with flavor and add beautiful pops of color to the finished cake. Remember to adjust baking time if adding wet ingredients like berries.
How to Prepare Coconut Yogurt Cake
Step 1: Prepare the Baking Vessel and Oven
Begin by preheating your oven to a moderate temperature of 350°F (175°C). This ensures the oven is at the optimal temperature when the cake batter is ready to bake, promoting even cooking and a beautiful rise. A properly preheated oven is crucial for achieving that perfect, tender crumb.
Next, meticulously prepare your 7 to 8-inch springform pan. A springform pan is ideal for cakes that are slightly more delicate, as it allows for easy removal without compromising the cake’s structure. Lightly grease the inside of the pan with a neutral oil, such as vegetable or canola oil, or even a little softened butter if you prefer. Ensure all the interior surfaces, including the bottom and sides, are coated.
Once greased, dust the inside of the pan with a light coating of all-purpose flour. This creates a non-stick barrier between the cake batter and the pan. Gently tilt and tap the pan to distribute the flour evenly, ensuring no large clumps remain. Invert the pan and tap out any excess flour; this step is vital for a clean release and prevents the cake from sticking, which is especially important for a cake that aims for a delicate presentation.
Step 2: Create the Airy Egg and Sugar Foundation
In a medium-sized mixing bowl, combine the granulated sugar and the two medium eggs. This is where you lay the groundwork for a light and tender cake structure. Using a whisk, whether it’s a hand whisk or an electric mixer on a medium speed, begin to beat the eggs and sugar together vigorously.
Continue whisking until the mixture transforms into a pale, airy, and frothy consistency. You’re aiming for a ribbon stage, where the mixture is thick enough to leave a trail when the whisk is lifted. This process incorporates air into the batter, which is essential for achieving a fluffy cake and contributes significantly to its final texture. Don’t rush this step; a few minutes of diligent whisking will yield a much lighter cake.
The visual cue you’re looking for is a significant increase in volume and a noticeable lightening of the color from yellow to a pale ivory. This aeration step is a fundamental technique in cake making that ensures the cake doesn’t end up dense or heavy, creating a delightful contrast with the moist elements to come.
Step 3: Incorporate the Moist and Flavorful Wet Ingredients
Once your egg and sugar mixture is wonderfully light and aerated, it’s time to introduce the liquid components that will add richness and depth of flavor. Gently stir in the melted coconut oil. Ensure the coconut oil has been melted and then allowed to cool slightly so it doesn’t cook the eggs or curdle the yogurt.
Follow this by adding the full-fat plain coconut yogurt. This ingredient is key to the cake’s incredible moistness and tender crumb. Stir these wet ingredients together until they are smoothly combined with the egg and sugar base. The mixture might appear slightly thinner at this stage, which is perfectly normal as you’re building the liquid foundation of your batter.
Finally, add the freshly squeezed lemon juice and the finely grated lemon peel. The lemon juice will bring a bright tanginess that cuts through the richness, while the lemon peel, with its concentrated oils, will infuse the entire cake with an irresistible citrus aroma. Mix just enough to evenly distribute these vibrant flavors throughout the wet ingredients, ensuring every spoonful of cake will carry that delightful lemon essence.
Step 4: Gently Combine Wet and Dry for a Tender Crumb
In a separate, clean mixing bowl, take a moment to combine the dry ingredients. This includes the all-purpose flour, which provides the cake’s structure, and the baking powder, which is responsible for its lift and light texture. Make sure these are well-distributed to ensure even leavening.
Also, add the shredded coconut to this dry mixture. This adds a subtle textural element and reinforces the coconut flavor without making the cake dense. Whisk these dry ingredients together lightly to ensure the baking powder is evenly dispersed throughout the flour and coconut. This even distribution is critical for a uniform rise.
Now, introduce this dry mixture to the wet ingredients in stages. It’s best to add it gradually, perhaps in two or three additions, folding or stirring gently after each addition. The key here is to avoid overmixing. As soon as the last streaks of flour disappear and the batter is just combined, stop mixing. Overworking the flour can develop gluten excessively, leading to a tougher, less tender cake, which is the opposite of what we aim for in this delicate bake.
Step 5: Bake to Golden Perfection
Carefully spoon the prepared batter into your greased and floured springform pan. Use a spatula to gently spread the batter evenly across the surface, ensuring it reaches all the edges of the pan. A smooth, level surface will contribute to an even bake and a beautiful presentation once the cake is cooled and ready to be served.
Place the pan into the preheated oven. Bake for approximately 35 to 40 minutes. It’s always a good idea to start checking the cake for doneness around the 35-minute mark, as oven temperatures can vary, and small cakes tend to bake more quickly than larger ones.
To test for doneness, insert a toothpick or a thin skewer into the center of the cake. If it comes out clean, with no wet batter clinging to it, your cake is perfectly baked. You can also look for signs like a lightly golden-brown top and edges that are just beginning to pull away slightly from the sides of the pan. Avoid the temptation to bake it any longer once it passes this test, as overbaking can lead to a dry cake.
Step 6: Cool and Reveal Your Masterpiece
Once the cake has achieved that perfect golden-brown hue and the toothpick test confirms it’s done, carefully remove the springform pan from the oven. Place the entire pan on a wire cooling rack to begin the cooling process. Allowing the cake to rest in the pan for about 10 minutes is an important step.
This brief resting period allows the cake to firm up slightly, making it more stable and less likely to break when you remove it from the pan. The warmth of the pan will continue to gently cook the very center of the cake. After this initial rest, carefully release the springform ring by unclipping it. This should allow the sides of the pan to pull away cleanly from the cake.
Once the ring is removed, gently slide the cake, still on its base, onto the wire rack to cool completely. This ensures air circulates around the entire cake, preventing the bottom from becoming soggy. Patience here is key; a completely cooled cake is easier to slice and will have a better texture than one cut while still warm.
Pro Tips for Coconut Yogurt Cake
Use the Freshest Lemon Zest Possible: For that vibrant, aromatic lift, always opt for freshly grated lemon peel over dried or bottled lemon zest. The essential oils released from fresh zest are far more potent and contribute to the cake’s incredible fragrance as it bakes and its bright flavor when served.
Temperature Control for Coconut Oil: When adding the melted coconut oil, ensure it’s cooled to a lukewarm temperature. If it’s too hot, it can potentially cook the eggs or cause the yogurt to separate, affecting the final texture. A slightly warm oil will blend seamlessly into the batter.
Gentle Folding is Key: Once you’ve added the dry ingredients to the wet, resist the urge to vigorously stir or beat the batter. A gentle folding motion until just combined is paramount. This technique prevents overdevelopment of gluten, ensuring that your cake remains incredibly tender and moist, rather than becoming tough or chewy.
Monitor Baking Time Closely: Smaller cakes like this one can bake relatively quickly. Start checking for doneness a few minutes before the minimum bake time suggested. An oven that runs slightly hotter can overbake a small cake rapidly, leading to a dry outcome. A clean toothpick test is your best friend here.
Cooling on a Wire Rack is Essential: After removing the cake from the springform pan, always transfer it to a wire rack. This allows air to circulate freely around the bottom of the cake, preventing steam from getting trapped and making the bottom soggy. A well-cooled cake slices beautifully and develops its best texture.
Serving Suggestions for Coconut Yogurt Cake
Decoration
For a simple yet elegant finish, a light dusting of powdered sugar over the cooled cake is always a classic choice. You can use a fine-mesh sieve to achieve a professional, even coating. If you wish to enhance the coconut theme, sprinkle a small amount of toasted shredded coconut over the powdered sugar for added texture and visual appeal. A few fresh berries, like raspberries or thinly sliced strawberries, can also add a burst of color and freshness.
Side Dishes
This cake pairs beautifully with simple, complementary flavors. A dollop of plain Greek yogurt or softly whipped cream provides a luscious accompaniment that doesn’t compete with the cake’s delicate lemon and coconut notes. A small bowl of fresh fruit salad, particularly one featuring citrus segments or berries, would also be a delightful and refreshing pairing. For a beverage, a warm cup of Earl Grey tea or a light floral infusion complements the cake’s subtle flavors perfectly.
Creative Serving Ideas
Consider transforming individual slices into elegant desserts by serving them warm with a drizzle of honey or a light fruit coulis. For a more substantial dessert, a single scoop of vanilla bean or coconut milk ice cream alongside a slice offers a delightful contrast in temperature and texture. You could also create mini cakes by baking the batter in muffin tins; these are perfect for individual portions or for a brunch spread, offering a charming presentation.
Preparation & Storage
Storing Leftovers
Once the Coconut Yogurt Cake has cooled completely, it’s important to store it properly to maintain its freshness and moisture. For short-term storage, up to 2-3 days, you can keep the cake at room temperature. Ensure it is tightly covered with plastic wrap or stored in an airtight cake container. If your kitchen is particularly warm, or you wish for longer storage, refrigerating the cake is the best option.
When storing in the refrigerator, place the covered cake in an airtight container. This helps prevent it from drying out and absorbing any odors from other foods. The flavors of lemon and coconut can often meld and deepen slightly when refrigerated, making the cake taste even more developed the next day. It’s recommended to bring refrigerated slices back to room temperature for about 15-20 minutes before serving to allow the crumb to soften and the aromatic flavors to become more pronounced.
Freezing
For longer-term storage, freezing is an excellent method to preserve the deliciousness of your Coconut Yogurt Cake. First, ensure the cake is entirely cooled. If it’s a whole cake, you can wrap it tightly in a double layer of plastic wrap, followed by a layer of aluminum foil to protect it from freezer burn. If you prefer to freeze individual slices, wrap each slice separately in plastic wrap, then place them together in a freezer-safe bag or container.
Properly wrapped, the cake or slices can be stored in the freezer for up to 1 to 2 months. This method allows you to have this delightful treat on hand whenever a craving strikes. The texture generally holds up well after freezing, especially if thawed correctly, making it a convenient option for future enjoyment.
Reheating
If you’ve stored your cake in the refrigerator or freezer, a little gentle reheating can bring back its delightful softness and aroma. For refrigerated cake, simply let it sit at room temperature for about 15-20 minutes to soften. If you prefer it slightly warm, you can place a slice on a microwave-safe plate and heat it in the microwave on a low power setting for 10-15 seconds. Be careful not to overheat, as this can make the cake dry.
For a thawed frozen slice, you can follow the same microwave reheating method. Alternatively, for a slightly more toasted texture, you can briefly warm a slice in a toaster oven at a low temperature for a minute or two. The goal is to gently warm the cake through, not to cook it further, ensuring it remains wonderfully moist and tender with its bright lemon and coconut flavors intact.
Frequently Asked Questions
-
Can I substitute the coconut yogurt with another type of yogurt?
Yes, you certainly can substitute the coconut yogurt, but be aware that the flavor profile and moisture content might change slightly. Plain, full-fat Greek yogurt is an excellent alternative as it provides a similar creamy texture and tanginess, contributing to a moist crumb. If you use a lower-fat yogurt, the cake might be slightly less moist. The key is to maintain a similar level of richness; otherwise, you might need to adjust other liquid or fat components in the recipe. While regular yogurt works, you will lose some of the distinctive subtle coconut essence that makes this cake unique.
-
Why is it important not to overmix the batter after adding the flour?
Overmixing the cake batter once the flour has been added is crucial to avoid developing too much gluten. Gluten is a protein found in flour that provides structure, but when it’s developed excessively through vigorous mixing, it can lead to a tough, dense, and chewy texture in your baked goods. For a delicate cake like this Coconut Yogurt Cake, which aims for a light, tender, and moist crumb, gentle mixing is essential. You only want to combine the ingredients until just incorporated, ensuring no dry streaks of flour remain, to maintain that desired soft texture.
-
How can I tell if the cake is fully baked and not underbaked or overbaked?
Determining when a cake is perfectly baked involves a few visual and tactile cues. Start by checking the cake around the 35-minute mark of its baking time. The most reliable method is the toothpick test: insert a thin wooden skewer or toothpick into the absolute center of the cake. If it comes out clean, with no wet batter clinging to it, the cake is done. A slightly moist crumb clinging to the toothpick is acceptable and indicates a moist cake, but raw batter means it needs more time. Visually, the cake should appear set, lightly golden on top, and the edges may begin to pull away slightly from the sides of the springform pan.