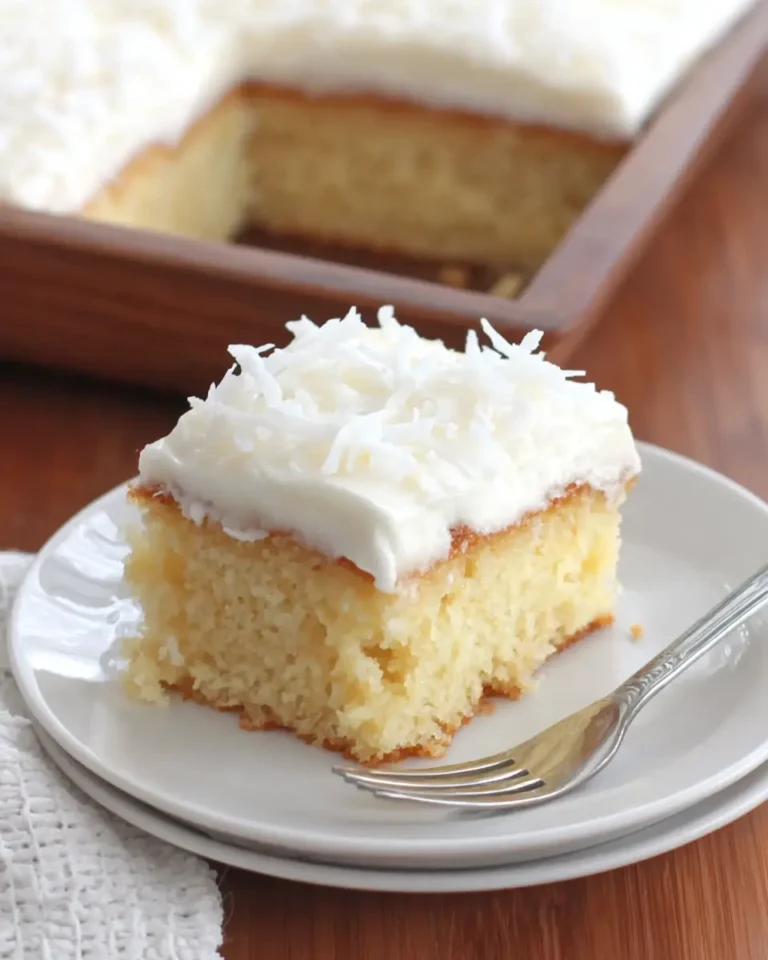
Coconut Cake with Raspberry Filling

This creamy, bakery-style Coconut Cake with Raspberry Filling delivers soft coconut layers, a bright fruit center, and a tangy frosting that feels special without requiring a complicated method.
It’s a reliable choice for celebrations, presents a beautiful appearance on a cake stand, and is packed with a delightful flavor contrast between sweet coconut, tart berries, and rich cream cheese frosting.
Why You Will Love This Recipe
- Effortless Elegance: This cake offers a polished, bakery-quality look and taste with surprisingly straightforward steps, making it perfect for special occasions without the stress.
- Perfect Flavor Harmony: The combination of tender coconut cake, vibrant raspberry filling, and tangy cream cheese frosting creates a balanced and irresistible taste experience.
- Tender Coconut Layers: Utilizing cake mix and pudding ensures consistently moist and tender coconut-infused cake layers that are a joy to bite into.
- Make-Ahead Convenience: Many components can be prepared in advance, allowing for easier assembly and reducing last-minute kitchen chaos.
- Visually Stunning: From the vibrant raspberry filling peeking through to the snowy finish of toasted coconut, this cake is as beautiful to look at as it is delicious to eat.
Ingredients You Need
The quality of your ingredients plays a significant role in the final outcome of this exquisite coconut cake. Opting for fresh, vibrant raspberries and full-fat dairy products will elevate both the flavor and texture of your dessert. Using high-quality coconut milk and finely shredded coconut ensures a rich, authentic coconut taste throughout the cake and frosting.
Creamy Coconut Cake with Raspberry Filling
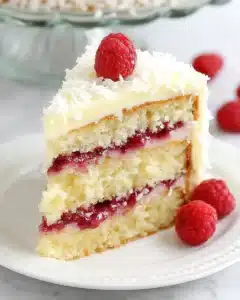
A tender coconut cake layered with a vibrant raspberry filling and finished with a smooth cream cheese frosting. Toasted coconut on the exterior adds texture and a polished presentation.
- For the Raspberry Filling:2 cups raspberries (fresh or frozen and thawed)1/4 cup granulated sugar2 teaspoons lemon juice1 1/2 tablespoons cornstarch1 1/2 tablespoons water1/4 teaspoon vanilla extract
- For the Cake:4 large eggs1 package yellow cake mix1 small package vanilla instant pudding mix1/2 cup canola oil1 cup full-fat unsweetened coconut milk (stirred before measuring)1 1/2 cups shredded coconut
- For the Cream Cheese Frosting:12 ounces full-fat cream cheese (softened)3/4 cup unsalted butter (room temperature)6 cups icing sugar (sifted)1 teaspoon vanilla essence1 to 2 tablespoons unsweetened coconut milk1 small pinch of salt
- For the Garnish:1 cup toasted coconut flakes
- 1Prepare the Raspberry Filling: In a medium saucepan, combine raspberries, sugar, and lemon juice. Cook over low-medium heat until berries soften and mixture thickens (8-10 minutes). In a small bowl, whisk cornstarch and water until smooth. Stir slurry into raspberry mixture; cook until thickened (2-3 minutes). Remove from heat, stir in vanilla, and cool completely. Refrigerate if needed.
- 2Prepare the Cake Pans: Preheat oven to 325°F (163°C). Line the bases of three 8-inch round cake pans with parchment paper, coat with cooking spray, and set aside.
- 3Make the Cake Batter: In a large mixing bowl, combine cake mix, instant pudding, eggs, coconut milk, and canola oil. Beat on medium speed for 2 minutes until smooth. Fold in shredded coconut.
- 4Bake the Cake Layers: Divide batter evenly among prepared pans. Bake for 22-25 minutes, until centers spring back lightly. Let layers rest in pans for 15-30 minutes, then turn out onto a wire rack to cool completely.
- 5Prepare the Frosting: Beat softened cream cheese and butter until smooth. Gradually add sifted icing sugar. Blend in vanilla essence, coconut milk, and salt. Beat until light and combined. Adjust consistency as needed.
- 6Toast the Coconut Flakes: Melt 1 teaspoon of butter in a large frying pan over low-medium heat. Add coconut and stir frequently until lightly golden. Transfer to wax paper to cool.
- 7Assemble the Cake: Place one cake layer on a serving stand. Spread a thin layer of frosting, then pipe a border around the edge. Spoon raspberry filling inside the border. Repeat with the second layer. Top with the final cake layer (upside down).
- 8Crumb Coat and Chill: Spread a thin crumb coat of frosting over the entire cake. Chill for 10-15 minutes.
- 9Frost and Garnish: Cover the chilled cake with the remaining frosting. Spoon extra raspberry filling over the top if desired. Press toasted coconut flakes around the outside of the cake.
Keywords: Coconut Cake, Raspberry Filling, Cream Cheese Frosting, Bakery Style, Celebration Cake, Dessert
The precise quantities for each ingredient are detailed within the recipe card. Using fresh or thawed frozen raspberries is equally acceptable for the filling, ensuring a beautiful color and tartness.
Variations
For those seeking a vegan twist on this delightful coconut cake, the substitution of ingredients can be wonderfully effective. Replace the eggs with a flax egg or a commercial egg replacer, and use a plant-based butter and cream cheese alternative for the frosting. The cake mix might require checking for dairy content, but many brands offer vegan-friendly options or can be adapted using a separate vegan cake recipe base.
Coconut milk is already vegan, and raspberries are naturally so, making the filling adaptable. The key is to ensure your chosen vegan alternatives melt, cream, and bake similarly to their dairy counterparts to achieve the best texture and flavor.
A low-carb adaptation offers a way to enjoy this cake with significantly reduced carbohydrate content. This would involve using a keto-friendly cake mix or creating a cake base from almond flour or coconut flour, sweetened with erythritol or stevia. For the filling, sugar-free raspberry preserves or a homemade version using a sugar substitute would be essential.
The cream cheese frosting can be made with a sugar substitute, and ensuring the coconut milk and shredded coconut are unsweetened will further reduce carb counts. This requires careful attention to ingredient ratios to maintain moisture and structure.
To introduce a different fruity dimension, consider swapping the raspberry filling for a luscious strawberry or mixed berry compote. You could also layer in a smooth lemon curd for a zesty, bright contrast to the sweet coconut. For an extra layer of indulgence, a simple chocolate ganache could be drizzled between the layers or used as a base for the frosting.
Exploring different extracts, like almond or even a hint of lime, can also offer subtle yet distinct flavor profiles. Don’t be afraid to experiment with complementary additions like finely chopped nuts or a touch of spice such as cardamom within the cake batter itself.
How to Prepare Coconut Cake with Raspberry Filling
Step 1: Crafting the Vibrant Raspberry Filling
Begin by preparing the star of your cake’s fruity heart: the raspberry filling. In a medium saucepan, combine two cups of fresh or thawed frozen raspberries with a quarter cup of granulated sugar and two teaspoons of lemon juice.
Cook this mixture over low-medium heat, stirring frequently, until the berries soften and the mixture starts to thicken into a jam-like consistency, typically taking about eight to ten minutes. This gentle cooking process allows the natural pectin in the raspberries to activate, aiding in the thickening.
While the fruit simmers, prepare a slurry by whisking together one and a half tablespoons of cornstarch with an equal amount of water in a small bowl until completely smooth. Pour this slurry into the simmering raspberry mixture and stir it in immediately and continuously. Continue to cook for an additional two to three minutes, stirring constantly, until the filling thickens to a robust consistency that will hold its shape between cake layers.
Remove the saucepan from the heat, stir in a quarter teaspoon of vanilla extract for an added depth of flavor, and then transfer the filling to a separate bowl. Allow it to cool completely, and if you’re pressed for time, refrigerating it can speed up the cooling process, ensuring it’s perfectly chilled and set before assembly.
Step 2: Preparing the Cake Pans for Perfect Layers
To ensure your delicate coconut cake layers release flawlessly, proper pan preparation is absolutely paramount. Preheat your oven to a moderate 325 degrees Fahrenheit (163 degrees Celsius), a temperature that promotes gentle, even baking for tender cakes.
Next, meticulously line the bases of three 8-inch round cake pans with parchment paper, cutting circles to fit snugly. After lining, lightly coat the insides of the pans with cooking spray or softened butter, ensuring all surfaces are covered to prevent any sticking. This dual approach of parchment and grease creates a non-stick barrier that is essential for these moist cake layers.
Setting these prepped pans aside means they are ready and waiting for the batter, preventing any delays in baking once the batter is mixed. The success of assembling a beautiful, intact cake hinges significantly on how well these layers are freed from their pans. Investing a few extra moments in this step pays dividends in the final presentation and ease of handling your baked cake components.
Step 3: Creating the Tender Coconut Cake Batter
In a large mixing bowl, combine the yellow cake mix and the small package of vanilla instant pudding mix. Add the four large eggs, half a cup of canola oil, and one cup of full-fat unsweetened coconut milk to the dry ingredients; ensure the coconut milk is stirred well before measuring to incorporate any separated cream.
Fit your mixing bowl with a paddle attachment and beat the mixture on medium speed for approximately two minutes. The goal is a smooth, homogenous batter that is thoroughly blended, with no pockets of dry ingredients remaining. This initial mix ensures a uniform base for a consistently textured cake.
Once the batter reaches a silky consistency, it’s time to incorporate the shredded coconut. Gently fold in one and a half cups of shredded coconut into the batter. It’s important to do this by hand or on a very low speed to avoid overmixing, which can toughen the cake layers. The shredded coconut adds delightful texture and amplifies the coconut flavor profile, making each bite a true coconut experience. The batter should be rich and slightly thick at this stage, ready for baking.
Step 4: Baking the Coconut Cake Layers to Golden Perfection
Carefully divide the prepared batter evenly among the three greased and lined 8-inch cake pans. Aim for consistency in the amount of batter in each pan to ensure the layers bake at a similar rate and result in uniform thickness. You can use a kitchen scale for precise measurement, with approximately 13.75 ounces or 390 grams of batter per pan being ideal.
Smooth the tops of the batter in each pan with a spatula to create a level surface, which will help the cakes bake evenly and sit flat when assembled. Place the filled pans into the preheated oven and bake for 22 to 25 minutes. You’ll know they’re ready when the centers no longer wobble and spring back lightly when gently touched, and the tops and edges have achieved a beautiful, light golden hue.
Once baked, allow the cake layers to rest in their pans on a wire rack for about 15 to 30 minutes. This brief resting period helps the cakes firm up slightly, making them easier to remove from the pans without breaking. After this initial rest, carefully invert the pans onto the wire rack to release the cake layers. Let them cool completely on the wire rack before you even think about frosting or assembling; warm cake layers are fragile and will not hold up to handling.
Step 5: Whipping Up the Tangy Cream Cheese Frosting
While your cake layers are cooling to room temperature, it’s time to prepare the luscious cream cheese frosting. Ensure your 12 ounces of full-fat cream cheese and three-quarters cup of unsalted butter are softened to room temperature; this is critical for achieving a smooth, lump-free frosting.
In a large mixing bowl, beat the softened cream cheese and butter together until they are completely smooth and creamy. Gradually add the six cups of sifted icing sugar, mixing on a low speed initially to prevent a sugar cloud, then increasing the speed as it incorporates. Sifting the icing sugar is a key step for a silky-smooth frosting texture.
Once the sugar is mostly incorporated, blend in one teaspoon of vanilla essence for that classic sweet aroma and flavor. Add one to two tablespoons of unsweetened coconut milk to achieve your desired consistency, and a small pinch of salt to enhance all the flavors and balance the sweetness. Beat the frosting only until it is light, fluffy, and well combined; overbeating can make it too soft. Adjust the texture with a little more icing sugar if it’s too thin, or a touch more coconut milk if it’s too stiff, aiming for a creamy, spreadable consistency that holds its shape.
Step 6: Toasting Coconut Flakes to Aromatic Perfection
The finishing touch of toasted coconut flakes adds not only a delightful crunch and aroma but also a visually appealing, classic coconut cake aesthetic. To prepare these, heat one teaspoon of butter in a large frying pan over low-medium heat. Once melted, add one cup of shredded coconut to the pan.
Stir the coconut frequently and consistently. It’s crucial to watch the coconut very closely, as it can quickly transition from perfectly golden to burnt. This process requires patience and constant attention to achieve an even, light golden color and a fragrant aroma.
Once the coconut reaches the desired toasty hue, promptly transfer it to a piece of wax paper or paper towel. This prevents residual heat from continuing to cook the coconut, ensuring it stops toasting at the perfect point. Allow the toasted coconut to cool completely before using it to decorate the cake; warm coconut can melt the frosting it adheres to.
Step 7: Assembling the Masterpiece
Begin the assembly by placing the first cake layer, top-side up, onto your chosen cake plate or serving stand. Spread a thin, even layer of the prepared cream cheese frosting over the surface of this layer. Next, using a piping bag fitted with a plain tip or even a ziplock bag with a corner snipped off, pipe a border of frosting around the outer edge of the cake layer.
This frosting border acts as a dam to hold the delicious raspberry filling in place, preventing it from oozing out the sides. Carefully spoon the cooled raspberry filling inside this piped border, spreading it evenly within the confines of the frosting dam. This creates a luscious, contained layer of fruit that complements the coconut cake beautifully.
Place the second cake layer on top of the raspberry filling, again with the top-side up. Repeat the process: spread a thin layer of frosting, pipe another dam around the edge, and fill it with raspberry filling. Finally, add the third cake layer, placing it top-side down. This ensures a flat surface for the final frosting. Apply a thin, even layer of cream cheese frosting over the entire cake; this is known as a crumb coat. Chill the cake in the refrigerator or freezer for 10 to 15 minutes until this crumb coat is firm to the touch.
Once chilled, apply the remaining frosting generously over the entire cake, smoothing the top and sides. Immediately press the cooled toasted coconut flakes all over the outside of the cake, adhering them to the frosting. You can also spoon extra raspberry filling over the top before adding the coconut for an extra burst of color and flavor, if desired. The cake is now ready to be admired and, more importantly, enjoyed.
Pro Tips for Coconut Cake with Raspberry Filling
Ensure Complete Cooling: Always allow the raspberry filling to cool down to room temperature, or even chill it further, before assembling the cake. If the filling is warm, it will melt the frosting border and cause the cake layers to slide. This is a critical step for structural integrity.
Embrace Full-Fat Dairy: For the richest flavor and the smoothest, most stable frosting texture, always opt for full-fat coconut milk and full-fat cream cheese. The higher fat content in these ingredients contributes significantly to the luxurious mouthfeel and delicious taste of the cake.
Chill for Clean Frosting: Applying a thin “crumb coat” of frosting and then chilling the cake briefly before the final frosting application is a game-changer. This seals in any loose crumbs, preventing them from marring the final, smooth frosting layer, and also helps the toasted coconut adhere more easily.
Gentle Folding is Key: When incorporating shredded coconut into the cake batter, use a gentle folding motion rather than aggressive mixing. Overmixing at this stage can develop the gluten too much, leading to tougher cake layers, and can also break down the shredded coconut too finely.
Toast Coconut with Vigilance: Toasted coconut adds a wonderful depth of flavor and texture, but it burns very quickly. Keep a close eye on it while toasting and stir constantly to ensure even browning and to prevent it from becoming bitter.
Serving Suggestions for Coconut Cake with Raspberry Filling
Decoration
The toasted coconut flakes provide a beautiful, snowy exterior that is classic and inviting. For an extra touch, consider piping small rosettes of cream cheese frosting around the top edge of the cake, or even dolloping a little extra raspberry filling in the center of each rosette. Fresh raspberries, either whole or halved, can also be artfully arranged on top for a vibrant pop of color and a hint of freshness.
A light dusting of powdered sugar through a stencil can add an elegant pattern, especially for holiday occasions. Edible flowers that complement the pink of the raspberries, such as violas or pansies, can also elevate the presentation. If you’ve made extra raspberry filling, a delicate drizzle over the top just before serving adds a glossy finish.
Side Dishes
A simple scoop of high-quality vanilla bean ice cream is a perfect accompaniment, offering a cool, creamy contrast to the cake’s flavors and textures. For a lighter option, a side of fresh berries, such as sliced strawberries or blueberries, can enhance the fruity element without competing. A dollop of lightly sweetened whipped cream can also add a cloud-like lightness.
If serving this cake as part of a larger dessert spread, consider pairing it with something that offers a different flavor profile, like a rich chocolate mousse or a tangy lemon tart. This allows guests to experience a variety of tastes and textures. However, the cake itself is so well-balanced that it truly shines when allowed to be the star, with minimal accompaniments.
Creative Serving Ideas
Consider serving individual cake slices alongside a delicate fruit coulis, perhaps made from passionfruit or mango, for an exotic twist. For a more casual gathering, deconstruct the cake elements by serving a small portion of cake, a spoonful of raspberry filling, and a quenelle of cream cheese frosting in a glass or small bowl, allowing guests to mix and match their bites. This makes for a fun and interactive dessert experience.
Transforming this cake into elegant dessert cups is another fantastic idea; layer crumbled cake, raspberry filling, and frosting in individual glasses for a charming presentation. For a brunch setting, serve smaller portions of this cake alongside a classic breakfast casserole or a platter of fresh fruit. This cake also pairs wonderfully with a cup of freshly brewed coffee or a delicate herbal tea, making it suitable for an afternoon treat.
Preparation & Storage
Storing Leftovers
Due to the presence of cream cheese frosting and the raspberry filling, this coconut cake must be stored in the refrigerator. Cover the cake loosely with plastic wrap or store it in an airtight cake carrier to prevent it from drying out. It will remain fresh and delicious for up to 4 days when kept properly chilled.
To enjoy the cake at its best after refrigeration, allow individual slices to sit at room temperature for about 15 to 20 minutes before serving. This brief resting period allows the frosting to soften slightly and brings the cake’s flavors and tender texture back to life, offering the optimal tasting experience. Avoid leaving the cake at room temperature for extended periods to maintain food safety.
Freezing
Individual slices of this coconut cake can be frozen for longer storage. Wrap each slice securely in plastic wrap, then in aluminum foil, and finally place them in an airtight freezer-safe container or a heavy-duty freezer bag. This triple layer of protection helps prevent freezer burn and preserve the cake’s quality.
Frozen cake slices can be stored for up to 2 months. To thaw, transfer the frozen slices to the refrigerator overnight. Once thawed, let them sit at room temperature for about 10-15 minutes before serving to achieve the best texture. While freezing whole cakes is possible, individual slices are generally easier to manage and thaw more evenly.
Reheating
Reheating is generally not recommended for this type of cake, as the cream cheese frosting and fruit filling are best served chilled or at cool room temperature. Attempting to reheat the cake could melt the frosting and make the cake layers soggy. The primary goal with this cake is to enjoy its cool, refreshing qualities.
If you prefer a slightly warmer cake experience, you could very gently warm a slice in a microwave on the lowest power setting for mere seconds, just to take the extreme chill off, but this is done at your own risk and is not the intended way to serve this delightful dessert. The natural refrigeration and subsequent brief period at room temperature provide the ideal balance of temperature and texture.
Frequently Asked Questions
-
Can I make the raspberry filling a day ahead of time?
Absolutely, and it’s highly recommended! The raspberry filling is an ideal component to prepare in advance, as it thickens further and develops its flavors as it chills. Store the cooled filling in an airtight container in the refrigerator. Before using it for assembly, give it a gentle stir to ensure it’s smooth and spreadable. This step significantly simplifies the cake assembly process and ensures the filling is perfectly set.
-
How do I prevent the cake layers from sliding during assembly?
Ensuring the cake layers do not slide is crucial for a stable and beautiful cake. A robust frosting border piped around the edge of each layer before adding the raspberry filling acts as a dam, effectively containing the fruit and preventing it from pushing the layers apart. It’s also vital that the raspberry filling is completely cooled and thickened. Finally, chilling the cake after the initial crumb coat solidifies everything, making the final frosting application much more secure and preventing any shifting.
-
Can I substitute fresh raspberries with frozen ones for the filling?
Yes, you can certainly use frozen raspberries for the filling. Thaw them completely before starting the cooking process, and drain off any excess liquid they may release. Cook them in the same manner as fresh raspberries, using the cornstarch slurry to ensure the filling thickens properly. Frozen berries might release a little more liquid initially, but the cornstarch will effectively bind it, resulting in a wonderfully thick and vibrant filling, ensuring your cake remains structurally sound and delicious.