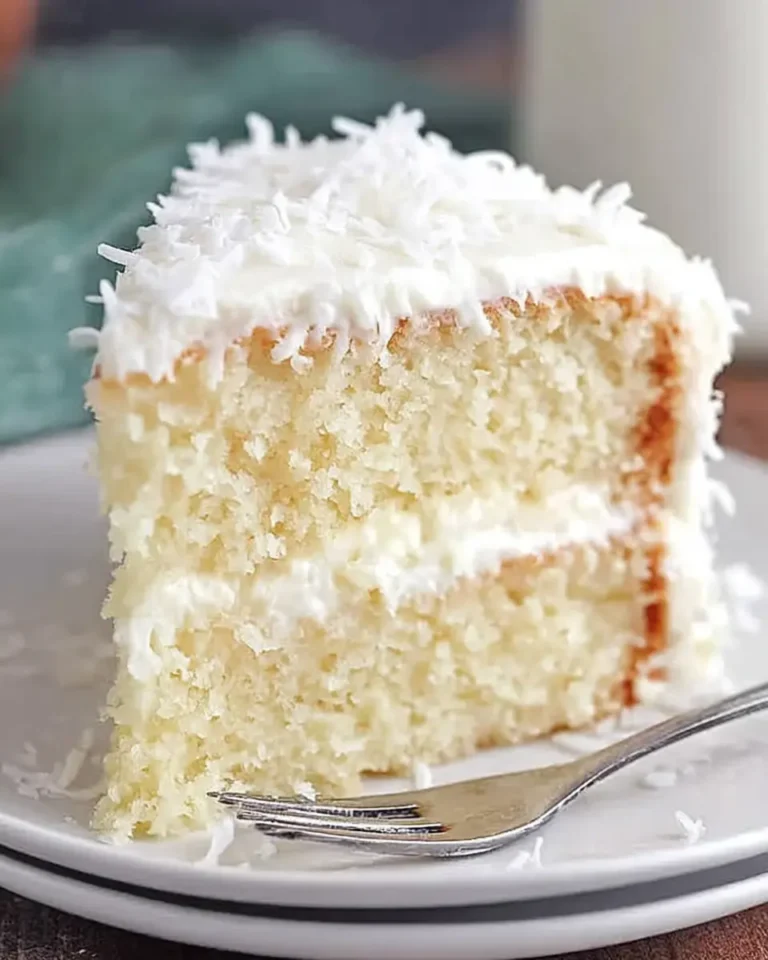
Coconut Cake with Buttercream Frosting
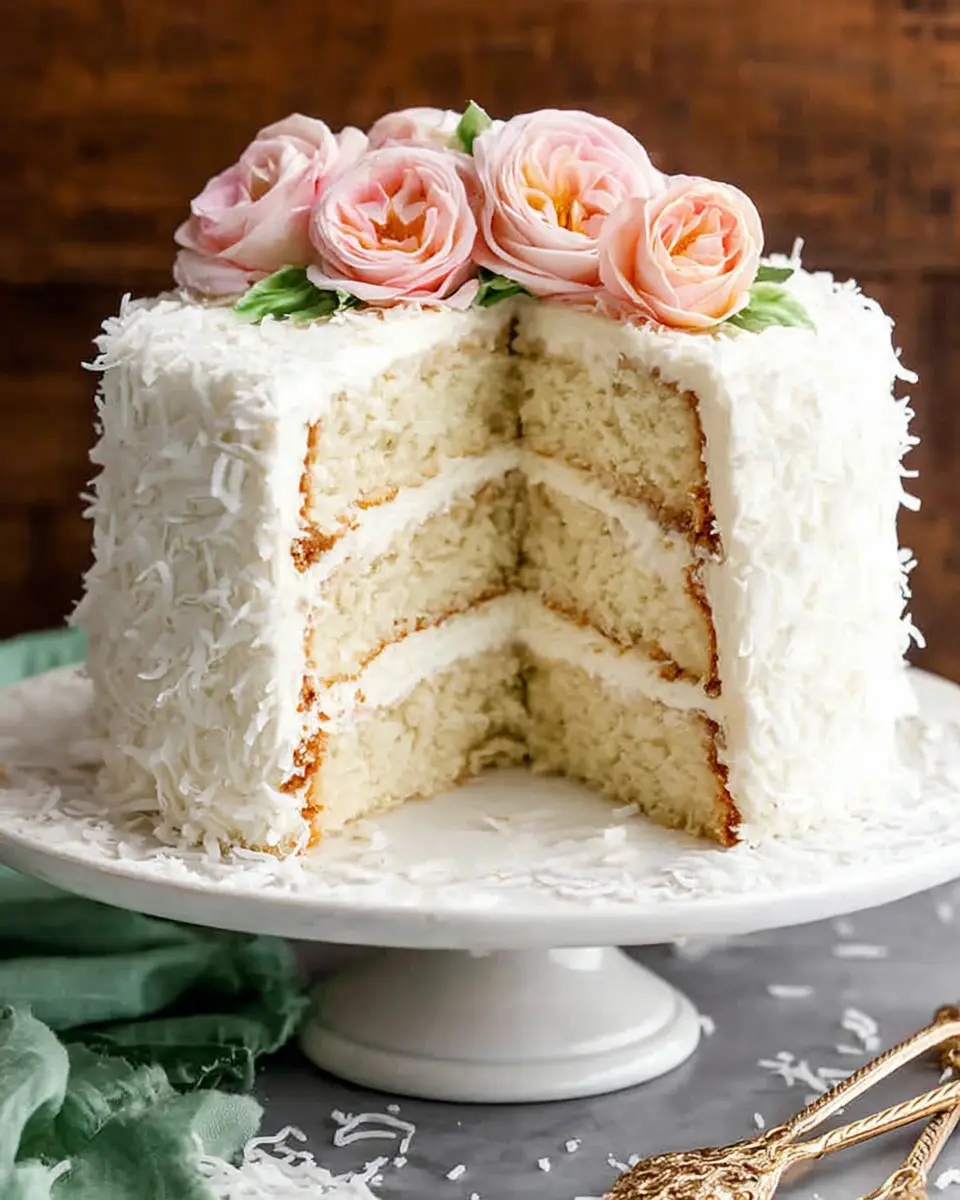
Coconut Cake with Buttercream Frosting is a tender, moist, and incredibly flavorful dessert that brings a touch of tropical paradise to any occasion. Its soft, airy crumb, rich coconut essence, and dreamy buttercream frosting make it a standout choice for celebrations, holidays, or simply when you crave a truly delightful homemade treat. This cake is designed to impress with its elegant presentation and even more so with its balanced, satisfying flavors.
The magic of this cake lies in its thoughtful combination of ingredients that work harmoniously to create a cake that is both delicate and satisfying. From the nuanced sweetness of the buttercream to the subtle yet pervasive coconut notes throughout, every element is crafted for a superior dessert experience. It’s the kind of cake that garners compliments and leaves a lasting impression on your guests.
Why You Will Love This Recipe
- Delicate Texture: The use of cake flour and egg whites creates an incredibly light and airy crumb that is a joy to bite into.
- Intense Coconut Flavor: From the coconut milk in the batter to the toasted coconut topping, each bite is infused with authentic coconut goodness.
- Rich Buttercream Frosting: A smooth, creamy buttercream infused with coconut and vanilla complements the cake layers perfectly without being overly sweet.
- Celebration Ready: This cake is structurally sound for stacking and decorating, making it an ideal centerpiece for birthdays, anniversaries, or holidays.
- Make-Ahead Friendly: The cake’s structure and flavor profile hold up beautifully when made a day in advance, easing your hosting stress.
Ingredients You Need
Selecting high-quality ingredients is paramount to achieving the exquisite flavor and texture of this Coconut Cake with Buttercream Frosting. Using the right type of coconut milk, fresh butter, and good quality flour will make a noticeable difference in the final outcome. Ensuring your dairy products are at the correct temperature also plays a crucial role in creating a smooth batter and luscious frosting.
Coconut Cake with Buttercream Frosting
A tender, richly flavored coconut layer cake prepared with canned coconut milk, sweetened shredded coconut, and egg whites for a soft, airy crumb. The layers are finished with a smooth coconut-vanilla frosting and coated with lightly toasted coconut for added texture and aroma.
- For the cake: 3/4 cup unsalted butter, softened to room temperature
- 1 cup sweetened shredded coconut
- 1 teaspoon fine salt
- 2 teaspoons baking powder
- 1/2 teaspoon baking soda
- 5 large egg whites
- 1/2 cup full-fat sour cream
- 2 teaspoons vanilla essence
- 1 cup canned unsweetened coconut milk (using the higher-fat variety rather than refrigerated coconut beverage)
- 1 2/3 cups granulated sugar
- 2 1/2 cups cake flour (preferably King Arthur for dependable texture)
- 1 teaspoon coconut flavoring
- For the frosting: 5 cups powdered sugar, sifted
- 1 cup unsalted butter, softened
- 8 ounces full-fat cream cheese, softened
- 2 tablespoons canned coconut milk
- 1/8 teaspoon salt
- 1/2 teaspoon vanilla essence
- 1/2 teaspoon coconut flavoring (preferably Schwartz)
- For the topping: 2 cups sweetened shredded coconut, lightly toasted
- 1Heat the oven to 350°F (177°C). Grease three 9-inch round cake pans, place parchment rounds in the bases, and lightly grease the parchment as well so the layers release cleanly after baking.
- 2In a medium bowl, whisk together the cake flour, baking powder, baking soda, and salt. Set the dry mixture aside.
- 3In a large mixing bowl, beat the softened butter with the granulated sugar on medium-high speed for about 2 minutes, until the mixture is pale and creamy. Scrape down the bowl as needed.
- 4Add the egg whites and beat just until incorporated. Mix in the sour cream, vanilla essence, and coconut flavoring. The batter may look slightly curdled at this stage, which is normal.
- 5With the mixer on low speed, add the dry ingredients and the coconut milk gradually, alternating as needed, and mix until combined. Fold in the shredded coconut by hand, making sure the batter is evenly blended and no pockets of butter remain. The finished batter should be somewhat thick.
- 6Divide the batter evenly among the prepared pans. Bake for 21 to 23 minutes, or until a toothpick inserted into the center comes out clean.
- 7Leave the cake layers in their pans to cool completely on a wire rack. Do not frost the cake until all layers are fully cooled.
- 8To make the frosting, beat the butter and cream cheese together on medium speed for about 2 minutes, until smooth and creamy.
- 9Add the sifted powdered sugar, coconut milk, vanilla essence, coconut flavoring, and salt with the mixer on low speed. Once incorporated, increase to high speed and beat for 3 minutes, until light and spreadable.
- 10Adjust the frosting only if needed. Add a little more powdered sugar if it seems too soft, or a small amount of coconut milk if it feels too firm. Taste and add a tiny extra pinch of salt if the sweetness needs balancing.
- 11If the cake layers have domed tops, level them carefully with a large serrated knife to create flat surfaces for stacking.
- 12Place the first cake layer on a serving plate or cake stand and spread about 1 1/2 cups of frosting over the top. Set the second layer over it and repeat with another layer of frosting. Add the final cake layer, then spread the remaining frosting over the top and sides of the cake.
- 13Scatter the toasted shredded coconut over the top and gently press additional coconut onto the sides so it adheres to the frosting.
- 14Refrigerate the finished cake for at least 20 minutes before slicing. This resting time helps the layers hold their shape neatly when served.
- cake flour: provides a soft, tender crumb that is essential for a delicate cake texture.
- unsalted butter: forms the rich base for both the cake and the frosting, contributing structure and a balanced flavor.
- granulated sugar: sweetens the cake layers while aiding in aeration when creamed with butter for a lighter texture.
- egg whites: are key to achieving the cake’s pale color and exceptionally light, fluffy crumb, minimizing density.
- canned coconut milk: delivers the most potent coconut flavor and a luxurious richness that lighter beverages cannot replicate.
- sour cream: adds essential moisture and a slight tang, ensuring the cake remains incredibly soft and tender.
- sweetened shredded coconut: infuses the cake batter with delightful texture and an extra layer of sweet coconut taste.
- baking powder and baking soda: are crucial leavening agents that ensure an even rise and a perfectly structured cake.
- salt: balances the sweetness, enhancing all the other flavors in the cake and frosting.
- cream cheese: lends a decadent creaminess and a subtle tang to the buttercream, cutting through the sweetness.
- powdered sugar: forms the smooth, spreadable base of the buttercream frosting, creating its signature texture.
- toasted coconut: provides a beautiful golden-brown finish, a wonderful aroma, and a delightful crunchy texture contrast.
The precise quantities for each ingredient can be found within the recipe card for your convenience.
Variations
For those seeking a twist on the classic, this Coconut Cake with Buttercream Frosting is wonderfully adaptable. Exploring different flavor profiles or dietary modifications can lead to exciting new versions of this beloved dessert.
Vegan Delight: To create a delicious vegan version, you can substitute the butter with a high-quality vegan butter alternative and use a flax egg or commercial egg replacer in place of the egg whites. For the sour cream, a thick, unsweetened vegan yogurt like coconut or soy yogurt would work beautifully. The buttercream can be made vegan by using vegan butter and cream cheese alternatives, ensuring all ingredients are plant-based for a compassionate and equally decadent treat. This variation still allows for that signature coconut flavor and tender crumb.
Low-Carb Indulgence: Adapting this cake for a low-carbohydrate lifestyle requires a few smart swaps. You can replace the granulated sugar with a keto-friendly sweetener like erythritol or xylitol, adjusting the amount to taste as sweeteners vary in intensity. For the cake flour, an almond flour and coconut flour blend can be used, though the texture might be slightly denser. The powdered sugar in the frosting can be replaced with powdered erythritol or a monk fruit blend, and for a richer, lower-carb frosting, you might consider adding a bit more cream cheese or heavy cream. This version caters to those managing sugar intake without sacrificing flavor.
Citrus Zest Infusion: Elevate the tropical theme by adding citrus zest to the cake batter and frosting. Lemon or lime zest, finely grated, pairs exceptionally well with coconut. Just a tablespoon or two of fresh zest added to the batter in Step 3 and a teaspoon incorporated into the frosting in Step 5 will impart a bright, refreshing counterpoint to the rich coconut and sweetness. This adds a sophisticated layer of flavor that makes the cake taste even more vibrant and summery.
How to Prepare Coconut Cake with Buttercream Frosting
Step 1: Preparing the Pans and Dry Ingredients
The foundation of any great cake lies in its meticulous preparation, and this Coconut Cake with Buttercream Frosting is no exception. Begin by preheating your oven to the specified temperature, ensuring it reaches optimal heat for even baking. This step is critical for allowing the cake to rise properly and develop its characteristic tender crumb without any part baking too quickly or too slowly.
Next, prepare your three 9-inch round cake pans. A thorough greasing is essential to prevent sticking, followed by lining the bases with parchment paper rounds. This double-layer of protection ensures that your delicate cake layers will slide out of the pans cleanly after baking, preserving their beautiful shape. A light re-greasing of the parchment paper adds an extra failsafe against any potential adherence.
In a medium-sized bowl, combine all the dry ingredients for the cake: cake flour, baking powder, baking soda, and fine salt. Whisk these together thoroughly until they are completely uniform. This ensures that the leavening agents and salt are evenly distributed throughout the flour, which is crucial for an even rise and consistent flavor in every bite of the finished cake. A well-mixed dry ingredient base prevents pockets of salt or baking powder from affecting the cake’s texture.
Step 2: Creaming Butter and Sugar, Adding Wet Ingredients
In a large mixing bowl, place the softened unsalted butter and the granulated sugar. Using an electric mixer, beat these together on medium-high speed for approximately two minutes. The goal here is to achieve a mixture that is visibly pale yellow and has a light, fluffy, creamy consistency. This process, known as creaming, incorporates air into the batter, which is vital for the cake’s tender and airy texture.
Once the butter and sugar are perfectly creamed, add the egg whites to the mixture. Beat them in just until they are fully incorporated into the batter. Following this, add the full-fat sour cream, vanilla essence, and coconut flavoring. Mix these ingredients until they are combined. At this stage, the batter might appear slightly curdled or separated, which is a perfectly normal reaction and should not cause alarm; this appearance will resolve as the other ingredients are added.
The slight curdling occurs due to the different fat and water content in the ingredients, but the starches in the flour and the fats from the butter and sour cream will emulsify everything into a smooth batter later on. Don’t be tempted to overmix at this stage; gentle incorporation is key to maintaining the airiness you’ve already built.
Step 3: Combining Batter and Folding in Coconut
With your electric mixer set to low speed, begin to gradually add the dry ingredients mixture and the canned coconut milk to the creamed butter and sugar mixture. It’s often best to alternate these additions, beginning and ending with the dry ingredients, if possible, to ensure everything blends smoothly without overworking the gluten in the flour. Mix only until the batter just comes together and no dry streaks of flour remain visible.
Once the batter is nearly combined, remove the mixer attachment and switch to a large spatula or a wooden spoon. Gently fold in the sweetened shredded coconut by hand. Folding is a technique that involves scooping down through the mixture, across the bottom, and then up and over, turning the bowl as you go. This method distributes the coconut evenly throughout the batter without breaking it down or deflating the air you incorporated earlier, ensuring delightful pockets of texture within the cake layers.
The finished batter should have a consistency that is somewhat thick but still pourable. This thickness is ideal for creating sturdy yet tender cake layers that will hold their shape well during baking and stacking. Avoid the temptation to add more liquid if the batter seems too thick; the texture is designed to be this way to accommodate the shredded coconut and produce the desired crumb.
Step 4: Baking and Cooling the Cake Layers
Carefully divide the prepared batter evenly among the three greased and parchment-lined 9-inch round cake pans. A kitchen scale can be helpful here to ensure each pan receives precisely the same amount of batter, which promotes uniform baking and ensures your cake layers will be of equal height, making stacking much easier and more stable. Smooth the tops of the batter in each pan with your spatula.
Place the filled pans into your preheated oven and bake for approximately 21 to 23 minutes. You will know the cakes are done when a wooden toothpick or cake tester inserted into the center of each cake comes out clean, with no wet batter clinging to it. The edges of the cakes should start to pull away slightly from the sides of the pans, and the tops should be lightly golden brown.
Once baked, remove the cakes from the oven and place the pans on a wire cooling rack. Allow the cake layers to cool completely in their pans. This is a crucial step; warm cakes are extremely delicate and prone to breaking or crumbling if you attempt to remove them too soon. Patience during the cooling process will result in perfectly intact cake layers ready for frosting, preserving their beautiful structure and crumb integrity.
Step 5: Preparing the Buttercream Frosting
While the cake layers are cooling, it’s time to prepare the luscious buttercream frosting that will tie everything together. In a large mixing bowl, combine the softened unsalted butter and the softened full-fat cream cheese. Using your electric mixer, beat these together on medium speed for about two minutes until the mixture is completely smooth and creamy. This creates a perfect base for the frosting, ensuring no lumps and a consistent texture.
Next, add the sifted powdered sugar, canned coconut milk, vanilla essence, coconut flavoring, and salt to the creamed butter and cream cheese mixture. Start the mixer on low speed to incorporate the powdered sugar gradually, preventing a cloud of sugar from erupting. Once the ingredients are roughly combined, increase the mixer speed to high and beat for an additional three minutes. This extended beating time is essential for developing a light, fluffy, and exceptionally spreadable frosting with a beautiful consistency.
After the initial beating, assess the frosting’s consistency. If it seems too soft or runny, you can add a little more sifted powdered sugar, one tablespoon at a time, until it reaches your desired firmness for spreading. Conversely, if the frosting appears too stiff or difficult to spread, add a very small amount of additional canned coconut milk, just a teaspoon at a time, until it becomes smooth and pliable. Taste the frosting and adjust seasoning if necessary, perhaps adding a tiny extra pinch of salt to balance the sweetness.
Step 6: Assembling and Decorating the Cake
Once your cake layers have completely cooled and your frosting is perfectly prepared, it’s time for the exciting part: assembly. If your cake layers have developed domed tops during baking, use a large serrated knife to carefully level them. This creates flat, even surfaces which are essential for stable stacking and a professional-looking finished cake. A gentle sawing motion works best for a clean cut.
Place the first leveled cake layer onto your serving plate or cake stand. Using an offset spatula, spread a generous layer of the prepared buttercream frosting evenly over the top of this first layer. Aim for about 1.5 cups of frosting for this layer to ensure ample sweetness and moisture between the cakes. Carefully set the second cake layer on top of the frosting, aligning its edges with the first layer. Repeat the process, spreading another generous layer of frosting over the second cake layer.
Finally, place the third cake layer on top. Use the remaining frosting to cover the top and the entire sides of the cake. Work from the center outwards for the top, and use long, smooth strokes for the sides. Once the cake is fully coated, scatter the lightly toasted shredded coconut over the top of the cake. Gently press additional toasted coconut onto the sides of the cake, allowing it to adhere to the frosting, creating a beautiful, textured finish that enhances the coconut theme.
Pro Tips for Coconut Cake with Buttercream Frosting
Perfectly Toasted Coconut: When toasting the shredded coconut for the topping, keep a close eye on it. You want it to be just lightly golden, not deeply browned. Over-toasted coconut can develop a bitter flavor that detracts from the cake’s delicate sweetness. A quick toast in a dry skillet over medium heat or a few minutes in a low oven (around 300°F/150°C) is usually sufficient. Let it cool completely before using it for decoration.
Room Temperature Ingredients are Key: For both the cake batter and the buttercream frosting, ensuring your butter, cream cheese, sour cream, and egg whites are at room temperature is incredibly important. Room temperature ingredients emulsify much more effectively, leading to a smoother batter and frosting with a lighter, more consistent texture. Cold ingredients can cause the batter to break or the frosting to become grainy.
Chill for Cleaner Slices: After the cake has been assembled and decorated, refrigerate it for at least 20 to 30 minutes before slicing. This chilling period allows the frosting to firm up slightly, which helps to set the layers. When you go to cut into the cake, the frosting will be more stable, resulting in much cleaner, neater slices, especially if you are aiming for a polished presentation.
Don’t Overmix the Batter: While you want to ensure all ingredients are combined, it’s crucial not to overmix the cake batter once the flour has been added. Overmixing develops the gluten in the flour excessively, which can lead to a tough, dense cake. Mix just until the ingredients are incorporated and no dry streaks remain visible, then proceed to folding in the coconut.
Taste and Adjust Frosting: The sweetness of powdered sugar can vary, and personal preference plays a role. Always taste your buttercream frosting before you consider it done. If it’s not sweet enough for your liking, add powdered sugar incrementally. If it’s too sweet, a tiny pinch of salt can help to balance it, or you can add a little more cream cheese or coconut milk for tang and moisture.
Serving Suggestions for Coconut Cake with Buttercream Frosting
Decoration
The toasted coconut is a classic and beautiful way to finish this cake, providing a lovely golden hue and a delightful texture. For an extra touch of elegance, consider adding some fresh edible flowers, like violas or pansies, scattered on top, or piping simple rosettes or borders around the edges of the cake using the buttercream. A dusting of edible glitter or fine shredded coconut can add a subtle shimmer that enhances its festive appeal.
Side Dishes
Fresh fruit is an excellent accompaniment to this rich coconut cake, offering a refreshing counterpoint. A simple bowl of mixed berries, such as strawberries, raspberries, and blueberries, adds vibrant color and a delightful tartness. Sliced fresh pineapple or mango chunks also complement the tropical theme beautifully, bringing a burst of juicy sweetness that pairs wonderfully with the coconut flavors.
Creative Serving Ideas
Instead of slicing whole layers, consider cutting the cake into smaller, elegant portions and serving them alongside a scoop of vanilla bean ice cream or a dollop of freshly whipped cream. For a more interactive dessert experience, you could offer a “build-your-own” topping bar with extra toasted coconut, fresh fruit, a drizzle of caramel sauce, or even a light coconut glaze on the side. This allows guests to customize their dessert to their own preferences, adding a fun element to your gathering.
Preparation & Storage
Storing Leftovers
To keep your Coconut Cake with Buttercream Frosting fresh and delicious, store any leftovers tightly covered in the refrigerator. The frosting, which contains cream cheese, requires refrigeration to maintain its quality and prevent spoilage. Ensure the cake is well-sealed with plastic wrap or placed in an airtight container to prevent it from drying out or absorbing other odors from the refrigerator. This method will help preserve the cake’s moist crumb and creamy frosting for up to 4 to 5 days.
Freezing
This cake is also quite amenable to freezing, which is a great option for preserving its deliciousness for longer periods or for making layers ahead of time. You can freeze the unfrosted cake layers very effectively. Wrap each cooled layer securely in a double layer of plastic wrap, followed by a layer of aluminum foil or a freezer-safe bag to prevent freezer burn. Unfrosted layers can be stored in the freezer for up to 2 to 3 months.
Reheating
There’s generally no need to “reheat” this cake as it is best served at a cool to room temperature. However, if you have refrigerated it and prefer a softer frosting and cake texture, simply take a slice out of the refrigerator and let it sit on the counter for about 15 to 20 minutes before serving. This brief resting period will allow the frosting to soften slightly and the cake’s flavors to become more pronounced, offering a more pleasant eating experience.
Frequently Asked Questions
-
Can I use regular all-purpose flour instead of cake flour for this recipe?
While it is possible to substitute all-purpose flour for cake flour, the texture of your cake will likely be different. Cake flour has a lower protein content, which results in a more tender and delicate crumb. Using all-purpose flour may lead to a slightly denser, chewier cake. If you must use all-purpose flour, you can try to “lighten” it by removing two tablespoons of flour per cup and replacing it with two tablespoons of cornstarch, then sifting this mixture several times to aerate it, mimicking cake flour more closely. However, for the best possible results and the intended delicate texture, cake flour is highly recommended.
-
My buttercream frosting seems too soft. How can I fix it without making it taste like pure sugar?
If your buttercream frosting is too soft, the most straightforward solution is to add more sifted powdered sugar, one tablespoon at a time, mixing well after each addition. Be patient, as it can take a few additions to achieve the desired consistency. If you find you’ve added too much powdered sugar and it’s becoming too stiff, you can introduce a small amount of additional liquid, such as a teaspoon of coconut milk or even a touch of heavy cream. If the issue is primarily a lack of structure rather than sweetness, ensuring your butter and cream cheese were sufficiently chilled before beating, and then beating for the full recommended time, can also help. Sometimes, a short stint in the refrigerator (about 10-15 minutes) can firm up a frosting that is slightly too soft, allowing you to then spread it more easily.
-
Can I omit the cream cheese from the frosting and just use butter?
Yes, you can omit the cream cheese from the frosting, but it will significantly change the texture and flavor profile of the buttercream. A traditional American buttercream is made primarily with butter and powdered sugar, often with a little milk or cream and vanilla. If you choose to omit the cream cheese, you would likely use a bit more butter (perhaps an additional half cup) and adjust the powdered sugar accordingly to achieve a spreadable consistency. The frosting will be sweeter and less tangy without the cream cheese, which provides a lovely contrast to the cake’s sweetness. For a similar tang without cream cheese, you could add a teaspoon of lemon juice or a tablespoon of sour cream to a butter-based frosting.