Coconut Cake with Seven-Minute Frosting
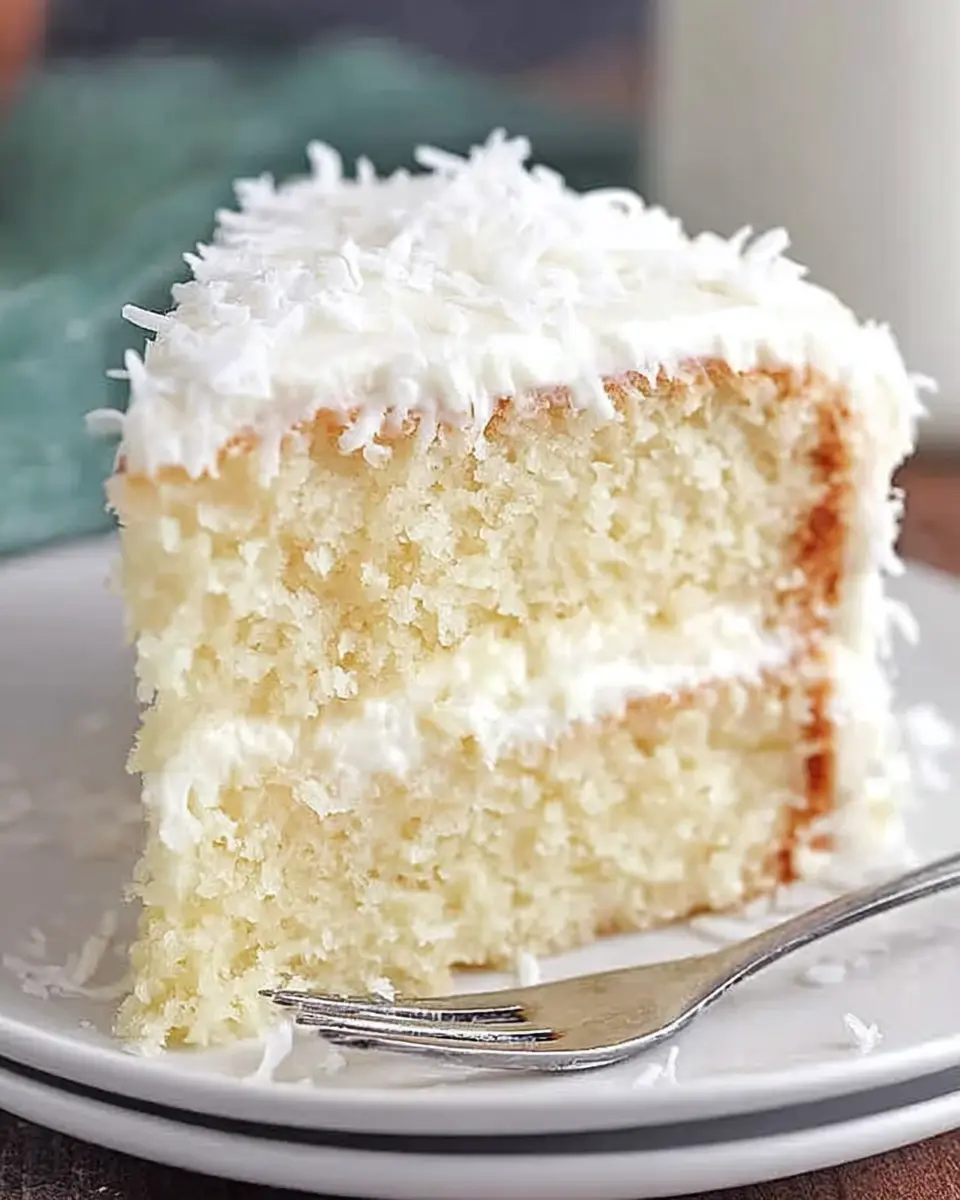
Coconut Cake with 7-Minute Frosting is a timeless classic, offering a delightful balance of tender cake and fluffy, sweet topping. It’s an approachable dessert, perfect for bakers of all skill levels seeking that quintessential coconut flavor. This cake embodies comfort and celebration in every slice.
The allure of this cake lies in its simplicity and the satisfying textures and tastes it delivers. From its moist, buttery crumb to the airy frosting and snowy coconut exterior, it’s a sensory delight. It’s the kind of dessert that evokes fond memories and creates new ones around the family table.
Why You Will Love This Recipe
- Effortless Elegance: Despite its impressive appearance, this cake is surprisingly easy to make, perfect for both special occasions and casual baking days.
- Perfect Texture Combination: The cake boasts a tender, moist crumb, beautifully complemented by the light and airy seven-minute frosting and a generous coating of sweet shredded coconut.
- Crowd-Pleasing Flavor: The classic combination of coconut, butter, and vanilla is universally loved, making this cake a guaranteed hit with guests of all ages.
- Beginner-Friendly: This recipe is designed for success, with straightforward steps that minimize the chance of error, even for novice bakers.
- Versatile Presentation: Whether baked in round layers or a single sheet pan, this cake offers a beautiful presentation that can be adapted to your needs and skill level.
Ingredients You Need
Selecting high-quality ingredients is paramount to achieving the best flavor and texture in your coconut cake. Using fresh butter, good quality vanilla, and finely shredded coconut will elevate the overall taste experience significantly. The foundation of this cake relies on simple pantry staples, enhanced by a few key flavor components.
Coconut Cake with 7-Minute Frosting

A classic coconut cake with a tender crumb, enriched with butter and buttermilk, then finished with a dependable seven-minute frosting and a generous coating of sweetened shredded coconut. This beginner-friendly dessert has a soft buttery crumb, a light cloudlike finish, and old-fashioned charm perfect for any occasion.
- Vegetable shortening (for greasing the pans)
- Flour (for coating the prepared pans)
- 1 cup unsalted butter (softened at room temperature)
- 2 cups granulated sugar
- 5 large eggs (separated with whites and yolks placed in separate bowls)
- 1 teaspoon vanilla extract
- 1 teaspoon coconut flavoring (such as imitation coconut extract)
- 2 1/2 cups all-purpose flour
- 1 teaspoon baking powder
- 1 teaspoon baking soda
- 1/4 teaspoon fine salt
- 1 cup buttermilk (brought to room temperature)
- A batch of reliable seven-minute frosting (such as a Joy of Cooking version)
- 2 cups sweetened shredded coconut (for topping and decorating)
- 1Preheat the oven to 350°F (175°C). Lightly coat two 9-inch round cake pans or one 9x13-inch pan with vegetable shortening, then dust with flour. Set the pans aside.
- 2In a large mixing bowl, beat the softened butter and sugar with an electric mixer on medium speed until the mixture becomes very smooth and creamy, allowing at least 4 minutes for proper aeration.
- 3Add the egg yolks, vanilla extract, and coconut flavoring to the butter mixture. Continue beating until the wet ingredients are fully incorporated.
- 4In a separate medium bowl, whisk together the all-purpose flour, baking soda, baking powder, and salt until evenly blended.
- 5Add the dry mixture and the room-temperature buttermilk gradually to the butter mixture. Beat on medium speed, scraping down the bowl as needed, until the batter is smooth and thoroughly combined, about 2 to 3 minutes.
- 6In a clean bowl, beat the egg whites until they hold soft peaks, then gently fold them into the batter.
- 7Divide the batter evenly between the prepared round pans, or spread it into the 9x13-inch pan. Bake until a toothpick inserted into the center comes out clean, about 25 to 30 minutes for round layers or 30 to 35 minutes for a 9x13-inch cake.
- 8Remove the cake from the oven and let it cool completely before adding the frosting.
- 9Once the cake has cooled, cover it with the seven-minute frosting in an even layer. Immediately scatter the shredded coconut over the top and gently press it onto the sides so it adheres well.
Keywords: Coconut Cake, 7-Minute Frosting, Classic Cake, Beginner Baking, Dessert, German Cuisine
The precise quantities for these essential ingredients can be found within the detailed recipe card, ensuring perfect proportions for a flawless bake.
Variations
For those looking to adapt this classic, several delicious variations can be explored. Imagine transforming this beloved coconut cake into a decadent chocolate-coconut delight. Simply incorporate about half a cup of unsweetened cocoa powder into the dry ingredients, ensuring it’s well sifted to avoid lumps, and consider reducing the flour slightly to maintain the perfect batter consistency. A swirl of melted dark chocolate over the finished frosting adds an extra layer of indulgence.
A lighter, perhaps more summery, variation could focus on citrus notes. Zest from one to two lemons or oranges can be added directly to the cake batter, infusing it with a bright, refreshing aroma and flavor. A simple glaze made from powdered sugar and fresh lemon juice, drizzled over the top instead of the seven-minute frosting, offers a wonderfully tangy counterpoint to the sweet coconut. This version is particularly delightful when served chilled.
For a healthier twist, consider a reduced-sugar version or one that incorporates whole wheat flour for added fiber. Replace a portion of the all-purpose flour with whole wheat flour and adjust the sugar down slightly, perhaps by a quarter cup, relying more on the natural sweetness of the coconut. You might also opt for a frosting alternative, such as a lighter whipped cream or a cream cheese frosting with a hint of coconut extract, to reduce the overall sweetness while still honoring the cake’s signature flavor profile. Each variation offers a unique way to enjoy the essence of coconut cake.
How to Prepare coconut cake with 7-minute frosting
Step 1: Oven and Pan Preparation
The initial step involves preheating your oven to a steady 350 degrees Fahrenheit (175 degrees Celsius). This ensures that the oven is at the optimal temperature when the batter is ready to bake, promoting even cooking and a beautiful rise. Simultaneously, prepare your chosen baking pans, which can be either two standard 9-inch round cake pans for a classic layered cake or a single 9×13-inch pan for a simpler, sheet-style dessert.
Thoroughly grease the insides of the pans using vegetable shortening or butter. This is a crucial step to prevent the cake from sticking, ensuring clean release after baking. Follow this by lightly dusting the greased pans with all-purpose flour. Tap out any excess flour; a thin, even coating is all that’s needed to create a non-stick barrier. This meticulous preparation guarantees that your beautifully baked cake will slide out of the pans intact, ready for its frosting transformation.
Step 2: Creaming Butter and Sugar
This stage is perhaps the most critical for achieving a light and airy cake texture. In a large mixing bowl, combine the softened unsalted butter and granulated sugar. The butter should be at room temperature, pliable but not melted, allowing it to cream effectively with the sugar. Using an electric mixer on medium speed, beat these two ingredients together for an extended period, aiming for at least 4 to 5 minutes.
The goal is to achieve a mixture that is exceptionally pale, fluffy, and creamy. This process, known as creaming, incorporates air into the batter, which will expand during baking and give the cake its signature lift and tender crumb. Do not rush this step; proper aeration here is key to a superior cake texture that is light and delicate, avoiding a dense or heavy result. The visual cue is a mixture that has significantly lightened in color and visibly increased in volume.
Step 3: Incorporating Wet Ingredients and Dry Components
Once the butter and sugar are perfectly creamed, it’s time to add the egg yolks, vanilla extract, and coconut flavoring. Beat these ingredients into the creamy butter-sugar mixture until everything is smoothly combined and homogenous. The egg yolks contribute richness and structure, while the vanilla and coconut flavoring provide the essential aromatic base for this classic dessert. Ensure the mixture is uniformly blended before proceeding to the next step.
In a separate medium bowl, whisk together the dry ingredients: all-purpose flour, baking soda, baking powder, and fine salt. Whisking thoroughly ensures that the leavening agents and salt are evenly distributed throughout the flour. This even distribution is vital for ensuring that the cake rises uniformly and that the flavors are consistent in every bite. Properly combining these dry elements beforehand prevents pockets of unincorporated ingredients in the final batter.
Step 4: Combining Wet and Dry Batters
Now, it’s time to bring the wet and dry components together to form the cake batter. To the creamed butter-sugar-egg mixture, you will gradually add the dry ingredients and the room-temperature buttermilk. It’s best to add them in alternating additions, beginning and ending with the dry ingredients. For instance, add about one-third of the dry mixture, mix until just combined, then add half of the buttermilk, mix, and repeat.
Continue this process, adding another third of the dry ingredients, the remaining buttermilk, and finally the last of the dry ingredients. Mix on medium speed, scraping down the sides of the bowl as needed, until the batter is smooth and all dry streaks have disappeared. It is crucial not to overmix the batter at this stage; overmixing can develop the gluten in the flour too much, resulting in a tougher cake crumb. Stop mixing as soon as the batter is smooth and cohesive, typically after about 2 to 3 minutes of combined mixing time.
Step 5: Folding in Egg Whites
This step is where the cake gains its remarkable lightness and tender texture, building upon the aeration achieved in the creaming stage. In a clean, dry bowl, whip the egg whites until they hold soft peaks. This means that when you lift the whisk, the peaks will curl over slightly. Be careful not to overbeat them to stiff peaks, as they will be more difficult to fold in smoothly.
Gently fold the whipped egg whites into the cake batter. Use a large spatula and a folding motion: cut down through the center of the batter, sweep across the bottom of the bowl, and then fold the batter over the egg whites. Rotate the bowl and repeat this motion until the egg whites are just incorporated. The batter should appear light and airy, with no visible streaks of egg white remaining. This careful folding preserves the air incorporated into the egg whites, contributing significantly to the cake’s delicate crumb.
Step 6: Baking and Frosting
Once your batter is prepared, divide it evenly between the two 9-inch round pans or spread it smoothly into the prepared 9×13-inch pan. Place the pans in the preheated oven and bake for approximately 25-30 minutes for the round layers, or 30-35 minutes for the 9×13-inch cake. The cake is done when a wooden skewer or toothpick inserted into the center comes out clean, and the top springs back lightly when touched.
Allow the cake to cool in the pans for about 10-15 minutes before inverting them onto a wire rack to cool completely. Once the cake has reached room temperature, it’s time for the frosting. Spread the seven-minute frosting evenly over the top and sides of the cake. Work quickly, as this frosting sets relatively fast. Immediately after frosting, generously scatter the sweetened shredded coconut over the entire cake, pressing it gently onto the sides and top with clean, dry hands to ensure it adheres beautifully and creates that iconic snowy appearance.
Pro Tips for coconut cake with 7-minute frosting
Room Temperature is Key: For the creamiest batter and most even bake, ensure your butter, eggs, and buttermilk are all at room temperature. This allows them to emulsify properly, creating a smooth, well-aerated cake that bakes beautifully without streaks or dense spots.
Don’t Overmix the Batter: While creaming the butter and sugar is crucial for air, once you start adding flour and liquid, mix only until just combined. Overmixing develops gluten, leading to a tough, rubbery cake. Stop as soon as you no longer see dry streaks.
Frost While Fresh: The seven-minute frosting is best applied and frosted immediately after it’s made and once the cake is completely cool. This frosting can deflate if left sitting too long, so having your cake ready to go is ideal for achieving that perfect, fluffy finish.
Gentle Coconut Coating: When applying the shredded coconut, use clean, dry hands to gently press it onto the frosted cake. Sprinkling from too high can cause it to fall off, while pressing helps it adhere securely for a full, even coverage that looks professional.
Test for Doneness Accurately: Use a thin skewer or toothpick inserted into the center of the cake to test for doneness. If it comes out clean with no wet batter clinging to it, your cake is ready. A slight moist crumb is acceptable, but raw batter indicates it needs more time in the oven.
Serving Suggestions for coconut cake with 7-minute frosting
Decoration
The signature decoration for this coconut cake is, of course, the abundant coating of sweetened shredded coconut. Ensure it’s pressed gently but firmly into the seven-minute frosting to create a dense, snowy exterior. For a touch of added elegance or color, consider adding a few maraschino cherries to the top layer of the cake, especially if it’s a round layer cake. A light dusting of powdered sugar can also add a delicate contrast against the white frosting and coconut.
Side Dishes
Complementing this sweet dessert doesn’t require complex side dishes. A simple fruit salad featuring seasonal berries like strawberries, raspberries, and blueberries provides a refreshing, slightly tart contrast to the cake’s sweetness. The vibrant colors of fresh fruit also add a beautiful visual appeal to the dessert table. Alternatively, a small scoop of vanilla bean or coconut ice cream can enhance the dessert experience, creating a delightful temperature and flavor interplay.
Creative Serving Ideas
For a sophisticated presentation, consider slicing the cake into smaller, elegant portions and serving them on individual dessert plates. A drizzle of raspberry coulis or a small dollop of whipped cream can elevate the presentation further. If serving for a celebration, use edible flowers or spun sugar for a truly show-stopping centerpiece. For a more casual gathering, serve slices alongside a warm cup of coffee or a refreshing glass of iced tea, allowing guests to customize their enjoyment.
Preparation & Storage
Storing Leftovers
Proper storage is essential to maintain the delightful texture of your coconut cake. If you plan to enjoy leftovers within a day or two, keep the cake covered at room temperature. A cake dome or an overturned bowl works well to protect it from air and contaminants. Ensure it’s stored in a cool, dry place away from direct sunlight to prevent the frosting from melting or the cake from drying out.
For longer storage, up to a week, refrigerating the cake is recommended. Before refrigerating, ensure it is well-covered to prevent it from absorbing any odors from other foods in the refrigerator. When you’re ready to serve a refrigerated slice, allow it to sit at room temperature for about 20-30 minutes before cutting. This allows the frosting to soften slightly and the cake’s crumb to regain its optimal texture, ensuring it tastes as fresh as possible.
Freezing
While the fully frosted cake is best enjoyed fresh or refrigerated, unfrosted cake layers can be frozen successfully. Once the baked cake layers have cooled completely, wrap them tightly in plastic wrap, followed by a layer of aluminum foil or place them in a freezer-safe airtight container. This double layer of protection helps prevent freezer burn and maintains the cake’s moisture. Frozen unfrosted layers can be stored for up to two months.
To thaw frozen cake layers, transfer them from the freezer to the refrigerator overnight. This gradual thawing process helps maintain the cake’s texture. Once thawed and closer to room temperature, they are ready to be frosted and decorated as usual. Freezing the unfrosted cake is the best way to preserve its quality for future enjoyment without compromising the delicate crumb.
Reheating
This coconut cake is not typically a dessert that benefits from reheating, as warming the seven-minute frosting can cause it to lose its characteristic airy texture and potentially become sticky or soupy. The best way to enjoy this cake, whether fresh, refrigerated, or thawed from frozen, is at cool room temperature. Allowing it to sit out for the recommended time will bring it back to its intended soft, fluffy state without altering the integrity of the frosting or cake.
Frequently Asked Questions
-
Can I make the seven-minute frosting ahead of time?
While it’s best to make the seven-minute frosting just before frosting the cake for optimal texture and volume, you can prepare the base ingredients and have them ready. However, the meringue-like structure is delicate and tends to deflate over time, so it’s highly recommended to whip and use it immediately after preparation. Having all your cake components cooled and ready is the best approach to timing.
-
Why is my cake dense and heavy?
A dense cake is often a result of overmixing the batter after the flour has been added, which develops the gluten too much. It can also be caused by not creaming the butter and sugar adequately to incorporate enough air, or by using leavening agents that have lost their potency. Ensuring your baking soda and baking powder are fresh and following the mixing instructions carefully, especially the folding of egg whites, is crucial for a light and airy crumb.
-
How can I achieve a professional-looking coconut coating?
To get a beautiful, even coating of coconut, apply it immediately after the frosting is spread while it’s still soft and sticky. Work over a baking sheet or a large tray to catch excess coconut, which can then be reused. Use clean, dry hands to gently press handfuls of coconut onto the sides and top of the cake. This method ensures better adhesion and a fuller coverage than simply sprinkling it from a distance.