Chicken Kiev – Easy and Classic Stuffed Chicken Recipe!
Prepare to embark on a culinary journey that celebrates crispy perfection and luscious, buttery indulgence. Chicken Kiev, a dish renowned for its dramatic presentation and sensational flavor, is a testament to the magic that happens when simple ingredients are transformed with a touch of technique and a generous heart.
This isn’t just another chicken dish; it’s an experience. Imagine a golden-brown, impossibly crunchy exterior giving way to succulent, tender chicken, all while a molten core of herbed garlic butter erupts with every bite. It’s a classic for a reason, offering a sophisticated yet approachable way to elevate your home cooking and impress your guests, or simply to treat yourself to something truly special.
Why You Will Love This Recipe
- Crispy Exterior: Achieved through a masterful combination of careful frying and baking, ensuring a satisfying crunch with every mouthful.
- Juicy Interior: The ingenious method of stuffing and sealing the chicken breast locks in moisture, guaranteeing a tender and succulent experience.
- Bursting with Flavor: The heart of this dish is the vibrant compound butter, infused with garlic, fresh parsley, and a bright hint of lemon zest, which melts and permeates the chicken as it cooks.
- Impressive Presentation: While remarkably easy to make, Chicken Kiev boasts an elegance that makes it perfect for special occasions or whenever you want to add a touch of flair to your meal.
- Customizable Core: The herbed butter filling can be adapted with various herbs and spices, allowing you to personalize this classic to your exact preferences.
Ingredients You Need
The beauty of Chicken Kiev lies in its accessible ingredients, which, when treated with care, deliver an extraordinary result. Opting for the freshest components will significantly enhance the final taste, making the effort truly worthwhile. You’ll find that the magic happens with the quality of the chicken and the vibrant flavor of the compound butter.
Chicken Kiev

Chicken Kiev is crispy crumbed chicken stuffed with lemony garlic and herb butter. It’s crunchy outside, juicy inside, and so delicious! This chicken recipe is a classic dish with loads of flavor, and it’s super simple to make. If you love the crunch of chicken Milanese and the extra flavor that comes from stuffed chicken, you’ll be head over heels for chicken Kiev!
- For the Butter
- 6 tablespoons unsalted butter, softened
- 2 cloves garlic, minced
- 2 tablespoons chopped fresh parsley
- ¼ teaspoon lemon zest, optional
- For the Chicken
- 4 chicken breast fillets, about 6 ounces each
- 1 cup all purpose flour
- salt and freshly ground black pepper, to taste
- 2 large eggs, beaten
- 2 cups panko breadcrumbs
- 1Combine the butter ingredients. Add softened butter, garlic, and parsley in a bowl. Stir well until combined. If you are using lemon zest, now is the time to add it.
- 2Chill. Place the butter on a piece of plastic wrap. Roll it into a log shape and twist the ends of the plastic wrap. Refrigerate the butter until firm.
- 3Pound the chicken. Place chicken breasts between two pieces of plastic wrap (one at a time) and pound with a meat mallet to ¼-inch thickness. Season the chicken to taste with salt and pepper.
- 4Roll the chicken. Cut the butter into four equal pieces. Place one piece of butter in the center of the pounded chicken. Fold the sides of the chicken breasts over the butter and roll from the narrower side until you have a log shape. Repeat with the remaining butter and chicken breasts.
- 5Wrap and freeze. Wrap the prepared chicken with plastic wrap and freeze for 30 minutes.
- 6Prepare the breading station. In the meantime, prepare the breading station. Add flour in a shallow wide bowl, with a pinch of salt and pepper. Stir to combine. Whisk the eggs with a pinch of salt and pepper in a separate bowl and add the panko breadcrumbs into the third bowl.
- 7Coat the chicken. Carefully remove plastic wrap from the chicken. Coat the chicken with flour, then eggs, shaking off the excess eggs. Finally, coat the chicken with panko breadcrumbs.
- 8Fry the chicken. Heat oil in a deep fryer to 375ºF. Meanwhile, preheat the oven to 350ºF. Fry the chicken for 1-2 minutes per side or until golden.
- 9Bake the chicken. Place a wire rack on top of the baking sheet. Add the fried chicken breasts to the wire rack and bake for 15 to 20 minutes or until the inner temperature reaches 165ºF.
- 10Rest and serve. Allow the chicken to rest for 5 minutes before serving and cutting.
Keywords: Chicken Kiev, stuffed chicken, garlic butter, herb butter, crispy chicken, fried chicken, baked chicken, German recipe
The specific quantities for these delightful components can be found within the detailed recipe card provided below.
Variations
While the classic Chicken Kiev is undeniably divine, its adaptable nature invites a world of exciting variations to suit different dietary needs and flavor preferences. Think of it as a canvas for your culinary creativity, ready to be painted with new and interesting tastes.
For those seeking a plant-based option, a “Mushroom Kiev” can be a revelation. Large portobello mushrooms, carefully hollowed out and stuffed with a mixture of sautéed mushrooms, garlic, herbs, and a touch of vegan butter or cream cheese, can be breaded and baked to achieve a similar satisfying crunch. This approach offers a hearty and flavorful vegetarian alternative that doesn’t shy away from the rich experience of the original.
If you’re exploring a lower-carbohydrate lifestyle, consider a “Parmesan Crusted Chicken Kiev.” Instead of traditional breadcrumbs, a mixture of finely grated Parmesan cheese, almond flour, and your favorite herbs can be used for the coating. This creates an equally crispy and flavorful crust while significantly reducing the carbohydrate count, making it a guilt-free indulgence for those mindful of their carb intake.
Another delightful twist involves infusing the butter with different flavor profiles. Imagine a “Spicy Chorizo Chicken Kiev,” where finely diced chorizo is added to the butter along with smoked paprika and a pinch of cayenne pepper. This introduces a smoky, subtly spicy kick that complements the richness of the chicken beautifully, offering a bold and exciting departure from the traditional lemon-herb blend.
How to Prepare chicken kiev
Step 1: Crafting the Luscious Compound Butter
The heart and soul of Chicken Kiev is undoubtedly its rich, aromatic compound butter. This is where the foundational flavors are built, setting the stage for the incredible taste experience that awaits. Taking the time to properly mix and chill this essential component is crucial for success.
Begin by ensuring your unsalted butter is at a perfectly softened, room temperature consistency. This makes it pliable and easy to work with, allowing for thorough incorporation of the other ingredients. In a small bowl, combine the softened butter with finely minced fresh garlic. The pungency of fresh garlic is unparalleled, offering a vibrant depth of flavor that dried garlic powder simply cannot replicate.
Next, add freshly chopped parsley to the mix. The bright, herbaceous notes of parsley are a classic pairing with butter and chicken, bringing a fresh, verdant quality to the rich base. If you’re feeling adventurous and want to add a personal touch, this is also the moment to incorporate a whisper of lemon zest. The zest provides a subtle, fragrant citrus note that beautifully cuts through the richness, adding a layer of complexity and brightness that elevates the entire dish.
Stir these ingredients together vigorously until they are thoroughly combined. You can use a spatula for this, working the ingredients into the butter, or employ a mortar and pestle for a more intensive blending process. The goal is a uniform mixture where the garlic and parsley are evenly distributed throughout the butter, ensuring consistent flavor in every bite of chicken.
Once mixed, transfer this flavorful butter onto a piece of plastic wrap or parchment paper. Shape it into a log, about 1 to 1.5 inches in diameter. This log shape is intentional, making it easy to slice into equal portions later. Twist the ends of the plastic wrap tightly to seal the butter log securely, preventing any contamination or drying out.
Now comes a critical step: chilling. Place the butter log in the refrigerator until it is completely firm. This hardening process is vital; it ensures that the butter will hold its shape and not melt and leak out prematurely when stuffed inside the chicken. A well-chilled butter log is the key to a clean and successful stuffing process.
Step 2: Preparing the Chicken Fillets
The chicken breasts are the vessels for our delicious butter, and their preparation is just as important as the butter itself. For Chicken Kiev, we need to transform thick chicken breasts into thin, pliable fillets that can be rolled without tearing. This process requires a bit of finesse but is remarkably straightforward.
Start by selecting good-quality, skinless, boneless chicken breast fillets. Aim for fillets that are roughly equal in size, which will help them cook evenly. Lay one chicken breast on a clean cutting board. To make the pounding process easier and prevent mess, cover the chicken breast with a piece of plastic wrap or a food-safe plastic bag. This also helps prevent the chicken from sticking to your mallet or rolling pin.
Using a meat mallet, the flat side of a tenderizer, or even a heavy rolling pin, gently but firmly pound the chicken breast. Start from the center and work your way outwards, applying even pressure. The aim is to flatten the chicken to a uniform thickness of about ¼ inch. Be careful not to pound too aggressively, as you don’t want to shred the meat; the goal is to create a tender, even surface that’s perfect for rolling.
Repeat this process for all the chicken breasts, ensuring each one is pounded to the same thickness. Once pounded, it’s essential to season the fillets. Lightly season both sides of each flattened chicken breast with salt and freshly ground black pepper. This initial seasoning is crucial for building flavor from the inside out. The salt enhances the natural taste of the chicken, while the pepper adds a subtle warmth.
After pounding and seasoning, you can proceed to the next step, which involves the prepared compound butter. The thinness of the pounded chicken is paramount; it allows for a neat roll and prevents the chicken from becoming tough during cooking. A well-prepared fillet is the foundation for a perfectly executed Chicken Kiev.
Step 3: Stuffing and Rolling the Chicken
This is where the magic truly begins to take shape, transforming simple chicken breasts into elegant parcels ready to burst with flavor. The careful stuffing and rolling process ensures that the precious compound butter remains encased within the chicken, creating that signature molten center.
Take your firm, chilled compound butter log out of the refrigerator. Using a sharp knife, carefully slice the butter log into four equal portions. Each portion should be roughly the same size, ensuring an even distribution of the flavorful filling among the chicken breasts. The butter should be firm enough to handle without melting significantly at this stage.
Lay one of your pounded and seasoned chicken breast fillets flat on your work surface. Place one portion of the compound butter directly in the center of the chicken fillet. Try to keep the butter as compact as possible in the middle to avoid any immediate leakage.
Now, begin the rolling process. Fold the sides of the chicken breast inward, over the butter, tucking them in snugly. This creates an initial seal, helping to contain the butter. Once the sides are folded, start rolling the chicken breast tightly from the narrower end towards the thicker end, much like you would roll up a burrito or a jelly roll. Apply gentle but firm pressure to create a compact, log-like shape.
The goal is to encase the butter completely within the chicken. If any butter does peek out slightly, try to tuck it back in as you roll. If you find the chicken is tearing, you may have pounded it too thin in places, or you might need to be a bit gentler with the rolling. The aim is a neat, sealed parcel.
Once each chicken breast is rolled around the butter, wrap each individual roll tightly in plastic wrap. Twist the ends of the plastic wrap to secure them, ensuring the chicken maintains its shape and that no butter can escape during the chilling or cooking process. Repeat this stuffing and rolling procedure with the remaining chicken breasts and butter portions.
After all the chicken breasts have been rolled and wrapped, place them on a plate or baking sheet. Now, transfer them to the freezer. This crucial freezing step allows the butter and the chicken to firm up considerably, making the rolls more stable and easier to handle during the breading process, significantly reducing the risk of leakage.
Step 4: Setting Up the Breading Station
A perfectly breaded exterior is key to achieving that signature golden crispiness of Chicken Kiev. This step involves setting up a streamlined “breading station” that allows for efficient and even coating of the chilled chicken rolls. Having everything prepped and ready in advance prevents the chicken from warming up too much.
You will need three shallow dishes or bowls for your breading station. In the first dish, place the all-purpose flour. Season the flour lightly with a pinch of salt and freshly ground black pepper. Whisk these dry ingredients together to ensure the seasoning is evenly distributed. This flour dredge acts as the first layer, providing a slightly sticky surface for the egg wash to adhere to.
In the second dish, crack your large eggs and whisk them thoroughly until they are well beaten and slightly frothy. You can add another pinch of salt and pepper to the eggs if you wish, further enhancing the flavor of the coating. The egg wash acts as the binder, holding the breadcrumbs to the chicken.
For the third dish, prepare your breadcrumbs. Panko breadcrumbs are highly recommended for Chicken Kiev because their larger, coarser texture creates an exceptionally crispy and golden crust. If you don’t have panko, regular fine breadcrumbs will also work, but the crunch factor might be slightly less pronounced. Ensure the breadcrumbs are spread out evenly in the dish.
Arrange these three dishes in a logical sequence: flour first, then eggs, and finally breadcrumbs. This order ensures a smooth and efficient breading process. Once the breading station is ready, and the chicken is sufficiently chilled from its time in the freezer, you’re all set to coat the chicken and prepare it for the next cooking stages.
A well-organized breading station not only makes the process easier but also ensures a more professional and even coating on your Chicken Kiev, contributing significantly to its final appearance and delightful texture. This meticulous preparation is a hallmark of achieving culinary excellence.
Step 5: The Art of Frying and Baking
This stage brings our Chicken Kiev closer to perfection, combining the rapid crisping power of frying with the thorough cooking of baking. This dual approach ensures a wonderfully crunchy exterior and a perfectly cooked, juicy interior.
First, prepare for frying. Heat a generous amount of neutral cooking oil in a deep fryer or a large, heavy-bottomed pot (like a Dutch oven) with tall sides. You’ll need enough oil to submerge the chicken rolls partially or fully, depending on your setup. Heat the oil to precisely 375°F (190°C). Using a thermometer is crucial here to maintain the correct temperature, ensuring the chicken fries efficiently without becoming greasy.
While the oil heats, preheat your oven to 350°F (175°C). It’s also a good idea to prepare a baking sheet lined with a wire rack. This wire rack allows hot air to circulate around the chicken, promoting even cooking and preventing the bottom from becoming soggy during baking.
Once the oil is at the correct temperature and the oven is preheated, carefully remove the chilled chicken rolls from their plastic wrap. Gently place them into the hot oil, being cautious not to overcrowd the pot. Fry the chicken for just 1 to 2 minutes per side. The goal here is not to cook the chicken through, but to achieve a beautiful golden-brown color on the exterior, forming the initial layer of crispiness.
Using a slotted spoon or tongs, carefully remove the partially fried chicken from the oil and place them onto the prepared wire rack set over the baking sheet. This quick frying step seals the breading and gives the chicken its initial crunch.
Now, transfer the baking sheet with the wire rack and chicken into the preheated oven. Bake for approximately 15 to 20 minutes. The exact baking time will depend on the thickness of your chicken breasts and your oven. The internal temperature of the chicken should reach 165°F (74°C) to ensure it is safely cooked through. An instant-read thermometer is your best friend here for accuracy.
After baking, remove the chicken from the oven. Resist the urge to cut into it immediately! Allow the chicken Kiev to rest on the wire rack for at least 5 minutes. This resting period is vital as it allows the juices within the chicken to redistribute, resulting in a more tender and moist final product. This careful balance of frying and baking is what elevates this dish.
Step 6: The Final Flourish – Resting and Serving
The journey of our exquisite Chicken Kiev is almost complete, and this final step, often overlooked, is paramount to achieving the most succulent and flavorful result. Patience during this phase is richly rewarded.
Once the Chicken Kiev has finished its baking time and registered the safe internal temperature of 165°F (74°C), it’s time to let it rest. Transfer the chicken from the oven and allow it to sit on the wire rack for a minimum of 5 minutes, but ideally up to 10 minutes. During this resting period, the muscle fibers in the chicken, which have tightened during cooking, begin to relax. This relaxation allows the flavorful juices that have been pushed to the center by the heat to redistribute throughout the meat.
This process is akin to resting a perfectly cooked steak; it’s what ensures that every bite is moist and tender, rather than dry and potentially bland. Skipping this step can lead to juices running out onto the plate when the chicken is cut, resulting in a less juicy final product. So, embrace the wait; it’s a crucial part of the culinary craft.
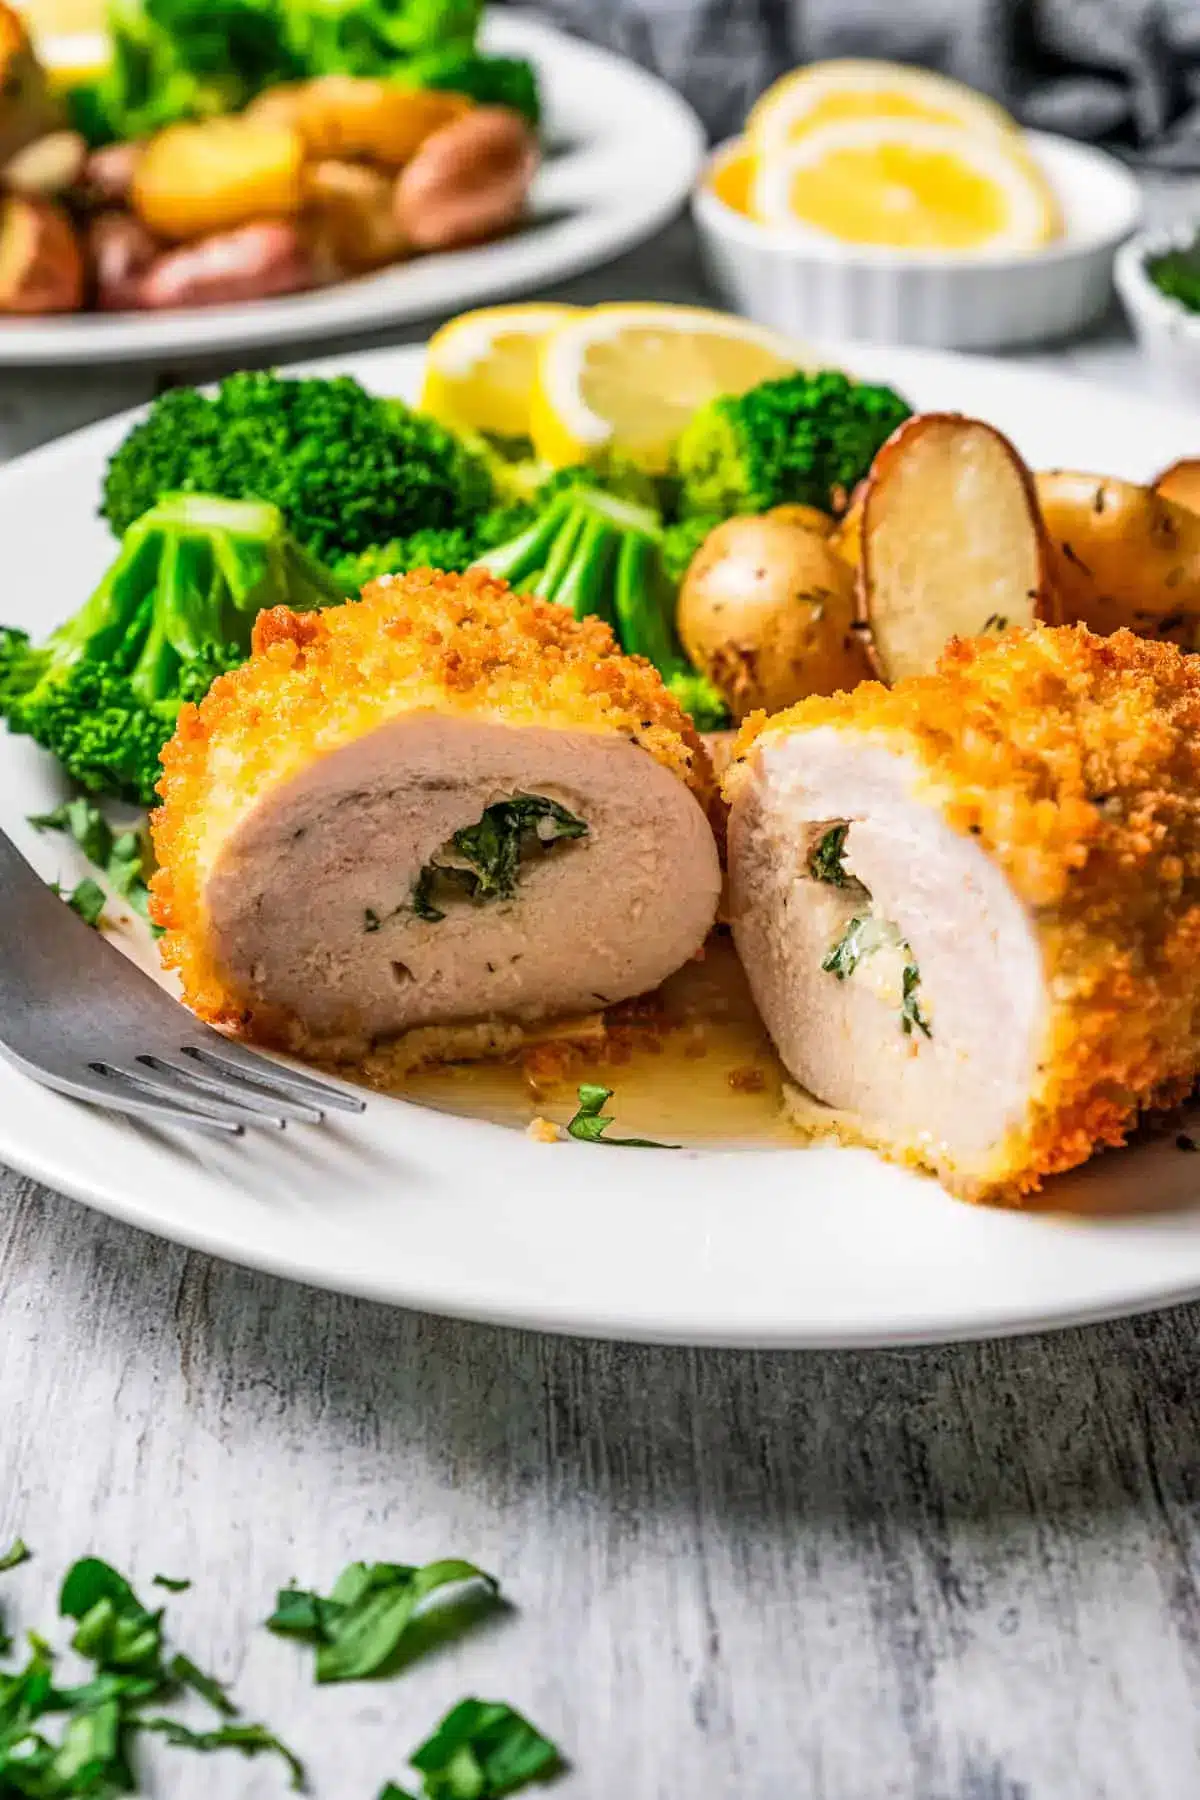
When the resting period is complete, your Chicken Kiev is ready to be presented and enjoyed. To serve, you can either place the whole, beautifully golden-brown chicken Kiev onto individual plates or slice them in half crosswise to reveal the luscious, melting garlic herb butter within. Slicing it open at the table can be a dramatic and delightful presentation, especially if you have guests.
Observe the molten butter oozing out – a visual testament to the success of your preparation. The combination of the crunchy breading, tender chicken, and the intensely flavored butter creates a symphony of textures and tastes that is truly unforgettable. Serve immediately while the butter is still warm and wonderfully molten, ensuring the peak of its flavor and texture.
Pro Tips for chicken kiev
Elevating your Chicken Kiev from simply delicious to truly spectacular often comes down to a few expert tips and tricks. These small adjustments can make a significant difference in the final outcome, ensuring a perfect crispiness and incredible juiciness every time.
Chill is Key: Always ensure your compound butter is thoroughly chilled and firm before stuffing it into the chicken. Furthermore, don’t skip the step of freezing the stuffed chicken rolls for at least 30 minutes before breading. This firming period is crucial; it helps the chicken maintain its shape during breading and significantly reduces the likelihood of butter leaking out during cooking.
The Importance of Dredging: When breading, ensure each layer is applied evenly. A light dusting of flour, followed by a good coating of egg wash, and then a thorough application of breadcrumbs is essential. Press the breadcrumbs gently onto the chicken to help them adhere well, creating a robust crust that will crisp up beautifully.
Oil Temperature Matters: For the initial frying step, maintaining the correct oil temperature of 375°F (190°C) is critical. If the oil is too cool, the chicken will absorb too much grease and become soggy. If it’s too hot, the breading will burn before the chicken is even close to cooked through.
Don’t Crowd the Pan: Whether you’re frying or baking, avoid overcrowding your cooking surfaces. Fry the chicken in batches if necessary, and ensure there’s space between the chicken pieces on the baking rack. This allows for proper air circulation, leading to a crispier exterior for all pieces.
The Science of Resting: Just like a prime steak, resting your cooked Chicken Kiev is non-negotiable. Allowing the chicken to rest for at least 5-10 minutes after baking enables the juices to redistribute throughout the meat. This simple step guarantees a supremely moist and tender chicken breast, making every bite an absolute delight.
Serving Suggestions for chicken kiev
Decoration
Garnish your beautifully golden Chicken Kiev with a final flourish of fresh chopped parsley. A delicate sprig of fresh dill or chives can also add a touch of elegance and a subtle aromatic note. For a pop of color, a thin slice of lemon or a few vibrant cherry tomatoes artfully placed on the plate can make the presentation truly shine. Consider a drizzle of a light sauce, like a lemon-butter reduction, around the plate for an added visual appeal and a complementary flavor.
Side Dishes
Balance the richness of Chicken Kiev with fresh, vibrant accompaniments. Creamy mashed potatoes are a classic pairing, providing a soft contrast to the crispy chicken. Roasted asparagus or steamed broccoli offer a welcome touch of green and a healthy element. For a more substantial meal, consider a side of fluffy rice pilaf or a medley of roasted root vegetables. A crisp green salad with a tangy vinaigrette cuts through the richness beautifully, offering a refreshing counterpoint to the decadent chicken.
Creative Serving Ideas
Transform your Chicken Kiev into a delightful appetizer by serving smaller, bite-sized versions. These can be perfect for parties or gatherings. Consider pairing the classic version with a side of crispy, oven-baked fries or seasoned potato wedges, creating a satisfying comfort food experience. For a lighter meal, serve it alongside a vibrant quinoa salad or a hearty lentil dish, showcasing the versatility of this classic preparation. You could also explore a fusion approach by serving it with an Asian-inspired slaw for an unexpected, yet delicious, flavor combination.
Preparation & Storage
Storing Leftovers
Should you be fortunate enough to have any leftover Chicken Kiev, proper storage is key to preserving its quality. Allow the chicken to cool completely to room temperature before storing it. Place the cooled chicken in an airtight container or wrap it tightly with plastic wrap and then aluminum foil. Stored correctly in the refrigerator, leftover Chicken Kiev can maintain its deliciousness for up to 3 days. The breading may soften slightly over time, but the flavor and tenderness of the chicken will remain excellent.
Freezing
Chicken Kiev freezes remarkably well, making it an excellent candidate for make-ahead meals. For best results, freeze the cooked and cooled chicken pieces individually. Wrap each piece tightly in plastic wrap, then in aluminum foil, or place them in a freezer-safe airtight container. Properly frozen, Chicken Kiev can be stored for up to 2-3 months. This allows you to have a gourmet meal ready to reheat on a busy weeknight.
Reheating
To reheat your Chicken Kiev and recapture its delightful crispiness, the oven is your best bet. Preheat your oven to 400°F (200°C). Place the frozen or refrigerated chicken on a wire rack set over a baking sheet, which allows for even heat circulation. Bake for approximately 20-30 minutes for frozen chicken, or 15-20 minutes for refrigerated chicken, or until the internal temperature reaches 165°F (74°C) and the breading is hot and crispy. Using the air fryer is also a great option for reheating, aiming for a similar temperature and time until heated through and crisp.
Frequently Asked Questions
-
How can I ensure the butter doesn’t leak out of my Chicken Kiev during cooking?
Preventing butter leakage is a common concern when preparing Chicken Kiev, but several techniques can significantly minimize this issue. Firstly, ensure the compound butter is thoroughly chilled and firm before stuffing it into the chicken. After stuffing and rolling, the crucial step is to freeze the wrapped chicken rolls for at least 30 minutes. This allows the butter and chicken to become very firm, making them less likely to melt and escape during the subsequent breading and cooking stages. When rolling the chicken, be sure to fold the sides in snugly before rolling to create a tight seal. Additionally, avoid overcooking; once the chicken reaches an internal temperature of 165°F (74°C), it is done, and prolonged cooking can increase the risk of leakage.
-
What are the best herbs and seasonings to use in the compound butter for Chicken Kiev?
The classic and most beloved combination for Chicken Kiev compound butter includes fresh parsley and garlic. Parsley offers a bright, herbaceous freshness that beautifully complements the richness of the butter and chicken. Finely minced garlic provides a pungent, savory depth that is essential to the dish’s characteristic flavor profile. While these are traditional, you can absolutely get creative! Consider adding finely chopped chives for a mild oniony note, a hint of thyme or rosemary for a more robust aroma, or even a touch of dill for a subtle anise-like flavor. Lemon zest, as included in this recipe, is a wonderful addition that brightens the butter and cuts through the richness, creating a more balanced and complex taste. Experiment with your favorite fresh herbs to personalize your Chicken Kiev.
-
Why is it important to fry the Chicken Kiev before baking, and can I skip this step?
The dual cooking method of frying and then baking is a hallmark of achieving the perfect Chicken Kiev. The initial brief fry at high heat (375°F/190°C) is primarily to achieve a rapid, even golden-brown crispiness on the breaded exterior. This step creates the signature crunchy coating that is so desirable. While it doesn’t cook the chicken through, it sets the stage for that perfect texture. If you choose to skip the frying step, you will need to increase the baking time significantly to ensure the chicken cooks through completely and the breading develops a crisp texture. You would likely bake the chicken at around 375°F (190°C) for 25-35 minutes, or until it reaches an internal temperature of 165°F (74°C) and the breading is golden and crisp. However, be aware that omitting the frying step may result in a slightly less intensely crispy breading compared to the traditional method.