Cheesy Chicken Cannelloni Recipe – How to Make Cannelloni!

Embark on a culinary journey with this delightful baked chicken cannelloni, a dish designed to impress both your family and your taste buds. Its comforting embrace and rich flavors promise a truly satisfying meal that feels both sophisticated and incredibly approachable.
This recipe transforms simple ingredients into an elegant entree, perfect for a cozy weeknight dinner or a special occasion. Get ready to discover your new favorite way to enjoy pasta and chicken.
Why You Will Love This Recipe
- Effortless Elegance: Creates a restaurant-worthy dish with straightforward steps, making it ideal for any home cook.
- Flavorful Filling: A harmonious blend of tender chicken, creamy ricotta, and vibrant spinach offers a taste sensation in every bite.
- Rich Creamy Sauce: The velvety sauce ties everything together beautifully, enhancing the overall indulgence of the cannelloni.
- Family-Friendly Appeal: This classic comfort food is universally loved and is sure to be a hit with both children and adults alike.
- Make-Ahead Convenience: Prepare most of the dish in advance, saving you precious time on busy evenings.
Ingredients You Need
Crafting this exquisite chicken cannelloni begins with selecting high-quality ingredients that promise to deliver exceptional flavor. The synergy of each component, from the pasta itself to the fresh produce and dairy, is crucial for achieving that perfect balance. We believe that using the freshest, most flavorful ingredients is the cornerstone of any truly memorable dish.
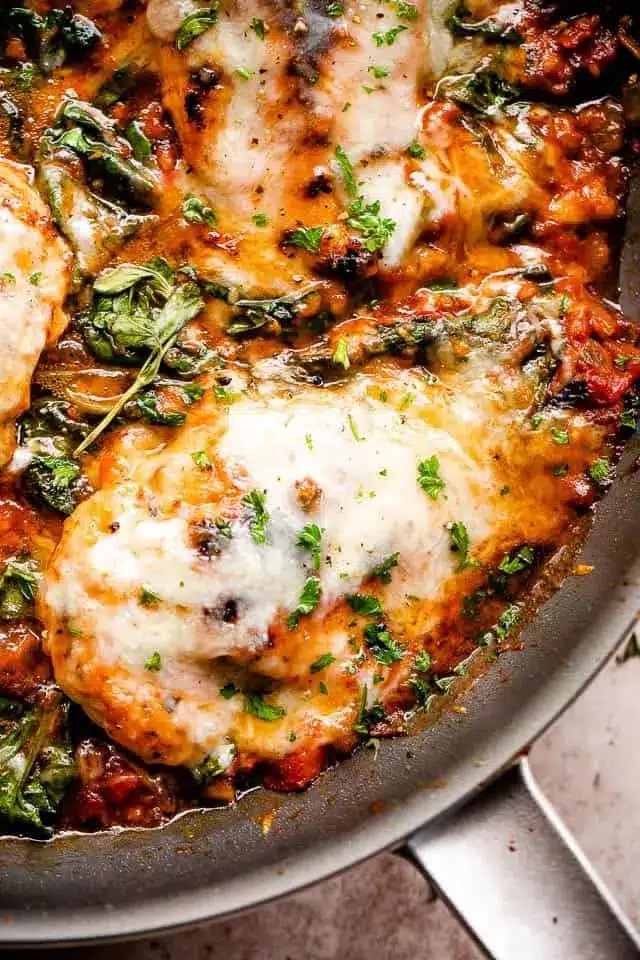
Cheesy Baked Cannelloni with Chicken
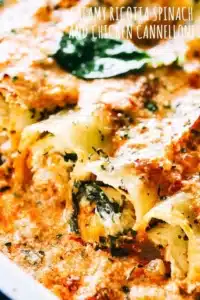
This recipe makes tender cannelloni stuffed with cheesy chicken, ricotta, and spinach, baked in creamy sauce. An easy family dinner, and so tasty!
- 12 cannelloni tubes
- 1 tablespoon olive oil
- 1 yellow onion, diced
- 2 cloves garlic, minced
- 3 cooked chicken breasts, finely chopped
- ½ cup milk
- 1 cup part-skim Ricotta cheese
- 8 to 10 ounces baby spinach
- salt and freshly ground black pepper, to taste
- 1 cup pasta sauce
- 1½ cups half-and-half
- ¼ cup grated Parmesan cheese
- ½ teaspoon dried basil
- ¼ teaspoon dried oregano
- ⅛ teaspoon ground nutmeg
- salt and freshly ground black pepper, to taste
- 1Par-cook the cannelloni: Cook the cannelloni tubes in boiling water for 5 minutes; rinse and set aside to cool for a few minutes, or just until cool enough to handle.
- 2Prepare to bake: Preheat the oven to 400ºF.
- 3Sauté: Heat the oil in a large skillet over medium-high heat. Add the onions and sauté for 2 minutes; stir in the garlic and chicken, and continue cooking for 4 minutes.
- 4Make it creamy: Add the milk and let it simmer for 2 minutes, or until most of the liquid has evaporated. Stir in the ricotta cheese until well blended.
- 5Add the spinach: Add the spinach and cook for 1 to 2 minutes, or until wilted. Remove from heat and let stand a few minutes, or until cool enough to handle.
- 6Stuff the cannelloni: Spoon pasta sauce on the bottom of a 9x13 baking dish and set aside. Using a spoon, your hands, or a piping bag, stuff the prepared chicken mixture into cannelloni tubes.
- 7Assemble: Arrange the cannelloni in a single layer on the bottom of the baking dish, over the pasta sauce. Set aside.
- 8Make the sauce: In a mixing bowl, whisk together the half-and-half, parmesan, basil, oregano, nutmeg, salt, and pepper until thoroughly combined. Pour the half-and-half mixture over the cannelloni.
- 9Bake: Transfer the baking dish to the oven and bake for 18 to 20 minutes, or until the top is golden brown and the cream is reduced.
- 10Finish and serve: Remove from the oven and let it rest for 3 to 5 minutes, or until the sauce thickens slightly. Spoon the sauce over the cannelloni and serve.
Keywords: chicken cannelloni, baked pasta, italian dinner, cheesy pasta, spinach ricotta
The exact quantities for each item are conveniently listed in the printable recipe card below, ensuring you have everything you need for a flawless preparation.
Variations
For those seeking a lighter, more vegetable-forward option, consider a delightful zucchini cannelloni variation. Instead of pasta tubes, carefully hollow out medium-sized zucchini and fill them with the seasoned chicken and ricotta mixture. These will bake beautifully, absorbing the flavors of the sauce and offering a wonderfully fresh twist on the original dish. This approach also adds an extra serving of greens to your meal.
A vegetarian delight can be achieved by omitting the chicken entirely and focusing on a rich spinach and ricotta filling, perhaps enhanced with sautéed mushrooms and sun-dried tomatoes for added depth. You could also explore a delightful “no-boil” lasagna noodle variation, where you layer the filling between cooked lasagna sheets instead of stuffing tubes. This simplifies the assembly process significantly.
For a low-carb adaptation, you could explore using large portobello mushrooms as your vessel, stuffing them with the chicken and cheese mixture and baking until tender. Another creative approach involves using thinly sliced eggplant, brushed with olive oil and roasted briefly before being rolled up with the filling. This offers a satisfying texture and a beautiful presentation, proving that this dish can be adapted to various dietary preferences with exciting results.
How to Prepare chicken cannelloni
Step 1: Prepare the Cannelloni Tubes
The first crucial step involves preparing the cannelloni tubes for their delicious filling. Bring a large pot of salted water to a rolling boil. Carefully add the dry cannelloni tubes to the boiling water. It’s important to note that not all brands require pre-cooking, but it’s a recommended safeguard to ensure the pasta is perfectly tender after baking.
Allow the cannelloni tubes to boil for approximately 5 minutes. This par-boiling step helps to soften them just enough so they cook through completely in the oven without becoming mushy. Once the time is up, carefully drain the pasta and rinse it under cool water. This rinsing helps to stop the cooking process and makes the tubes easier to handle for stuffing.
Set the par-cooked cannelloni tubes aside to cool slightly. They should be cool enough to comfortably handle, allowing you to stuff them without burning your fingers. This preparation ensures that the pasta provides the perfect vessel for the rich, flavorful filling awaiting it.
Step 2: Sauté the Aromatics and Chicken
While the cannelloni tubes are cooling, begin crafting the savory filling. Heat a tablespoon of olive oil in a large skillet or Dutch oven over medium-high heat. Add the finely diced yellow onion to the hot oil. Sauté the onion for about 2 minutes, stirring frequently, until it begins to soften and turn translucent. This process releases its natural sweetness.
Next, stir in the minced fresh garlic and the finely chopped cooked chicken. Continue to cook for another 4 minutes, stirring occasionally, until the garlic is fragrant and the chicken is heated through. If you are using pre-cooked chicken, such as rotisserie chicken, ensure it is well chopped or shredded to distribute evenly within the filling. For ground chicken, ensure it is fully cooked and any excess fat has been drained.
The combination of sautéed onions, garlic, and chicken forms the flavorful base of our cannelloni filling. This aromatic foundation is essential for developing the deep, satisfying taste that defines this classic dish. Ensure the ingredients are thoroughly combined before moving on to the next stage of filling preparation.
Step 3: Create the Creamy Filling Base
Introduce the milk to the skillet with the chicken and onion mixture. Allow this to simmer gently for approximately 2 minutes. The goal here is for the milk to reduce slightly, creating a subtle creamy base that will bind the ingredients together beautifully. Stir the mixture occasionally as it simmers to prevent sticking.
Once the milk has reduced and thickened slightly, stir in the part-skim ricotta cheese. Continue to stir until the ricotta is thoroughly blended with the chicken and onion mixture, creating a cohesive and creamy filling. The ricotta cheese is key to achieving that signature smooth and rich texture characteristic of classic cannelloni fillings. Ensure there are no dry lumps of ricotta remaining.
This step is where the filling truly begins to come together, transforming into a luscious mixture ready to be combined with the spinach. The gentle simmering of the milk with the other ingredients ensures a harmonious blend of flavors and textures, setting the stage for the final assembly.
Step 4: Incorporate the Spinach and Seasonings
Now it’s time to add the fresh baby spinach to the skillet. If you are using frozen spinach, ensure it has been thoroughly thawed and all excess moisture has been squeezed out to prevent a watery filling. Add the spinach to the skillet with the chicken and ricotta mixture. Cook for another 1 to 2 minutes, stirring continuously, until the spinach has wilted down completely.
Remove the skillet from the heat. Allow the filling mixture to stand for a few minutes, or until it’s cool enough to handle. This cooling period allows the flavors to meld and also makes it easier to stuff the cannelloni tubes without the filling being too hot. Season the mixture generously with salt and freshly ground black pepper to taste. Properly seasoning at this stage is vital for a well-balanced final dish.
This savory and tender filling is now perfectly prepared to be nestled inside the cannelloni tubes. The vibrant green spinach not only adds a pop of color but also contributes essential nutrients and a fresh counterpoint to the richness of the cheese and chicken. The aroma at this stage is incredibly inviting.
Step 5: Assemble the Cannelloni in the Baking Dish
Prepare your 9×13 inch baking dish by spreading a thin, even layer of your favorite pasta sauce across the bottom. This bottom layer of sauce not only adds an extra burst of flavor but also helps to prevent the cannelloni from sticking and ensures they cook evenly. Use a good quality marinara or your preferred pasta sauce for this step.
Now, carefully stuff the prepared chicken mixture into each of the cooled cannelloni tubes. You can achieve this by using a small spoon, your fingers, or for a cleaner and more efficient method, a piping bag fitted with a large tip. Fill each tube generously but avoid overstuffing, which could cause them to split during baking. Ensure each tube is well-filled to maximize the deliciousness in every bite.
Arrange the stuffed cannelloni tubes in a single layer over the pasta sauce in the prepared baking dish. Try to place them snugly side-by-side to create a beautiful and cohesive presentation. This orderly arrangement is key to ensuring even cooking and a delightful visual appeal once the dish is baked to perfection.
Step 6: Prepare and Add the Creamy Sauce, then Bake
In a separate mixing bowl, whisk together the half-and-half, grated Parmesan cheese, dried basil, dried oregano, ground nutmeg, and a pinch of salt and pepper. Ensure all the ingredients are thoroughly combined, creating a smooth and luscious cream sauce. The nutmeg, though used sparingly, adds a subtle warmth that complements the dairy and herbs beautifully. Taste and adjust seasonings as needed.
Carefully and evenly pour this creamy sauce over the arranged cannelloni tubes in the baking dish. Ensure that the sauce covers the top of the cannelloni, allowing them to bake in a rich, creamy bath. This sauce will bubble and thicken in the oven, creating a wonderfully indulgent topping.
Preheat your oven to 400°F (200°C). Transfer the baking dish to the preheated oven. Bake for 18 to 20 minutes, or until the top of the sauce is golden brown and has thickened beautifully. The cannelloni should be bubbling around the edges. Once removed from the oven, let the dish stand for 3 to 5 minutes to allow the sauce to thicken slightly further before serving.
Pro Tips for chicken cannelloni
Embrace the Piping Bag: For the cleanest and most efficient stuffing of cannelloni tubes, a piping bag is your best friend. Load your chicken and spinach mixture into a large piping bag (or a sturdy zip-top bag with a corner snipped off) and pipe the filling directly into each tube. This method ensures even filling and minimizes mess.
Quality Cheese Matters: While pre-grated Parmesan is convenient, investing in a block of good quality Parmesan and grating it yourself will significantly elevate the flavor of the creamy sauce. Freshly grated cheese melts more smoothly and offers a more intense, nutty profile.
Don’t Skip the Resting Time: After baking, allowing the cannelloni to rest for 5-10 minutes is essential. This brief period allows the creamy sauce to set and thicken slightly, making it easier to serve and preventing it from being too runny. It also ensures the filling has a moment to settle within the pasta.
Pre-Cook with Caution: If you’re unsure about whether your cannelloni tubes will cook through, par-boiling for 5 minutes is a wise precaution. However, be careful not to overcook them at this stage, as they will continue to cook in the oven. Aim for al dente, as they will soften further.
Leftover Rotisserie Chicken is a Game Changer: Utilizing leftover rotisserie chicken is an excellent shortcut for this recipe. It’s already cooked, seasoned, and tender, saving you a significant amount of prep time. Simply shred or chop it finely and incorporate it into the filling.
Serving Suggestions for chicken cannelloni
Decoration
Elevate the visual appeal of your chicken cannelloni with a final flourish of fresh herbs. A sprinkle of finely chopped fresh parsley or chives over the top just before serving adds a burst of color and a hint of freshness that beautifully contrasts with the rich, creamy sauce. A few delicate basil leaves can also add an aromatic and elegant touch.
Side Dishes
This hearty baked pasta dish pairs wonderfully with a crisp, refreshing green salad. A simple mixed greens salad with a light vinaigrette provides a balancing acidity and freshness that cuts through the richness of the cannelloni. Another excellent accompaniment would be crusty garlic bread or warm, soft dinner rolls, perfect for sopping up every last drop of that delicious creamy sauce.
Creative Serving Ideas
For a more refined presentation, consider serving individual portions of cannelloni in shallow bowls, ensuring each serving gets a generous amount of the luscious sauce. You could also arrange the cannelloni artfully on a large platter, garnished with those fresh herbs, for a family-style serving that encourages communal enjoyment. A drizzle of high-quality olive oil around the platter can add an extra layer of sophistication.
Preparation & Storage
Storing Leftovers
Leftover chicken cannelloni can be stored in an airtight container in the refrigerator for up to 3-4 days. Ensure the dish has cooled completely before sealing the container to prevent condensation. Covering the dish tightly helps maintain the moisture and flavor of the cannelloni and sauce.
Freezing
While this recipe is generally best enjoyed fresh, it can be frozen. It is often recommended to freeze the cannelloni *unbaked* if possible. Prepare the dish as directed, cover it tightly with plastic wrap and then foil, and freeze for up to 2-3 months. If freezing baked leftovers, the creamy sauce might change texture slightly upon reheating.
Reheating
To reheat baked cannelloni, place the desired portion in an oven-safe dish, cover with foil, and bake at 350°F (175°C) until heated through, usually 20-30 minutes. If reheating from frozen, thaw overnight in the refrigerator and then bake as directed, potentially adding a splash of milk or cream to the sauce if it appears dry. For smaller portions, reheating gently in a microwave is also an option, though it may not achieve the same crispy topping.
Frequently Asked Questions
-
Can I use different types of pasta instead of cannelloni tubes?
Absolutely! If you can’t find cannelloni tubes, manicotti shells are an excellent substitute, as they are similarly shaped for stuffing. Jumbo pasta shells are also a fantastic option; simply cook them according to package directions until al dente, then stuff and bake. For an even more adventurous approach, you could use lasagna sheets, boiled until pliable, then spread with the filling and rolled up like a roulade before placing them in the baking dish and topping with the sauces. Each alternative offers a slightly different texture and presentation but will result in a delicious baked pasta dish.
-
How can I make the filling richer or more decadent?
To enhance the richness of the filling, you can substitute some or all of the part-skim ricotta with whole milk ricotta for a creamier texture and more luxurious mouthfeel. Another decadent addition would be to incorporate a small amount of shredded Gruyère or fontina cheese directly into the chicken and ricotta mixture for an added layer of nutty flavor and extra creaminess. If you desire an even more indulgent creamy sauce, consider using heavy cream instead of half-and-half, though this will significantly increase the fat content.
-
What is the best way to ensure the cannelloni tubes are fully cooked and not dry?
The key to perfectly cooked cannelloni lies in a combination of proper preparation and sufficient moisture during baking. As mentioned, par-boiling the tubes for 5 minutes before stuffing is a reliable method to ensure they are tender. During assembly, ensuring a generous base layer of pasta sauce in the baking dish and then thoroughly coating the stuffed cannelloni with the creamy sauce are crucial steps. These sauces provide the necessary liquid for the pasta to absorb and cook through without drying out. Overcrowding the baking dish can also hinder even cooking, so arrange the cannelloni in a single layer for best results. If you notice the sauce reducing too quickly during baking, you can always add a small splash more of half-and-half or milk around the edges.