Irresistible Cheese Chicken Enchiladas
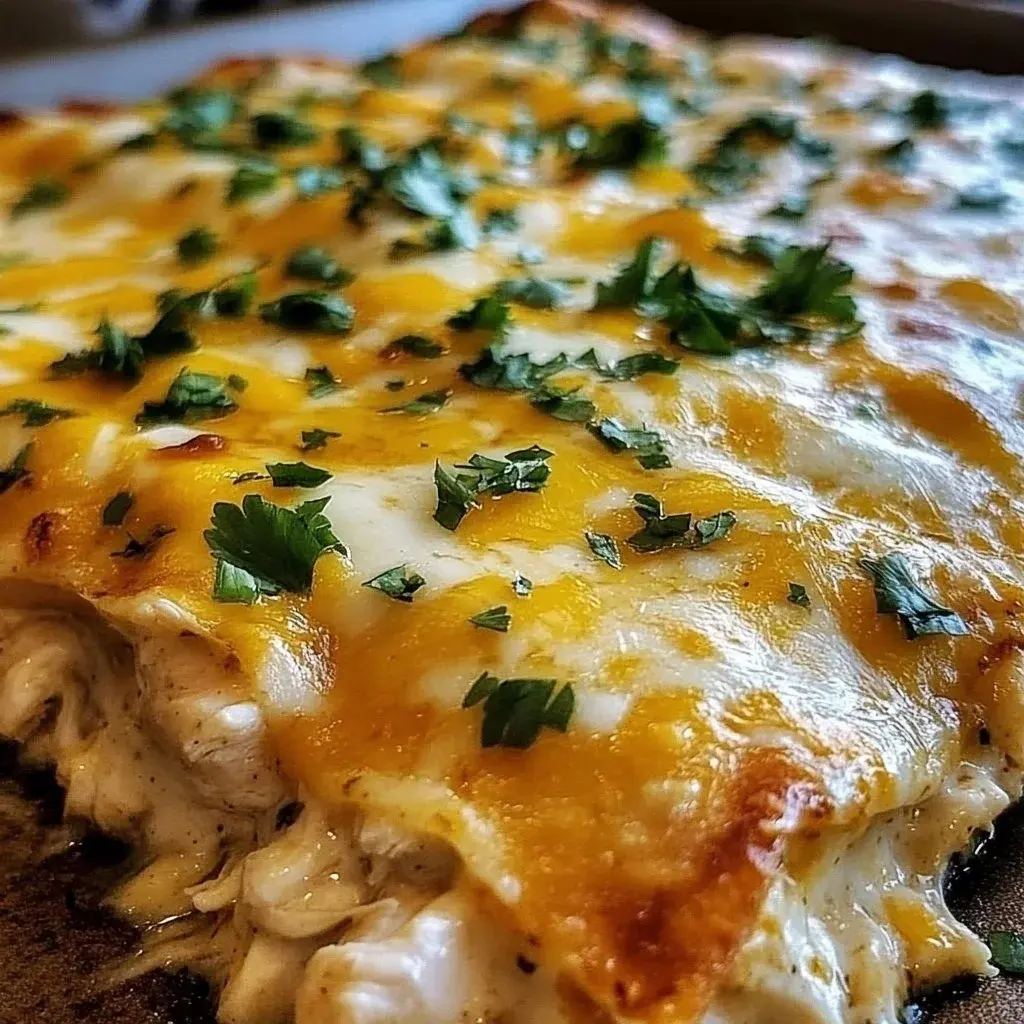
Are you on the hunt for a dish that perfectly marries comforting familiarity with an explosion of delightful flavors? Your culinary quest ends here! Cheese Chicken Enchiladas offer a hearty and incredibly satisfying meal, bursting with taste and remarkably simple to bring to life in your own kitchen. Imagine tender, shredded chicken nestled within warm corn tortillas, all lovingly bathed in a velvety cheese sauce and crowned with bubbling cheddar – a truly gooey and irresistible experience for every single member of the family.
What truly elevates the humble Cheese Chicken Enchilada to a household favorite is its inherent adaptability. They are wonderfully suited for lively family dinners, relaxed weekend brunches with friends, or simply as that soul-warming meal on a demanding weeknight. The straightforward nature of this recipe ensures it’s an approachable project for both budding home cooks and seasoned culinary aficionados alike. Furthermore, who can resist a dish that generously showers you with cheesy, savory goodness and allows for delightful personal touches to match your unique preferences?
The rich, velvety notes of the cheese sauce harmonize impeccably with the subtly spiced, tender chicken. When you introduce a touch of fresh cilantro and finely diced onions, you inject a vibrant burst of freshness that cuts through the richness, resulting in a meal that is not only incredibly easy to prepare but also profoundly delicious. Wouldn’t it be wonderful to present a dish that looks and tastes as though it required an entire afternoon of dedicated effort, yet was surprisingly simple to achieve?
In the unfolding sections of this comprehensive guide, we will embark on a deep dive into the enchanting world of Cheese Chicken Enchiladas. From meticulously uncovering their core advantages to mastering the nuances of achieving that perfect bake every single time, you will soon discover why this particular recipe is an absolute must-try for anyone who cherishes the art of home cooking. So, tie on your apron with enthusiasm, and let us joyfully commence this exquisite culinary adventure together!
Why You Will Love This Recipe
- Irresistible Flavor Profile: The harmonious blend of succulent shredded chicken, creamy cheese sauce, and perfectly seasoned spices creates a truly mouthwatering experience that will leave you craving more.
- Remarkable Simplicity: With clear, easy-to-follow steps, this recipe is an ideal choice for those busy weeknights when time is of the essence but the desire for a delicious homemade meal remains strong.
- Exceptional Versatility: Feel empowered to customize your enchiladas by adjusting the spice levels, incorporating your favorite vegetables, or selecting different cheese varieties to perfectly match your personal taste preferences.
- Ideal for Meal Prep: These enchiladas are wonderfully suited for making ahead of time, offering a convenient and utterly satisfying solution for quick lunches or dinners throughout the week.
- Visually Appealing: The enticing sight of bubbling, golden cheese and the vibrant colors of the garnishes create a stunning presentation that is as delightful to behold as it is to eat.
- Guaranteed Crowd-Pleaser: This dish consistently delights both children and adults alike, thanks to its comforting flavors and universally loved cheesy goodness.
Ingredients You Need
The foundation of any truly great dish lies in the quality of its ingredients. For these Cheese Chicken Enchiladas, we focus on simple, readily available items that come together to create something truly special. Using fresh components will always elevate the final outcome, ensuring a vibrant and satisfying meal that celebrates the inherent deliciousness of each element.
Easy Cheese Chicken Enchiladas

Discover the ultimate comfort food with these Easy Cheese Chicken Enchiladas. Featuring tender shredded chicken wrapped in warm corn tortillas, smothered in a creamy queso cheese sauce and topped with bubbling cheddar cheese, this recipe is a guaranteed crowd-pleaser. Perfect for weeknight dinners, family gatherings, or any occasion that calls for a delicious, cheesy, and satisfying meal. Simple to prepare and incredibly versatile, these enchiladas are a must-try for any home cook.
- 2 cups cooked shredded chicken
- 8 corn tortillas
- 1 cup queso cheese sauce
- 1 cup shredded cheddar cheese
- 1/2 cup diced onions
- 1/2 cup chopped cilantro
- 1 tablespoon olive oil
- 1 teaspoon ground cumin
- Salt and pepper to taste
- 1Prepare Ingredients: Gather all your ingredients. Ensure your chicken is shredded, and have your onions diced and cilantro chopped.
- 2Cook the Base: In a skillet, heat the olive oil over medium heat. Add the diced onions and sauté until translucent, about 3-4 minutes. Mix in the shredded chicken, ground cumin, salt, and pepper. Cook for another 3-4 minutes until well combined and heated through.
- 3Warm the Tortillas: Warm the corn tortillas in the microwave for about 30 seconds or on a skillet until soft and pliable.
- 4Fill the Tortillas: Place a generous amount of the chicken mixture in the center of each warm tortilla and roll up tightly.
- 5Arrange in Baking Dish: Place the rolled tortillas seam-side down in a greased baking dish.
- 6Add Cheese Sauce: Pour the queso cheese sauce evenly over the top of the rolled enchiladas.
- 7Sprinkle with Cheddar Cheese: Top with shredded cheddar cheese.
- 8Bake: Bake in a preheated oven at 350°F (175°C) for 20 minutes, or until the cheese is bubbly and golden.
- 9Garnish and Serve: Let the enchiladas cool for a few minutes, then garnish with chopped cilantro before serving hot.
Keywords: Cheese Chicken Enchiladas, Comfort Food, Easy Dinner Recipe, Mexican Food, Cheesy Chicken
- cooked shredded chicken: This forms the savory heart of our enchilada filling, providing a satisfying protein base.
- corn tortillas: The essential vessel for our filling, providing that classic enchilada structure and authentic flavor.
- queso cheese sauce: This creamy, dreamy sauce binds the ingredients and creates that signature gooey texture everyone adores.
- shredded cheddar cheese: Adds a familiar, sharp tang and a beautiful golden crust when baked to perfection.
- diced onions: Offer a subtle sweetness and aromatic depth that complements the other flavors.
- chopped cilantro: Provides a burst of fresh, herbaceous brightness that cuts through the richness.
- olive oil: Used to sauté the onions, laying down a flavorful base for the chicken mixture.
- ground cumin: An indispensable spice that lends an earthy, warm, and subtly smoky undertone to the filling.
- salt and pepper: Essential for seasoning, these work together to enhance and balance all the other flavors in the dish.
Please note that specific quantities for each ingredient can be found within the detailed recipe card provided.
Variations
Embracing creativity in the kitchen allows us to tailor dishes to our evolving tastes and dietary needs. These Cheese Chicken Enchiladas are wonderfully adaptable, opening up a world of delicious possibilities beyond the classic preparation.
For those seeking a vibrant, meat-free option, consider transforming these enchiladas into a spectacular vegetarian delight. Instead of chicken, you can fill the tortillas with a hearty mix of sautéed bell peppers (red, yellow, and green for a riot of color), tender zucchini, earthy mushrooms, and perhaps some nutrient-rich spinach. A can of rinsed black beans can also be incorporated to add further substance and protein, ensuring a deeply satisfying and wholesome meal that appeals to a wide range of palates. This variation offers a lighter yet equally flavorful experience.
If you’re navigating a lower-carbohydrate lifestyle, a simple modification can make these enchiladas fit your needs beautifully. The key here is to rethink the tortilla. Instead of traditional corn tortillas, you can opt for low-carb alternatives such as large lettuce leaves (like romaine or iceberg) which can be lightly blanched to make them more pliable, or even specially made low-carb tortillas. The filling of seasoned chicken and cheese sauce remains largely the same, delivering all the beloved flavor without the carbohydrate load, making it a guilt-free indulgence.
A particularly exciting variation for those who adore smoky, sweet, and tangy flavors is the Barbecue Chicken Enchilada. Here, you would prepare your shredded chicken and then toss it with your favorite barbecue sauce before filling the tortillas. You can even enhance this by adding a pinch of smoked paprika to the chicken mixture for an extra layer of smoky depth. Topping these with a blend of cheddar and Monterey Jack cheese, and perhaps a drizzle of extra BBQ sauce after baking, creates a unique and utterly irresistible twist that’s perfect for a casual gathering.
How to Prepare Cheese Chicken Enchiladas
Step 1: Assembling Your Culinary Canvas
The initial stage of preparing any dish is often the most critical for ensuring a smooth and enjoyable cooking process. This involves a mindful gathering and organization of all the necessary components before the heat is even turned on. By having everything prepped and within easy reach, you significantly reduce the chances of mid-cooking rushes and potential errors.
Begin by ensuring your cooked chicken is thoroughly shredded. The finer the shreds, the more evenly they will distribute within the tortilla, creating a more consistent texture in every bite. Have your onions finely diced; small, uniform pieces will soften and integrate beautifully without overpowering the dish. Chop your cilantro roughly for both the filling and as a fresh garnish later on. This preliminary preparation is akin to setting the stage for a well-rehearsed performance, where every actor is ready for their cue.
Take a moment to preheat your oven to the specified temperature, usually around 350°F (175°C). This ensures that when your assembled enchiladas are ready for their transformation, the oven is at the perfect heat to achieve that delightful bubbling and golden-brown finish without any delay. Selecting a suitable baking dish and lightly greasing it is also a crucial part of this initial setup, preventing any unfortunate sticking issues later on.
Step 2: Crafting the Flavorful Core
The heart of these enchiladas lies in the savory chicken mixture, which requires a gentle sauté to awaken its aromatic potential. This step lays down a foundational layer of flavor that will permeate the entire dish.
In a medium-sized skillet, warm the olive oil over a medium heat setting. Once the oil shimmers lightly, indicating it’s ready, add your finely diced onions. Sauté these aromatic jewels until they become wonderfully translucent and tender, a process that typically takes about 3 to 4 minutes. This gentle cooking softens their sharp bite and brings out their natural sweetness, creating a subtle yet impactful base.
Now, introduce the shredded chicken to the skillet along with the ground cumin, a generous pinch of salt, and a few grinds of black pepper. Stir everything together thoroughly, ensuring the chicken is evenly coated with the spices and softened onions. Continue to cook for another 3 to 4 minutes, allowing the flavors to meld beautifully and the chicken to heat through completely. This step is where the main flavor profile of the enchilada filling is firmly established.
Step 3: Preparing the Tortillas for Rolling
Warm, pliable tortillas are absolutely essential for successful enchilada assembly; attempting to roll stiff, cold tortillas is a recipe for frustration and breakage. This step ensures your tortillas can be rolled snugly without cracking, keeping all that delicious filling securely inside.
There are a couple of effective methods to achieve perfectly pliable tortillas. The quickest way is to place a stack of corn tortillas in the microwave, covering them with a damp paper towel, and heating for approximately 30 seconds. This gentle steaming makes them wonderfully flexible. Alternatively, you can warm them one by one in a dry skillet over medium heat for about 20-30 seconds per side until they become soft and pliable. Avoid overcooking them, as this can make them brittle.
Once warmed, it’s best to work with the tortillas immediately while they are still warm and flexible. If you’re making a large batch, you can keep the warmed tortillas covered with a clean kitchen towel to retain their pliability as you move on to the filling stage. This attention to detail at the tortilla stage prevents tears and ensures neat, well-formed enchiladas that are a joy to behold and eat.
Step 4: The Art of Filling and Rolling
This is where the magic truly begins to take shape, as the prepared chicken mixture finds its home within the warm embrace of the tortillas. Each roll is a promise of cheesy, savory goodness.
Take one warm, pliable corn tortilla at a time and lay it flat. Spoon a generous portion of the seasoned chicken and onion mixture onto the center of the tortilla. Be careful not to overfill, as this can make rolling difficult and lead to ingredients spilling out during baking. The amount should be enough to create a substantial, satisfying filling but still allow for a neat roll.
Carefully and snugly roll up the tortilla, enclosing the filling completely. Aim for a tight roll to help the enchiladas maintain their shape once placed in the baking dish. Repeat this process meticulously with the remaining warm tortillas and chicken mixture until all the filling has been used and you have a collection of beautifully rolled enchiladas ready for their next step.
Step 5: Arranging for Optimal Baking
The way you arrange the rolled enchiladas in the baking dish plays a vital role in their structural integrity during the cooking process. A well-arranged dish ensures even heating and prevents them from unraveling.
Place the rolled enchiladas seam-side down in your lightly greased baking dish. This is a crucial step as it helps to keep the rolled tortillas from opening up during the baking process. Arrange them snugly against each other in a single layer. This close proximity not only helps them maintain their shape but also creates a more cohesive and attractive presentation once baked.
If your baking dish is not large enough to accommodate all the enchiladas in a single layer, you can carefully stack a second layer on top, ensuring the seams are still facing downwards. However, a single layer is generally preferred for even cooking and easier serving. Ensure the dish is the correct size for the number of enchiladas you have prepared to avoid overcrowding or excessive empty space.
Step 6: Drenching in Cheesy Goodness
The queso cheese sauce is the luxurious, binding element that elevates these enchiladas from simple filled tortillas to a decadent, comforting masterpiece. Its creamy texture and rich flavor are key to the dish’s appeal.
Once your rolled enchiladas are nestled snugly in the prepared baking dish, it’s time to add the luscious queso cheese sauce. Pour the sauce evenly over the entire surface of the rolled enchiladas, ensuring that every single one is well-coated. Gently spread it with the back of a spoon or a spatula if needed to ensure complete coverage, creating a velvety blanket that will bubble and melt beautifully in the oven.
The queso sauce not only adds a significant layer of flavor but also helps to keep the tortillas moist during baking. It creates a wonderfully creamy texture that complements the chicken filling and the melted cheddar cheese that will follow. This step is where the enchiladas begin to visually transform into the gooey, irresistible dish we all know and love.
Step 7: The Crown of Golden Cheese
Following the creamy queso, a generous topping of shredded cheddar cheese provides that quintessential, irresistible golden crust that defines baked enchiladas. It’s the final cheesy flourish before they hit the heat.
After the queso cheese sauce has been evenly distributed, it’s time to add the crowning glory: the shredded cheddar cheese. Sprinkle the cheddar cheese generously and uniformly over the entire layer of queso sauce. Ensure you cover the majority of the surface, allowing for ample melting and browning. Cheddar cheese brings its characteristic sharp flavor and beautiful golden hue, creating that appealing visual and delicious taste.
For an even more indulgent experience, you could consider using a blend of cheeses, such as cheddar mixed with Monterey Jack or a Mexican blend. This adds complexity and another dimension to the cheesy topping. The goal here is a generous, even layer that will melt into a glorious, bubbly, golden-brown blanket, promising a delightful textural contrast to the soft tortillas and tender chicken.
Step 8: The Transformation in the Oven
This is the crucial baking stage where all the individual elements meld together, transforming into a cohesive and utterly delicious dish. The heat of the oven works its magic, melting the cheeses and bringing out their full aromatic potential.
Carefully place the assembled baking dish into your preheated oven. Bake for approximately 20 minutes, or until the cheese topping is beautifully melted, bubbly, and boasts a tempting golden-brown hue. Keep an eye on them during the last few minutes of baking, as oven temperatures can vary. You are looking for that perfect point where the cheese is fully melted, perhaps with a few slightly darker, crisped edges, indicating optimal doneness.
The aroma that fills your kitchen during this time is truly intoxicating, a testament to the delicious flavors that are harmonizing within the oven. This baking period allows the queso sauce to further meld with the chicken and tortillas, creating a unified, comforting dish. It’s the final, essential step before these culinary delights can be enjoyed.
Step 9: The Final Flourish of Freshness
Once freed from the oven’s warmth, a brief resting period allows the enchiladas to set slightly, making them easier to serve. The addition of fresh garnishes at this stage introduces a vibrant contrast and a lift to the rich flavors.
As soon as the Cheese Chicken Enchiladas emerge from the oven, remove the baking dish and allow them to rest on a heat-proof surface for about 5 to 10 minutes. This short period of cooling helps the cheese and sauce to set slightly, preventing them from becoming too loose or messy when served. It also allows the intense heat to dissipate just enough for comfortable eating.
Before presenting them to your eager diners, sprinkle the top generously with freshly chopped cilantro. This bright green herb not only adds a beautiful visual appeal, cutting through the golden hues of the cheese, but also introduces a crucial element of freshness and a lovely herbaceous note that complements the savory flavors of the enchiladas. A final squeeze of lime juice over the top can also add a welcome zing.
Step 10: The Joyful Moment of Enjoyment
The culmination of all your efforts is now at hand – the moment to savor the delicious, homemade Cheese Chicken Enchiladas you have so skillfully prepared. This is the reward for your culinary journey.
Serve the Cheese Chicken Enchiladas hot, directly from the baking dish, allowing everyone to appreciate their bubbling, cheesy perfection. They are wonderfully satisfying on their own, but they also pair beautifully with a variety of complementary side dishes and toppings, allowing for further customization of the dining experience.
Take a moment to appreciate the textures and flavors – the soft, yielding tortilla, the savory shredded chicken, the creamy queso, and the melted cheddar. Each bite is a testament to the simple yet profound pleasure of well-executed comfort food. Enjoy the delightful, heartwarming flavors of your homemade Cheese Chicken Enchiladas, a dish that is sure to bring smiles and satisfaction to your table!
Pro Tips for Cheese Chicken Enchiladas
Achieving perfectly cheesy, flavorful enchiladas is all about paying attention to the finer details. These expert tips will help you elevate your homemade enchiladas from good to absolutely spectacular, ensuring consistently delicious results every time you make them.
Tip: Embrace the Power of Proper Tortilla Handling. Always ensure your corn tortillas are thoroughly warmed and softened before attempting to fill and roll them. This critical step prevents them from cracking and tearing, which can lead to messy fillings and a less aesthetically pleasing final dish. A few seconds in the microwave with a damp paper towel or a quick warm-up in a dry skillet is all it takes.
Tip: Don’t Overstuff Your Tortillas. While it might be tempting to pack as much delicious chicken filling into each tortilla as possible, resist the urge. Overfilling makes the rolling process incredibly difficult and significantly increases the likelihood of the enchiladas bursting open during baking, leading to a less tidy presentation and potential loss of filling.
Tip: Grease Your Baking Dish Diligently. A common pitfall is forgetting to properly grease the baking dish. This oversight can cause the bottom of your enchiladas to stick stubbornly to the dish, making them difficult to remove and potentially tearing them. A light but thorough coating of oil or cooking spray is your best defense against this frustrating issue.
Tip: Use Room Temperature Ingredients Where Possible. While not strictly essential for every component, using ingredients like softened cream cheese (if making a substitute sauce) or ensuring your chicken is not ice-cold can contribute to more even heating and blending of flavors, particularly if you are making your own cheese sauce from scratch.
Tip: Allow for a Brief Resting Period. Patience is a virtue, especially when it comes to baked dishes. After removing the enchiladas from the oven, allowing them to rest for a few minutes is highly beneficial. This brief cooling period allows the melted cheese and sauce to set slightly, making the enchiladas easier to slice and serve neatly, preventing them from falling apart.
Extra Tip: Experiment with Cheese Blends. While cheddar is classic, don’t be afraid to mix it up! Combining cheddar with Monterey Jack, pepper jack for a little heat, or even a touch of smoky Gouda can add incredible depth and complexity to your cheese topping. The goal is a delicious, melty, and slightly browned crust.
Extra Tip: Add Extra Texture with Corn or Beans. For a heartier and more texturally interesting filling, consider stirring in a cup of drained canned corn or a cup of rinsed and drained black beans into the chicken mixture. These additions boost the fiber content and add delightful pops of flavor and chewiness.
Extra Tip: A Zesty Finish with Lime. Just before serving, a simple squeeze of fresh lime juice over the top of the finished enchiladas can add a wonderfully bright and zesty counterpoint to the rich, cheesy flavors. It’s a small touch that makes a big difference in balancing the dish.
Serving Suggestions for Cheese Chicken Enchiladas
Decoration
The visual appeal of a dish can be just as important as its taste, and garnishes are your best tools for creating a stunning presentation. A few thoughtful touches can transform your Cheese Chicken Enchiladas into a feast for the eyes as well as the palate.
The most classic and effective garnish is undoubtedly fresh cilantro. Its vibrant green color provides a beautiful contrast to the golden cheese, and its fresh, slightly peppery flavor awakens the palate. Finely chopped, it offers flecks of color and freshness scattered across the top. For an added touch of creaminess and visual appeal, consider dolloping a spoonful of sour cream or a drizzle of Mexican crema onto each serving or strategically across the top of the entire dish.
Thinly sliced avocado or perfectly ripe guacamole adds a luxurious texture and a rich, buttery flavor that complements the enchiladas wonderfully. A sprinkle of finely diced red onion or thinly sliced jalapeños can introduce a pleasing sharpness and a touch of heat, appealing to those who enjoy a bit of a kick. A final, light squeeze of fresh lime juice right before serving adds a refreshing burst that cuts through the richness, making the flavors pop.
Side Dishes
Complementary side dishes are essential for creating a well-rounded and satisfying meal experience. They add texture, flavor, and balance to the richness of the Cheese Chicken Enchiladas, transforming a delicious main course into a complete culinary event.
No Mexican-inspired meal is truly complete without the classic accompaniments of Spanish rice and refried beans. The fluffy, seasoned Spanish rice provides a neutral yet flavorful base, soaking up any extra sauce, while creamy refried beans offer a hearty, earthy counterpoint. Both are staples that have stood the test of time for a reason.
A crisp, refreshing side salad is an excellent way to introduce some lighter elements and contrast the richness of the enchiladas. Think a simple green salad with a zesty vinaigrette, or perhaps a corn and black bean salad with lime and cilantro for an extra burst of flavor and texture. Pico de gallo, with its fresh blend of tomatoes, onions, cilantro, and jalapeños, offers a bright, chunky salsa that adds a welcome tang and textural contrast.
For a truly authentic experience, consider serving with a side of grilled corn on the cob, especially during the summer months. The slight char and sweetness of the corn provide a delightful contrast. Alternatively, some pickled jalapeños or red onions can offer a piquant, tangy element that cuts through the cheese and enhances the overall flavor profile of the meal.
Creative Serving Ideas
Moving beyond the traditional plate, there are several creative ways to serve and present your Cheese Chicken Enchiladas that can add an extra layer of excitement and convenience to your dining experience, perfect for different occasions and serving styles.
For a fun and interactive twist, consider serving your enchiladas family-style directly from the baking dish, allowing everyone to serve themselves. This encourages a communal dining atmosphere and lets guests customize their portion size and cheese-to-filling ratio. You can place the baking dish on a beautiful wooden board or trivet at the center of the table, surrounded by all the delicious side dishes and toppings.
If you’re hosting a party or a buffet-style gathering, individual ramekins or small oven-safe dishes can be used to bake and serve single portions. This makes for an elegant presentation and ensures each guest receives a perfectly portioned and piping hot serving. These individual portions are also incredibly convenient for grab-and-go scenarios or for easier plating.
Another unique approach is to serve the enchiladas buffet-style, with the rolled enchiladas already placed in a large, warmed serving platter. Guests can then choose their desired toppings and sides from separate bowls arranged around the main dish. This allows for maximum customization and creates a visually appealing spread that invites guests to mix and match their perfect bite. Remember to keep the enchiladas warm in a low oven or a chafing dish if serving buffet-style for an extended period.
Preparation & Storage
Storing Leftovers
The wonderful thing about Cheese Chicken Enchiladas is that they often taste just as delicious, if not better, the next day. Proper storage ensures that any delicious leftovers can be safely enjoyed for several days.
Once the enchiladas have cooled down to room temperature, transfer any remaining portions into an airtight container. This is the most crucial step to prevent the enchiladas from drying out or absorbing odors from other foods in the refrigerator. Ensure the lid is securely fastened to maintain freshness and prevent spoilage. Properly stored, Cheese Chicken Enchiladas will typically remain fresh and safe to eat for up to 3 to 4 days in the refrigerator.
It’s important to note that while refrigeration is excellent for short-term storage, the texture of the tortillas might soften slightly over time. However, this does not significantly detract from the overall deliciousness of the dish, especially when reheated. Always check for any signs of spoilage, such as off smells or mold, before consuming leftovers, though with proper airtight storage, this is unlikely within the recommended timeframe.
Freezing
For longer-term storage, freezing is an excellent option for Cheese Chicken Enchiladas, allowing you to enjoy this comforting meal at a later date. The key to successful freezing lies in proper preparation to prevent freezer burn.
Before freezing, ensure the enchiladas have cooled completely. This is essential to prevent condensation, which can lead to ice crystals forming and compromising the texture. Once cooled, wrap the enchiladas very tightly. You can wrap individual portions or the entire baking dish (if it’s freezer-safe) in several layers of plastic wrap, ensuring no air can penetrate. For an extra layer of protection against freezer burn, wrap the plastic-covered enchiladas again in heavy-duty aluminum foil.
You can also place individually wrapped enchiladas into a freezer-safe bag, squeezing out as much air as possible before sealing. Properly frozen, Cheese Chicken Enchiladas can retain their quality for up to 2 to 3 months. Labeling the package with the date of freezing will help you keep track of their freshness and ensure you use them within the optimal timeframe.
Reheating
Reheating your Cheese Chicken Enchiladas properly ensures they are brought back to their delicious, cheesy best without becoming dry or rubbery. Both microwave and oven methods are effective, depending on your preference and available time.
Microwave Reheating: For a quick reheat, place a portion of frozen or refrigerated enchiladas on a microwave-safe plate. Cover loosely with a damp paper towel to help retain moisture. Microwave on medium power for 1 to 2 minutes, checking for warmth. Continue microwaving in 30-second intervals until heated through. Frozen enchiladas will require a longer reheating time than refrigerated ones.
Oven Reheating: For a result closer to freshly baked, preheat your oven to 350°F (175°C). If reheating from frozen, it’s best to thaw them in the refrigerator overnight first. Place the refrigerated enchiladas in an oven-safe dish. Cover loosely with aluminum foil to prevent the cheese from browning too quickly. Bake for 15-20 minutes, or until heated through. Remove the foil for the last 5 minutes if you wish to crisp up the cheese topping slightly.
Regardless of the method used, always ensure the enchiladas are heated thoroughly until they are piping hot throughout before serving. This ensures food safety and the most enjoyable eating experience. The residual warmth from the oven method often helps to re-melt the cheese to its optimal gooey consistency.
Frequently Asked Questions
-
How long can I keep leftovers of Cheese Chicken Enchiladas?
Leftover Cheese Chicken Enchiladas can be safely stored in an airtight container in the refrigerator for up to 3 to 4 days. It’s important to cool them completely before refrigerating and to ensure the container is sealed tightly to maintain freshness and prevent them from drying out or picking up unwanted odors. Always check for any signs of spoilage before consuming.
-
Can Cheese Chicken Enchiladas be made ahead of time?
Absolutely! Cheese Chicken Enchiladas are an excellent candidate for making ahead. You can prepare them entirely, including assembling them in the baking dish and topping with cheese, and then cover them tightly with plastic wrap and refrigerate them for up to 24 hours before baking. When ready to serve, simply remove them from the refrigerator, uncover, and bake as directed, potentially adding a few extra minutes to the baking time to ensure they are heated through completely.
-
How do I freeze Cheese Chicken Enchiladas?
To freeze Cheese Chicken Enchiladas, allow them to cool completely after baking, or prepare them unbaked and freeze them before the first baking. Wrap individual portions or the entire dish (if freezer-safe) very tightly in plastic wrap, followed by a layer of heavy-duty aluminum foil, or place them in a freezer-safe airtight container. This double-layer protection is crucial for preventing freezer burn. Frozen enchiladas can be stored for up to 2 to 3 months and should be thawed in the refrigerator overnight before reheating.