Challah French Toast Recipe – Fluffy & Flavorful!

The aroma of sweet cinnamon and warm vanilla is an invitation to a comforting embrace, a sensory prelude to weekend mornings filled with joy. Imagine thick, golden slices of challah bread, transformed into a masterpiece of fluffy texture and irresistible flavor, a true celebration for the palate.
This isn’t just any French toast; it’s an elevated experience, a culinary hug that transforms the ordinary into the extraordinary. Get ready to discover a recipe that promises to become a cherished staple, perfect for those leisurely mornings when time seems to slow down.
Why You Will Love This Recipe
- Golden Perfection: Each slice achieves a beautiful golden-brown hue, creating a visually appealing and delicious breakfast.
- Spongy Delight: The challah bread absorbs the rich custard, resulting in a wonderfully spongy texture that’s never soggy.
- Flavorful Custard: A creamy blend of eggs, half-and-half, honey, vanilla, and nutmeg infuses every bite with warmth and sweetness.
- Simple Elegance: Despite its gourmet taste and texture, this recipe is surprisingly easy to prepare, making it accessible for any home cook.
- Versatile Toppings: Easily customizable with a wide array of toppings, from classic maple syrup to fresh fruit and whipped cream.
Ingredients You Need
The foundation of exceptional French toast lies in the quality of its ingredients, and this recipe champions simplicity and freshness. Using a loaf of stale challah bread is paramount, as its slightly dry texture allows it to soak up the rich custard without becoming waterlogged. This careful selection ensures each bite offers a perfect balance of crisp exterior and tender interior.
Challah French Toast

Make thick, fluffy challah bread French toast soaked in an eggy custard with cinnamon, vanilla, and grated nutmeg. Using challah is an easy way to level up homemade French toast!
- 1 loaf of challah bread, stale
- 6 large eggs
- 2 cups half and half (milk or heavy cream are also okay to use)
- 2 teaspoons pure vanilla extract
- pinch of grated nutmeg
- pinch of ground cinnamon
- 3-4 tablespoons unsalted butter, for cooking
- French toast toppings of choice (such a maple syrup, whipped cream, fresh fruit, or confectioners' sugar)
- 1Slice the challah bread into thick 1-inch slices and lay them on a cooling rack overnight to dry. If short on time, dry in an oven at 300°F (150°C) for 10-15 minutes, flipping halfway.
- 2Prepare two baking sheets lined with parchment paper, each with a wire rack on top. Ensure at least one rack is oven-safe.
- 3In a medium bowl, whisk together eggs, half-and-half, warm honey, salt, vanilla, nutmeg, and cinnamon until well combined. Pour this custard into a 9x9 inch baking dish or shallow bowl.
- 4Soak the dried bread slices in the custard, 2 slices at a time, for about 2 minutes per side.
- 5Transfer the soaked bread to one of the prepared baking sheets with a drying rack. Sprinkle the tops with cinnamon and let them rest for about 3 minutes to drain excess custard.
- 6Preheat your oven to 190°F (90°C) and place the second prepared baking sheet with its rack inside.
- 7Heat 1 tablespoon of butter in a greased griddle or pan over medium heat.
- 8Cook the soaked bread slices for about 2 minutes per side, until golden brown and cooked through. Cook in batches of 2-4 slices, adding ½ tablespoon of butter to the griddle between batches.
- 9As each batch is cooked, move the French toast slices to the rack inside the preheated oven to keep warm.
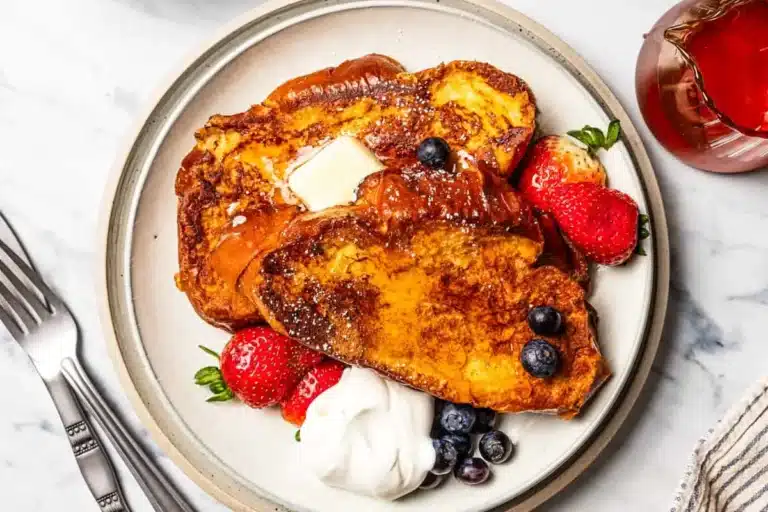
- 10Serve immediately with your favorite toppings like whipped cream, maple syrup, and fresh berries.
Keywords: Challah, French Toast, Breakfast, Brunch, Easy, Vegetarian
- challah bread: use a loaf that is at least a day old for the best results, as it will absorb the custard better without becoming mushy.
- large eggs: these are the backbone of the custard, providing richness and binding the other ingredients together beautifully.
- half and half: this blend of milk and cream creates a luxuriously smooth and creamy custard that coats the bread perfectly.
- honey: adds a delicate sweetness and a subtle floral note, enhancing the overall flavor profile.
- kosher salt: a small pinch of salt balances the sweetness and amplifies the other flavors in the custard mixture.
- pure vanilla extract: imparts a classic, comforting aroma and flavor that is essential to any great French toast.
- grated nutmeg: a hint of freshly grated nutmeg adds a warm, slightly spicy complexity that complements the cinnamon beautifully.
- ground cinnamon: this beloved spice lends its warm, inviting fragrance and taste, making the French toast truly irresistible.
- unsalted butter: essential for cooking, butter provides a rich, delicious flavor and helps achieve that perfect golden-brown crust.
- french toast toppings of choice: from luscious maple syrup and fluffy whipped cream to vibrant fresh fruits and a dusting of powdered sugar, customize to your heart’s content.
The exact quantities for these delightful ingredients are readily available in the recipe card below.
Variations
Challah French toast is wonderfully adaptable, allowing for creative twists that cater to various dietary preferences and flavor profiles. For a decadent dessert-like experience, consider incorporating a touch of orange zest into the custard. The citrus notes beautifully cut through the richness of the eggs and cream, adding a bright, refreshing element that elevates the dish to new heights.
To achieve a delightful vegan version, a rich plant-based milk, such as unsweetened almond or soy milk, can effectively replace the half-and-half. Ensure you use a high-quality vegan egg replacer for the custard, and perhaps add a tablespoon of nutritional yeast for a subtle savory undertone that complements the sweetness. A sprinkle of toasted coconut flakes as a topping would add a tropical flair.
For those seeking a lower-carbohydrate option, while challah itself is a carbohydrate-rich bread, you can adapt this recipe by serving it with low-carb toppings. Think sugar-free syrups, berries in moderation, and a dollop of unsweetened whipped cream. Experimenting with alternative flours to create a more bread-like base could also be an avenue, though it would significantly alter the classic challah texture.
How to Prepare Challah French Toast
Step 1: Preparing the Challah for Soaking
The cornerstone of perfect French toast is the bread itself, and for challah, this means ensuring it has the right moisture content. Ideally, you want to use challah that is at least a day old, and ideally two days old, for optimal results. This slight staleness allows the bread to absorb the custard deeply without becoming overly saturated and falling apart. If your challah is freshly baked, do not despair; there are ways to achieve the desired dryness.
To prepare your challah, carefully slice the loaf into thick, uniform pieces. Aim for slices that are approximately 1 to 1.5 inches thick. Thinner slices are prone to becoming soggy, while overly thick slices might not cook through evenly in the center. Lay these prepared slices on a wire cooling rack set over a baking sheet.
Allow the slices to air dry overnight at room temperature. This slow drying process is far superior to toasting, as it removes excess moisture without imparting any toasted flavor or texture. The bread should feel slightly firm and dry to the touch by morning, ready to embrace the custard.
Step 2: The Art of Custard Creation
While your challah bread is diligently drying, it’s time to prepare the luscious custard that will transform those humble slices into golden delights. In a medium-sized mixing bowl, begin by whisking together the eggs. It’s important to break up the yolks and whites thoroughly, ensuring a smooth, homogenous base for your custard mixture.
Next, gradually incorporate the half-and-half (or your chosen milk substitute) into the whisked eggs. Continue whisking until the mixture is well combined and appears creamy. The ratio of eggs to dairy is crucial for achieving the right consistency – enough to coat the bread beautifully without making it overly eggy or heavy.
Now, it’s time to infuse this creamy base with an symphony of flavors. Stir in the honey, ensuring it is fully dissolved into the liquid. Add the kosher salt, which acts as a flavor enhancer, balancing the sweetness and bringing out the best in the other ingredients. Finally, add the pure vanilla extract and the freshly grated nutmeg, along with a pinch of ground cinnamon. Whisk everything together until it is perfectly smooth and the spices are evenly distributed, creating an aromatic, deeply flavorful custard.
Step 3: The Crucial Soaking and Draining Process
With your challah bread dried and your custard perfectly blended, the next step is the crucial soaking and draining process. Prepare two sets of baking sheets, each fitted with a wire rack. One of these racks will be used for draining the excess custard from the soaked bread, while the other, which should be oven-safe, will be used to keep the cooked French toast warm in a low oven. This dual rack system is key to preventing sogginess and ensuring even cooking.
Pour the prepared custard into a shallow baking dish or a wide, shallow bowl. This wider surface area makes it easier to submerge the bread slices without them becoming bent or broken. Working with one or two slices at a time, gently place them into the custard mixture. Allow each slice to soak for approximately two minutes per side.
You are looking for the bread to absorb the custard thoroughly, becoming saturated but not waterlogged. The exact time may vary slightly depending on the dryness of your bread. Once soaked, carefully lift each slice and place it on the prepared wire rack for draining. Let the excess custard drip back into the dish for about 3 to 5 minutes. This draining step is critical; it removes any surplus liquid that could lead to a soggy final product, ensuring a perfectly cooked exterior.
Step 4: The Sizzle and Sear – Cooking the French Toast
Now comes the moment of truth: cooking your perfectly soaked and drained challah slices. Place a large griddle or non-stick frying pan over medium heat. Add about 1 tablespoon of unsalted butter to the pan and allow it to melt and foam. The medium heat is crucial; too high, and the outside will burn before the inside cooks; too low, and the toast will absorb too much fat and become greasy.
Carefully place one to two soaked challah slices onto the hot, buttered griddle. Be sure not to overcrowd the pan, as this can lead to uneven cooking and steaming rather than crisping. Cook each slice for about 2 to 3 minutes per side, or until a beautiful golden-brown crust has formed. You should be able to see the custard gently cooking and solidifying around the edges.
Keep a watchful eye on the color and texture. If your pan has hot spots, you may need to rotate the slices periodically to ensure even browning. As soon as one batch is cooked to perfection, remove it from the griddle and place it on the second wire rack, which should be set inside a preheated oven at a low temperature (around 190°F or 90°C) to keep the finished toast warm.
Step 5: Maintaining Warmth and Serving Perfection
As each batch of challah French toast is cooked to a beautiful golden hue, its journey isn’t over yet. Promptly transfer the perfectly cooked slices to the oven-safe wire rack that is situated on a baking sheet and residing within your gently preheated oven. This step is a game-changer for serving multiple guests or simply ensuring that every piece of French toast is warm and ready when you are.
The low temperature of the oven will keep the already cooked French toast warm and slightly crisp without continuing to cook it, preventing it from becoming dry or tough. Continue this process of cooking, transferring, and warming until all of your challah slices have been transformed into golden perfection. The aroma filling your kitchen will be nothing short of divine.
Once all the French toast has been cooked and is being kept warm in the oven, it’s time for the grand finale: serving. Arrange the warm challah French toast on serving plates. You can stack them to create impressive towers of deliciousness or arrange them artfully. Garnish with your favorite toppings – perhaps a generous drizzle of pure maple syrup, a dollop of homemade whipped cream, a scattering of fresh, vibrant berries, or a light dusting of confectioners’ sugar. Present this masterpiece with pride, and watch as smiles light up the faces of your lucky diners.
Step 6: Optional Finishing Touches and Flavor Boosts
While the classic preparation of challah French toast is undeniably delicious, there are several optional finishing touches and flavor boosts that can elevate this beloved breakfast even further. A light dusting of powdered sugar, sifted through a fine-mesh sieve, provides an elegant visual appeal and a subtle hint of sweetness that perfectly complements the rich custard and warm spices. This simple addition transforms the presentation, making each plate look like it came straight from a high-end bakery.
For those who enjoy a bit more texture and complexity, consider a sprinkle of toasted nuts over the finished French toast. Chopped pecans, walnuts, or even slivered almonds can add a delightful crunch and a nutty depth of flavor that pairs beautifully with the soft, custardy bread. Ensure the nuts are lightly toasted to bring out their aromatic oils and enhance their flavor profile.
Another fantastic addition is a sprinkle of fresh fruit zest, such as orange or lemon zest, right before serving. This brightens the overall flavor profile, cutting through the richness and adding a zesty, aromatic lift. A few fresh mint leaves as a garnish can also add a pop of color and a hint of refreshing coolness. Experimenting with these small additions can turn a great French toast into an absolutely unforgettable culinary creation.
Pro Tips for Challah French Toast
Embrace the Staleness: The absolute key to non-soggy French toast is using bread that’s at least a day old, ideally two. Stale bread has lost a significant amount of its moisture, allowing it to soak up the custard like a dream without disintegrating. If you forget to plan ahead, you can lightly toast your bread slices in a low oven (around 300°F/150°C) for about 10-15 minutes, flipping halfway, until they are dry but not browned.
Master the Custard Consistency: The ratio of eggs to liquid is critical. Too much liquid and your French toast will be soggy; too little and it will taste eggy. The recipe’s balance of eggs and half-and-half is designed to create a custard that coats the bread beautifully without overwhelming it. Whisking thoroughly ensures an even distribution of ingredients, preventing any pockets of uncooked egg white.
Don’t Over-Soak: While you want the bread to absorb the custard, over-soaking will lead to mushiness. A quick dip of about 2 minutes per side is usually sufficient for properly stale challah. The draining step on the wire rack afterwards is just as important as the soaking itself, allowing excess liquid to escape.
Medium Heat is Your Friend: Cooking French toast over medium heat allows the custard to cook through and set properly without the exterior burning. If your pan is too hot, you’ll end up with blackened bread and a raw interior. It’s better to take a little longer over consistent medium heat for perfectly cooked results.
Butter Management: Add butter to the pan between batches, allowing it to melt and foam before adding the next set of soaked bread slices. This ensures each piece gets a fresh start with a buttery, non-stick surface and contributes to that gorgeous golden-brown crust. Using good quality unsalted butter imparts the best flavor.
Serving Suggestions for Challah French Toast
Decoration
The visual appeal of challah French toast can be enhanced with simple yet effective decorative elements. A delicate dusting of confectioners’ sugar, sifted through a fine-mesh sieve, provides an elegant, snowy finish. This offers a subtle sweetness and a classic bakery look.
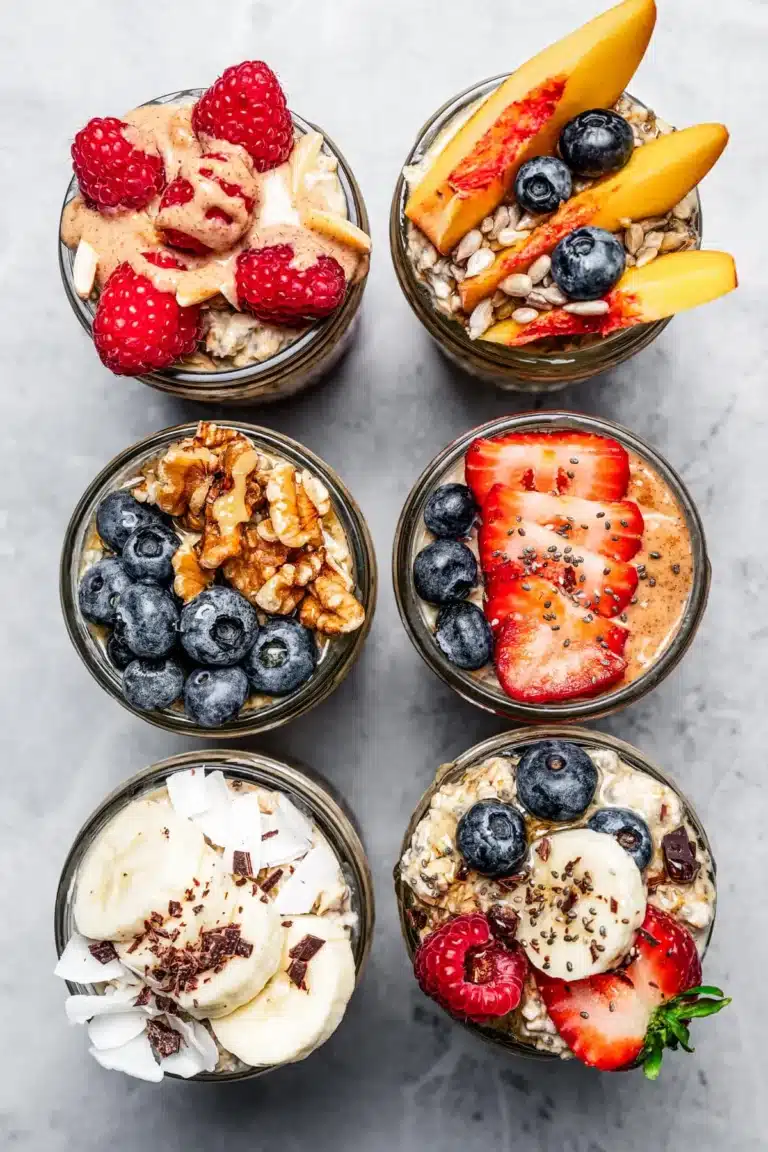
For a burst of color and freshness, arrange vibrant fresh berries such as strawberries, blueberries, raspberries, or a mix of all three around the French toast. A few sprigs of fresh mint can add a touch of green and a refreshing aroma.
A swirl of homemade whipped cream, piped or dolloped generously, adds a luxurious touch and a creamy contrast to the toasted bread. Consider adding a sprinkle of toasted nuts like pecans or walnuts for added texture and visual interest.
Side Dishes
To complement the sweetness of your challah French toast, consider pairing it with savory elements for a balanced meal. A simple side of crispy bacon or breakfast sausage offers a salty, smoky counterpoint. Fluffy scrambled eggs or a light, airy frittata provide additional protein and a different texture.
For a lighter option, a fresh fruit salad featuring seasonal fruits can add a refreshing and healthy component to the breakfast spread. A side of yogurt, perhaps with a drizzle of honey, also offers a cooling contrast.
Consider serving alongside a light, crisp green salad if you are enjoying this as a brunch option. A classic German pancake or a bowl of creamy oatmeal could also offer complementary textures and flavors, depending on the desired richness of the meal.
Creative Serving Ideas
Elevate your challah French toast experience with creative serving ideas that delight the senses. Create individual parfaits by layering bite-sized pieces of French toast with yogurt, granola, and fresh fruit in clear glasses. This offers a visually appealing and portable option.
Build a “French Toast Board” by arranging various toppings – syrups, fruits, whipped cream, nuts, chocolate chips, and even a few savory items like mini sausages – on a large platter. This allows everyone to customize their own perfect slice. It’s a fun, interactive way to enjoy the meal, perfect for family gatherings or brunches with friends.
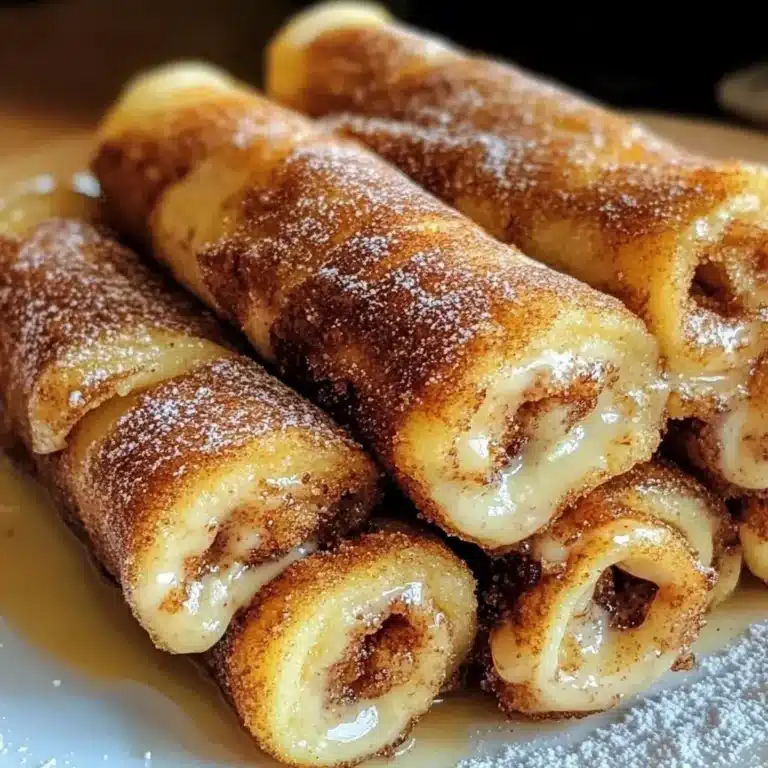
For a fun twist, cut the French toast into fun shapes using cookie cutters after cooking. This is especially delightful for children. You can also serve smaller, bite-sized pieces as appetizers or part of a larger dessert spread, perhaps drizzled with a warm caramel sauce.
Preparation & Storage
Storing Leftovers
Should you be fortunate enough to have any leftover challah French toast, storing it properly will ensure its deliciousness can be enjoyed later. Once the French toast has completely cooled to room temperature, carefully place the slices in an airtight container. Alternatively, you can wrap them tightly in plastic wrap, ensuring minimal exposure to air. This helps to prevent them from drying out too much or absorbing any unwanted odors from the refrigerator.
These properly stored leftovers can be kept in the refrigerator for up to 3 to 4 days. The ideal scenario is to store them in a single layer if possible to avoid them sticking together, though if they must be stacked, a piece of parchment paper between layers can help. Remember that while refrigeration helps preserve them, the texture may slightly soften upon reheating.
It’s always best to avoid storing them while still warm, as condensation can form inside the container, leading to sogginess. Ensure they are fully cooled before sealing them away for future enjoyment. This simple step makes a significant difference in maintaining the quality of your delicious challah French toast.
Freezing
Challah French toast freezes remarkably well, making it an excellent candidate for make-ahead meals or for stocking up on this delightful breakfast treat. To freeze, ensure the French toast slices have cooled completely to room temperature. This is a crucial step to prevent ice crystals from forming, which can degrade the texture upon thawing.
Lay the cooled French toast slices in a single layer on a baking sheet lined with parchment paper. Place this baking sheet in the freezer for about 1 to 2 hours, or until the slices are firm enough to handle without sticking together. This “flash freezing” method prevents them from clumping into a solid mass.
Once firm, transfer the individually frozen slices into a freezer-safe airtight container or a heavy-duty freezer bag. Remove as much air as possible from the bag before sealing to prevent freezer burn. Properly stored, your challah French toast can be kept frozen for up to 2 months, retaining much of its original flavor and texture.
Reheating
Reheating challah French toast is a straightforward process that aims to restore its warm, comforting appeal. The best method for reheating is in a conventional oven or a toaster oven. Preheat your oven to around 350°F (175°C). Arrange the frozen or thawed French toast slices in a single layer on a baking sheet lined with parchment paper. This allows for even heating and helps maintain crispness.
Bake for about 5-10 minutes if thawing beforehand, or 10-15 minutes if reheating from frozen, flipping halfway through. Keep an eye on them to ensure they don’t overcook and become dry or hard. The goal is to heat them through until they are warm and slightly crisp on the outside.
While a microwave can be used for quick reheating, it is generally not recommended as it can often result in a softer, sometimes even slightly rubbery texture. If you must use a microwave, heat in short intervals of 30 seconds, checking for warmth and desired consistency each time. For the best texture, oven or toaster oven reheating is always the preferred choice.
Frequently Asked Questions
-
What is the primary difference between challah bread and other enriched breads like brioche when used for French toast?
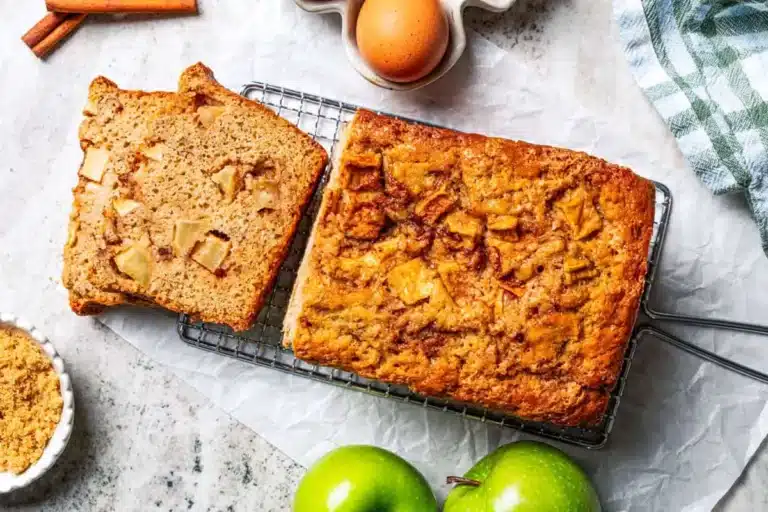
The key distinction lies in the fat content and composition. While brioche is typically made with butter, eggs, and milk, imparting a rich, buttery flavor and dense texture, traditional challah bread is made without dairy products. Its richness and characteristic golden hue come from a generous amount of eggs and oil, giving it a slightly lighter, fluffier, and more subtly sweet profile. This difference means challah tends to absorb custard beautifully, offering a tender interior with a less dense crumb compared to brioche, making it exceptionally well-suited for French toast where a perfect balance of absorbency and structure is desired.
-
Can I use fresh challah bread for this recipe, and if so, how should I prepare it to achieve the best texture?
While stale, day-old challah is ideal for French toast, you can certainly use fresh challah bread. The crucial step is to adequately dry out the fresh bread before soaking it in the custard. The most effective method is to slice the fresh challah into 1-inch thick pieces and spread them out on a wire cooling rack set over a baking sheet. Allow them to air dry at room temperature overnight. If you’re short on time, you can expedite the drying process by placing the sliced challah in a preheated oven at a low temperature, around 300°F (150°C), for 10-15 minutes, flipping them halfway through. The goal is to remove excess moisture until the bread feels dry to the touch but is not toasted or browned.
-
What are the best ways to prevent challah French toast from becoming soggy, and how long should it be soaked?
Preventing sogginess is paramount for achieving perfectly textured French toast. The first line of defense is using stale bread, as it has less moisture to begin with. Secondly, the soaking time is critical; aim for about 2 minutes per side, allowing the bread to absorb the custard but not become saturated. Over-soaking will inevitably lead to a mushy texture. Immediately after soaking, transfer the bread to a wire rack to drain off any excess custard for at least 3-5 minutes. This draining step is often overlooked but is essential for removing surplus liquid that could compromise the crispness of the final product. Lastly, cooking over medium heat ensures the custard sets properly without burning the exterior.